Page 507 of 548
09
9-31
Longer wearing tires can be more
susceptible to irregular tread wear.
It is very important to follow the tire
rotation interval in this chapter to
achieve the tread life potential of
these tires. Cuts and punctures in
radial-ply tires are repairable only in
the tread area, because of sidewall
flexing. Consult your tire dealer for
radial-ply tire repairs.
WARNING
Do not mix bias ply and radial ply
tires under any circumstances.
This may cause unusual handling
characteristics that may cause loss
of vehicle control resulting in an
accident.
Low Aspect Ratio Tires
The aspect ratio is lower than 50 on
low aspect ratio tires.
Because low aspect ratio tires are
optimized for handling and braking, their
sidewall is a little stiffer than a standard
tire. Also low aspect ratio tires tend to be
wider and consequently have a greater
contact patch with the road surface. In
some instances they may generate more
road noise compared with standard tires.
CAUTION
The side wall of a low aspect ratio
tire is shorter than the normal one.
Thus, the low-aspect wheel and
tire are easily damaged. Follow the
below instructions. • When driving on a rough road or
driving off a road, be careful not to
damage the tires and wheels. After
driving, inspect the tires and wheels.
• When passing over a pothole, speed
bump, manhole, or curb stone, drive
the vehicle slowly so as not to damage
the tires and wheels.
• When there is an impact on a tire,
inspect the tire condition. Or,
you can contact an authorized
HYUNDAI dealer.
• Inspect the tire condition and
pressure every 3,000 km (1,800
miles) to prevent tire damage.
• It is difficult to recognize a tire damage
only with your eyes. When there is a
slight hint of a tire damage, check and
replace the tire to prevent the damage
caused by air leakage.
• When a tire is damaged while driving
on a rough road, off a road, or over
obstacles, such as a pothole, manhole,
or curb stone, your warranty does not
cover the damage.
• The tire information is specified
on the tire side wall.
Page 508 of 548
![HYUNDAI KONA EV 2023 Owners Manual Maintenance
9-32
FUSES
„„Blade type
AB
„
„Cartridge type
„
„Multi fuse
OTM078035
AB
AB
[A] : Normal, [B] : Blown
A vehicle’s electrical system is protected
from elect HYUNDAI KONA EV 2023 Owners Manual Maintenance
9-32
FUSES
„„Blade type
AB
„
„Cartridge type
„
„Multi fuse
OTM078035
AB
AB
[A] : Normal, [B] : Blown
A vehicle’s electrical system is protected
from elect](/manual-img/35/56170/w960_56170-507.png)
Maintenance
9-32
FUSES
„„Blade type
AB
„
„Cartridge type
„
„Multi fuse
OTM078035
AB
AB
[A] : Normal, [B] : Blown
A vehicle’s electrical system is protected
from electrical overload damage by fuses.
This vehicle has 2 (or 3) fuse panels, one
located in the driver’s side panel bolster,
the other in the motor compartment.
If any of your vehicle’s lights,
accessories, or controls do not work,
check the appropriate circuit fuse. If a
fuse has blown, the element inside the
fuse will be melted or broken.
If the electrical system does not work,
first check the driver’s side fuse panel.
Before replacing a blown fuse, turn the
vehicle and all switches off, and then
disconnect the negative battery cable.
Always replace a blown fuse with one of
the same rating.
If the replacement fuse blows, this
indicates an electrical problem.
Avoid using the system involved and it is
recommended to consult an authorized
dealer.
Information
Three kinds of fuses are used: blade type
for lower amperage rating, cartridge
type, and multi fuse for higher amperage ratings.
WARNING
NEVER replace a fuse with anything but
another fuse of the same rating. • A higher capacity fuse could cause
damage and possibly cause a fire.
• Do not install a wire or aluminum
foil instead of the proper fuse -
even as a temporary repair. It may
cause extensive wiring damage and
possibly a fire.
NOTICE
Do not use a screwdriver or any other
metal object to remove fuses because
it may cause a short circuit and damage
the system.
Page 509 of 548
09
9-33
Instrument panel fuse
replacement
OOSEV070015L
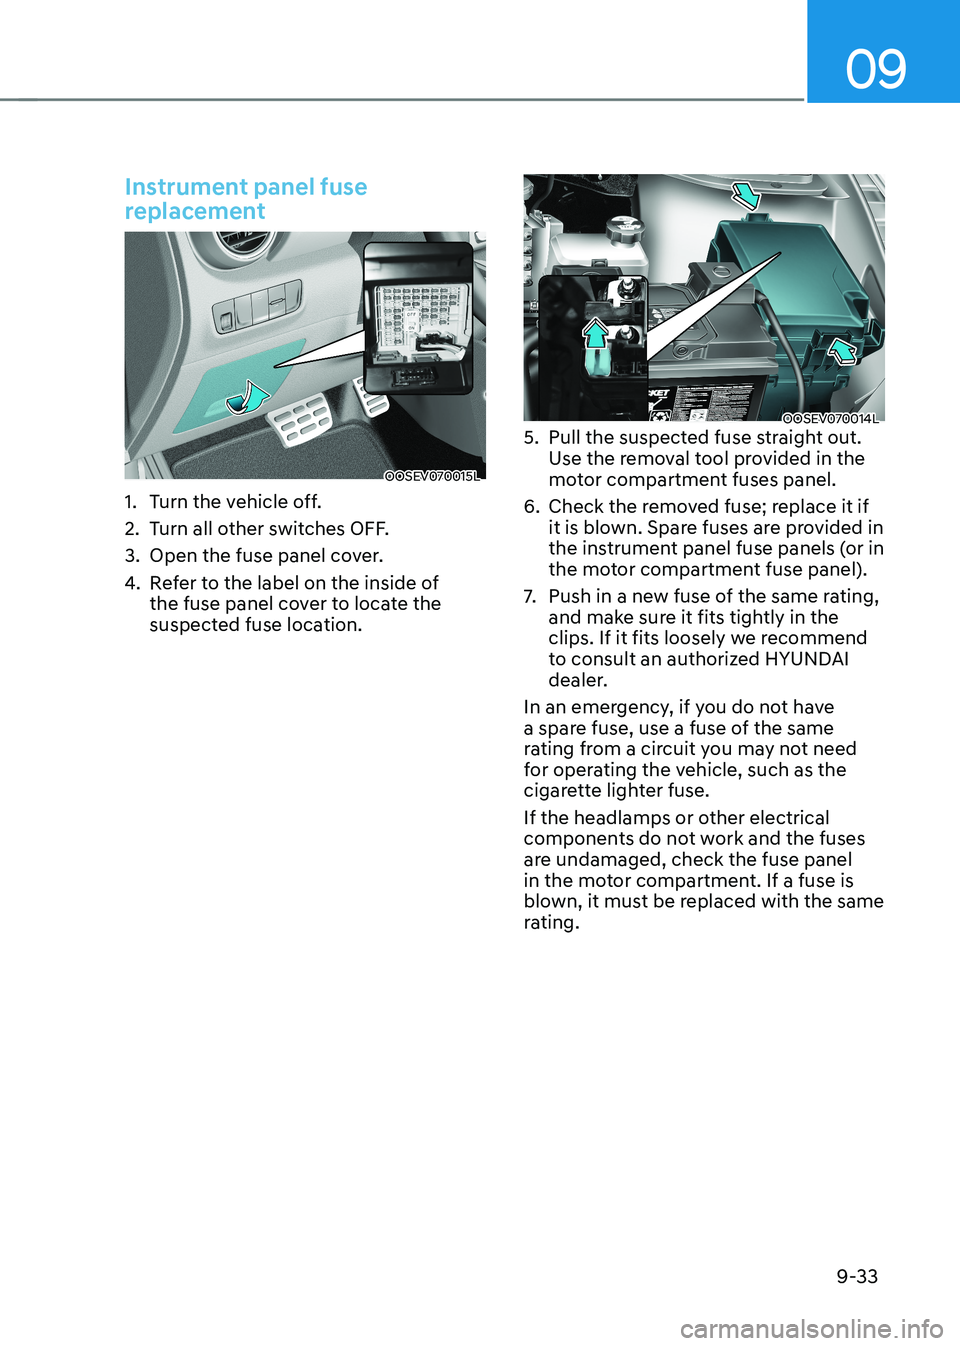
1. Turn the vehicle off.
2. Turn all other switches OFF.
3. Open the fuse panel cover.
4. Refer to the label on the inside of
the fuse panel cover to locate the
suspected fuse location.
OOSEV070014L
5. pull the suspected fuse straight out.
Use the removal tool provided in the
motor compartment fuses panel.
6. Check the removed fuse; replace it if it is blown. Spare fuses are provided in
the instrument panel fuse panels (or in
the motor compartment fuse panel).
7. push in a new fuse of the same rating,
and make sure it fits tightly in the
clips. If it fits loosely we recommend
to consult an authorized HYUNDAI
dealer.
In an emergency, if you do not have
a spare fuse, use a fuse of the same
rating from a circuit you may not need
for operating the vehicle, such as the
cigarette lighter fuse.
If the headlamps or other electrical
components do not work and the fuses
are undamaged, check the fuse panel
in the motor compartment. If a fuse is
blown, it must be replaced with the same
rating.
Page 520 of 548
Maintenance
9-44
LIgHT BULBS
We recommend to consult an authorized
dealer to replace most vehicle light
bulbs. It is difficult to replace vehicle
light bulbs because other parts of the
vehicle must be removed before you can
get to the bulb. This is especially true for
removing the headlamp assembly to get
to the bulb(s).
Removing/installing the headlamp
assembly can result in damage to the
vehicle.
WARNING
• Prior to working on a light, depress
the foot brake, shift to P (Park), apply
the parking brake, place the START/
STOP button in the OFF position
and take the key with you when
leaving the vehicle to avoid sudden
movement of the vehicle and to
prevent possible electric shock.
• Be aware the bulbs may be hot and
may burn your fingers.
NOTICE
Be sure to replace the burned-out bulb
with one of the same wattage rating.
Otherwise, it may cause damage to the
fuse or electrical wiring system.
NOTICE
To prevent damage, do not clean the
headlamp lens with chemical solvents
or strong detergents.
Information
The headlamp and tail lamp lenses could
appear frosty if the vehicle is washed after
driving or the vehicle is driven at night
in wet weather. This condition is caused
by temperature difference between the lamp inside and outside and, it does not
indicate a problem with your vehicle.
When moisture condenses in the lamp,
it will be removed after driving with the
headlamp on. The removable level may
differ depending on lamp size, lamp
position and environmental condition.
However, if moisture is not removed, we
recommend that your vehicle is inspected
by an authorized HYUNDAI dealer.
Information
• A normally functioning lamp may
flicker momentarily to stabilize the
vehicle’s electrical control system.
However, if the lamp goes out after
flickering momentarily, or continues to
flicker, we recommend the system be checked by an authorized HYUNDAI
dealer.
• The position lamp may not turn on when the position lamp switch is turned on, but the position lamp and headlamp switch may turn on when the headlamp
switch is turned on. This may be caused
by network failure or vehicle electrical
control system malfunction. If this
occurs, we recommend the system be checked by an authorized HYUNDAI
dealer.
Information
After an accident or head lamp
replacement we recommend to consult an
authorized HYUNDAI dealer to perform the headlamp aiming.
Page 521 of 548
09
9-45
Headlamp, position lamp, turn
signal lamp and daytime running
light bulb replacement
Type A
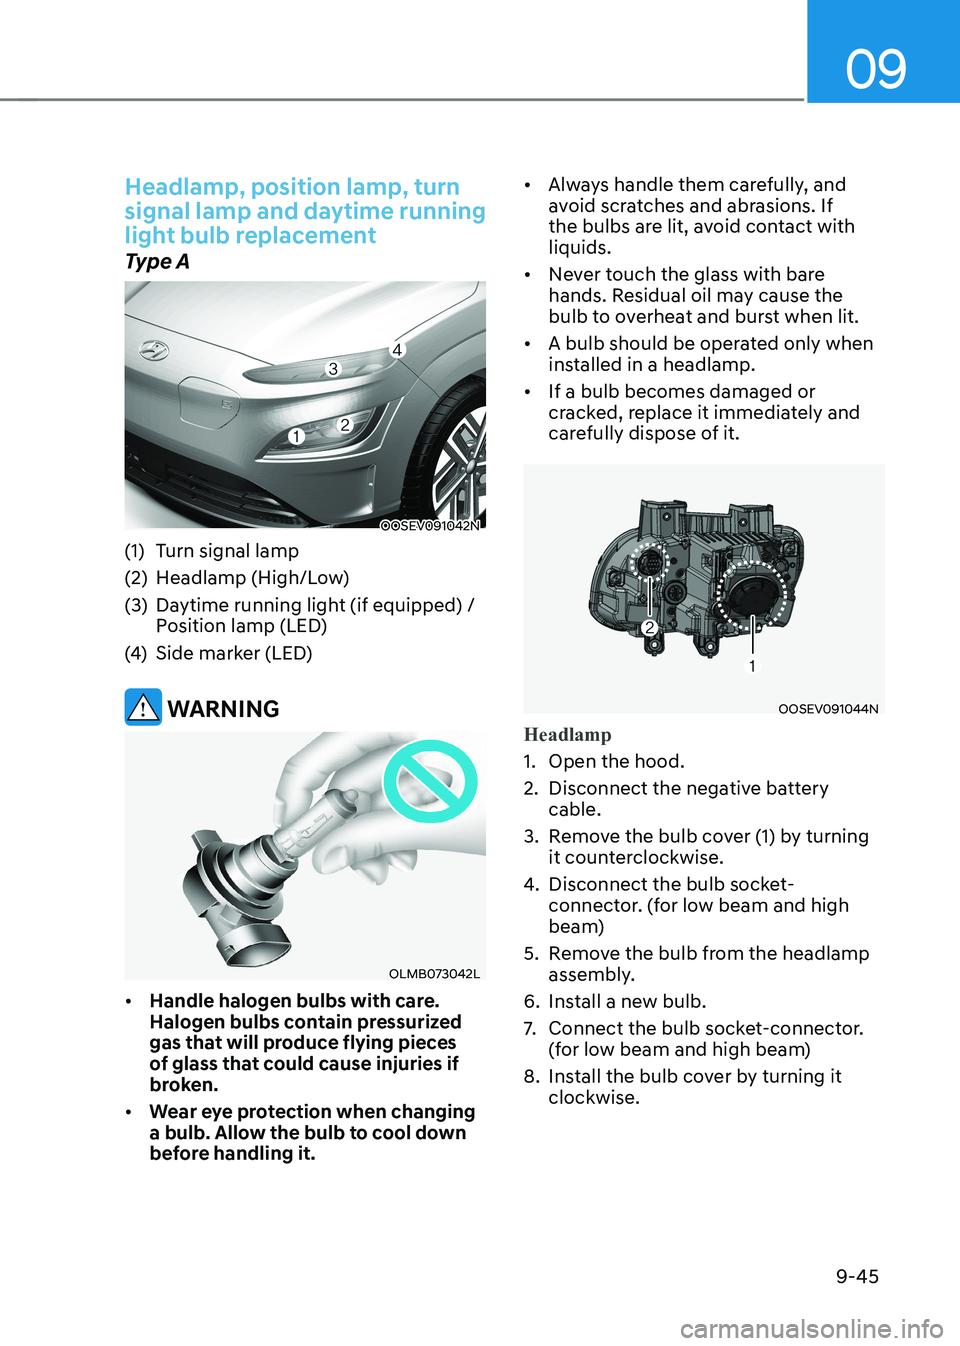
OOSEV091042N
(1) Turn signal lamp
(2) Headlamp (High/Low)
(3) Daytime running light (if equipped) / position lamp (LED)
(4) Side marker (LED)
WARNING
OLMB073042L
• Handle halogen bulbs with care.
Halogen bulbs contain pressurized
gas that will produce flying pieces
of glass that could cause injuries if
broken.
• Wear eye protection when changing
a bulb. Allow the bulb to cool down
before handling it. •
Always handle them carefully, and
avoid scratches and abrasions. If
the bulbs are lit, avoid contact with liquids.
• Never touch the glass with bare
hands. Residual oil may cause the
bulb to overheat and burst when lit.
• A bulb should be operated only when
installed in a headlamp.
• If a bulb becomes damaged or
cracked, replace it immediately and
carefully dispose of it.
OOSEV091044N
Headlamp
1. Open the hood.
2. Disconnect the negative battery
cable.
3. Remove the bulb cover (1) by turning it counterclockwise.
4. Disconnect the bulb socket-
connector. (for low beam and high
beam)
5. Remove the bulb from the headlamp assembly.
6. Install a new bulb.
7. Connect the bulb socket-connector.
(for low beam and high beam)
8. Install the bulb cover by turning it clockwise.
Page 522 of 548
Maintenance
9-46
OOSEV091044N
Turn signal lamp
1. Open the hood.
2. Disconnect the negative battery cable.
3. Remove the bulb cover (2) by turning it counterclockwise.
4. Disconnect the bulb socket-
connector.
5. Remove the bulb from the assembly.
6. Install a new bulb.
7. Connect the bulb socket-connector.
8. Install the bulb cover by turning it clockwise.
Daytime running light, Side marker, and position lamp
If the LED lamp does not operate, we
recommend that you have the vehicle
checked by an authorized HYUNDAI
dealer. Type B
OOSEV091042N
(1) Headlamp (High) (LED)
(2) Headlamp (Low) (LED)
(3) Daytime running light / position lamp/
Turn signal lamp (LED) (if equipped)
(4) Side marker (LED)
WARNING
OLMB073042L
• Handle halogen bulbs with care.
Halogen bulbs contain pressurized
gas that will produce flying pieces
of glass that could cause injuries if
broken.
• Wear eye protection when changing
a bulb. Allow the bulb to cool down
before handling it.
Page 523 of 548
09
9-47
•
Always handle them carefully, and
avoid scratches and abrasions. If
the bulbs are lit, avoid contact with liquids.
• Never touch the glass with bare
hands. Residual oil may cause the
bulb to overheat and burst when lit.
• A bulb should be operated only when
installed in a headlamp.
• If a bulb becomes damaged or
cracked, replace it immediately and
carefully dispose of it.
Daytime running light, position lamp, turn signal lamp, and head lamp
If the LED lamp does not operate, we
recommend that you have the vehicle
checked by an authorized HYUNDAI
dealer.
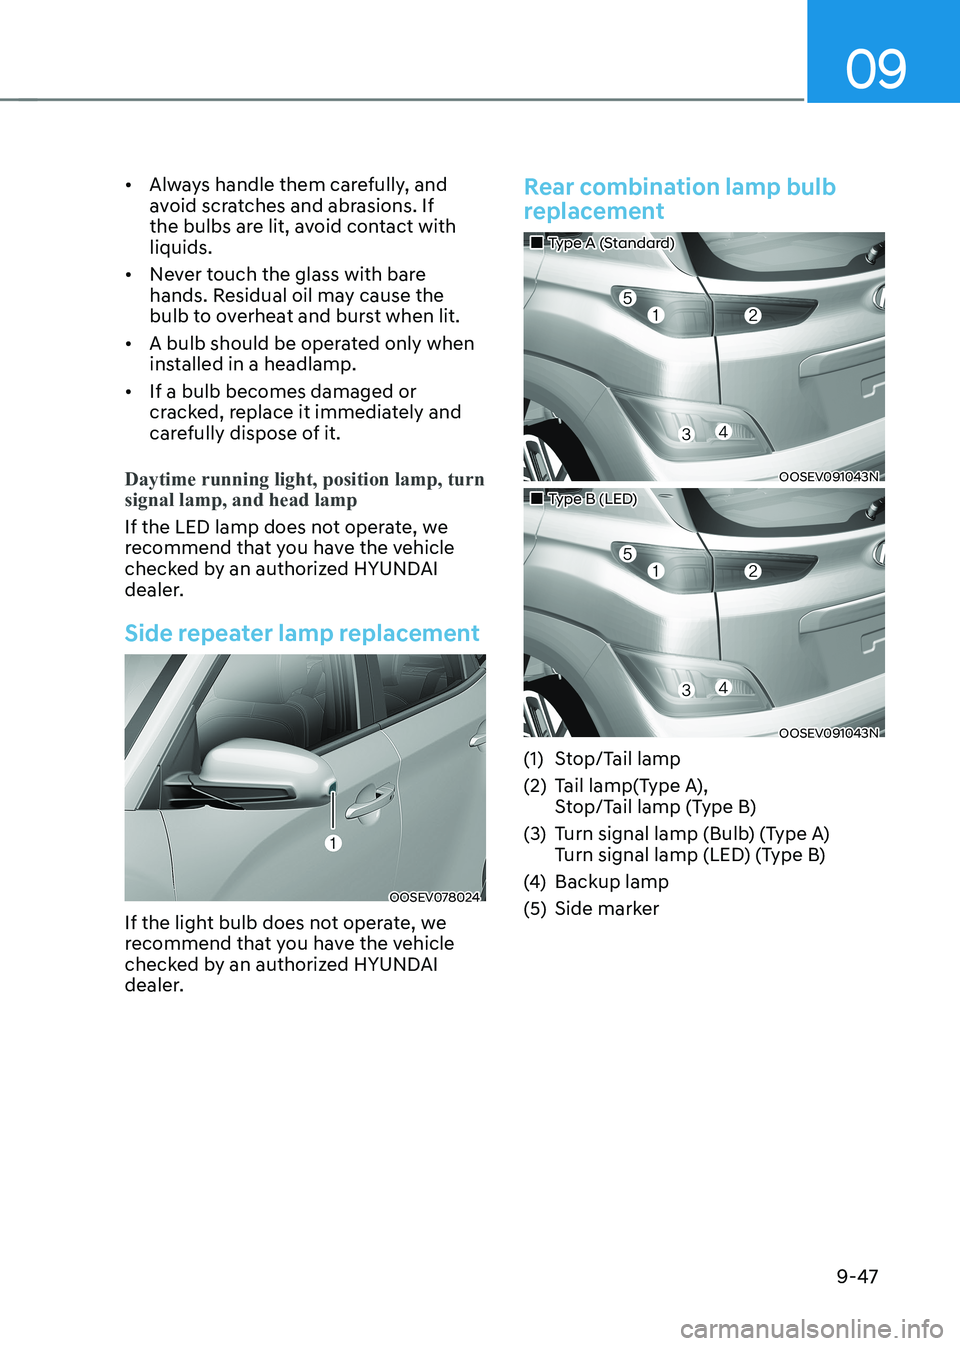
Side repeater lamp replacement
OOSEV078024
If the light bulb does not operate, we
recommend that you have the vehicle
checked by an authorized HYUNDAI
dealer.
Rear combination lamp bulb
replacement
„„Type A (Standard)
OOSEV091043N
„„Type B (LED)
OOSEV091043N
(1) Stop/Tail lamp
(2) Tail lamp(Type A), Stop/Tail lamp (Type B)
(3) Turn signal lamp (Bulb) (Type A) Turn signal lamp (LED) (Type B)
(4) Backup lamp
(5) Side marker
Page 526 of 548
Maintenance
9-50
License plate light bulb
replacement
OOS077043
1. Using a flat-blade screwdriver, gently pry the lens cover from the lamp housing.
2. Remove the bulb by pulling it straight out.
3. Install a new bulb.
4. Reinstall in the reverse order.
Interior light bulb replacement
Map lamp, room lamp and luggage
compartment lamp (LED type)
OOSEV078066
„
„Map lamp
OOSEV078036
„
„Room lamp
OOSEV078038
„
„Luggage compartment lamp
If the LED lamp does not operate, we
recommend that you have the vehicle
checked by an authorized HYUNDAI
dealer.