2023 HYUNDAI KONA EV light
[x] Cancel search: lightPage 460 of 548
08
8-5
Jump starting procedure
1. Position the vehicles close enough
that the jumper cables will reach, but
do not allow the vehicles to touch.
2. Avoid fans or any moving parts in the motor compartment at all times, even
when the vehicles are turned off.
3. Turn off all electrical devices such as radios, lights, air conditioning, etc.
Put the vehicles in P (Park) and set
the parking brakes. Turn both vehicles
OFF.
1VQA4001
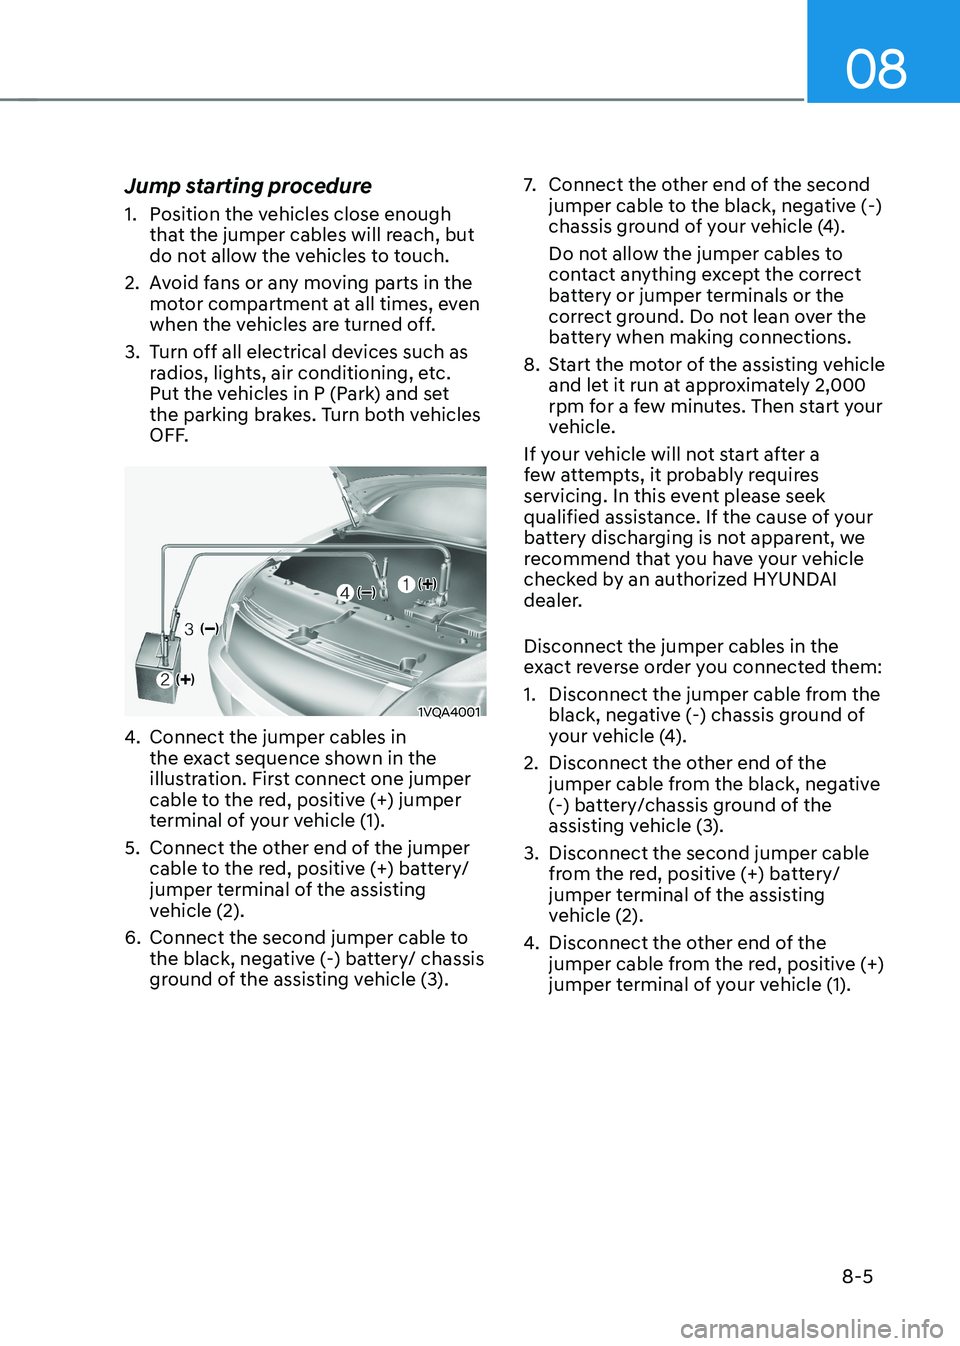
4. Connect the jumper cables in
the exact sequence shown in the
illustration. First connect one jumper
cable to the red, positive (+) jumper
terminal of your vehicle (1).
5. Connect the other end of the jumper cable to the red, positive (+) battery/
jumper terminal of the assisting
vehicle (2).
6. Connect the second jumper cable to the black, negative (-) battery/ chassis
ground of the assisting vehicle (3). 7.
Connect the other end of the second
jumper cable to the black, negative (-)
chassis ground of your vehicle (4).
Do not allow the jumper cables to
contact anything except the correct
battery or jumper terminals or the
correct ground. Do not lean over the
battery when making connections.
8. Start the motor of the assisting vehicle and let it run at approximately 2,000
rpm for a few minutes. Then start your
vehicle.
If your vehicle will not start after a
few attempts, it probably requires
servicing. In this event please seek
qualified assistance. If the cause of your
battery discharging is not apparent, we
recommend that you have your vehicle
checked by an authorized HYUNDAI
dealer. Disconnect the jumper cables in the
exact reverse order you connected them:
1. Disconnect the jumper cable from the black, negative (-) chassis ground of
your vehicle (4).
2. Disconnect the other end of the jumper cable from the black, negative
(-) battery/chassis ground of the
assisting vehicle (3).
3. Disconnect the second jumper cable from the red, positive (+) battery/
jumper terminal of the assisting
vehicle (2).
4. Disconnect the other end of the
jumper cable from the red, positive (+)
jumper terminal of your vehicle (1).
Page 463 of 548
Emergency situations
8-8
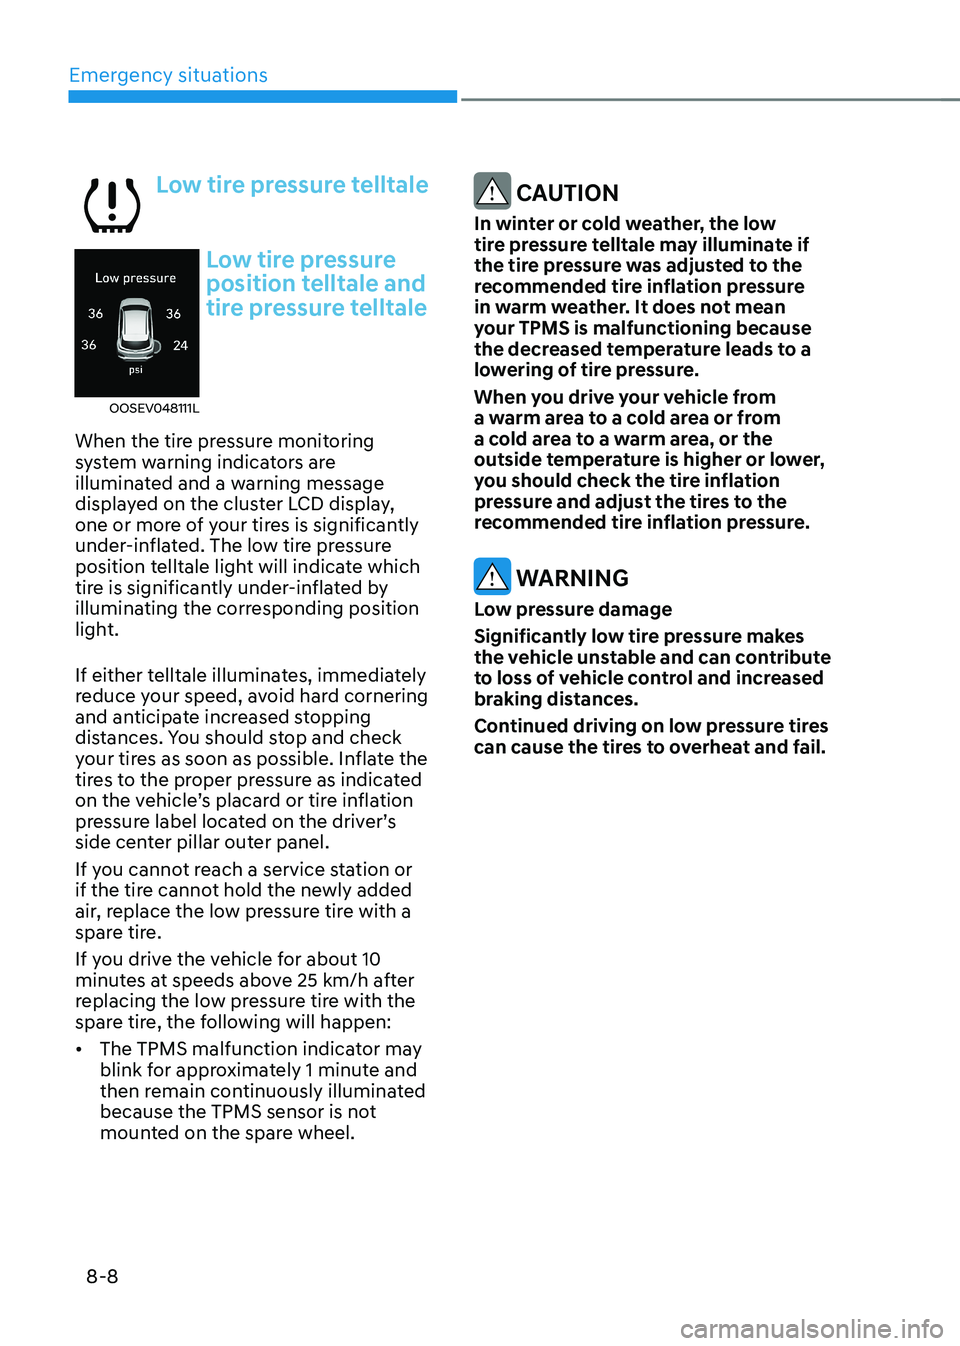
Low tire pressure telltale
OOSEV048111L
Low tire pressure
position telltale and
tire pressure telltale
When the tire pressure monitoring
system warning indicators are
illuminated and a warning message
displayed on the cluster LCD display,
one or more of your tires is significantly
under-inflated. The low tire pressure
position telltale light will indicate which
tire is significantly under-inflated by
illuminating the corresponding position
light.
If either telltale illuminates, immediately
reduce your speed, avoid hard cornering
and anticipate increased stopping
distances. You should stop and check
your tires as soon as possible. Inflate the
tires to the proper pressure as indicated
on the vehicle’s placard or tire inflation
pressure label located on the driver’s
side center pillar outer panel.
If you cannot reach a service station or
if the tire cannot hold the newly added
air, replace the low pressure tire with a
spare tire.
If you drive the vehicle for about 10
minutes at speeds above 25 km/h after
replacing the low pressure tire with the
spare tire, the following will happen: • The TPMS malfunction indicator may
blink for approximately 1 minute and
then remain continuously illuminated
because the TPMS sensor is not
mounted on the spare wheel.
CAUTION
In winter or cold weather, the low
tire pressure telltale may illuminate if
the tire pressure was adjusted to the
recommended tire inflation pressure
in warm weather. It does not mean
your TPMS is malfunctioning because
the decreased temperature leads to a
lowering of tire pressure.
When you drive your vehicle from
a warm area to a cold area or from
a cold area to a warm area, or the
outside temperature is higher or lower,
you should check the tire inflation
pressure and adjust the tires to the
recommended tire inflation pressure.
WARNING
Low pressure damage
Significantly low tire pressure makes
the vehicle unstable and can contribute
to loss of vehicle control and increased
braking distances.
Continued driving on low pressure tires
can cause the tires to overheat and fail.
Page 465 of 548
Emergency situations
8-10
WARNING
• The TPMS cannot alert you to severe
and sudden tire damage caused by
external factors such as nails or road debris.
• If you feel any vehicle instability,
immediately take your foot off
the accelerator, apply the brakes
gradually and with light force, and
slowly move to a safe position off the
road.
WARNING
Tampering with, modifying, or disabling
the Tire Pressure Monitoring System
(TPMS) components may interfere
with the system’s ability to warn the
driver of low tire pressure conditions
and/or TPMS malfunctions. Tampering
with, modifying, or disabling the Tire
Pressure Monitoring System (TPMS)
components may void the warranty for
that portion of the vehicle.
WARNING
This device complies with Industry
Canada RSS-210 standard.
Operation is subject to the following
three conditions: 1. This device may not cause harmful
interference.
2. This device must accept any
interference received, including
interference that may cause
undesired operation.
3. Changes or modifications not
expressly approved by the party
responsible for compliance could
void the user’s authority to operate
the equipment.
Page 478 of 548
9
Tire and wheels ............................................................................................... 9-20
Tire care ..................................................................................................................... 9-20
Recommended cold tire inflation pressures ..........................................................9-20
Check tire inflation pressure ..................................................................................... 9-21
Tire rotation ................................................................................................................ 9-22
Wheel alignment and tire balance ............................................................................ 9-22
Tire replacement ........................................................................................................ 9-23
Wheel replacement .................................................................................................... 9-24
Tire traction ................................................................................................................ 9-24
Tire maintenance ....................................................................................................... 9-24
Tire sidewall labeling .................................................................................................. 9-24
Tire Terminology and Definitions .............................................................................. 9-27
All season tires ........................................................................................................... 9-30
Summer tires ............................................................................................................. 9-30
Snow Tires.................................................................................................................. 9-30 Radial-ply Tires .......................................................................................................... 9-30
Low Aspect Ratio Tires ............................................................................................... 9-31
Fuses ................................................................................................................ 9-32
Instrument panel fuse replacement ........................................................................ 9-33
Motor compartment panel fuse replacement ..........................................................9-35
Light bulbs ....................................................................................................... 9-44
Headlamp, position lamp, turn signal lamp and
daytime running light bulb replacement .................................................................9-45
Side repeater lamp replacement .............................................................................. 9-47
Rear combination lamp bulb replacement ..............................................................9-47
High mounted stop lamp replacement ................................................................... 9-49
License plate light bulb replacement ...................................................................... 9-50
Interior light bulb replacement ................................................................................ 9-50
Appearance care ............................................................................................. 9-52
Exterior care ............................................................................................................... 9-52
Interior care ................................................................................................................ 9-57
Page 482 of 548
Maintenance
9-6
While operating your vehicle: •
Check for vibrations in the steering
wheel. Notice if there is any increased
steering effort or looseness in the
steering wheel, or change in its
straight-ahead position.
• Notice if your vehicle constantly turns
slightly or “pulls” to one side when
traveling on smooth, level road.
• When stopping, listen and check for
unusual sounds, pulling to one side,
increased brake pedal travel or “hard-
to-push” brake pedal.
• If any slipping or changes in the
operation of your reduction gear
occurs, check the reduction gear fluid
level.
• Check the reduction gear p (park) function.
• Check the parking brake.
• Check for fluid leaks under your
vehicle (water dripping from the air
conditioning system during or after use is normal).
At least monthly: • Check coolant level in the coolant
reservoir.
• Check the operation of all exterior
lights, including the stoplights, turn
signals and hazard warning flashers.
• Check the inflation pressures of all
tires including the spare for tires that
are worn, show uneven wear, or are damaged.
• Check for loose wheel lug nuts.
• Do not add regular green coolant. •
At least twice a year:
(i.e., every Spring and Autumn)
• Check radiator, heater and air
conditioning hoses for leaks or damage.
• Check windshield washer spray and
wiper operation. Clean wiper blades
with a clean cloth dampened with
washer fluid.
• Check headlamp alignment.
• Check the seat belts for wear and function.
At least once a year: • Clean body and door drain holes.
• Lubricate door hinges and hood hinges.
• Lubricate door and hood locks and
latches.
• Lubricate door rubber weather strips.
• Check the air conditioning system.
• Inspect and lubricate reduction gear
linkage and controls.
• Clean the battery and terminals.
• Check the brake fluid level.
Page 492 of 548
Maintenance
9-16
OLF074019
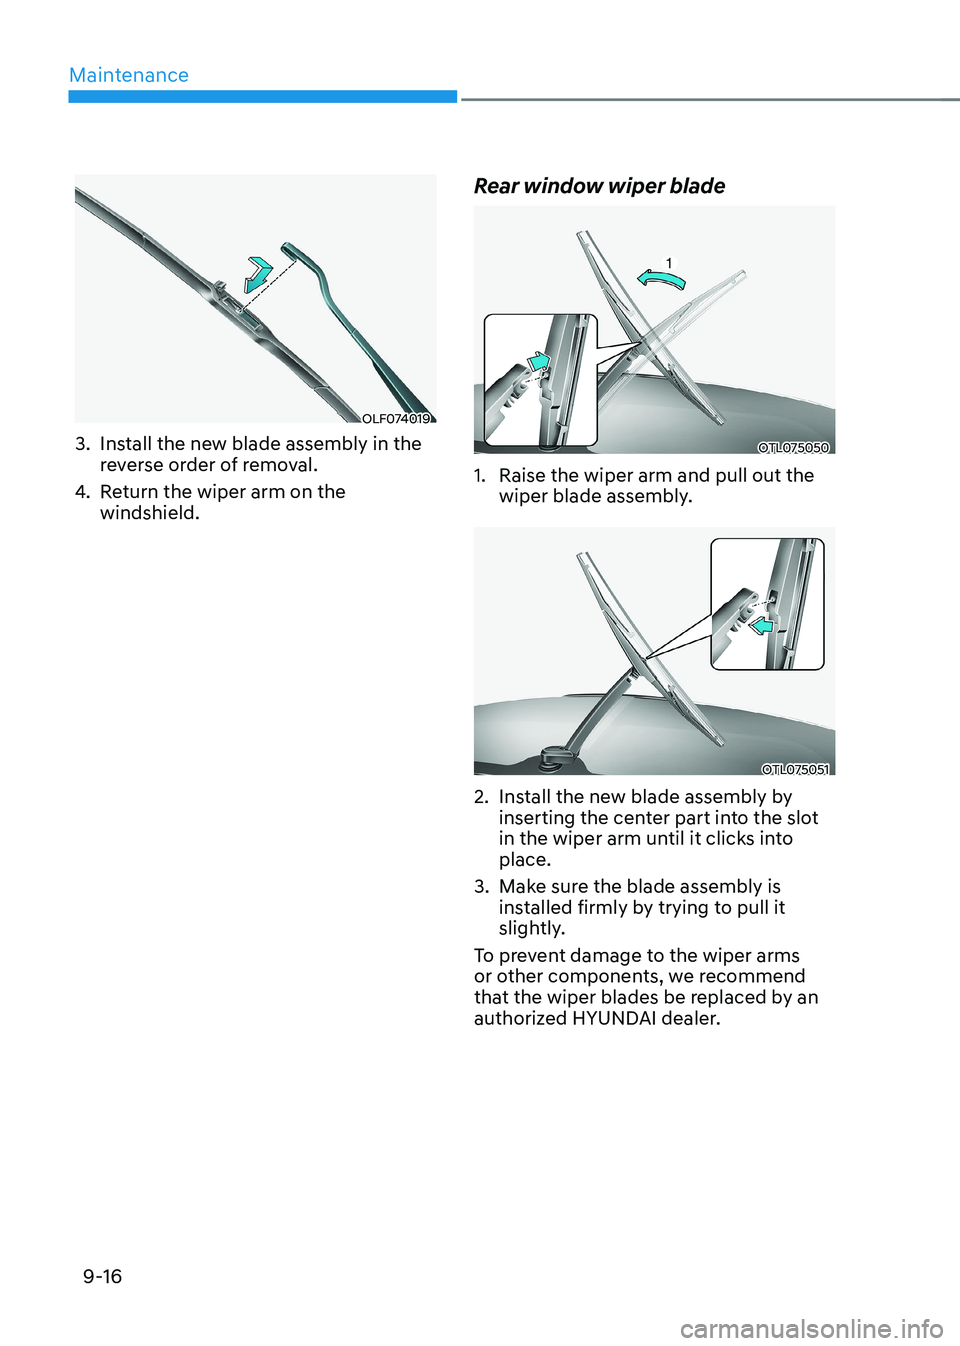
3. Install the new blade assembly in the reverse order of removal.
4. Return the wiper arm on the windshield. Rear window wiper blade
OTL075050
1. Raise the wiper arm and pull out the wiper blade assembly.
OTL075051
2. Install the new blade assembly by inserting the center part into the slot
in the wiper arm until it clicks into place.
3. Make sure the blade assembly is installed firmly by trying to pull it
slightly.
To prevent damage to the wiper arms
or other components, we recommend
that the wiper blades be replaced by an
authorized HYUNDAI dealer.
Page 494 of 548
Maintenance
9-18
Battery Usage
Recommendations
OOSEV078035
• Keep the battery securely mounted.
• Keep the battery top clean and dry.
• Keep the terminals and connections
clean, tight, and coated with
petroleum jelly or terminal grease.
• Rinse any spilled electrolyte from the
battery immediately with a solution
of water and baking soda.
• If the vehicle is not going to be used
for an extended time, disconnect the
battery cables.
Battery capacity label
„„Example
OLMB073072
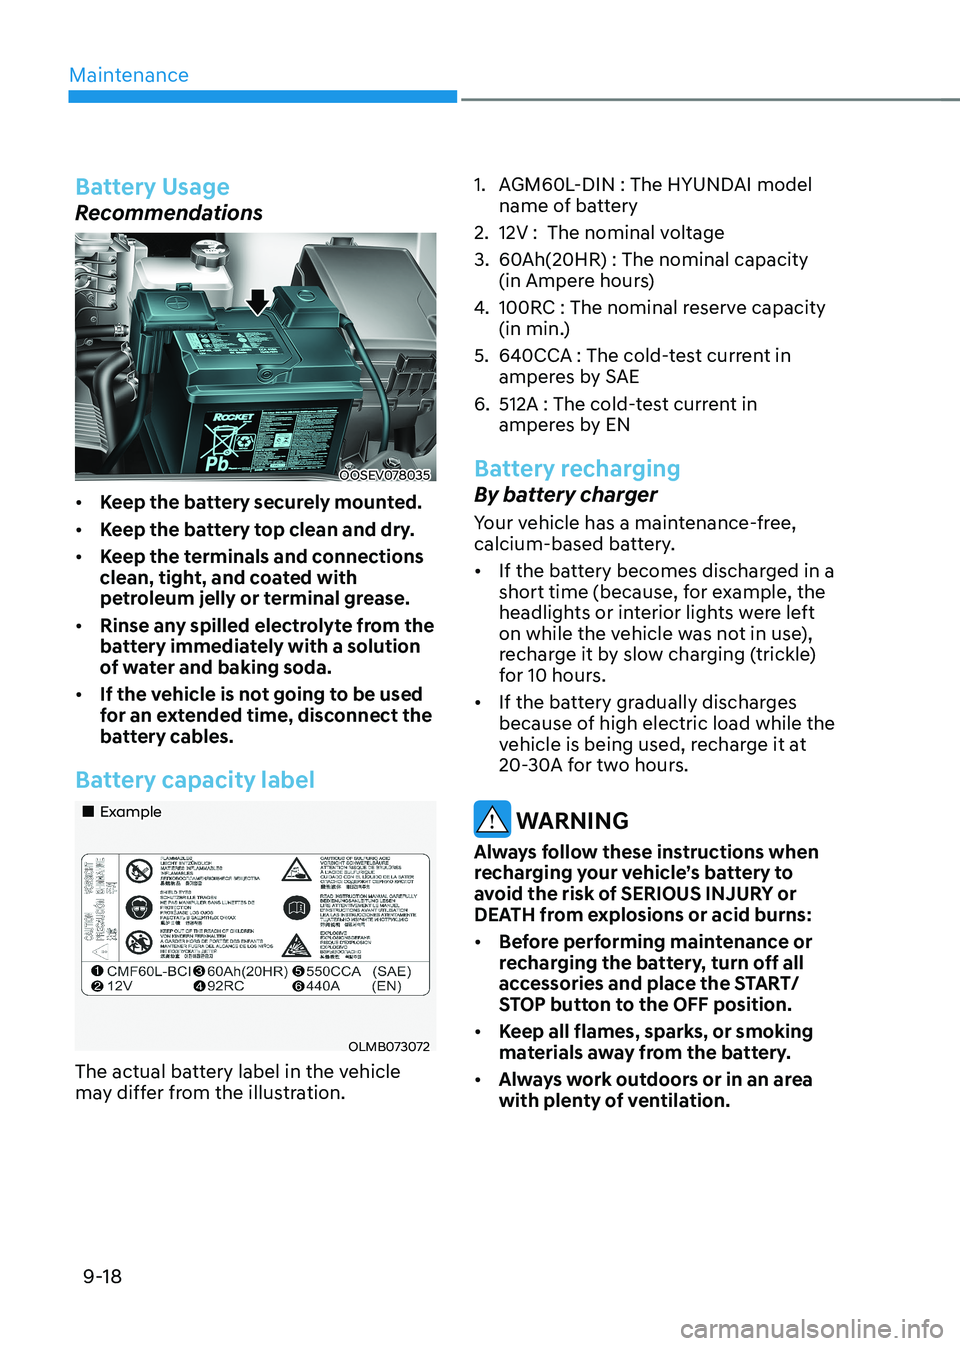
The actual battery label in the vehicle
may differ from the illustration. 1. AGM60L-DIN : The HYUNDAI model
name of battery
2. 12V : The nominal voltage
3. 60Ah(20HR) : The nominal capacity (in Ampere hours)
4. 100RC : The no minal reserve capacity
(in min.)
5. 640CCA : The cold-test current in amperes by SAE
6. 512A : The cold-test current in amperes by EN
Battery recharging
By battery charger
Your vehicle has a maintenance-free,
calcium-based battery. • If the battery becomes discharged in a
short time (because, for example, the
headlights or interior lights were left
on while the vehicle was not in use),
recharge it by slow charging (trickle)
for 10 hours.
• If the battery gradually discharges
because of high electric load while the
vehicle is being used, recharge it at
20-30A for two hours.
WARNING
Always follow these instructions when
recharging your vehicle’s battery to
avoid the risk of SERIOUS INJURY or
DEATH from explosions or acid burns: • Before performing maintenance or
recharging the battery, turn off all
accessories and place the START/
STOP button to the OFF position.
• Keep all flames, sparks, or smoking
materials away from the battery.
• Always work outdoors or in an area
with plenty of ventilation.
Page 504 of 548
Maintenance
9-28
Curb weight
This means the weight of a motor
vehicle with standard and optional
equipment including the maximum
capacity of fuel, oil and coolant, but
without passengers and cargo.
DOT markings
The DOT code includes the Tire
Identification Number (TIN), an
alphanumeric designator which can
also identify the tire manufacturer,
production plant, brand and date of
production.
GVWR
Gross Vehicle Weight Rating
GAWR FRT
Gross Axle Weight Rating for the
Front Axle.
GAWR RR
Gross Axle Weight Rating for the
Rear axle.
Intended outboard sidewall
The side of an asymmetrical tire,
that must always face outward when
mounted on a vehicle.
Kilopascal (kPa)
The metric unit for air pressure.
Light Truck (LT) tire
A tire designated by its manufacturer
as primarily intended for use on
lightweight trucks or multipurpose
passenger vehicles.
Load ratings
The maximum load that a tire is rated
to carry for a given inflation pressure.
Load index
An assigned number ranging from 1
to 279 that corresponds to the load
carrying capacity of a tire.
Maximum inflation pressure
The maximum air pressure to which
a cold tire may be inflated. The
maximum air pressure is molded
onto the sidewall.
Maximum load rating
The load rating for a tire at the
maximum permissible inflation
pressure for that tire.
Maximum loaded vehicle weight
The sum of curb weight; accessory
weight; vehicle capacity weight; and
production options weight.
Normal occupant weight
The number of occupants a vehicle
is designed to seat multiplied by 150
pounds (68 kg).
Occupant distribution
Designated seating positions.
Outward facing sidewall
An asymmetrical tire has a particular
side that faces outward when
mounted on a vehicle. The outward
facing sidewall bears white lettering
or bears manufacturer, brand, and/or
model name molding that is higher or deeper than the same moldings
on the inner facing sidewall.
Passenger (P-Metric) tire
A tire used on passenger cars
and some light duty trucks and
multipurpose vehicles.