2023 HYUNDAI IONIQ 6 warning
[x] Cancel search: warningPage 29 of 582

1
1-23
WARNING Do not touch the charging connector of the charging cable or the charging inlet on the
vehicle.
5. Remove the charging connector protection cap of the AC charging cable, hold the charging connector handle, and connect it to the AC charging inlet on the vehicle. Push
it until you hear a click.
6. [If using separately purchased charging cable] Remove the charging plug protection
cap of the AC charging cable, hold the charging plug handle, and connect it to the
electric outlet (120 V) of the AC charger.
• This process is required only when using a separately purchased AC charging cable. If you use a charging cable installed in an AC charger, a separate charging plug
connection is not required.
• When charging starts, the estimated charging time will be displayed on the instrument cluster for about one minute.
Information • If you open the driver’s door while charging, the estimated charging time will also be displayed on the instrument cluster for about one minute.
• When scheduled charging is set, a message saying "Waiting to charge at scheduled time" will be displayed.
• When scheduled air conditioner or heater operates while waiting for the scheduled charging, the estimated charging time will be displayed as “-”.
7. [If using a separately purchased charging cable] When charging is complete, hold the
charging plug handle, disconnect the charging plug from the electric outlet (120 V) of
the AC charger, and close the protection cap of the charging plug.
• This process is required only when using an AC charging cable purchased separately. If you use a charging cable installed in an AC charger, a separate charging plug
disconnection is not required.
8. Hold the charging connector handle with the unlock button pressed, and pull the charging connector to disconnect it from the charging inlet.
CAUTION Do not forcibly disconnect the charging connector without pressing the unlock button
on the charging connector. It may damage the charging connector or the charging
inlet on the vehicle.
9. Close the charging inlet cover and press the charging door to completely close it.
Hyundai_CE_en_US.book Page 23
Page 30 of 582

Introduction/Getting Started with Your Electric Vehicle
1-24
Information • If the charging connector locking mode is set to Always or While Charging , unlock the door
by pressing the button on the smart key or the button on the driver’s door, and disconnect the
charging connector from the charging inlet.
- For more information, refer to the "Setting charging connector locking mode" section in this chapter.
• During AC charging, the quality of radio reception may degrade in some areas.
Using a DC Charger
If you need to charge the vehicle in a shorter time, you can charge at high speeds using
a DC charger installed in public charging stations.
• To find a nearby charging station, refer to the "Searching for nearby charging stations" section in this chapter.
WARNING Before charging the vehicle, carefully read and follow the instructions in “Setting
charging connector locking mode” to prevent property damage or injury due to electric
shock, fire, explosion, etc.
CAUTION Battery performance and life may deteriorate if the DC charger is used constantly. Use
AC charging unless DC charging is necessary.
Hyundai_CE_en_US.book Page 24
Page 31 of 582

1
1-25
Understanding the DC charging connector
The exterior of the DC charging cable is as follows:
B0001101(1) DC charging connector (Vehicle side)
Charging with a DC charger
Follow the instructions below to charge the vehicle with a DC charger.
1. With the vehicle started, apply the Electronic Parking Brake (EPB) while pressing the brake pedal.
2. Turn all switches off, shift to P (Park), and stop the vehicle.
3. With the vehicle door unlocked, press the open indicator on the charging door to open the charging door.
4. Open the charging inlet cover and check the charging connector and charging inlet for dust or other contaminants.
• If there is any dirt or contaminants, remove it using the air gun.
WARNING Do not touch the interior of the charging connector of the charging cable or the
charging inlet on the vehicle.
5. Remove the charging connector protection cap of the DC charging cable, hold the charging connector handle, and connect it to the DC charging inlet on the vehicle. Push
it until you hear a click.
• When charging starts, the estimated charging time will be displayed on the instrument cluster for a minute.
Information If you open the driver’s door while charging, the estimated charging time will also be displayed
on the instrument cluster for a minute.
Hyundai_CE_en_US.book Page 25
Page 32 of 582

Introduction/Getting Started with Your Electric Vehicle
1-26
6. When charging is complete, hold the charging connector handle with the unlock button pressed and pull on the charging connector to disconnect it from the charging
inlet.
• Depending on the DC charger types, some DC chargers may not have a charger connector unlock button so it may be necessary to stop at the DC charger control
panel or by charger company's app.
CAUTION Before disconnecting the charging connector, check if there is an unlock button on the
connector handle. If the connector handle is equipped with an unlock button, forcibly
disconnecting the connector without pressing the button may damage the charging
connector or charging inlet on the vehicle.
NOTICE • For more information, refer to the “Setting charging connector locking mode” section in this chapter.
7. Close the charging inlet cover.
8. Press the charging door to completely close it.
Using a Portable Charger (ICCB)
If the vehicle cannot be moved to a public charging station, you can charge the vehicle
using a separately purchased In-Cable Control Box (ICCB) in places where general power
(AC 120 V) is supplied.
WARNING Before charging the vehicle, carefully read and follow the instructions in “Setting
charging connector locking mode” to prevent property damage or injury due to electric
shock, fire, explosion, etc.
CAUTION To prevent property damage or injury due to fire or explosion, follow the instructions
below.
• Only use a genuine HYUNDAI portable charger (if equipped).
• Do not let children operate or touch the portable charger. Doing so may lead to unexpected accidents.
• Try to avoid using an extension cord, but if you must use to reach a 120 V outlet, ensure it is a medium to heavy duty grounded extension cord rated at 15 A minimum.
• The charger power you are using must comply with regulations and safely accommodate the Voltage, Current (Amps), and Power (Watts) ratings. If not, the
vehicle may not be charged or safety hazards, such as fire, may occur.
Hyundai_CE_en_US.book Page 26
Page 35 of 582

1
1-29
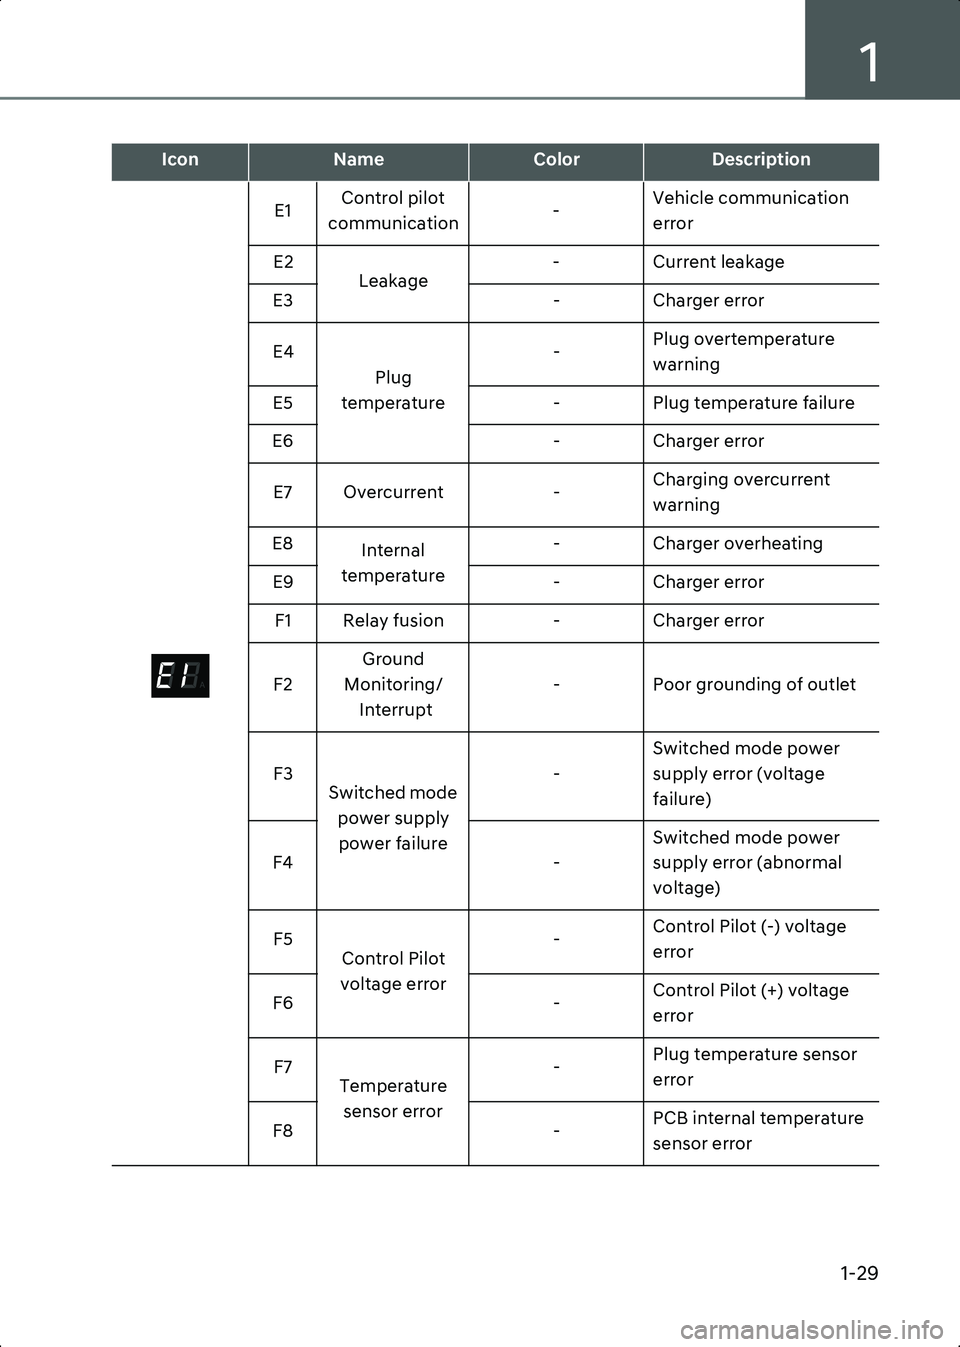
E1Control pilot
communication -Vehicle communication
error
E2 Leakage - Current leakage
E3 - Charger error
E4 Plug
temperature -
Plug overtemperature
warning
E5 - Plug temperature failure
E6 - Charger error
E7 Overcurrent -Charging overcurrent
warning
E8 Internal
temperature - Charger overheating
E9 - Charger error
F1 Relay fusion - Charger error
F2 Ground
Monitoring/ Interrupt - Poor grounding of outlet
F3 Switched mode
power supply power failure -
Switched mode power
supply error (voltage
failure)
F4 -Switched mode power
supply error (abnormal
voltage)
F5 Control Pilot
voltage error -
Control Pilot (-) voltage
error
F6 -Control Pilot (+) voltage
error
F7 Temperature
sensor error -
Plug temperature sensor
error
F8 -PCB internal temperature
sensor error
IconNameColorDescription
A
Hyundai_CE_en_US.book Page 29
Page 37 of 582

1
1-31
WARNING Do not touch interior of the charging connector of the charging cable or the charging
inlet of the vehicle.
7. Remove the charging connector protection cap of the portable charging cable, hold the charging connector handle, and connect it to the AC charging inlet of the vehicle.
Push it until you hear a click.
• When charging starts, the estimated charging time will be displayed on the instrument cluster for about one minute.
Information • If you open the driver’s door while charging, the estimated charging time will also be displayed on the instrument cluster for about one minute.
• When scheduled charging is set, a message saying “Waiting to charge at scheduled time” will be displayed.
• When scheduled air conditioner or heater operates while waiting for the scheduled charging, the estimated charging time will be displayed as ‘-’.
8. When charging is complete, hold the charging connector handle with the unlock button pressed and pull on the charging connector to disconnect it from the charging
inlet.
Information If you have set the charging connector locking mode as Alwaysor While Charging , unlock the
door by pressing the button on the smart key or the button on the driver’s door, and disconnect
the charging connector from the charging inlet.
• For more information, refer to the “Setting charging connector locking mode” section in this chapter.
9. Close the charging inlet cover.
10.Press the charging door to completely close it.
Using the scheduled charging function
The scheduled charging function allows you to charge your vehicle using low cost, late
night power until the next departure time.
Information You can use the scheduled charging function only when using an AC charger or the portable
charger (ICCB: In-Cable Control Box). For more information about connecting an AC charger and
portable charger, refer to the “Using an AC Charger”and “Using a Portable Charger (ICCB)”
section in this chapter.
Hyundai_CE_en_US.book Page 31
Page 52 of 582

Introduction/Getting Started with Your Electric Vehicle
1-46
Using V2L Function
Using the Vehicle to Load (V2L) feature, you can turn on electronic devices by connecting
them to the high voltage battery.
Safety Precautions When Using the V2L Function
Before using the V2L function, read and comply with all the safety information below.
Failure to do so may cause electric shock or fire and result in serious injury, death, vehicle
malfunction, or property damage.
Precautions when using the V2L function
WARNING • Do not use the V2L function if the V2L connector, charging inlet, power plug, or cable is damaged, corroded, or rusted.
• Do not touch the V2L connector, charging inlet, or power plug with wet hands.
• Do not use the V2L function if the connection part of the V2L connector and the charging inlet is loose.
• Check if there is no water, dust, or other contaminants before connecting the connector and the power plug. They may cause electric shock or fire.
• Do not put metal objects or touch the V2L connector or charging inlet with bare hands.
• For electric devices used outdoors in a vehicle, use a product that is waterproof or use it in a waterproof environment. If rain or humidity intrude into electric devices,
multi-outlets, extension cords, etc., it may cause electric shock or damage the vehicle
or devices.
• If there is a risk of lightning, do not use the V2L function outside the vehicle.
• Do not use electric heating appliances such as an electric kettle, toaster, or iron in the vehicle. Doing so may result in a fire and injury.
Precautions when the cooling fan operates
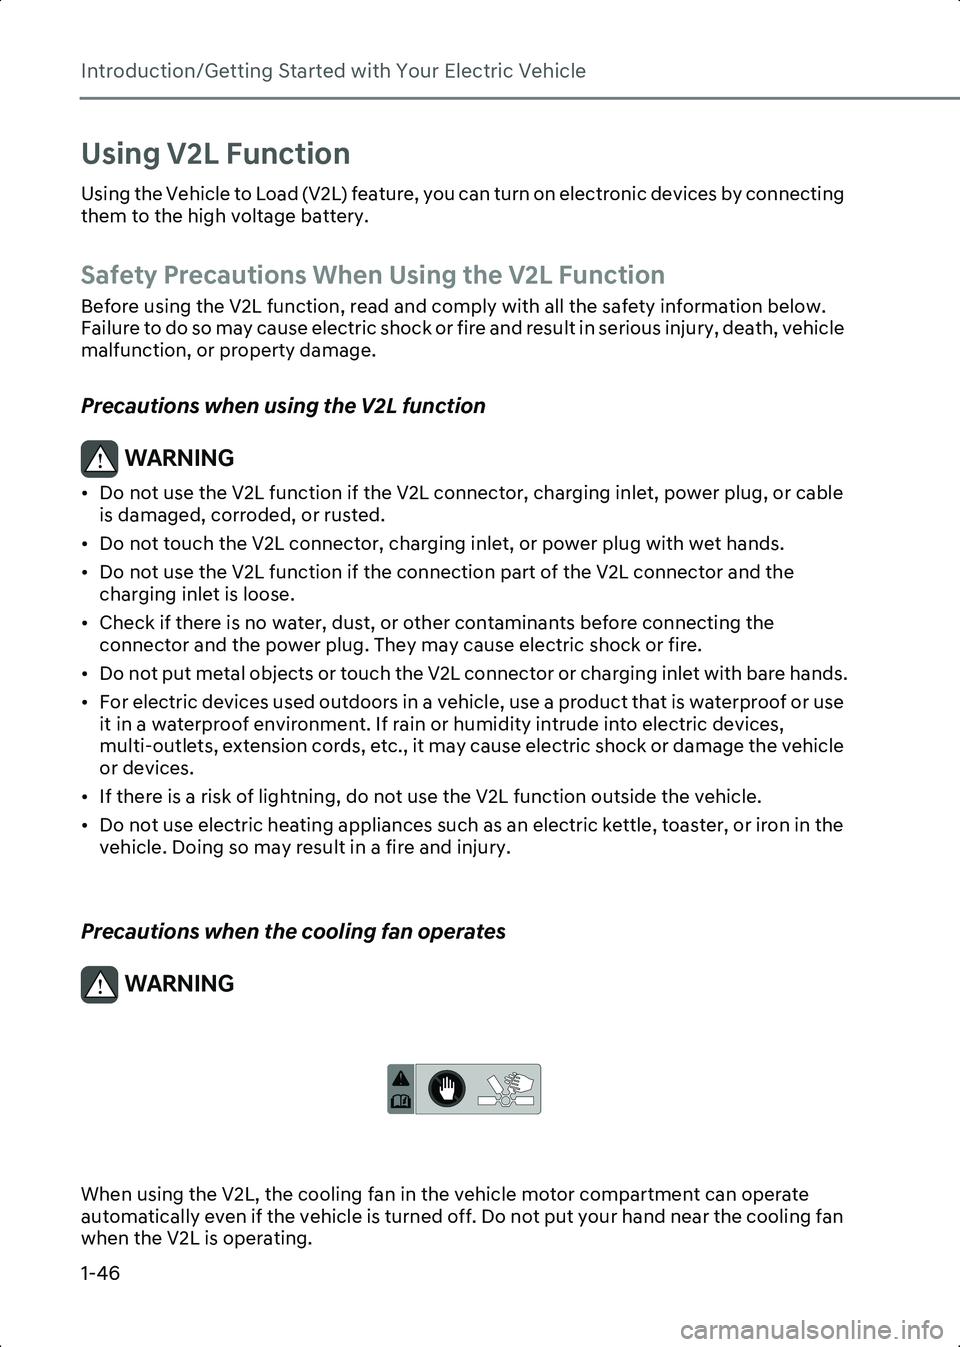
WARNING
WL_MotorRoomHotCaution
When using the V2L, the cooling fan in the vehicle motor compartment can operate
automatically even if the vehicle is turned off. Do not put your hand near the cooling fan
when the V2L is operating.
Hyundai_CE_en_US.book Page 46
Page 54 of 582

Introduction/Getting Started with Your Electric Vehicle
1-48
• The V2L discharging mode is blocked automatically in the event of overheating. When the discharging mode is blocked, check whether the V2L connector or power plug is
contaminated, worn, corroded or broken.
- If the temperature falls to a proper level after it is left unattended, you can use it again.
- If overheating repeats when using a certain electric device, do not use the electric device.
• Do not connect more than two extension cords or multi-outlet. Also, when using the extension cable, ensure that the cable is not twisted. Heat from the overlapped cable
may cause fire.
• Do not hang home appliances on the wire.
• Do not use if the sheath of home appliance cables is damaged or broken.
• Fully insert the power plug when connecting it to the power.
• Only use qualified power plug with ground connection that meets the standard. Do not use worn, corroded, or broken power plug or improper power plug that does not meet
the standard.
Using Electricity Outside the Vehicle
Before using V2L function, carefully read all the safety information and precautions on
the “Safety Precautions When Using the V2L Function” section and follow the
instructions.
Follow the instructions below to connect the V2L connector to the charging inlet on the
vehicle and supply power to an electronic product.
1. Open the cover of the V2L connector.
2. Close the cover after connecting the plug of an electronic product to the power outlet of the connector.
WARNING Some types of plugs may not fit into the outlet cover of the V2L connector, causing
incomplete closing of the cover. Do not use the V2L connector on a rainy or snowy day
if the outlet cover is not completely closed. There is a risk of fire and/or injury.
3. Open the connection terminal protection cap of the connector with the open switch pressed.
4. Open the charging door and connect the V2L connector to the charging inlet on the vehicle.
• Connect the V2L connector to the charging inlet within 60 seconds after opening the charging door.
5. Press the power switch of the V2L connector. • The power is supplied and the indicator on the V2L connector is turned on.
Hyundai_CE_en_US.book Page 48