2023 HYUNDAI IONIQ 5 ECU
[x] Cancel search: ECUPage 214 of 680

Convenience Features
5-22
CAUTION
• Do not leave the registered digital
key (smartphone) and card key in
your vehicle. Please carry around
your keys all the times.
• If you happen to lose your digital
key (smartphone) or card key
registered as a main user’s key, you
should immediately delete the key
on the vehicle’s key menu. For more
information, refer to the Digital Key
Deletion in this chapter.
• If you registered your digital key
(smartphone) or card key in the
vehicle, a message appears on the
instrument cluster and let you know
the key is registered.
(Message: Digital key(s) active.)
• If you buy a used vehicle, you should
confirm the message and delete the
registered smartphone key and card
key. In this case, you should carry
your smart key.
• If you keep place the NFC card
of the digital key on the interior
authentication pad (wireless
charger) while driving, it may cause a
malfunction of the NFC card.
• You should remove your NFC card
of the digital key on the interior
authentication pad after turning on the engine.
• Hyundai digital key app may not
work properly when the NFC or
Bluetooth communication between
smartphone and car is not good. •
If the remote control operation
is executed where the mobile
connection is weak, Bluetooth
connection is poor due to lots of
Bluetooth devices or there is an
object such as metal or concrete, it
might be delayed or the operable
distance might decrease. Especially,
you should not cover the smartphone
with your hand or place other
devices which can cause frequency
interference. It may result in poor
performance.
• If the remote control function is not
activated, please use NFC function to
lock or unlock the doors
• You should be careful not to
press the remote control button
on the digital key (smartphone)
accidentally.
• If the digital key (smartphone) is
discharged or defective or you
cannot use the digital key since the
vehicle battery is discharged, use the
inside door lock button to lock all of
the doors.
Page 227 of 680

05
5-35
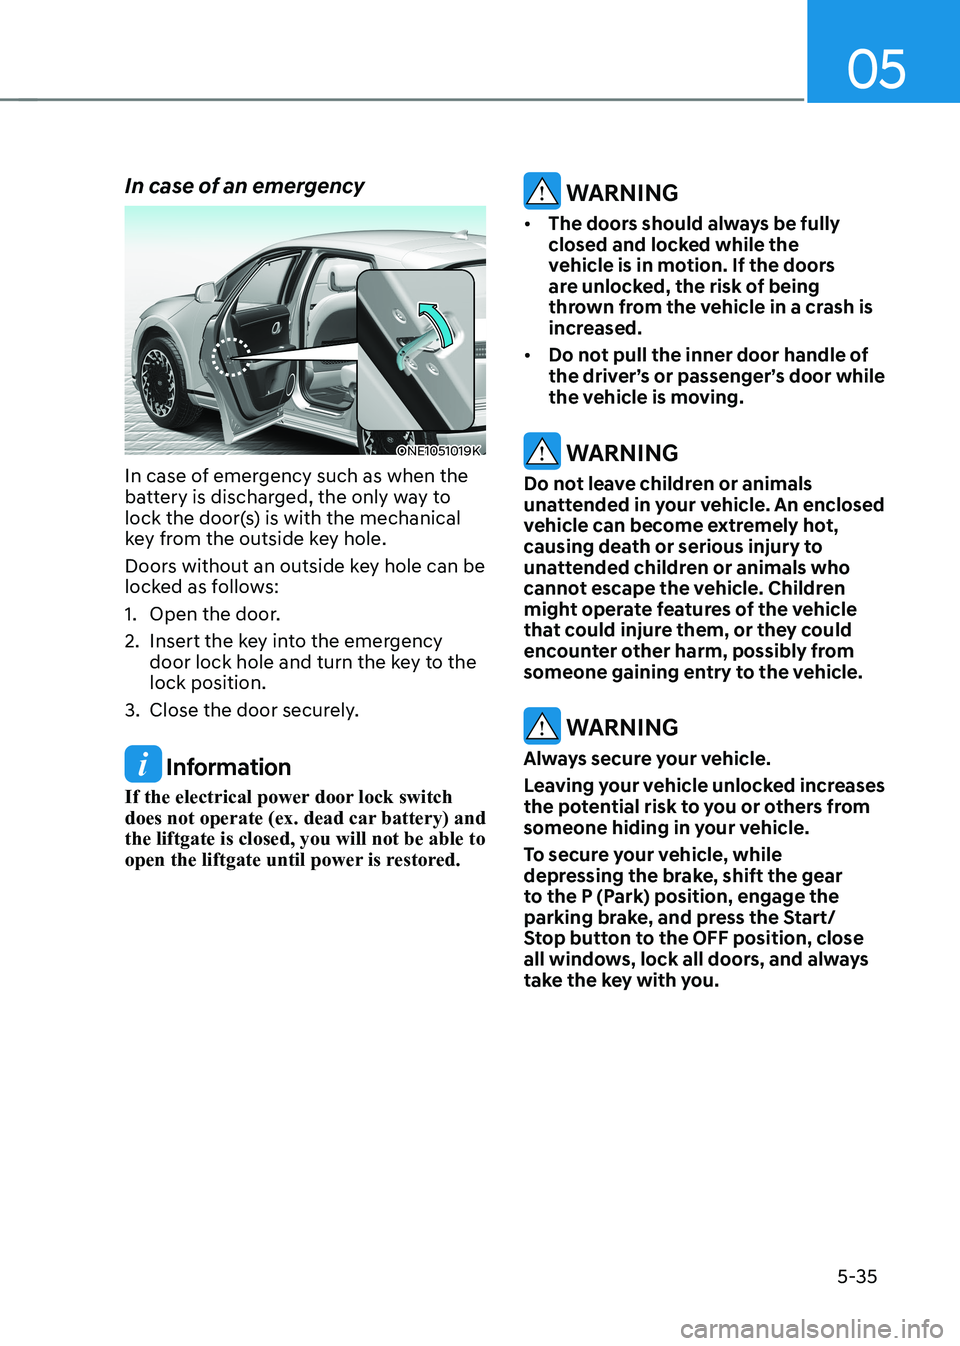
In case of an emergency
ONE1051019K
In case of emergency such as when the
battery is discharged, the only way to
lock the door(s) is with the mechanical
key from the outside key hole.
Doors without an outside key hole can be
locked as follows:
1. Open the door.
2. Insert the key into the emergency door lock hole and turn the key to the lock position.
3. Close the door securely.
Information
If the electrical power door lock switch
does not operate (ex. dead car battery) and the liftgate is closed, you will not be able to
open the liftgate until power is restored.
WARNING
• The doors should always be fully
closed and locked while the
vehicle is in motion. If the doors
are unlocked, the risk of being
thrown from the vehicle in a crash is
increased.
• Do not pull the inner door handle of
the driver’s or passenger’s door while
the vehicle is moving.
WARNING
Do not leave children or animals
unattended in your vehicle. An enclosed
vehicle can become extremely hot,
causing death or serious injury to
unattended children or animals who
cannot escape the vehicle. Children
might operate features of the vehicle
that could injure them, or they could
encounter other harm, possibly from
someone gaining entry to the vehicle.
WARNING
Always secure your vehicle.
Leaving your vehicle unlocked increases
the potential risk to you or others from
someone hiding in your vehicle.
To secure your vehicle, while
depressing the brake, shift the gear
to the P (Park) position, engage the
parking brake, and press the Start/
Stop button to the OFF position, close
all windows, lock all doors, and always
take the key with you.
Page 231 of 680

05
5-39
This system helps to protect your vehicle
and valuables. The horn will sound and
the hazard warning lights will blink
continuously if any of the following occur:
- A door is opened without using the smart key.
- The liftgate is opened without using the smart key.
- The vehicle hood is opened.
The alarm continues for 30 seconds, then
the system resets. To turn off the alarm,
unlock the doors with the smart key.
The Theft Alarm System automatically
sets 30 seconds after you lock the
doors and the liftgate. For the system to
activate, you must lock the doors and
the liftgate from outside the vehicle with
the smart key or by touching the touch
sensor or pressing the button on the
outside door handle with the smart key
in your possession.
The hazard warning lights will blink and
the chime will sound once to indicate the
system is armed.
Once the security system is set, opening
any door, the liftgate, or the hood
without using the smart key will cause
the alarm to activate.
The Theft Alarm System will not set if the
hood, the liftgate, or any door is not fully
closed. If the system will not set, check
the hood, the liftgate, or the doors are fully closed.
Do not attempt to alter this system or
add other devices to it.
Information
• Do not lock the doors until all passengers have left the vehicle. If the
remaining passenger leaves the vehicle when the system is armed, the alarm will be activated.
• If the vehicle is not disarmed with the
smart key, open the doors by using the mechanical key and start the vehicle by
directly pressing the Start/Stop button
with the smart key.
• If the system is disarmed by unlocking
the vehicle, but neither a door or the liftgate is opened within 30 seconds, the
doors will relock and the system will
rearm automatically.
ThefT-alarm sysTem
Page 242 of 680

Convenience Features
5-50
Automatic-Dimming Night Vision Safety™ (NVS®
) Mirror (if equipped)
The NVS® Mirror automatically reduces
glare by monitoring light levels in the
front and the rear of the vehicle. Any
object that obstructs either light sensor
will degrade the automatic dimming
control feature.
For more information regarding NVS®
mirrors and other applications, please
refer to the Gentex website:
www.gentex.com
Your mirror will automatically dim
upon detecting glare from the vehicles
traveling behind you.
The mirror defaults to the ON position
each time the vehicle is started.
Integrated HomeLink ®
Wireless Control
System
The HomeLink® Wireless Control System
provides a convenient way to replace
up to three hand held radio-frequency
transmitters used to activate compatible
devices such as gate operators, garage
door openers, entry door locks, security
systems, and home lighting.
NOTICE
HomeLink® operates while the ignition
switch is in the ACC or ON position
for safety reasons. It is to prevent
unintentional security problems from
happening when the vehicle is parked
outside the garage.
WARNING
Before programming HomeLink® to a
garage door opener or gate operator,
make sure people and objects are out
of the way of the device to prevent
potential harm or damage. Do not
use the HomeLink® with any garage
door opener that lacks the safety
stop and reverse features required
by U.S. federal safety standards (this
includes any garage door opener model
manufactured before April 1, 1982).
A garage door that cannot detect an
object - signaling the door to stop and
reverse - does not meet current U.S.
federal safety standards. Using a garage
door opener without these features
increases the risk of serious injury or
death.
For more information, contact
HomeLink® at www.homelink.com, or
call Home-Link customer support at
1-800-355-3515.
It is also recommended that a new
battery be replaced in the handheld
transmitter of the device being trained
to HomeLink® for quicker training and
accurate transmission of the radio
frequency.
Page 244 of 680

Convenience Features
5-52
ONE1051264N
2. Position the garage door opener remote 1 – 3 inches (2 – 8cm) away
from the HoleLink buttons.
3. While the HomeLink indicator light (7) is flashing orange, press and hold the
hand-held remote button. Continue
pressing the handheld remote button
until the HomeLink indicator light (7)
light changes from orange to green.
You may now release the handheld
remote button.
4. Wait until your garage door comes
to a complete stop, regardless of
position, before proceeding to the
next steps.
5. Press and release the HomeLink button you are programming and
observe the indicator light.
• If the indicator light remains solid
green, your device should operate
when the HomeLink button is
pressed. At this point, if your device
operates, programming is complete.
• If the indicator light rapidly
flashes green, firmly press, hold
for two seconds and release the
HomeLink button up to three times
in a row slowly to complete the
programming process. Do not press
the HomeLink button rapidly. At
this point if your device operates,
programming is complete. If the
device does not operate, continue
with step 6. 6. At the garage door opener motor,
(security gate motor, etc.) locate the
“Learn”, “Smart”, “Set” or “Program”
button. This can usually be found
where the hanging antenna wire is
attached to the motor-head unit (see
the device’s manual to identify this
button). The name and color of the
button may vary by manufacturer.
ODL3A040504
à A ladder and/or second person may
simplify the following steps.
7. Firmly press and release the “Learn”,
“Smart”, “Set” or “Program” button.
You now have up to 30 seconds in
which to complete the next step.
8. Return to the vehicle and firmly press, hold for two seconds and release,
the HomeLink button up to three
times in a row slowly. Do not press
the HomeLink button rapidly. As soon
as you see the garage door start to
move, stop pressing any buttons
until a few seconds after the garage
door has come to a complete stop,
regardless of position. At this point,
programming is complete and your
device should operate when the
HomeLink button is pressed and
released.
Page 249 of 680

05
5-57
FCC (USA) and ISED (Canada)
This device complies with FCC rules
part 15 and Innovation, Science, and
Economic Development Canada RSS-
210. Operation is subject to the following
two conditions: (1) This device may not
cause harmful interference, and (2) This
device must accept any interference that
may be received including interference
that may cause undesired operation.
WARNING: The transmitter has been
tested and complies with FCC and
ISED rules. Changes or modifications
not expressly approved by the party
responsible for compliance could void
the user’s authority to operate the
device.
This equipment complies with FCC
and ISED radiation exposure limits set
forth for an uncontrolled environment.
End Users must follow the specific
operating instructions for satisfying RF
exposure compliance. This transmitter
must be at least 20cm from the user and
must not be co-located or operating in
conjunction with any other antenna or
transmitter.
Cet appareil est conforme aux
règlements de la FCC, section 15, et
au CNR-210 d’Innovation, Sciences et
Dhveloppement économique Canada. Le
fonctionnement est assujetti aux deux
conditions suivantes : (1) cet appareil ne
doit pas causer d’interférences nuisibles
et (2) cet appareil doit accepter toute
interférence reçue, y compris celle qui
pourrait entraîner un dysfonctionnement.
MISE EN GARDE : L’émetteur a subi des
tests et est conforme aux règlements
de la FCC et d’ISDE. Les changements
ou modifications non approuvés
explicitement par la partie responsable
de la conformité pourraient rendre
caduque l’autorisation de l’utilisateur de
se servir du dispositif.
Cet appareil est conforme aux limites
d’exposition aux radiations de la FCC et
d’ISDE établies pour un environnement
non contrôlé. Les utilisateurs finaux
doivent respecter les instructions
d’utilisation spécifiques pour satisfaire
aux exigences de conformité aux
expositions de RF. L’émetteur doit
se trouver à 20 cm au minimum de
l’utilisateur et ne doit pas être situé au
même endroit que tout autre émetteur
ou antenne ni fonctionner avec un autre
émetteur ou antenne.
Page 262 of 680

Convenience Features
5-70
exterior feAtures
Hood
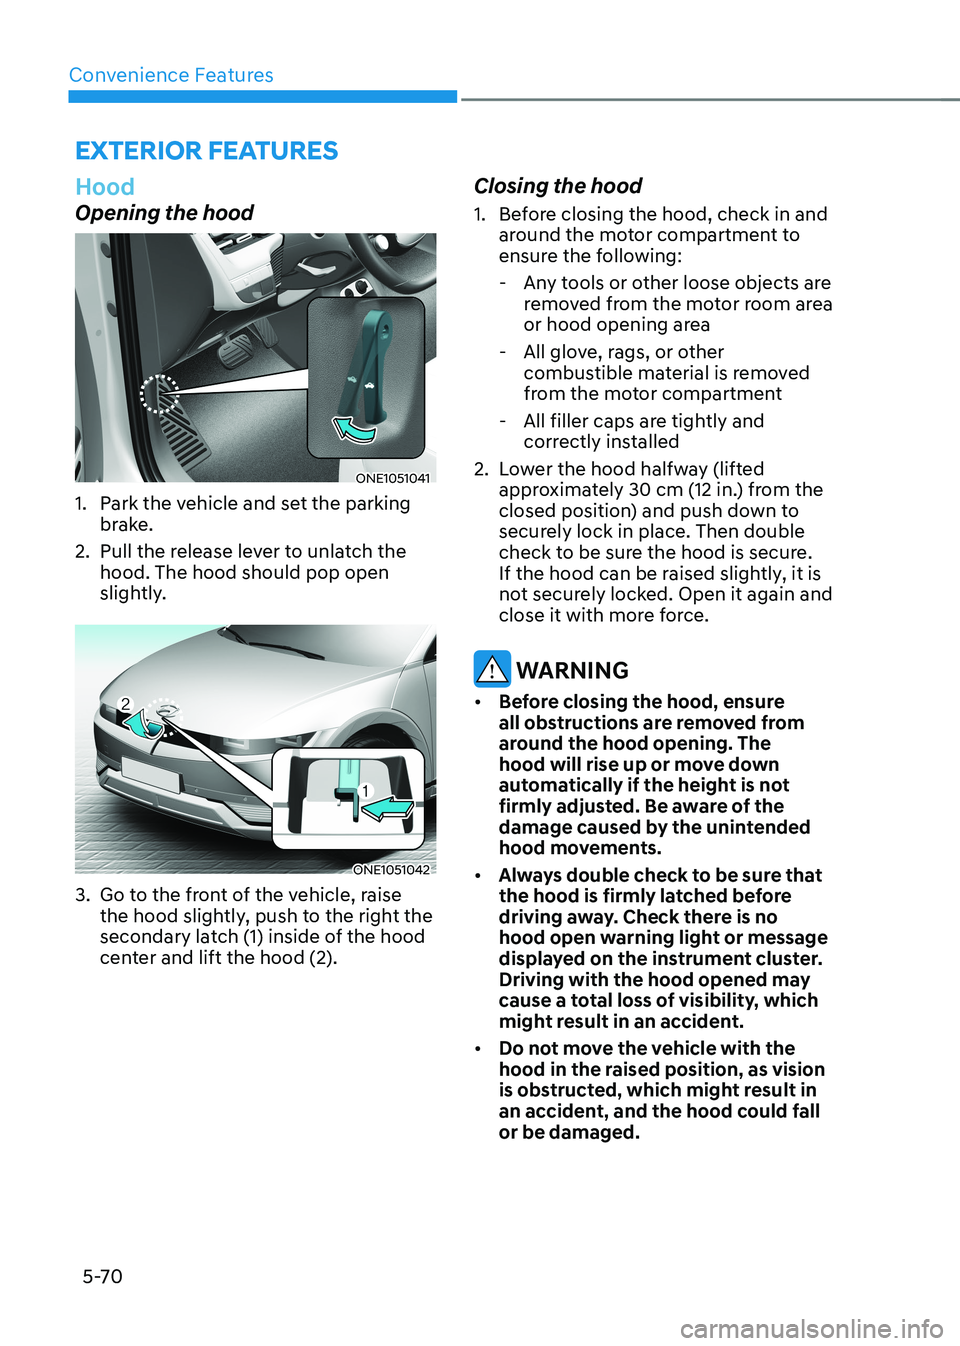
Opening the hood
ONE1051041
1. Park the vehicle and set the parking brake.
2. Pull the release lever to unlatch the hood. The hood should pop open
slightly.
ONE1051042
3. Go to the front of the vehicle, raise the hood slightly, push to the right the
secondary latch (1) inside of the hood
center and lift the hood (2). Closing the hood
1. Before closing the hood, check in and
around the motor compartment to
ensure the following:
- Any tools or other loose objects are removed from the motor room area
or hood opening area
- All glove, rags, or other combustible material is removed
from the motor compartment
- All filler caps are tightly and correctly installed
2. Lower the hood halfway (lifted approximately 30 cm (12 in.) from the
closed position) and push down to
securely lock in place. Then double
check to be sure the hood is secure.
If the hood can be raised slightly, it is
not securely locked. Open it again and
close it with more force.
WARNING
• Before closing the hood, ensure
all obstructions are removed from
around the hood opening. The
hood will rise up or move down
automatically if the height is not
firmly adjusted. Be aware of the
damage caused by the unintended
hood movements.
• Always double check to be sure that
the hood is firmly latched before
driving away. Check there is no
hood open warning light or message
displayed on the instrument cluster.
Driving with the hood opened may
cause a total loss of visibility, which
might result in an accident.
• Do not move the vehicle with the
hood in the raised position, as vision
is obstructed, which might result in
an accident, and the hood could fall or be damaged.
Page 263 of 680

05
5-71
Front trunk
Opening the Front Trunk
ONE1051213
• Open the hood
• Lift up the front trunk cover while
depressing the front trunk lever (1).
Closing the Front Trunk
Push down the front trunk cover to the
right position.
Information
Available front trunk weight • 2WD : 55 lbs. (25 kg)
• AWD : 25 lbs. (10 kg)
Available front trunk weight depends on the specifications.
WARNING
• NEVER make an attempt to get inside
the front trunk. It will cause a fatal
injury.
• Before closing the hood, ensure
all obstructions are removed from
around the hood opening. The
hood will rise up or move down
automatically if the height is not
firmly adjusted. Be aware of the
damage caused by the unintended
hood movements.
• Never store cigarette lighters,
propane cylinders, or other
flammable/explosive materials in
the vehicle. These items may catch
fire and/or explode if the vehicle
is exposed to hot temperatures for
extended periods.
CAUTION
• Do not exceed the luggage volume
capacity of the front trunk. The
overweighted front trunk can be
severely damaged.
• Do not store the fragile objects in the
front trunk.
• ALWAYS keep the front trunk cover
closed securely while driving. Items
inside your vehicle are moving as fast
as the vehicle. If you have to stop or
turn quickly, or if there is a crash, the
items can be damaged.
• Do not spray water in the front
trunk. Vehicle driving system may
get damaged since the front trunk
is located at the center of motor
compartment.
• Be careful when you store any liquid
in the front trunk. If liquid leak
outside the front trunk, it will cause a
damage to the electric devices in the
motor compartment.
• Do not press the front trunk cover
or place the objects on the front
trunk cover. It may be deformed or damaged.
• When closing the front trunk cover,
be careful not to touch objects
inside the trunk. Loaded objects or
the front trunk may be deformed or
damaged and the front trunk cover
may be opened during driving due to
poor closing, resulting in joints and damage.
NOTICE
To avoid possible theft, do not leave
valuables in the storage compartments.