2023 HYUNDAI IONIQ 5 rear view mirror
[x] Cancel search: rear view mirrorPage 252 of 680

Convenience Features
5-60
Adjusting the rearview mirrors
ONE1051028
Adjusting the rearview mirrors:
1. When the START/STOP button is in the ACC, ON or START position, press
either the L (Left side) or R (Right side)
button (1) to select the rearview mirror
you would like to adjust.
2. Use the mirror adjustment control switch (2) to position the selected
mirror up, down, left or right.
3. After adjustment, move the lever (1) to the middle to prevent inadvertent
adjustment.
NOTICE
• The mirrors stop moving when
they reach the maximum adjusting
angles, but the motor continues to
operate while the switch is pressed.
Do not press the switch longer than
necessary, because this can damage
the motor.
• Do not attempt to adjust the
rearview mirrors by hand, because
this can damage the motor. Folding the rearview mirrors
ONE1051029
Folding button
The rearview mirrors can be folded or
unfolded by pressing the button.
Infotainment system setting
•
Enable on door unlock
If ‘Setup → Vehicle Settings → Welcome
Mirror → Enable on Door Unlock’ is
selected from the Settings menu in
the infotainment system screen,
- The mirror will fold or unfold when the door is locked or unlocked by
the smart key.
- The mirror will fold or unfold when the door is locked or unlocked by
the touch sensor or button on the outside door handle.
• Enable on driver approach
If ‘Setup → Vehicle Settings →
Convenience → Welcome Mirror
→ Enable on Driver Approach’ is
selected from the Settings menu in
the infotainment system screen, the
mirror will unfold when the vehicle
is approached with the smart key in possession.
For detailed information, refer to the
separately supplied infotainment
system manual.
Page 253 of 680

05
5-61
NOTICE
The electric type outside rearview
mirror operates even though the Start/
Stop button is in the OFF position.
However, to prevent unnecessary
battery discharge, do not adjust the
mirrors longer than necessary while the
vehicle is not running.
NOTICE
Do not fold the electric type outside
rearview mirror by hand. It could cause
motor failure.
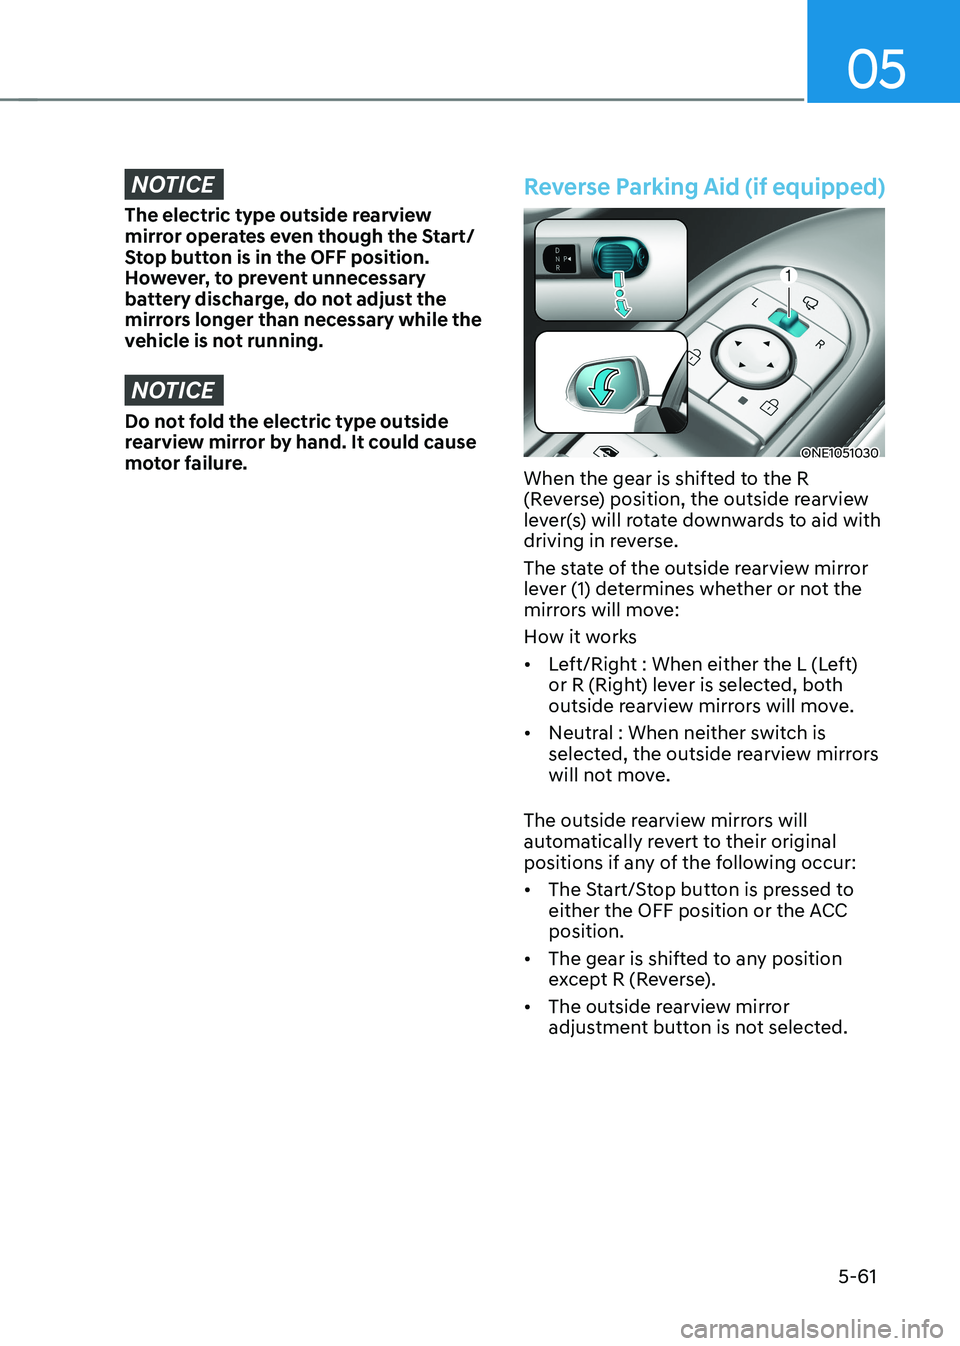
Reverse Parking Aid (if equipped)
ONE1051030
When the gear is shifted to the R
(Reverse) position, the outside rearview
lever(s) will rotate downwards to aid with
driving in reverse.
The state of the outside rearview mirror
lever (1) determines whether or not the
mirrors will move:
How it works• Left/Right : When either the L (Left)
or R (Right) lever is selected, both
outside rearview mirrors will move.
• Neutral : When neither switch is
selected, the outside rearview mirrors
will not move.
The outside rearview mirrors will
automatically revert to their original
positions if any of the following occur: • The Start/Stop button is pressed to
either the OFF position or the ACC position.
• The gear is shifted to any position
except R (Reverse).
• The outside rearview mirror
adjustment button is not selected.
Page 254 of 680

Convenience Features
5-62
Reverse parking aid user settings mode
You may change the angle of the outside
rearview mirror if it is difficult to see
the rear view with the basic downward
mirror angle provided when reversing.
When the vehicle is first delivered, the
set downward angle of the left and right
outside rearview mirror are different to
ensure driver visibility.
1. Make sure the vehicle is stopped.
2. Depress the brake pedal and shift the
gear to R (Reverse). When L (Left) or R
(Right) button is pressed, both outside
rearview mirror angle will move
downward to the basic set position.
3. Press either L or R button to select the outside rearview mirror you would like
to adjust. Then press “ ▼, ▲ , ◄ , ► ”
switch to adjust the outside rearview
mirror to the desired angle.
4. After adjusting the angle to save the
adjusted outside rearview mirror
angle, shift the gear to another
position other than R (Reverse), or
change the L and R buttons to the
neutral position (L and R buttons are
not pressed).
5. Set the other outside rearview mirror following the above procedure 1 to 4.
Resetting reverse parking aid user settings mode
To change the outside rearview mirror
angle back to the basic angle, shift the
gear to R (Reverse), and adjust the mirror angle higher than when the gear is in P
(Park), N (Neutral) and D (Drive).
NOTICE
When changing the angle of both
outside rearview mirrors, it is
recommended to change the angle one
side at a time following the procedure
1 to 4.
Page 305 of 680

05
5-113
winDshielD Defrosting AnD Defogging
WARNING
Windshield heating
Do not use the
position during
cooling operation in extremely humid
weather. The difference between the
temperature of the outside air and that
of the windshield could cause the outer
surface of the windshield to fog up,
causing loss of visibility could cause
an accident resulting in serious injury
or death. In this case, set the mode
selection to the
position and fan
speed control to a lower speed. • For maximum defrost performance,
set the temperature control to the
highest temperature setting and
the fan speed control to the highest
setting.
• If warm air to the floor is desired while
defrosting or defogging, set the mode
to the floor-defrost position.
• Before driving, clear all snow and ice
from the windshield, rear window,
outside rearview mirrors, and all side
windows.
• Clear all snow and ice from the
hood and air inlet in the cowl grill
to improve heater and defroster
efficiency and to reduce the
probability of fogging up the inside of the windshield.
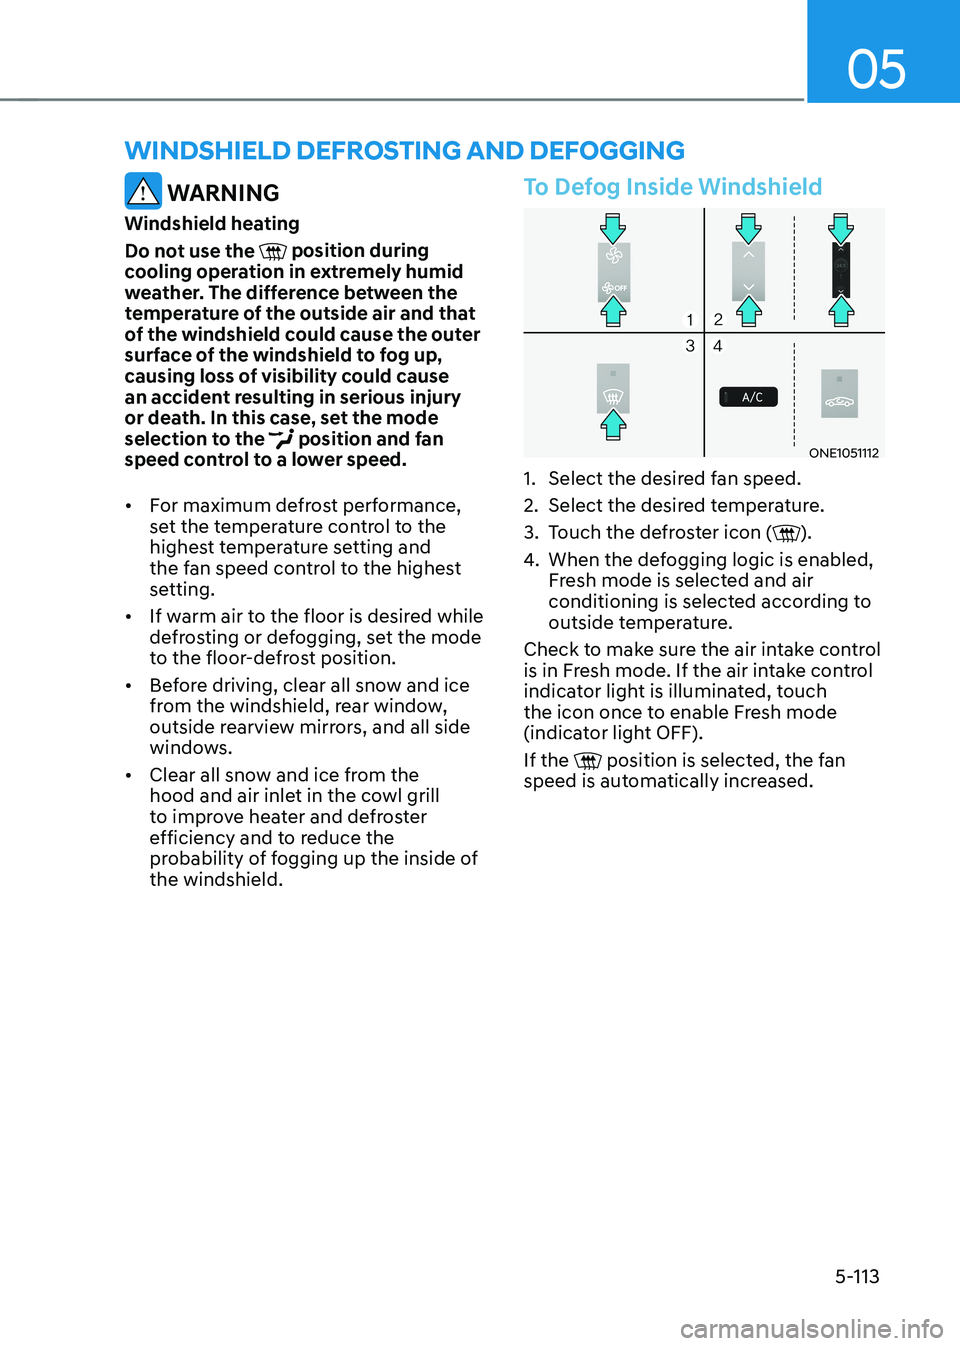
To Defog Inside Windshield
ONE1051112
1. Select the desired fan speed.
2. Select the desired temperature.
3. Touch the defroster icon (
).
4. When the defogging logic is enabled,
Fresh mode is selected and air
conditioning is selected according to
outside temperature.
Check to make sure the air intake control
is in Fresh mode. If the air intake control
indicator light is illuminated, touch
the icon once to enable Fresh mode
(indicator light OFF). If the
position is selected, the fan
speed is automatically increased.
Page 307 of 680

05
5-115
Rear Window Defroster
NOTICE
To prevent damage to the rear window
defroster conducting elements bonded
to the inside surface of the rear window,
never use sharp instruments or window
cleaners containing abrasives to clean
the window.
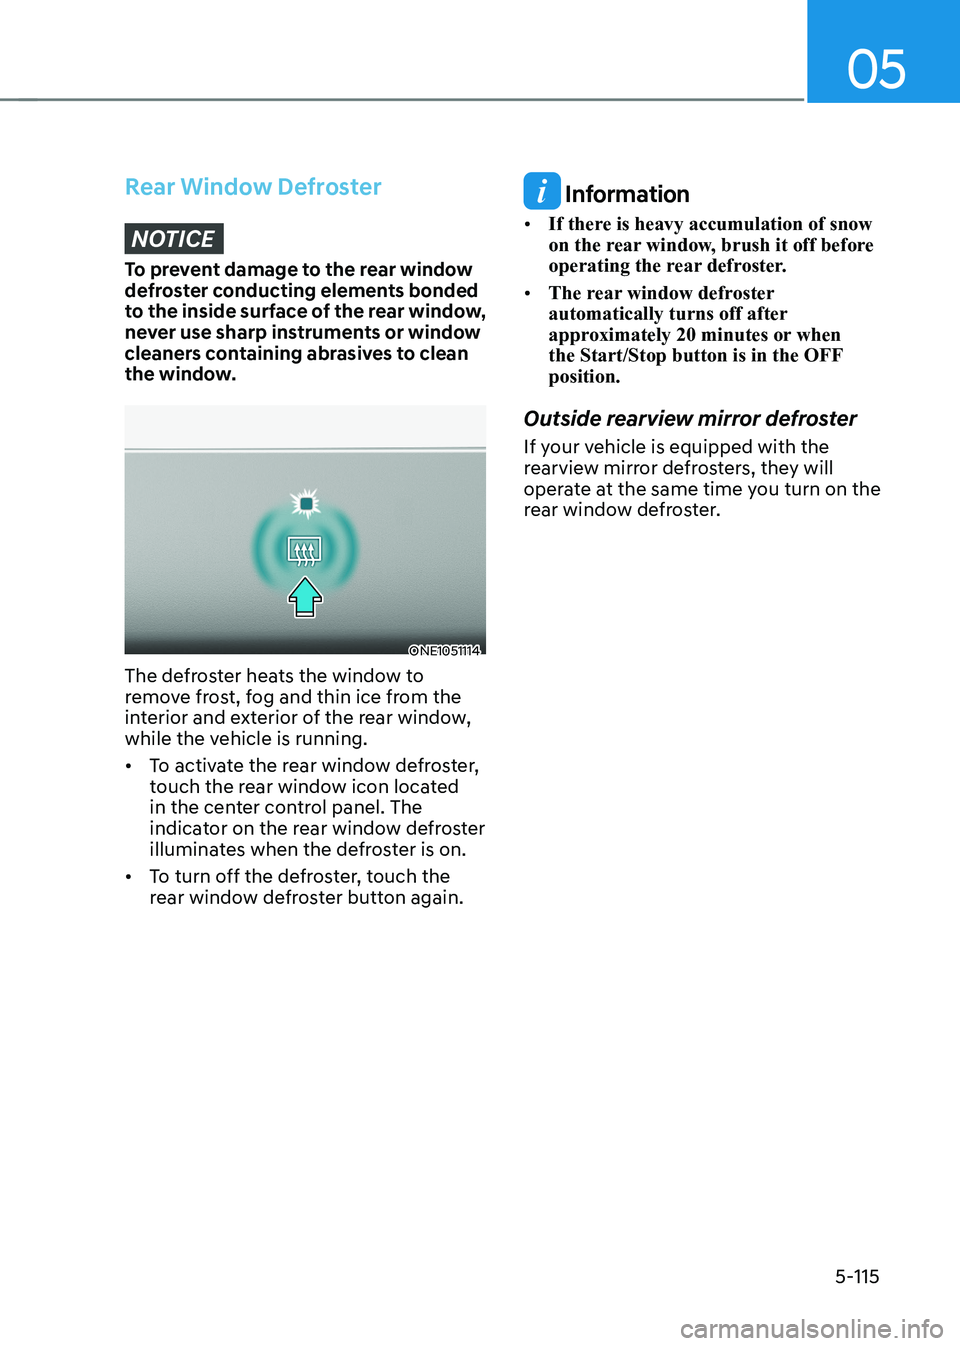
ONE1051114
The defroster heats the window to
remove frost, fog and thin ice from the
interior and exterior of the rear window,
while the vehicle is running. • To activate the rear window defroster,
touch the rear window icon located
in the center control panel. The
indicator on the rear window defroster
illuminates when the defroster is on.
• To turn off the defroster, touch the
rear window defroster button again.
Information
• If there is heavy accumulation of snow
on the rear window, brush it off before
operating the rear defroster.
• The rear window defroster
automatically turns off after
approximately 20 minutes or when
the Start/Stop button is in the OFF position.
Outside rearview mirror defroster
If your vehicle is equipped with the
rearview mirror defrosters, they will
operate at the same time you turn on the
rear window defroster.
Page 329 of 680

06
6-3
WARNING
CALIFORNIA PROPOSITION 65
WARNING
Engine exhaust and a wide variety of
automobile components including
components found in the interior
furnishings in a vehicle, contain or
emit harmful chemicals known to the
State of California to cause cancer and
birth defects and reproductive harm.
In addition, certain fluids contained
in vehicles and certain products of
components contain or emit chemicals
known to the State of California to
cause cancer and birth defects or other
reproductive harm.
Before Entering the Vehicle
• Be sure all windows, outside mirror(s),
and outside lights are clean and
unobstructed.
• Remove frost, snow, or ice.
• Visually check the tires for uneven
wear and damage.
• Check under the vehicle for any sign
of leaks.
• Be sure there are no obstacles behind
you if you intend to back up.
Before Starting
• Make sure the hood, the liftgate, and
the doors are securely closed and
locked.
• Adjust the position of the seat and
steering wheel.
• Adjust the inside and outside rearview
mirrors.
• Verify all the lights work.
• Fasten your seat belt. Check that all
passengers have fastened their seat belts.
• Check the gauges and indicators
in the instrument panel and the
messages on the instrument display
when the vehicle is in the ON position. •
Check that any items you are carrying
are stored properly or fastened down
securely.
WARNING
To reduce the risk of SERIOUS INJURY or
DEATH, take the following precautions: • ALWAYS wear your seat belt. All
passengers must be properly belted
whenever the vehicle is moving.
For more information, refer to “Seat
Belts” section in chapter 3.
• Always drive defensively. Assume
other drivers or pedestrians may be
careless and make mistakes.
• Stay focused on the task of driving.
Driver distraction can cause
accidents.
• Leave plenty of space between you
and the vehicle in front of you.
WARNING
NEVER drink or take drugs and drive. Drinking or taking drugs and driving
is dangerous and may result in an
accident and SERIOUS INJURY or
DEATH. Drunk driving is the number one
contributor to the highway death
toll each year. Even a small amount
of alcohol will affect your reflexes,
perceptions and judgment. Just
one drink can reduce your ability to
respond to changing conditions and
emergencies and your reaction time
gets worse with each additional drink.
Driving while under the influence
of drugs is as dangerous or more
dangerous than driving under the
influence of alcohol.
You are much more likely to have a
serious accident if you drink or take
drugs and drive. If you are drinking or
taking drugs, don’t drive. Do not ride
with a driver who has been drinking
or taking drugs. Choose a designated
driver or call a taxi.
Before driving
Page 406 of 680
![HYUNDAI IONIQ 5 2023 Owners Manual Driver Assistance System
7-4
Detecting sensor
ONE1071002K
ONE1071003
ONE1071004N
[1]: Front view camera, [2]: Front radar,
[3]: Front corner radar (if equipped),
[4]: Rear corner radar (if equipped HYUNDAI IONIQ 5 2023 Owners Manual Driver Assistance System
7-4
Detecting sensor
ONE1071002K
ONE1071003
ONE1071004N
[1]: Front view camera, [2]: Front radar,
[3]: Front corner radar (if equipped),
[4]: Rear corner radar (if equipped](/manual-img/35/56168/w960_56168-405.png)
Driver Assistance System
7-4
Detecting sensor
ONE1071002K
ONE1071003
ONE1071004N
[1]: Front view camera, [2]: Front radar,
[3]: Front corner radar (if equipped),
[4]: Rear corner radar (if equipped)
Refer to the picture above for the
detailed location of the detecting
sensors.
CAUTION
Take the following precautions to
maintain optimal performance of the
detecting sensor: • Never disassemble the detecting
sensor or sensor assembly, or cause
any damage to it.
• If the detecting sensors have
been replaced or repaired, have
the vehicle be inspected by an
authorized HYUNDAI dealer.
• Never install any accessories or
stickers on the front windshield, or
tint the front windshield.
• Pay extreme caution to keep the
front view camera dry.
• Never place any reflective objects
(for example, white paper, mirror)
over the dashboard.
• Do not place any objects near the
front windshield or install any
accessories on the front windshield.
It can affect the performance of the
defogging and defrosting function
of the climate control system, which
may prevent the Driver Assistance
systems from operating
• Do not place objects or mount
structures near the windshield.
When operating the air conditioner,
moisture and defrost performance
may be poor, and driver assistance
functions may not work.
• Do not apply license plate frame or
objects, such as a bumper sticker,
film or a bumper guard, near the
front radar cover.
• Always keep the front radar and
cover clean and free of dirt and debris.
Use only a soft cloth to wash the
vehicle. Do not spray pressurized
water directly on the sensor or
sensor cover.
Page 439 of 680

07
7-37
Collision warning
• Collision warning will operate when the turn signal is turned on in the
direction of the detected vehicle.
• If ‘Warning Only’ is selected from the
Settings menu, the collision warning
will operate when your vehicle
approaches the lane the blind spot
vehicle is detected.
• To warn the driver of a collision, the
warning light on the outside side
view mirror and head-up display (if
equipped) will blink. At the same time,
an audible warning will sound.
• When the turn signal is turned off or
you move away from the lane, the
collision warning will be canceled and
Blind-Spot Collision-Avoidance Assist
will return to vehicle detection state. WARNING
• The detecting range of the rear
corner radar is determined by a
standard road width, therefore, on
a narrow road, Blind-Spot Collision-
Avoidance Assist may detect other
vehicles two lanes over and warn
you. In contrast, on a wide road,
Blind-Spot Collision-Avoidance
Assist may not be able to detect a
vehicle driving in the next lane and
may not warn you.
• When the hazard warning flasher is
on, the collision warning by the turn
signal will not operate.