2023 HYUNDAI I30 ESP
[x] Cancel search: ESPPage 415 of 533
6-9
What to do in an emergency
6
The displayed tyre pressure values
may differ from those measured
with a tyre pressure gauge.
You can change the tyre pressure
unit in the User Settings mode on
the instrument cluster.
- psi, kpa, bar (Refer to "User
Setting Mode" in chapter 3).Tyre pressure monitoring sys-
tem
Each tyre, including the spare (if pro-
vided), should be checked monthly
when cold and inflated to the inflation
pressure recommended by the vehi-
cle manufacturer on the vehicle plac-
ard or tyre inflation pressure label. (If
your vehicle has tyres of a different
size than the size indicated on the
vehicle placard or tyre inflation pres-
sure label, you should determine the
proper tyre inflation pressure for
those tyres.)As an added safety feature, your
vehicle has been equipped with a
tyre pressure monitoring system
(TPMS) that illuminates a low tyre
pressure telltale when one or more
of your tyres is significantly under-
inflated. Accordingly, when the low
tyre pressure telltale illuminates, you
should stop and check your tyres as
soon as possible, and inflate them to
the proper pressure. Driving on a sig-
nificantly under-inflated tyre causes
the tyre to overheat and can lead to
tyre failure. Under-inflation also
reduces fuel efficiency and tyre tread
life, and may affect the vehicle’s han-
dling and stopping ability.
Please note that the TPMS is not a
substitute for proper tyre mainte-
nance, and it is the driver’s responsi-
bility to maintain correct tyre pres-
sure, even if under-inflation has not
reached the level to trigger illumina-
tion of the TPMS low tyre pressure
telltale. Over-inflation or under-inflation
can reduce tyre life, adversely
affect vehicle handling, and
lead to sudden tyre failure that
may cause loss of vehicle con-
trol resulting in an accident.
WARNING
Page 426 of 533
6-20
What to do in an emergency
Use of compact spare tyres
(if equipped)
Compact spare tyres are designed
for emergency use only. Drive care-
fully on the compact spare tyre and
always follow the safety precautions.When driving with the compact spare
tyre mounted to your vehicle:
Check the tyre pressure after
installing the compact spare tyre.
The compact spare tyre should be
inflated to 420 kPa (60 psi).
Do not take this vehicle through an
automatic car wash whilst the com-
pact spare tyre is installed.
Do not use the compact spare tyre
on any other vehicle because this
tyre has been designed especially
for your vehicle.
The compact spare tyre’s tread life
is shorter than a regular tyre.
Inspect your compact spare tyre
regularly and replace worn compact
spare tyres with the same size and
design, mounted on the same
wheel.
Do not use more than one compact
spare tyre at a time.
Do not tow a trailer whilst the com-
pact spare tyre is installed.
Do not tow a trailer while the com-
pact spare tyre is installed.When the original tyre and wheel
are repaired and reinstalled on the
vehicle, the wheel nut torque must
be set correctly. The correct wheel
nut tightening torque is 11~13
kgf·m.
NOTICE
To prevent compact spare tyre
failure and loss of control pos-
sibly resulting in an accident:
Use the compact spare tyre
only in an emergency.
NEVER operate your vehicle
over 80 km/h.
Do not exceed the vehicle’s
maximum load rating or the
load carrying capacity shown
on the sidewall of the com-
pact spare tyre.
Do not use the compact spare
tyre continuously. Repair or
replace the original tyre as
soon as possible to avoid fail-
ure of the compact spare tyre.
WARNING
Page 432 of 533
7
Maintenance
7
Maintenance
Engine compartment .............................................7-3
Maintenance services ...........................................7-5
Owner's responsibility ......................................................7-5
Owner maintenance precautions ..................................7-5
Owner maintenance ...............................................7-6
Owner maintenance schedule ........................................7-7
Scheduled maintenance services.........................7-9
Normal Maintenance Schedule
(Petrol Engine [1.6 T-GDI]) ..........................................7-10
Maintenance Under Severe Usage and
Low Mileage Conditions
(Petrol Engine [1.6 T-GDI]) ..........................................7-13
Normal Maintenance Schedule
(Petrol Engine [2.0 GDI])...............................................7-15
Maintenance Under Severe Usage and
Low Mileage Conditions
(Petrol Engine [2.0 GDI])...............................................7-18
Normal Maintenance Schedule (Diesel Engine) ......7-20
Maintenance Under Severe Usage and
Low Mileage Conditions (Diesel Engine) ...................7-23
Explanation of scheduled maintenance items .7-25
Engine oil ..............................................................7-28
Checking the engine oil level (Petrol engine) ..........7-28
Checking the engine oil level (Diesel Engine)..........7-29
Checking the engine oil and filter ..............................7-30
Engine coolant......................................................7-31
Checking the engine coolant level..............................7-31
Changing the engine coolant .......................................7-33
Brake/clutch fluid ................................................7-34
Checking the brake/clutch fluid level ........................7-34
Washer fluid .........................................................7-35
Checking the washer fluid level ..................................7-35
Parking brake .......................................................7-35
Checking the parking brake .........................................7-35
Fuel filter (For Diesel) ........................................7-36
Draining water from fuel filter ....................................7-36
Fuel filter cartridge replacement ................................7-36
Air cleaner ............................................................7-36
Filter replacement ...........................................................7-36
Climate control air filter .....................................7-38
Filter inspection ...............................................................7-38
Filter replacement ...........................................................7-38
Wiper blades .........................................................7-39
Blade inspection ..............................................................7-39
Blade replacement ..........................................................7-40
Battery...................................................................7-43
For best battery service................................................7-44
Battery capacity label ...................................................7-44
Battery recharging .........................................................7-44
Reset items .......................................................................7-46
7
Page 436 of 533

7-5
7
Maintenance
M MA
AI
IN
NT
TE
EN
NA
AN
NC
CE
E
S
SE
ER
RV
VI
IC
CE
ES
S
You should exercise the utmost care
to prevent damage to your vehicle
and injury to yourself whenever per-
forming any maintenance or inspec-
tion procedures.
We recommend you have your vehi-
cle maintained and repaired by an
authorised HYUNDAI dealer. An
authorised HYUNDAI dealer meets
HYUNDAI’s high service quality stan-
dards and receives technical support
from HYUNDAI in order to provide
you with a high level of service satis-
faction.
Owner’s responsibility
Maintenance service and record reten-
tion are the owner’s responsibility.
You should retain documents that show
proper maintenance has been per-
formed on your vehicle in accordance
with the scheduled maintenance serv-
ice charts shown on the following
pages. You need this information to
establish your compliance with the
servicing and maintenance require-
ments of your vehicle warranties.Detailed warranty information is pro-
vided in your Service Passport.
Repairs and adjustments required as
a result of improper maintenance or
a lack of required maintenance are
not covered.
Owner maintenance precautions
Inadequate, incomplete or insufficient
servicing may result in operational
problems with your vehicle that could
lead to vehicle damage, an accident,
or personal injury. This chapter pro-
vides instructions only for the mainte-
nance items that are easy to perform.
Several procedures can be done only
by an authorised HYUNDAI dealer
with special tools.
Your vehicle should not be modified in
any way. Such modifications may
adversely affect the performance,
safety or durability of your vehicle and
may, in addition, violate conditions of
the limited warranties covering the
vehicle.Improper owner maintenance dur-
ing the warranty period may affect
warranty coverage. For details, read
the separate Service Passport pro-
vided with the vehicle. If you're
unsure about any servicing or main-
tenance procedure, we recommend
that the system be serviced by an
authorised HYUNDAI dealer.
NOTICE
Page 486 of 533
7-55
7
Maintenance
Wheel size designation
Wheels are also marked with impor-
tant information that you need if you
ever have to replace one. The follow-
ing explains what the letters and
numbers in the wheel size designa-
tion mean.
Example wheel size designation:
6.5JX16
6.5 - Rim width in inches.
J - Rim contour designation.
16 - Rim diameter in inches.
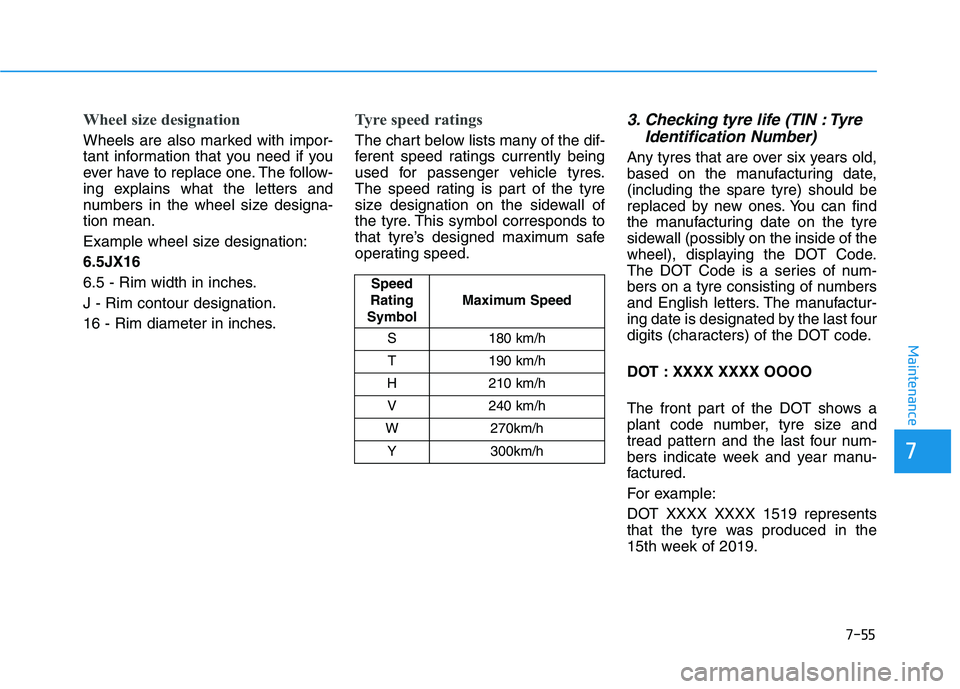
Tyre speed ratings
The chart below lists many of the dif-
ferent speed ratings currently being
used for passenger vehicle tyres.
The speed rating is part of the tyre
size designation on the sidewall of
the tyre. This symbol corresponds to
that tyre’s designed maximum safe
operating speed.
3. Checking tyre life (TIN : Tyre
Identification Number)
Any tyres that are over six years old,
based on the manufacturing date,
(including the spare tyre) should be
replaced by new ones. You can find
the manufacturing date on the tyre
sidewall (possibly on the inside of the
wheel), displaying the DOT Code.
The DOT Code is a series of num-
bers on a tyre consisting of numbers
and English letters. The manufactur-
ing date is designated by the last four
digits (characters) of the DOT code.
DOT : XXXX XXXX OOOO
The front part of the DOT shows a
plant code number, tyre size and
tread pattern and the last four num-
bers indicate week and year manu-
factured.
For example:
DOT XXXX XXXX 1519 represents
that the tyre was produced in the
15th week of 2019.
Speed
Rating
SymbolMaximum Speed
S 180 km/h
T 190 km/h
H 210 km/h
V 240 km/h
W 270km/h
Y 300km/h
Page 487 of 533
7-56
Maintenance
4. Tyre ply composition and
material
The number of layers or plies of rub-
ber-coated fabric in the tyre. Tyre
manufacturers also must indicate the
materials in the tyre, which include
steel, nylon, polyester, and others.
The letter "R" means radial ply con-
struction; the letter "D“ means diago-
nal or bias ply construction; and the
letter "B" means restrained-bias ply
construction.
5. Maximum permissible infla-
tion pressure
This number is the greatest amount
of air pressure that should be put in
the tyre. Do not exceed the maximum
permissible inflation pressure. Refer
to the Tyre and Loading Information
label for recommended inflation
pressure.
6. Maximum load rating
This number indicates the maximum
load in kilograms and pounds that
can be carried by the tyre. When
replacing the tyres on the vehicle,
always use a tyre that has the same
load rating as the factory installed
tyre.
7. Uniform tyre quality grading
Quality grades can be found where
applicable on the tyre sidewall
between tread shoulder and maxi-
mum section width.
For example:
TREAD WEAR 200
TRACTION AA
TEMPERATURE A
Tread wear
The tread wear grade is a compara-
tive rating based on the wear rate of
the tyre when tested under controlled
conditions on a specified government
test course. For example, a tyre grad-
ed 150 would wear one-and-a-half
times (1½) as well on the government
course as a tyre graded 100.The relative performance of tyres
depends upon the actual conditions
of their use, however, and may
depart significantly from the norm
due to variations in driving habits,
service practices and differences in
road characteristics and climate.
These grades are molded on the
sidewalls of passenger vehicle tyres.
The tyres available as standard or
optional equipment on your vehicle
may vary with respect to grade.
Traction - AA, A, B & C
The traction grades, from highest to
lowest, are AA, A, B and C. Those
grades represent the tyre’s ability to
stop on wet pavement as measured
under controlled conditions on speci-
fied government test surfaces of
asphalt and concrete. A tyre marked C
may have poor traction performance.
Page 497 of 533

7-66
Maintenance
L LI
IG
GH
HT
T
B
BU
UL
LB
BS
S
Consult an authorised HYUNDAI
dealer to replace most vehicle light
bulbs. It is difficult to replace vehicle
light bulbs because other parts of the
vehicle must be removed before you
can get to the bulb. This is especially
true for removing the headlamp
assembly to get to the bulb(s).
Removing/installing the headlamp
assembly can result in damage to
the vehicle.Be sure to replace the burned-out
bulb with one of the same wattage
rating. Otherwise, it may cause
damage to the fuse or electrical
wiring system.
Information
The headlamp and tail lamp lenses
could appear frosty if the vehicle is
washed after driving or the vehicle is
driven at night in wet weather. This
condition is caused by temperature dif-
ference between the lamp inside and
outside and, it does not indicate a prob-
lem with your vehicle. When moisture
condenses in the lamp, it will be
removed after driving with the head-
lamp on. The removable level may dif-
fer depending on lamp size, lamp posi-
tion and environmental condition.
However, if moisture is not removed,
we recommend that your vehicle is
inspected by an authorised HYUNDAI
dealer.
Information
The headlamp aiming should be adjust-
ed after an accident or after the head-
lamp assembly is reinstalled, at an
authorised HYUNDAI dealer.
i
i
NOTICE
Prior to working on a light, firmly
apply the parking brake, ensure
that the ignition switch is in the
LOCK/OFF position and turn off
the lights to avoid sudden move-
ment of the vehicle and burning
your fingers or receiving an elec-
tric shock.
WARNING
Page 508 of 533
7-77
7
Maintenance
A AP
PP
PE
EA
AR
RA
AN
NC
CE
E
C
CA
AR
RE
E
Exterior care
Exterior general caution
It is very important to follow the label
directions when using any chemical
cleaner or polish. Read all warning
and caution statements that appear
on the label.
Finish maintenance
Washing
To help protect your vehicle’s finish
from rust and deterioration, wash it
thoroughly and frequently at least
once a month with lukewarm or cold
water.
If you use your vehicle for off-road
driving, you should wash it after each
off-road trip. Pay special attention to
the removal of any accumulation of
salt, dirt, mud, and other foreign
materials. Make sure the drain holes
in the lower edges of the doors and
rocker panels are kept clear and
clean.
Insects, tar, tree sap, bird droppings,
industrial pollution and similar deposits
can damage your vehicle’s finish if not
removed immediately.
Even prompt washing with plain water
may not completely remove all these
deposits.
A mild soap, safe for use on painted
surfaces, may be used.
After washing, rinse the vehicle thor-
oughly with lukewarm or cold water.
Do not allow soap to dry on the finish. Do not use strong soap, chemi-
cal detergents or hot water, and
do not wash the vehicle in direct
sunlight or when the body of the
vehicle is warm.
Be careful when washing the
side windows of your vehicle.
Especially, with high-pressure
water, water may leak through
the windows and wet the interior.
To prevent damage to the plastic
parts and lamps, do not clean
with chemical solvents or strong
detergents.
NOTICE
Wet brakes
After washing the vehicle, test
the brakes whilst driving slowly
to see if they have been affected
by water. If braking performance
is impaired, dry the brakes by
applying them lightly whilst
maintaining a slow forward
speed.
WARNING