Page 158 of 533
3-75
Convenient features of your vehicle
3
4. Sound
Warning)
- Softer/Louder
To adjust the Volume for Parking
Distance Warning system volume.
To activate or deactivate the Blind-
Spot Collision Warning sound.
For more information, refer to
"Blind-Spot Collision Warning
(BCW)" in chapter 5.
To activate or deactivate the wel-
come sound.5. Convenience
To activate or deactivate the wireless
charging system in the front seat.
For more information, refer to
"Wireless Charging System" in
this chapter.
To activate or deactivate the Wiper/
Light mode.
When activated, the LCD display
shows the selected Wiper/Light
mode whenever you changed the
mode.
To activate or deactivate the rear
wiper whilst the vehicle is in reverse
with the front wiper ON.
To activate or deactivate the gear
position pop-up.
When activated, the gear position
will be displayed on the display (if
equipped with automatic transmis-
sion/dual clutch transmission).
6. Service Interval
To activate or deactivate the service
interval function.
If the service interval menu is acti-
vated, you may adjust the time and
distance.
Information
To use the service interval menu, con-
sult an authorised HYUNDAI dealer.
i
Page 167 of 533
3-84
One-touch turn signal function
To activate a one-touch turn signal
function, move the turn signal lever
slightly and then release it. The lane
change signals will blink 3, 5 or 7
times.
You can activate/deactivate the One
Touch Turn Signal function or choose
the number of blinks (3, 5, or 7) from
the User Settings mode on the LCD
display.For more details, refer to
"LCD Display" in this chapter.
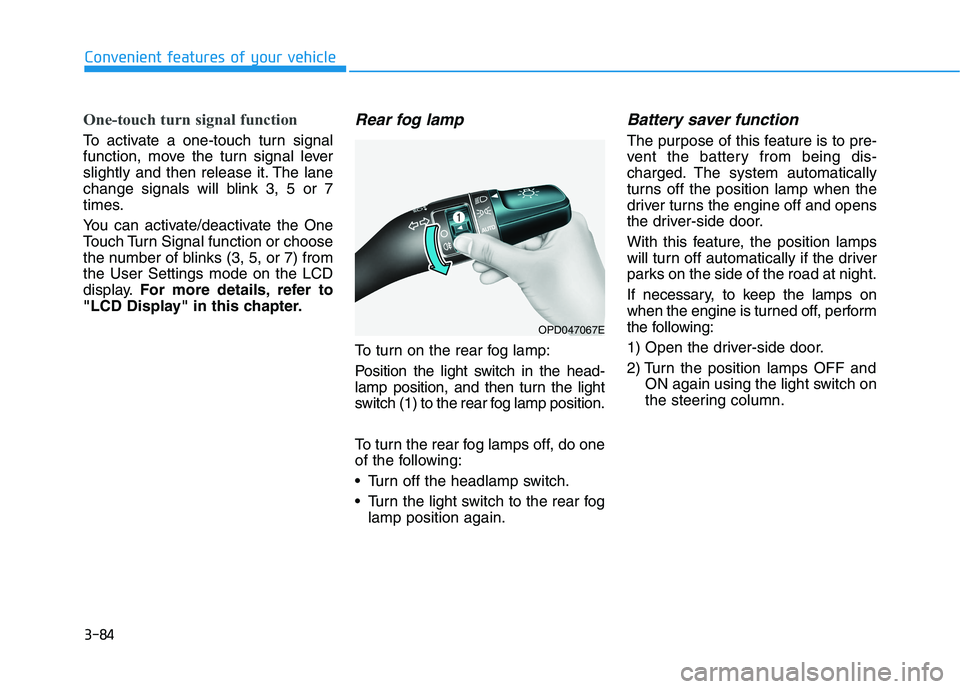
Rear fog lamp
To turn on the rear fog lamp:
Position the light switch in the head-
lamp position, and then turn the light
switch (1) to the rear fog lamp position.
To turn the rear fog lamps off, do one
of the following:
• Turn off the headlamp switch.
Turn the light switch to the rear fog
lamp position again.
Battery saver function
The purpose of this feature is to pre-
vent the battery from being dis-
charged. The system automatically
turns off the position lamp when the
driver turns the engine off and opens
the driver-side door.
With this feature, the position lamps
will turn off automatically if the driver
parks on the side of the road at night.
If necessary, to keep the lamps on
when the engine is turned off, perform
the following:
1) Open the driver-side door.
2) Turn the position lamps OFF and
ON again using the light switch on
the steering column.
Convenient features of your vehicle
OPD047067E
Page 195 of 533
3-112
Convenient features of your vehicle
Air conditioning system operation
tips
If the vehicle has been parked in
direct sunlight during hot weather,
open the windows for a short time
to let the hot air inside the vehicle
escape.
achieved, switch back from the
recirculated air to the fresh outside
air position.
To help reduce moisture inside of
the windows on rainy or humid
days, decrease the humidity inside
the vehicle by operating the air
conditioning system with the win-
dows and sunroof closed.
Use the air conditioning system
every month for a few minutes to
ensure maximum system perform-
ance.
If you operate the air conditioner
excessively, the difference between
the temperature of the outside air
and that of the windscreen could
cause the outer surface of the wind-
screen to fog up, causing loss of vis-
ibility. In this case, set the mode
selection button to the position
and set the blower speed control
knob to the lowest speed setting.
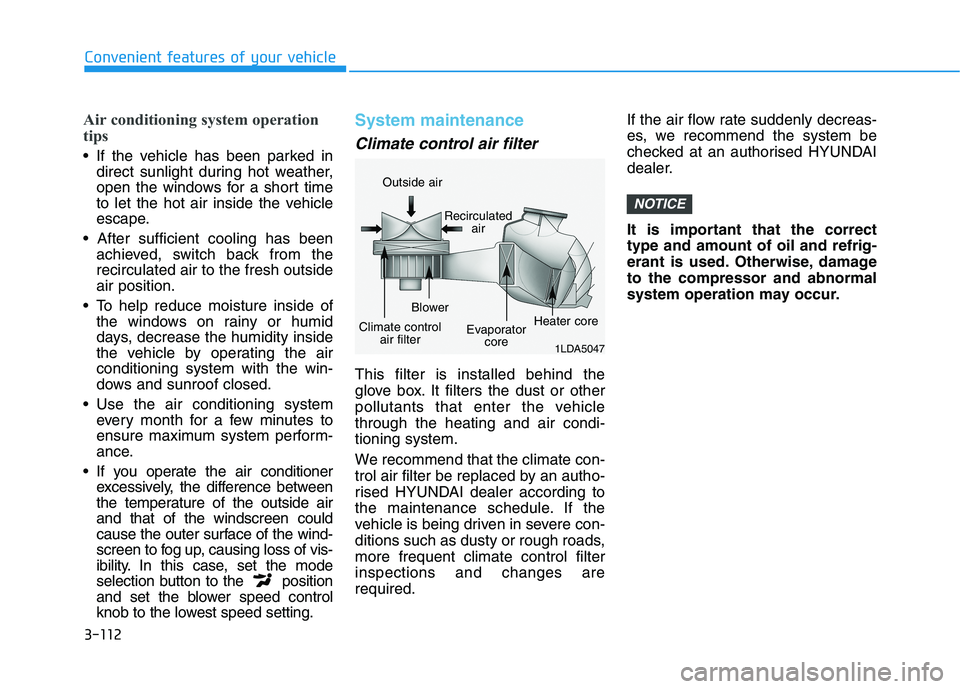
System maintenance
Climate control air filter
This filter is installed behind the
glove box. It filters the dust or other
pollutants that enter the vehicle
through the heating and air condi-
tioning system.
We recommend that the climate con-
trol air filter be replaced by an autho-
rised HYUNDAI dealer according to
the maintenance schedule. If the
vehicle is being driven in severe con-
ditions such as dusty or rough roads,
more frequent climate control filter
inspections and changes are
required.If the air flow rate suddenly decreas-
es, we recommend the system be
checked at an authorised HYUNDAI
dealer.
It is important that the correct
type and amount of oil and refrig-
erant is used. Otherwise, damage
to the compressor and abnormal
system operation may occur.
NOTICE
1LDA5047
Outside air
Recirculated
air
Climate control
air filterBlower
Evaporator
coreHeater core
Page 213 of 533
3-130
Convenient features of your vehicle
C CL
LI
IM
MA
AT
TE
E
C
CO
ON
NT
TR
RO
OL
L
A
AD
DD
DI
IT
TI
IO
ON
NA
AL
L
F
FE
EA
AT
TU
UR
RE
ES
S
Cluster ionizer (if equipped)
When the ignition switch is in the ON
position, the clean air function turns
on automatically.
Also, the clean air function turns off
automatically, when the ignition
switch is in the OFF position.
Automatic ventilation
(if equipped)
When the ignition switch is in the ON
position or when the engine is run-
ning and the outside temperature is
low, the automatic ventilation feature
will activate if the recirculated air
intake position is selected for more
than 30 minutes whilst A/C is on. In
this condition, the air intake position
will automatically switch to the out-
side (fresh) air position.
To cancel or set the Automatic
Ventilation
When the air conditioning system is
on, select Face Level mode and
whilst pressing the A/C button, press
the recirculated air position button for
three seconds.
When the automatic ventilation is set,
the air intake control button (recircu-
lated air position) indicator will blink 6
times. When cancelled, the air intake
control button (recirculated air posi-
tion) indicator will blink 3 times.
Sunroof inside air recirculation
(if equipped)
When the sunroof is opened, outside
(fresh) air will be automatically
selected. At this time, if you press the
air intake control button, recirculated
air position will be selected but will
change back to outside (fresh) air
after 3 minutes. When the sunroof is
closed, the air intake position will
return to the original position that
was selected.
Page 222 of 533

3-139
Convenient features of your vehicle
3
Clock
Vehicles with Audio system
Ty p e A
H (Hour)
Each time you press the "H" button,
the clock will change by one hour.
Pressing and holding the "H" button
will change the clock continuously.
Release the button at the desired
time.
M (Minute)
Each time you press the "M" button ,
the clock will change by one minute.
Pressing and holding the "M" button
will change the clock continuously.
Release the button at the desired
time.
Display conversion
To change the 12 hour format to the
24 hour format, press the "H" and
"M" button simultaneously for more
than 4 seconds.
For example, if the "H" and "M" but-
ton is pressed when the time is 10:15
p.m., the display will change to
22:15.
Type B
Select the [SETUP/CLOCK ]button on
the audio system ➟Select [Date/Time].
Set time: Set the time displayed on
the audio screen.
Time format: Choose between 12-
hour and 24-hour time formats.
Vehicles with Navigation system
Select the Settings menu on the
Navigation system➟Select
[Date/Time].
GPS time: Displays time according
to the received GNSS time.
24-hour: Switches to 12 hour or 24
hour.
For more details, please refer to
the separate manual that was sup-
plied with your vehicle. Do not adjust the clock whilst
driving. You may lose your steer-
ing control and cause severe
personal injury or accidents.
WARNING
Page 235 of 533
4-10
Multimedia System
Features of your Audio
Head unit
❈The actual features in the vehicle
may differ from the illustration.(1) LCD screen
Tap the screen to select a button.
(2) RADIO
Start FM and AM Radio.
(3) SEEK/TRACK
Search for next station in radio
mode.
Change the current song in media
mode.(4) POWER/VOL knob
Turn to adjust the volume.
Press to turn the device on or off.
(5) RESET
Shutdown and restart the system.
■Type B
■Type A
Page 238 of 533
4-13
Multimedia System
4
Feature of your Audio
Head unit
❈The actual features in the vehicle
may differ from the illustration.(1) LCD screen
Tap the screen to select a button.
(2) RADIO
Start FM and AM Radio.
(3) SEEK/TRACK
Search for next station in radio
mode.
Change the current song in media
mode.(4) POWER/VOL knob
Turn to adjust the volume.
Press to turn the device on or off.
(5) RESET
Shutdown and restart the system.
■Type D
■Type C
Page 240 of 533
4-15
Multimedia System
4
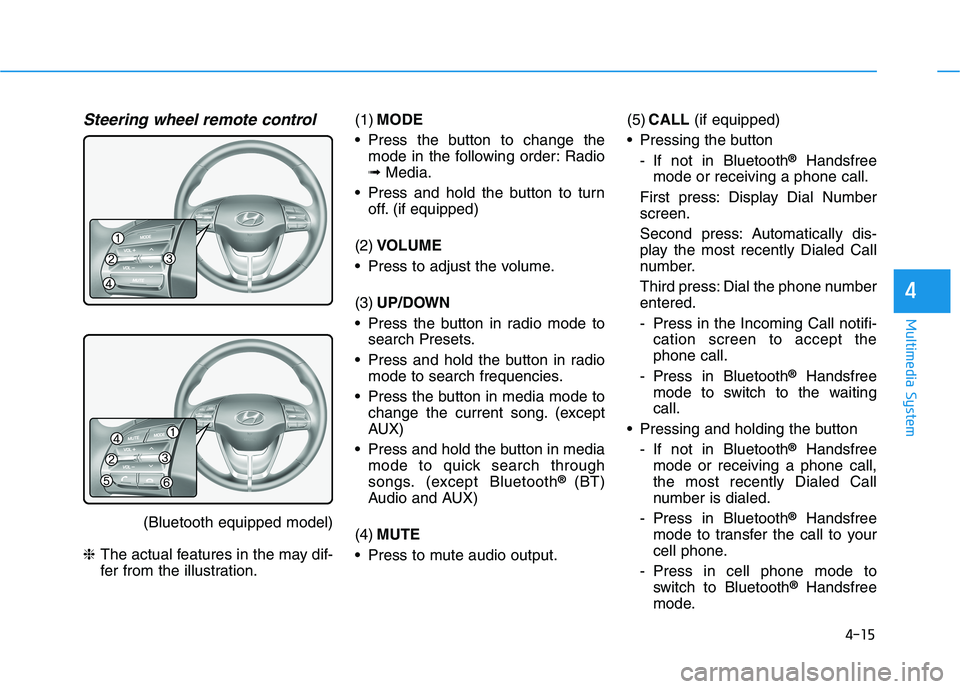
Steering wheel remote control
(Bluetooth equipped model)
❈The actual features in the may dif-
fer from the illustration.(1)MODE
Press the button to change the
mode in the following order: Radio
➟Media.
Press and hold the button to turn
off. (if equipped)
(2)VOLUME
Press to adjust the volume.
(3)UP/DOWN
Press the button in radio mode to
search Presets.
Press and hold the button in radio
mode to search frequencies.
Press the button in media mode to
change the current song. (except
AUX)
Press and hold the button in media
mode to quick search through
songs. (except Bluetooth
® (BT)
Audio and AUX)
(4)MUTE
Press to mute audio output.(5)CALL(if equipped)
Pressing the button
- If not in Bluetooth
®Handsfree
mode or receiving a phone call.
First press: Display Dial Number
screen.
Second press: Automatically dis-
play the most recently Dialed Call
number.
Third press: Dial the phone number
entered.
- Press in the Incoming Call notifi-
cation screen to accept the
phone call.
- Press in Bluetooth
®Handsfree
mode to switch to the waiting
call.
Pressing and holding the button
- If not in Bluetooth
®Handsfree
mode or receiving a phone call,
the most recently Dialed Call
number is dialed.
- Press in Bluetooth
®Handsfree
mode to transfer the call to your
cell phone.
- Press in cell phone mode to
switch to Bluetooth
®Handsfree
mode.