Page 513 of 543

09
9-45
Instrument Panel Fuse
Replacement
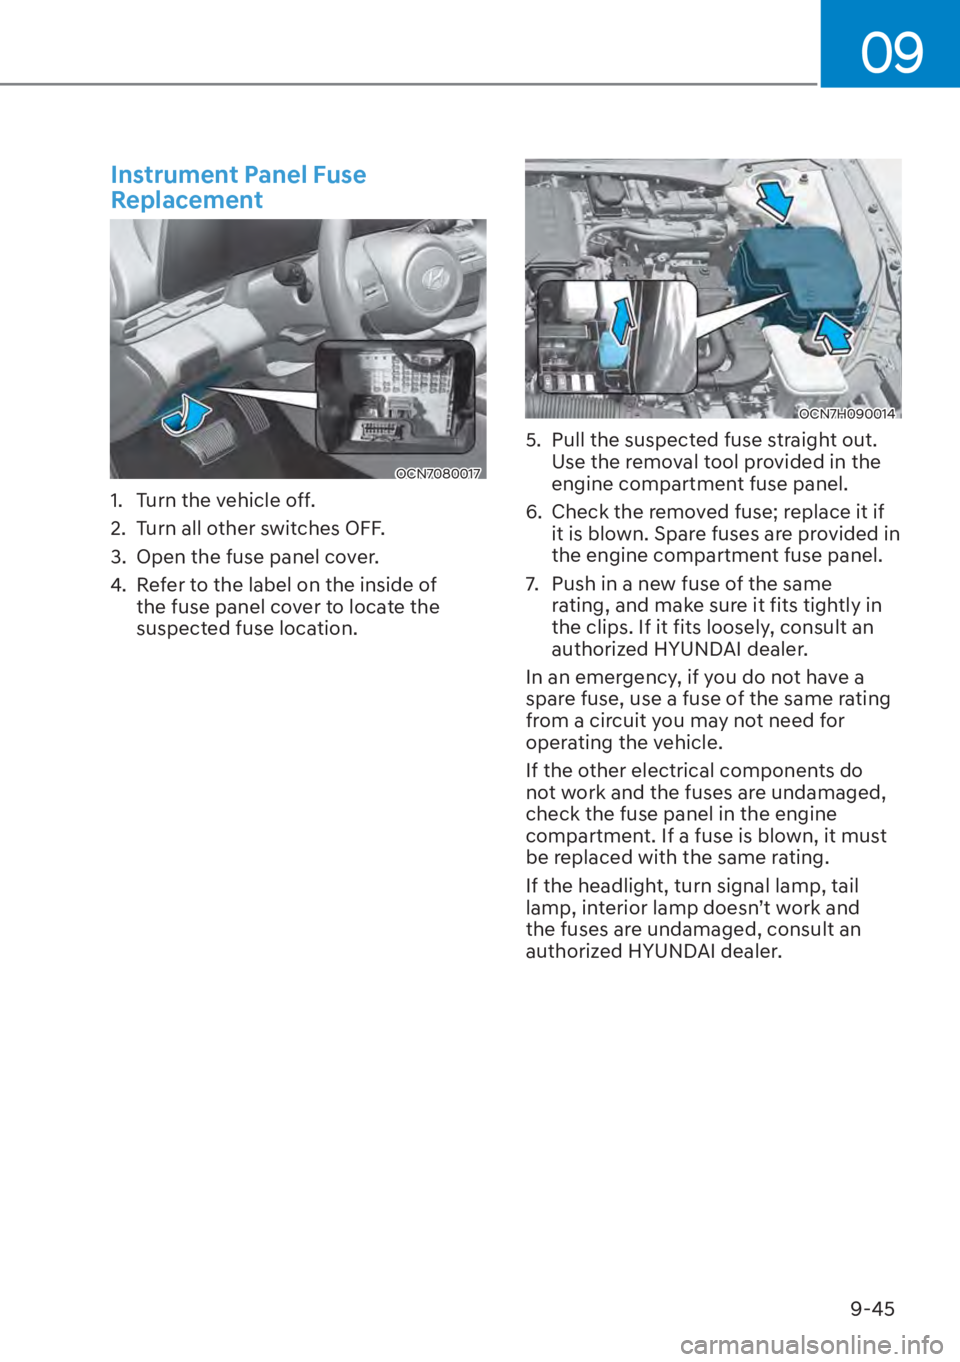
OCN7080017
1. Turn the vehicle off.
2. Turn all other switches OFF.
3. Open the fuse panel cover.
4. Refer to the label on the inside of the fuse panel cover to locate the
suspected fuse location.
OCN7H090014
5. Pull the suspected fuse straight out. Use the removal tool provided in the
engine compartment fuse panel.
6. Check the removed fuse; replace it if it is blown. Spare fuses are provided in
the engine compartment fuse panel.
7. Push in a new fuse of the same rating, and make sure it fits tightly in
the clips. If it fits loosely, consult an
authorized HYUNDAI dealer.
In an emergency, if you do not have a
spare fuse, use a fuse of the same rating
from a circuit you may not need for
operating the vehicle.
If the other electrical components do
not work and the fuses are undamaged,
check the fuse panel in the engine
compartment. If a fuse is blown, it must
be replaced with the same rating.
If the headlight, turn signal lamp, tail
lamp, interior lamp doesn’t work and
the fuses are undamaged, consult an
authorized HYUNDAI dealer.
Page 522 of 543

Maintenance9-54
Consult an authorized HYUNDAI dealer
to replace most vehicle light bulbs. It is
difficult to replace vehicle light bulbs
because other parts of the vehicle must
be removed before you can get to the
bulb. This is especially true for removing
the headlight assembly to get to the
bulb(s).
Removing/installing the headlight
assembly can result in damage to the
vehicle.
Information
The headlight and tail lamp lenses could
appear frosty if the vehicle is washed after
driving or the vehicle is driven at night in
wet weather. This condition is caused by
temperature difference between the lamp
inside and outside and does not indicate
a problem with your vehicle. When
moisture condenses in the lamp, it will be
removed after driving with the headlight
on. The removable level may differ
depending on lamp size, lamp position
and environmental condition. However, if
moisture is not removed, have the vehicle
inspected by an authorized HYUNDAI
dealer.
WARNING
�[�� Prior to replacing a lamp, depress the
foot brake, move the shift lever into P
(Park) apply the parking brake, place
the ignition switch to the LOCK/OFF
position, and take the key with you
when leaving the vehicle to avoid
sudden movement of the vehicle and
to prevent possible electric shock.
�[�� Be aware the bulbs may be hot and
may burn your fingers.
�[�� When the bulb is disconnected or the
lamp connector is removed while the
lamp is operating normally, the fuse
box electronics may recognize the
lamp as a malfunction. Therefore, a
fault record for the lamp may remain
in the Diagnostic Trouble Code (DTC)
recorded in the fuse box.
LIGHT BULBS
Page 523 of 543
09
9-55
Headlight, Parking Lamp,
Daytime Running Light, Turn
Signal Lamp and Side Marker
OCN7090015N
OCN7090016N
(1) Headlight (Low)
(2) Headlight (High)
(3) Daytime running lamp (DRL)/ Parking lamp
(4) Turn signal lamp
(5) Side marker
OLMB073042L
Headlight (Halogen bulb)
WARNING
�[�� Handle halogen bulbs with care.
Halogen bulbs contain pressurized
gas that will produce flying pieces
of glass that could cause injuries if
broken.
�[�� Wear eye protection when changing
a bulb. Allow the bulb to cool down
before handling it.
�[�� Always handle them carefully, and
avoid scratches and abrasions. If
the bulbs are lit, avoid contact with
liquids.
�[�� Never touch the glass with bare
hands. Residual oil may cause the
bulb to overheat and burst when lit.
�[�� A bulb should be operated only when
installed in a headlight.
�[�� If a bulb becomes damaged or
cracked, replace it immediately and
carefully dispose of it.
Page 524 of 543

Maintenance9-56
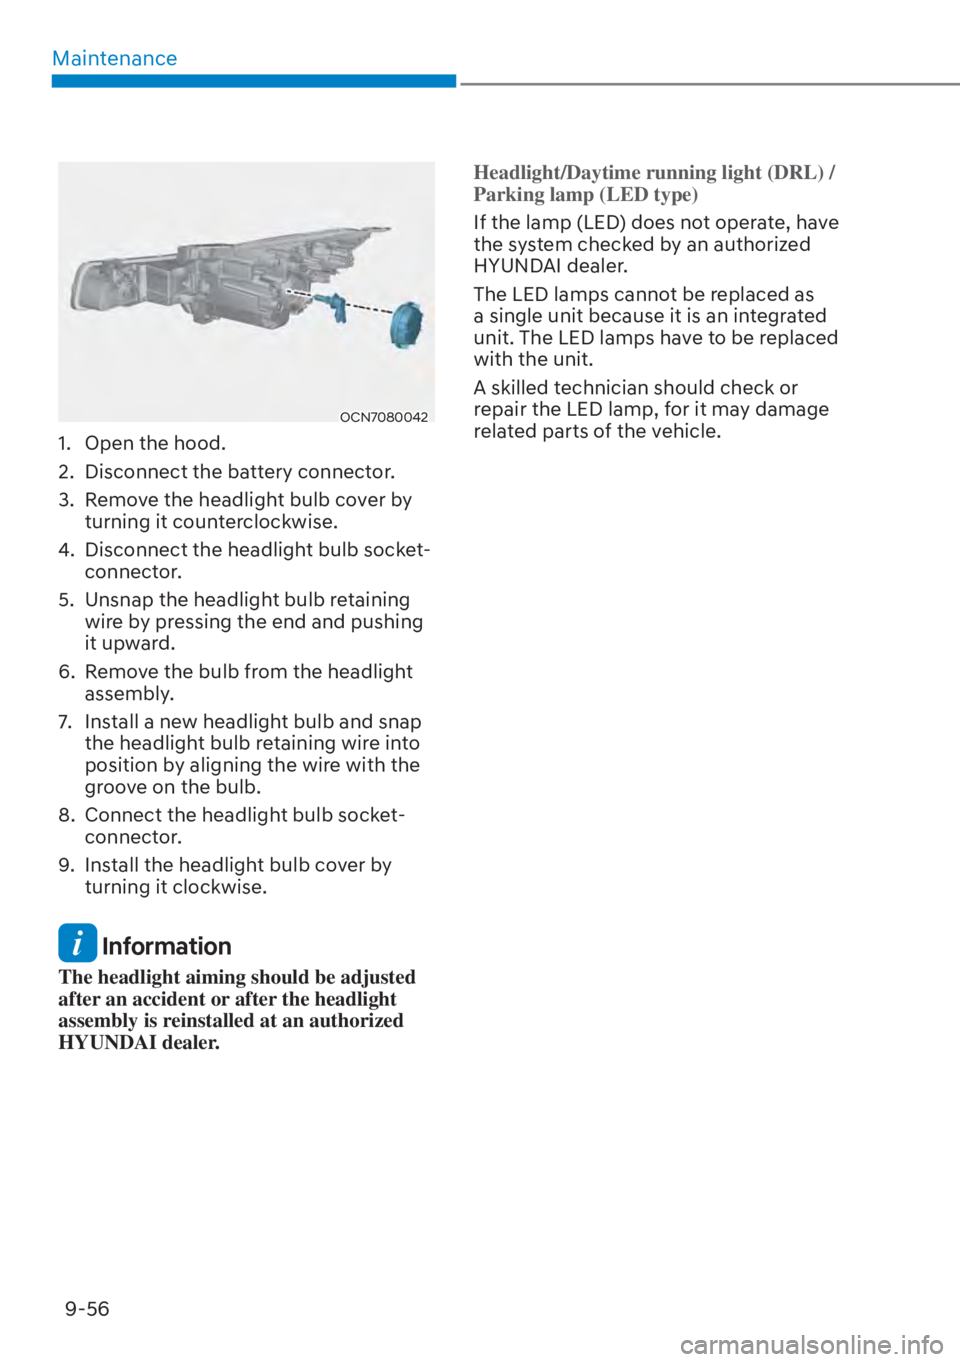
OCN7080042
1. Open the hood.
2. Disconnect the battery connector.
3. Remove the headlight bulb cover by turning it counterclockwise.
4. Disconnect the headlight bulb socket- connector.
5. Unsnap the headlight bulb retaining wire by pressing the end and pushing
it upward.
6. Remove the bulb from the headlight assembly.
7. Install a new headlight bulb and snap the headlight bulb retaining wire into
position by aligning the wire with the
groove on the bulb.
8. Connect the headlight bulb socket- connector.
9. Install the headlight bulb cover by turning it clockwise.
Information
The headlight aiming should be adjusted
after an accident or after the headlight
assembly is reinstalled at an authorized
HYUNDAI dealer. Headlight/Daytime running light (DRL) /
Parking lamp (LED type)
If the lamp (LED) does not operate, have
the s
ystem checked by an authorized
HYUNDAI dealer.
The LED lamps cannot be replaced as
a single unit because it is an integrated
unit. The LED lamps have to be replaced
with the unit.
A skilled technician should check or
repair the LED lamp, for it may damage
related parts of the vehicle.
Page 527 of 543
09
9-59
Tail/Stop lamp/Turn signal lamp/
Side marker (Outer lamp) (Bulb type)
1. Open the trunk lid.
OCN7080045
2. Remove the service cover by pulling out the service cover.
OCN7080046
3. Loosen the assembly retaining nuts.
OCN7080047
4. Remove the rear combination light assembly from the body of the
vehicle.
Page 528 of 543
![HYUNDAI ELANTRA HYBRID 2023 Owners Manual Maintenance9-60
OCN7080075L
OCN7090019N
[A] : Tail/Stop lamp, [B] : Turn signal lamp,
[C] : Rear side marker
5. Remove the socket from the assembly by turning the socket
counterclockwise until the HYUNDAI ELANTRA HYBRID 2023 Owners Manual Maintenance9-60
OCN7080075L
OCN7090019N
[A] : Tail/Stop lamp, [B] : Turn signal lamp,
[C] : Rear side marker
5. Remove the socket from the assembly by turning the socket
counterclockwise until the](/manual-img/35/58880/w960_58880-527.png)
Maintenance9-60
OCN7080075L
OCN7090019N
[A] : Tail/Stop lamp, [B] : Turn signal lamp,
[C] : Rear side marker
5. Remove the socket from the assembly by turning the socket
counterclockwise until the tabs on
the socket align with the slots on the
assembly.
6. Remove the bulb from the socket by pressing it in and rotating it
counterclockwise until the tabs on the
bulb align with the slots in the socket.
Pull the bulb out of the socket.
7. Insert a new bulb by inserting it into the socket and rotating it until it locks
into place.
8. Install the socket in the assembly by aligning the tabs on the socket with
the slots in the assembly. Push the
socket into the assembly and turn the
socket clockwise.
Reverse lamp (Inner lamp)
(Bulb type)
1. Disconnect the connector and then remove the nuts by turning the nuts
counter clockwise.
2. Take the light assembly out.
OCN7080053
3. Remove the socket from the assembly by turning the socket
counterclockwise until the tabs on
the socket align with the slots on the
assembly.
4. Remove the bulb by pulling it out.
5. Insert a new bulb by inserting it into the socket.
6. Install the light assembly to the trunk.
7. Reinstall the trunk lid cover by pushing in the screw.
Stop/Tail lamp and rear side marker
(LED type)
If the LED lamp does not operate, we
recommend that you have the vehicle
checked by an authorized HYUNDAI
dealer.
Page 529 of 543
09
9-61
High Mounted Stop Lamp
Replacement
OCN7080032
OAD075042[A] : High mounted stop lamp
1. Open the trunk.
2. Remove the socket by turning it counterclockwise until the tabs on the
socket align with the slots.
3. Remove the bulb from the socket by pressing it in and rotating it
counterclockwise until the tabs on the
bulb align with the slots in the socket.
Pull the bulb out of the socket.
4. Insert a new bulb by inserting it into the socket and rotating it until it locks
into place.
5. Install the socket in the assembly by aligning the tabs on the socket with
the slots in the assembly.
Push the socket into the assembly and
turn the socket clockwise.
License Plate Light Bulb
Replacement
OCN7H090020
1. Using a flat-blade screwdriver gently pry the lens cover from the lamp
housing.
2. Remove the bulb by pulling it straight out.
3. Install a new bulb.
4. Reinstall in the reverse order.
Page 530 of 543

Maintenance9-62
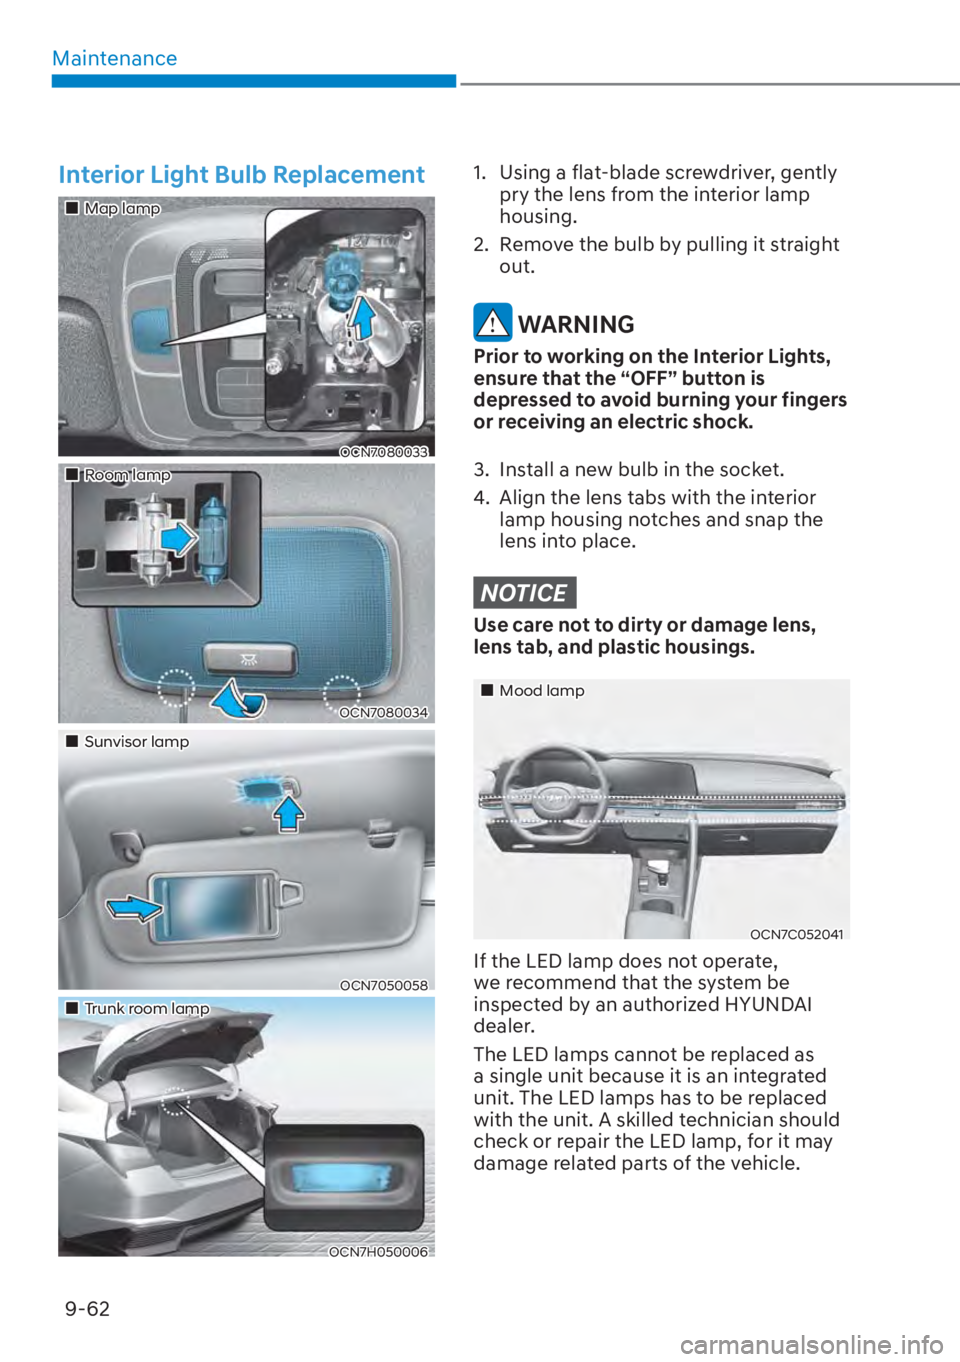
Interior Light Bulb Replacement
���„Map lamp
OCN7080033
���„Room lamp
OCN7080034
���„Sunvisor lamp
OCN7050058
���„Trunk room lamp
OCN7H050006
1. Using a flat-blade screwdriver, gently pry the lens from the interior lamp
housing.
2. Remove the bulb by pulling it straight out.
WARNING
Prior to working on the Interior Lights,
ensure that the “OFF” button is
depressed to avoid burning your fingers
or receiving an electric shock.
3. Install a new bulb in the socket.
4. Align the lens tabs with the interior lamp housing notches and snap the
lens into place.
NOTICE
Use care not to dirty or damage lens,
lens tab, and plastic housings.
���„Mood lamp
OCN7C052041
If the LED lamp does not operate,
we recommend that the system be
inspected by an authorized HYUNDAI
dealer.
The LED lamps cannot be replaced as
a single unit because it is an integrated
unit. The LED lamps has to be replaced
with the unit. A skilled technician should
check or repair the LED lamp, for it may
damage related parts of the vehicle.