Page 698 of 814
697
uuMaintenance MinderTMuTo Use Maintenance MinderTM
Continued
Maintenance
1. Set the power mode to ON.
2. Roll the right selector wheel until the Maintenance Minder screen is displayed.
The engine oil life appears on the driv er information interface along with
maintenance items due soon.
Models with B-type meter
Engine Oil Life
Main Item Sub Item
Right Selector Wheel
23 PILOT-31T906000_03.book 697 ページ 2022年10月31日 月曜日 午前10時26分
Page 699 of 814
698
uuMaintenance MinderTMuTo Use Maintenance MinderTM
Maintenance
*1:Models with A-type meter
*2:Models with B-type meter
■Maintenance Minder Messages on the Driver Information
Interface
Maintenance MessageOil Life DisplayExplanationInformation
-
When you select the
Maintenance Minder screen,
it displays codes for
maintenance items due at
the next engine oil change,
along with the percentage of
engine oil life remaining.
-
Maintenance Due Soon15 %The remaining engine oil life
is 15 to 6 percent.
Press the (home) button
to switch to another display.
Roll the right selector wheel
to switch to another display.The engine oil is approaching
the end of its service life, and
the maintenance items should
be inspected and serviced
soon.
*1*2
*1*2
Models with A-type meter
Models with B-type meter
23 PILOT-31T906000_03.book 698 ページ 2022年10月31日 月曜日 午前10時26分
Page 700 of 814

699
uuMaintenance MinderTMuTo Use Maintenance MinderTM
Continued
Maintenance
*1:Models with A-type meter
*2:Models with B-type meter
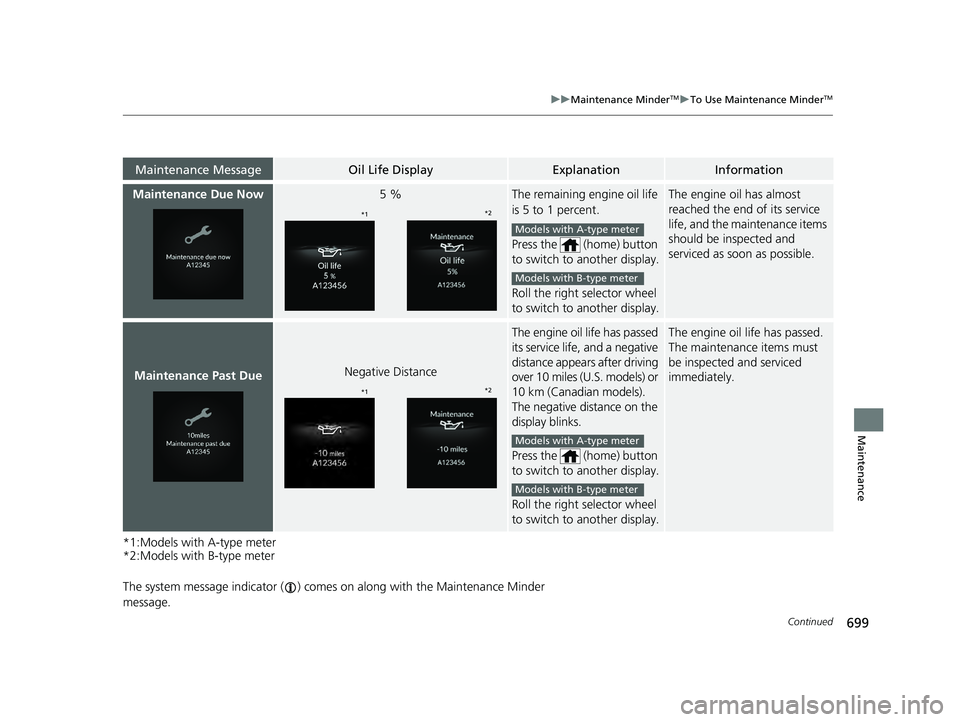
The system message indicator ( ) comes on along with the Maintenance Minder
message.
Maintenance MessageOil Life DisplayExplanationInformation
Maintenance Due Now5 %The remaining engine oil life
is 5 to 1 percent.
Press the (home) button
to switch to another display.
Roll the right selector wheel
to switch to another display.The engine oil has almost
reached the end of its service
life, and the maintenance items
should be inspected and
serviced as s oon as possible.
Maintenance Past DueNegative Distance
The engine oil life has passed
its service life, and a negative
distance appears after driving
over 10 miles (U.S. models) or
10 km (Canadian models).
The negative distance on the
display blinks.
Press the (home) button
to switch to another display.
Roll the right selector wheel
to switch to another display.The engine oil life has passed.
The maintenance items must
be inspected and serviced
immediately.
*1 *2
Models with A-type meter
Models with B-type meter
*1*2
Models with A-type meter
Models with B-type meter
23 PILOT-31T906000_03.book 699 ページ 2022年10月31日 月曜日 午前10時26分
Page 704 of 814

Continued703
uuMaintenance MinderTMuTo Use Maintenance MinderTM
Maintenance
Reset the maintenance minder information display if you have performed the
maintenance service.
1. Set the power mode to ON.
2. Press the (home) button.
3. Roll the left selector wheel until is displayed.
4. Press the left selector wheel to go to the Maintenance Minder screen.
5. Press and hold the left selector wheel for about 10 seconds to enter the reset
mode.
6. Roll the left selector wheel to select a ma intenance item to reset, or to select All
due items (You can also select Cancel to end the process).
7. Press the left selector wheel to reset the selected item.
8. Repeat from step 5 for other items you wish to reset.
■Resetting the Display1Resetting the Display
NOTICE
Failure to reset the Maintenance MinderTM display
after a maintenance servic e results in the system
showing incorrect maintenance intervals, which can
lead to serious mechanical problems.
The dealer will reset the Maintenance Minder
TM
display after completing th e required maintenance
service. If someone other than a dealer performs
maintenance service, reset the Maintenance
Minder
TM display yourself.
You can also reset the Maintenance Minder
TM display
using the audio/information screen.
2 Customized Features P. 429
Models with 9-in. Color Touchscreen
Models with A-type meter
Left Selector Wheel
(home) Button
23 PILOT-31T906000_03.book 703 ページ 2022年10月31日 月曜日 午前10時26分
Page 705 of 814
704
uuMaintenance MinderTMuTo Use Maintenance MinderTM
Maintenance
1. Set the power mode to ON.
2. Roll the right selector wheel until the Maintenance Minder screen is displayed.
3. Press and hold the right selector wheel for about 10 seconds to enter the reset
mode.
4. Roll the right selector wheel to select a maintenance item to reset, or to select All
due items (You can also select Cancel to end the process).
5. Press the right selector wheel to reset the selected item.
6. Repeat from step 3 for other items you wish to reset.
Models with B-type meter
Right Selector Wheel
23 PILOT-31T906000_03.book 704 ページ 2022年10月31日 月曜日 午前10時26分
Page 729 of 814

728
Maintenance
Checking and Maintaining Tires
Checking Tires
To safely operate your vehicle, your tires must be of the proper type and size, in
good condition with adequate tread, and properly inflated.
■Inflation guidelines
Properly inflated tires provide the best combination of handling, tread life, and comfort.
Refer to the driver’s doorjamb label or spec ifications page for the specified pressure.
Underinflated tires wear unevenly, adversely affect handling and fuel economy, and
are more likely to fail from overheating.
Overinflated tires make your vehicle ride harshly, are more prone to road hazards,
and wear unevenly.
Every day before you drive, look at each of the tires. If one looks lower than the
others, check the pressure with a tire gauge.
At least once a month or before long trips, use a gauge to measure the pressure in
all tires, including the spare. Even tires in good condition can lose 1-2 psi (10-20 kPa,
0.1-0.2 kgf/cm
2) per month.
■Inspection guidelines
Every time you check inflation, also examine the tires and valve stems.
Look for:
• Bumps or bulges on the side or in the tread. Replace the tire if you find any cuts,
splits, or cracks in the si de of the tire. Replace it if you see fabric or cord.
• Remove any foreign objects and inspect for air leaks.
• Uneven tread wear. Have a deal er check the wheel alignment.
• Excessive tread wear.
2 Wear Indicators P. 733
•Cracks or other damage around valve stem.
1Checking Tires
Measure the air pressure when tires are cold. This
means the vehicle has been parked for at least three
hours, or driven less than 1 mile (1.6 km). If
necessary, add or releas e air until the specified
pressure is reached.
If checked when hot, tire pressure can be as much as
4–6 psi (30–40 kPa, 0.3–0.4 kgf/cm
2) higher than if
checked when cold.
Have a dealer check the tires if you feel a consistent
vibration while driving. Ne w tires and any that have
been removed and reinst alled should be properly
balanced.
3WARNING
Using tires that are excessively worn or
improperly inflated can cause a crash in
which you can be seriously hurt or killed.
Follow all instruction s in this owner’s
manual regarding ti re inflation and
maintenance.
23 PILOT-31T906000_03.book 728 ページ 2022年10月31日 月曜日 午前10時26分
Page 733 of 814

uuChecking and Maintaining Tires uDOT Tire Quality Grading (U.S. Vehicles)
732
Maintenance
The traction grades, from highest to lowest, are AA, A, B, and C.
Those grades represent the tire’s ability to stop on wet pavement
as measured under controlled conditions on specified
government test surfaces of asphalt and concrete. A tire marked
C may have poor traction performance.
The temperature grades are A (the highest), B, and C,
representing the tire’s resistance to the generation of heat and its
ability to dissipate h eat when tested under controlled conditions
on a specified indoor laboratory test wheel. Sustained high
temperature can cause the material of the tire to degenerate and
reduce tire life, and excessive temp erature can lead to sudden tire
failure. The grade C corresponds to a level of performance which
all passenger car tires must meet under the Federal Motor Vehicle
Safety Standard No. 109. Grades B and A represent higher levels
of performance on the laboratory test wheel than the minimum
required by law.
■Traction
■Temperature
1 Traction
Warning: The traction grade
assigned to this tire is based on
straight-ahead braking traction tests,
and does not include acceleration,
cornering, hydroplaning, or peak
traction characteristics.
1Temperature
Warning: The temperature grade for
this tire is establishe d for a tire that is
properly inflated and not
overloaded. Excessive speed,
underinflation, or excessive loading,
either separately or in combination,
can cause heat buildup and possible
tire failure.
23 PILOT-31T906000_03.book 732 ページ 2022年10月31日 月曜日 午前10時26分
Page 735 of 814

734
uuChecking and Maintaining Tires uTire and Wheel Replacement
Maintenance
Tire and Wheel Replacement
Replace your tires with radials of the sa me size, load range, speed rating, and
maximum cold tire pressure ra ting (as shown on the tire's sidewall). Using tires of a
different size or construction can cause ce rtain vehicle systems such as the ABS and
Vehicle Stability Assist
TM (VSA ®) system to work incorrectly.
It is best to replace all four tires at the same time. If that isn’t possible, replace the
front or rear tires in pairs.
Whenever you have a tire replaced or reset, make sure that the rubber valve stem is
replaced and that the TPMS sensor is trans ferred from the old valve stem to the new
one.
If you replace a wheel, make sure that the wheel’s specifications match those of the
original wheels.
1 Tire and Wheel Replacement
3WARNING
Installing improper tires on your vehicle can
affect handling and stability. This can cause
a crash in which you can be seriously hurt or
killed.
Always use the size and type of tires
recommended in this owner’s manual.
23 PILOT-31T906000_03.book 734 ページ 2022年10月31日 月曜日 午前10時26分