2023 HONDA HRV park assist
[x] Cancel search: park assistPage 89 of 664

87
uuIndicators u
Continued
Instrument Panel
Parking Brake and
Brake System
Indicator (Red)
Parking Brake and
Brake System
Indicator (Amber)
U.S.
Canada
U.S.
Canada Automatic Brake
Hold System Indicator
Automatic Brake Hold
Indicator
U.S.
Canada
*1 : When you set the power mode to ON, these indicators come on to indicate that system checks are being performed. They go off a few seconds later or after the engine
has started. If an indicator does not come on or turn off, ther e may be a malfunction in the corresponding system. To resolve the issue, follow the instructions in the
owner's manual.
P. 88*1
Malfunction Indicator
Lamp
Charging System
Indicator
Anti-lock Brake System
(ABS ) Indicator
Seat Belt Reminder
Indicator
Low Fuel Indicator
(Amber)
Vehicle Stability AssistTM
(VSA®) System Indicator
Vehicle Stability Assist
TM
(VSA®) OFF Indicator
Supplemental Restraint
System Indicator
Auto High-Beam
Indicator
Low Tire Pressure/TPMS
Indicator*
Electric Power Steering
(EPS) System Indicator
Turn Signal and Hazard
Warning Indicators
Lights On Indicator
High Beam Indicator
System Message Indicator
Adaptive Cruise Control
(ACC) with Low Speed
Follow Indicator (Amber)
Lane Keeping Assist System
(LKAS) Indicator (Amber)
Safety Support Indicator
(Green/Gray)
P. 90
P. 90
P. 90
P. 91
P. 91*1 *1
P. 95
*1
Shift Position Indicator P. 91
Transmission System
Indicator P. 91
P. 92
P. 92
P. 93
P. 93
P. 96
P. 94
*1
*1
P. 94
*1 P. 93
P. 99
*1
P. 96
P. 96
P. 96
Immobilizer System
Indicator
Security System Alarm
Indicator P. 97
P. 98
P. 100
P. 103
*1
Adaptive Cruise Control
(ACC) with Low Speed
Follow Indicator (White/
Green) P. 99
*1
Lane Keeping Assist
System (LKAS) Indicator
(White/Green) P. 100
*1Safety Support Indicator
(Amber) P. 101
*1
Cruise Mode Indicator
(White/Green) P. 99
*1
Low Temperature
Indicator P. 92
P. 97*1 *1
ECON
Mode Indicator P. 98
NORMAL Mode Indicator P. 98
SNOW Mode Indicator P. 98
Hill Descent Control System
Indicator (White/Green) P. 98*1
*1 *1
*1
*1
* Not available on all models
23 HR-V-313V06000_01.book 87 ページ 2022年4月4日 月曜日 午前10時49分
Page 175 of 664

173
uuOperating the Switches Around the Steering Wheel uAuto High-Beam
Controls
■Manual switching between high-beam and low-beam
If you want to manually switch the h eadlights between high beam and low beam,
follow either of the procedur es below. Note that when you do this, the auto high-
beam indicator will turn off and the auto high-beam will be deactivated.
Using the lever:
Pull the lever toward you for flashing the hi gh beams then release it within about
one second while driving. u To reactivate the auto hi gh-beam, pull the lever toward you for flashing the
high beams then release it while driv ing. The auto high-beam indicator will
come on.
Using the light switch:
Turn the light switch to .
u To reactivate the au to high-beam, turn the light switch to AUTO when the
lever is in the low beam position, the auto high-beam indicator will come on.1How to Use the Auto High-Beam
How to turn off the Auto High-Beam System
You can turn the auto high- beam system on and off.
2 Settings
* P. 123
2 How to Customize the Vehicle Settings
P. 357
If the Some driver assist systems cannot operate:
Camera temperature too high message appears:
•Use the climate control system to cool down the
interior and, if necessary, also use defroster mode
with the airflow directed toward the camera.
•Start driving the vehicle to lower the windshield
temperature, which cool s down the area around
the camera.
If the Some driver assist systems cannot operate:
Clean front windshield or poor viewing
condition. message appears:
•Park your vehicle in a sa fe place, and clean the
windshield. If the message does not disappear after
you have cleaned the windshield and driven for a
while, have your vehicle checked by a dealer.
Models with 7-in. Color Touchscreen
Models with 9-in. Color Touchscreen
* Not available on all models
23 HR-V-313V06000_01.book 173 ページ 2022年4月4日 月曜日 午前10時49分
Page 312 of 664

uuAudio System Basic Operation uAndroid AutoTM
310
Features
1. Connect the Android phone to the USB port using the USB cable.
2 USB Ports P. 213
uThe confirmation screen will be displayed.
2. Select Yes.
u If you do not want to connect Android Auto, select No.
You may change the consent settings under the Smartphone Connection settings
menu.
■Connect Android Auto wirelessly on the home screen
1. Press the button.
2. Select Smartphone Connection .
3. Select + Connect New Device.
4. Pair the Android phone to the vehicle’s Bluetooth® HandsFreeLink ® (HFL) system.
2Phone Setup P. 394
5.Select Yes.
u If your Android phone asks for permission to accept an Android Auto
connection, accept to connect. A confir mation message for HondaLink Assist
appears.
6. Select Yes or No.
■Connecting Android Auto Using the USB Cable to the USB Port
■Connect Android Auto Wirelessly
1Connecting Android Auto Using the USB Cable to the USB Port
Only initialize Android Auto when you are safely
parked. When Android Auto first detects your phone,
you will need to set up your phone so that auto
pairing is possibl e. Refer to the instruction manual
that came with your phone.
You can use the following procedure to disconnect or
delete the devices connecting Android Auto after you
have completed the initial setup:
Press the button Select General Settings
Smartphone Connection Android Auto
Select device
Use of user and vehicle information
The use and handling of user and vehicle information
transmitted to/from your phone by Android Auto is
governed by the Google’s Privacy Policy.
23 HR-V-313V06000_01.book 310 ページ 2022年4月4日 月曜日 午前10時49分
Page 394 of 664

392
uuBluetooth ® HandsFreeLink ®u HFL Menus
Features
HFL Menus
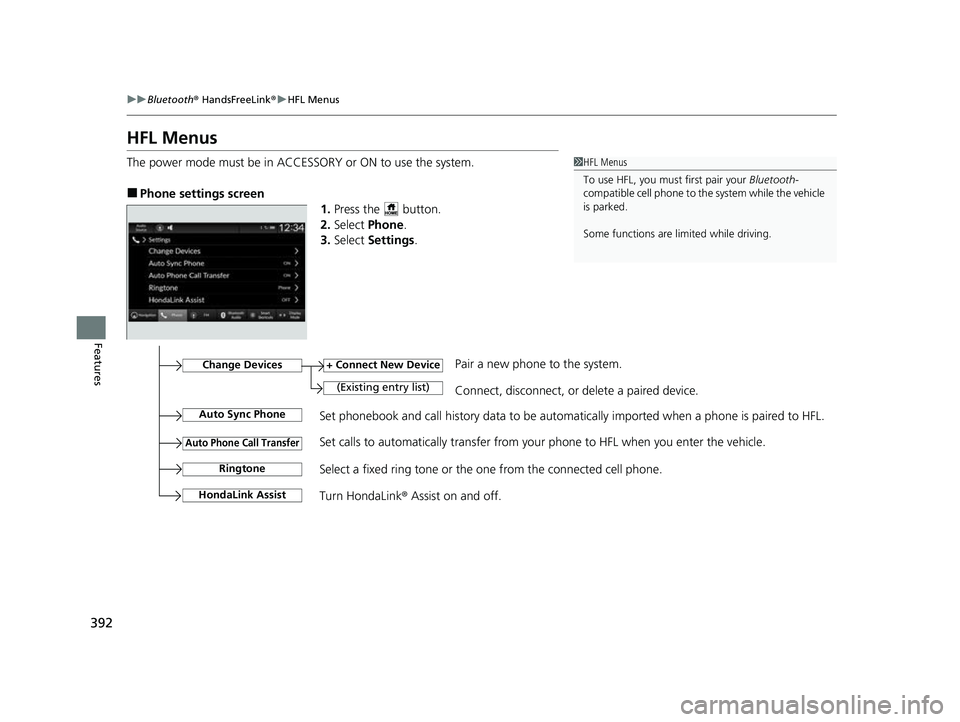
The power mode must be in ACCESSORY or ON to use the system.
■Phone settings screen
1.Press the button.
2. Select Phone .
3. Select Settings .
1HFL Menus
To use HFL, you must first pair your Bluetooth-
compatible cell phone to th e system while the vehicle
is parked.
Some functions are li mited while driving.
Set phonebook and call history data to be automatically imported when a phone is paired to HFL.
+ Connect New Device
(Existing entry list)Connect, disconnect, or delete a paired device.
Change DevicesPair a new phone to the system.
Auto Sync Phone
Auto Phone Call Transfer
Ringtone
HondaLink Assist
Set calls to automatically transfer from your phone to HFL when you enter the vehicle.
Select a fixed ring tone or the one from the connected cell phone.
Turn HondaLink ® Assist on and off.
23 HR-V-313V06000_01.book 392 ページ 2022年4月4日 月曜日 午前10時49分
Page 411 of 664

409
Driving
This chapter discusses driving and refueling.
Before Driving
Driving Preparation .............................. 410
Maximum Load Limit............................ 413
Towing a TrailerTowing Behind a Motorhome............... 415Off-Highway Driving Guidelines..... 416
When Driving
Starting the Engine .............................. 418
Precautions While Driving..................... 425
Continuously Variable Transmission ......... 426Shifting ................................................ 427
Drive Mode Switch ............................... 429
Hill Descent Control System ................. 432
Vehicle Stability AssistTM (VSA®), aka Electronic
Stability Control (ESC), System ................... 434
Real Time AWD with Intelligent Control SystemTM*.. 437Tire Pressure Monitoring System (TPMS) ........... 438Tire Pressure Monitoring System (TPMS) - Required Federal Explanation ............. 443
Blind Spot Information System
*........... 445Honda Sensing ®................................ 449Collision Mitigation Braking SystemTM
(CMBSTM) ........................................... 453
Low Speed Braking Control*................ 465
Adaptive Cruise Control (ACC) with Low Speed Follow ..................................... 471 Lane Keeping Assist System (LKAS) ....... 491
Traffic Jam Assist
*................................ 502
Road Departure Mitigation System ....... 511
Traffic Sign Recognition System ............ 519
Front Wide View Camera...................... 525
Sonar Sensors
*..................................... 527BrakingBrake System ........................................ 528
Anti-lock Brake System (ABS) ................ 535
Brake Assist System .............................. 536
Parking Your Vehicle
Multi-View Rear Camera .................. 545
Refueling
Fuel Economy and CO
2 Emissions .... 550
* Not available on all models
23 HR-V-313V06000_01.book 409 ページ 2022年4月4日 月曜日 午前10時49分
Page 425 of 664

Continued423
uuWhen Driving uStarting the Engine
Driving
1. Depress and hold the brake pedal, then press the ENGINE START/STOP button.
1. Keeping your right foot on the br ake pedal, put the transmission into
(D. Select
(R when reversing.
2. With the parking brake applied, release the brake pedal and gently depress the
accelerator pedal.
u Make sure the parking brake and brake system indicator (red) goes off.
2Parking Brake P. 528
■Hill start assist system
Hill start assist keeps the brake engaged br iefly to help prevent the vehicle from
rolling on inclines as you move your foot from the brake pedal to the accelerator.
Put the transmission into
(D, (S, or (L when facing uphill, or (R when facing
downhill, then release the brake pedal.
■Starting to Drive1 Starting to Drive
The engine stops when th e transmission is taken out
of
( P before the ENGINE START/STOP button is
pressed. Follow step 1 when starting to drive.
You can also release the parking brake by pressing
the electric parking brake sw itch while depressing the
brake pedal.
When facing downhill, you can start your vehicle
more smoothly by manually releasing it with the
electric parking brake switch than by releasing it with
the accelerator pedal.
When the engine was started using the button
on the keyless remote*When the engine was started using the button on the keyless remote*
When the engine was started in any case
1 Hill start assist system
Hill start assist may not prevent the vehicle from
rolling downhill on a very st eep or slippery slope, and
will not operate on small inclines.
Hill start assist will operate even when VSA ® is
switched off.
Hill start assist is not a replacement for the parking
brake.
* Not available on all models
23 HR-V-313V06000_01.book 423 ページ 2022年4月4日 月曜日 午前10時49分
Page 436 of 664

434
uuWhen Driving uVehicle Stability AssistTM (VSA ®), aka Electronic Stability Control (ESC), System
Driving
Vehicle Stability AssistTM (VSA ®), aka Electronic
Stability Control (ESC), System
VSA ® helps to stabilize the vehicle during cornering if the vehicle turns more or less
than what was intended. It also assists in maintaining traction on slippery surfaces.
It does so by regulating engine output and select ively applying the brakes.
When VSA ® activates, you may notice that the
engine does not respond to the accelerator.
You may also notice some noise from the
hydraulic brake system. You will also see the
indicator blink.
■VSA ® Operation
1 Vehicle Stability AssistTM (VSA ®), aka Electronic Stability Control
(ESC), System
The VSA ® may not function properl y if tire type and
size are mixed. Make sure to use the same size and
type of tire, and the air pressures as specified.
When the VSA ® system indicator comes on and stays
on while driving, there ma y be a problem with the
system. While this may not interfere with normal
driving, have your vehi cle checked by a dealer
immediately.
VSA ® cannot enhance stability in all driving situations
and does not control the entire braking system. You
still need to drive and corner at speeds appropriate
for the conditions and always leave a sufficient
margin of safety.
The main function of the VSA ® system is generally
known as Electronic Stability Control (ESC). The
system also includes a traction control function.
The Vehicle Stability Assist
TM (VSA ®) system, Vehicle
Stability AssistTM (VSA ®) OFF , Adaptive Cruise Control
(ACC) with Low Speed Follow, low tire pressure/
TPMS
*, parking brake and bra ke system and safety
support indicators may come on in amber along with
a message in the gauge when you set the power
mode to ON after re connecting the battery.
Drive a short distance at more than 12 mph (20 km/h).
Each indicator should go off. If any do not, have your
vehicle checked by a dealer.
VSA ® System
Indicator
* Not available on all models
23 HR-V-313V06000_01.book 434 ページ 2022年4月4日 月曜日 午前10時49分
Page 441 of 664

Continued439
uuWhen Driving uTire Pressure Monitoring System (TPMS)
Driving
You must start TPMS calibration every time you:
• Adjust the pressure in one or more tires.
• Rotate the tires.
• Replace one or more tires.
Before calibrating the TPMS:
• Set the cold tire pressure in all four tires.
2 Checking Tires P. 581
Make sure:
• The vehicle is at a complete stop.
• The transmission is in
(P.
• The power mode is in ON.
■TPMS Calibration
1Tire Pressure Monitoring System (TPMS)
The Vehicle Stability Assist
TM (VSA ®) system, Vehicle
Stability AssistTM (VSA ®) OFF , Adaptive Cruise Control
(ACC) with Low Speed Follow, low tire pressure/
TPMS
*, parking brake and bra ke system and safety
support indicators may come on in amber along with
a message in the gauge when you set the power
mode to ON after re connecting the battery.
Drive a short distance at more than 12 mph (20 km/h).
Each indicator should go off. If any do not, have your
vehicle checked by a dealer.
1 TPMS Calibration
TPMS cannot be calibrated if a co mpact spare tire is installed.
The calibration process requires approximately 30
minutes of cumulative driv ing at speeds between 30-
60 mph (48-97 km/h).
During this period, if the power mode is set to ON
and the vehicle is not moved within 45 seconds, you
may notice the low tire pressure/TPMS indicator
comes on briefly. This is no rmal and indicates that the
calibration process is not yet complete.
If the tire chains are installed, remove them before
calibrating the TPMS.
If the low tire pressure/TPMS indicator comes on even
when the properly inflated specified regular tires are
installed, have your vehi cle checked by a dealer.
We recommend that the tires be replaced with the
same brand, model, and size as the originals. Ask a
dealer for details.
* Not available on all models
23 HR-V-313V06000_01.book 439 ページ 2022年4月4日 月曜日 午前10時49分