2023 HONDA CRV ECO mode
[x] Cancel search: ECO modePage 669 of 719

668
uuPower System Won’t Start uIf the Keyless Remote Battery is Weak
Handling the Unexpected
If the Keyless Remote Battery is Weak
If the beeper sounds, the To start, touch start butto n with emblem side of
remote message appears on the driver information interface, the POWER button
flashes, and the READY indicator does not come on, tu rn on the power system as
follows: 1.Press the POWER button.
u The beeper sounds and the POWER
button flashes for about 30 seconds.
2. Touch the center of the POWER button
with the H logo on the keyless remote while
the POWER button is flashing. The buttons
on the keyless remote should be facing you.
u The beeper sounds, and the POWER
button stays on for about 10 seconds.
3. Depress the brake pedal and press the
POWER button while the POWER button is
on.
u The READY indicator comes on.
u If you don’t depress the pedal, the mode
will change to ACCESSORY.
Page 670 of 719

669
uuPower System Won’t Start uEmergency Power System On
Handling the Unexpected
Emergency Power System On
If the power system cannot be turned on using the normal starting procedure, you
may be able to turn it on using the emergency starting procedure below.
Do not use this procedure if it is not an emergency.
1. Make sure the parking brake is applied.
2. Check that the transmission is in
(P, then set the power mode to ACCESSORY.
3. Firmly depress the brake peda l, then press and hold the POWER button for at
least 15 seconds.
This should be considered a system malfun ction even if you are able to turn the
power system on using the above procedure.
Have your vehicle checked by a dealer immediately.
1Emergency Power System On
Refer to the following if you cannot move the shift
lever out of the
( P position.
2 Shift Lever Does Not Move P. 673
Page 671 of 719

670
uuPower System Won’t StartuEmergency Power System Off
Handling the Unexpected
Emergency Power System Off
The POWER button may be used to turn the pow er system off due to an emergency
situation even while driving. If you must turn the power system off, do either of the
following operations:
• Press and hold the POWER button for about two seconds.
• Firmly press the POWER button three times.
The steering wheel will not lock. However, because turning off the power system
disables the power assist the power syst em provides to the steering and braking
systems, it will require significantly more physical effort and time to steer and slow
the vehicle. Use both feet on the brake pe dal to slow down the vehicle and stop
immediately in a safe place.
The power mode is in ACCESSORY wh en the power system is stopped.
To change the mode to VEHICLE OFF, put the transmission into
(P after the vehicle
comes to a complete stop.
1 Emergency Power System Off
Do not press the POWER button while driving unless
it is absolutely necessary for the power system to be
turned off.
If you press the POWER button while driving, the
beeper sounds.
Page 672 of 719

671Continued
Handling the Unexpected
If the 12-Volt Battery Is Dead
Jump Starting Procedure
Turn off the power to electric devices, such as audio and lights. Turn off the power
system, then open the hood. 1.Open the terminal cover on your vehicle’s
12-volt battery positive + terminal.
2. Connect the first jumper cable to your
vehicle's 12-volt battery + terminal.
3. Connect the other end of the first jumper
cable to the booster battery + terminal.
u Use a 12-volt booster battery only.
u
When using an automotive battery charger
to boost your 12-volt battery, select a
lower charging voltage than 15-volt. Check
the charger manual for the proper setting.
4. Connect the second jumper cable to the
booster battery - terminal.
5. Connect the other end of the second
jumper cable to the engine mounting bolt
as shown. Do not connect this jumper cable
to any other part.
6. If your vehicle is connected to another
vehicle, start the assisting vehicle's engine
and increase its rpm slightly.
7. Attempt to start your ve hicle's engine. If it
turns over slowly, check that the jumper
cables have good metal-to-metal contact.
1 Jump Starting Procedure
Securely attach the jumper cables clips so that they
do not come off when the e ngine vibrates. Be careful
not to tangle the jumper cables or allow the cable
ends to touch each other while attaching or
detaching the jumper cables.
12-volt battery performa nce degrades in cold
conditions and may prevent the engine from starting.
The Vehicle Stability Assist
TM (VSA ®) system, brake
system (Amber), Adaptive Cruise Control (ACC) with
Low Speed Follow, low tire pressure/TPMS
* and
Safety Support indicators may come on along with a
message in the gauge when you set the power mode
to ON after reconnecting the 12-volt battery.
Drive a short distance at more than 12 mph (20 km/h).
Each indicator should go off. If any do not, have your
vehicle checked by a dealer.
3WARNING
A 12-volt battery can explode if you do not
follow the correct procedure, seriously
injuring anyone nearby.
Keep all sparks, open flames, and smoking
materials away from the 12-volt battery.
Booster Battery
* Not available on all models
Page 685 of 719

684
uuFuses uFuse Locations
Handling the Unexpected
■Circuit protected and fuse rating
Circuit ProtectedAmps
1MAIN FUSE175 A
2 - 30 A
- 40 A
F/BOX OPTION1 60 A PTC HTR1 (40 A)
F/BOX OPTION2 60 A - 60 A
F/BOX MAIN1 60 A
3
AUDIO AMP*(30 A)
-30 A
PTC HTR3(40 A)
RR DEF30 A
-50 A
HTR MTR40 A
PTG MTR*(40 A)
4 ABS/VSA FSR 40 A
ABS/VSA MTR 40 A ENG EWP 40 A ESB 40 A
IG MAIN1 30 A RFC SUB 40 A
IG MAIN2 30 A
5
SUB FUSE130 A
WIPER30 A
EPS70 A
-30 A
RFC MAIN40 A
P-ACT MTR*(30 A)
F/BOX MAIN260 A
6- -
7 SRM220 A
8A/C MAIN*(10 A)
9BACK UP10 A
10 FR WIPER DEICER*(15 A)
11RR FOG*(10 A)
12 EWVLT*(10 A)
13AUDIO SUB7.5 A
14 EWVHT*(10 A)
15FR FOG(10 A)
16 SOV*(10 A)
17ECH1*(10 A)
18 HORN 15 A
19FR WASHER15 A
20 AUDIO 15 A
21SRM120 A
22 DBW 15 A
23HAZARD10 A
24 VBU 10 A
25IGP15 A
Circuit ProtectedAmps
26 EVTC 20 A
27LCM L20 A
28 INJ 20 A
29STOP10 A
30 LCM R 20 A
31IG COIL15 A
32 ICM 10 A
33PCU EWP10 A
34 EWPLT2*(10 A)
35ECOMP*(10 A)
36 - -
37--
38 IGA 10 A
39IGB10 A
40 P-ACT UNIT*(10 A)
41IGPS LAF7.5 A
42 MON2 5 A
Circuit ProtectedAmps
* Not available on all models
Page 696 of 719

695
uuSpecifications u
Information
■
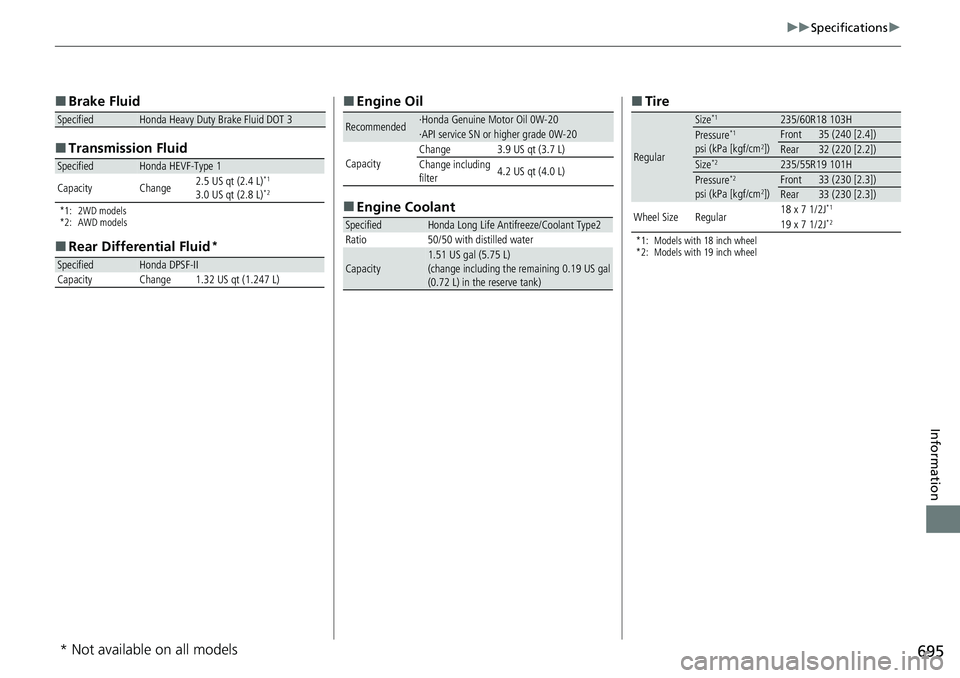
Brake Fluid
■ Transmissi on Fluid
*1: 2WD models
*2: AWD models
■
Rear Differential Fluid*
SpecifiedHonda Heavy Duty Brake Fluid DOT 3
SpecifiedHonda HEVF-Type 1
Capacity Change 2.5 US qt (2.4 L)*1
3.0 US qt (2.8 L)*2
SpecifiedHonda DPSF-II
Capacity Change 1.32 US qt (1.247 L)
■ Engine Oil
■ Engine Coolant
Recommended·Honda Genuine Motor Oil 0W-20·API service SN or higher grade 0W-20
CapacityChange3.9 US qt (3.7 L)
Change including
filter 4.2 US qt (4.0 L)
SpecifiedHonda Long Life Antifreeze/Coolant Type2
Ratio 50/50 with distilled water
Capacity1.51 US gal (5.75 L)
(change including the remaining 0.19 US gal
(0.72 L) in the reserve tank)
■ Tire
*1: Models with 18 inch wheel
*2: Models with 19 inch wheel
Regular
Size*1235/60R18 103HPressure*1
psi (kPa [kgf/cm2])Front35 (240 [2.4])Rear32 (220 [2.2])Size*2235/55R19 101HPressure*2
psi (kPa [kgf/cm2])Front33 (230 [2.3])Rear33 (230 [2.3])
Wheel SizeRegular18 x 7 1/2J*1
19 x 7 1/2J*2
* Not available on all models
Page 700 of 719

699Continued
Information
Emissions Testing
Testing of Readiness Codes
Your vehicle has readiness code as part of the onboard self diagnostic system.
Some states use these codes for testing to verify whether your vehicle’s emissions
components are working properly.
The codes may not be read properly if te sting is performed just after the 12-volt
battery has gone dead or been disconnected.
To check if they are set, set the powe r mode to ON, without turning the power
system on. The malfunction indicator lamp will come on for several seconds. If it
then goes off, the readiness co des are set. If it blinks five times, the readiness codes
are not set.
If you are required to have your vehicle te sted before the readiness codes are ready,
prepare the vehicle for retest ing by doing the following:
1. Fill the gas tank to approximately 3/4 full.
2. Park the vehicle and leave the power system off for six hours or more.
3. Make sure the ambient temperature is between 40°F and 95°F (4°C and 35°C).
4. Turn the power system on.1Testing of Readiness Codes
The readiness codes are erased when the 12-volt
battery is disconnected, and set again only after
several days of driving unde r a variety of conditions.
If a testing facility determines that the readiness
codes are not set, you may be requested to return at
a later date to complete the test.
If the testing facility determines the readiness codes
are still not set, see a dealer.
Page 709 of 719

Index
708
Index
Index
Numbers
12-Volt Battery.......................................... 640
Charging System Indicator ....................... 677
Maintenance (Checking the 12-Volt Battery) ............... 640
12-Volt Battery Charging System Indicator .................................................. 677
A
ABS (Anti-lock Brake System) ................... 580
Accessories and Modifications ................. 649
Accessory Power Socket ........................... 224
Acoustic Vehicle Alerting System ............ 469
Adaptive Cruise Control (ACC) with Low Speed Follow ................................... 109, 513
Additives Coolant ................................................... 618
Engine Oil ................................................ 615
Washer .................................................... 622
Adjusting
Armrest ................................................... 215
Clock ....................................................... 146
Front Seats .............................................. 205
Head Restraints........................................ 213
Mirrors .................................................... 203
Rear Seats................................................ 209
Sound.............................................. 247, 290
Steering Wheel ........................................ 202
Agile Handling Assist ................................ 478 Air Conditioning System
(Climate Control System) ....................... 232
Changing the Mode ................................ 232
Defrosting the Windshield and Windows ............................................... 234
Dust and Pollen Filter............................... 643
Recirculation/Fresh Air Mode ................... 233
Sensor ..................................................... 236
Synchronization Mode............................. 235
Using Automatic Climate Control ............ 232
Air Pressure ....................................... 632, 695
Airbags ........................................................ 59
Advanced Airbags ..................................... 65
Airbag Care............................................... 78
Event Data Recorder .................................... 0
Front Airbags (SRS) .................................... 62
Indicator............................................ 75, 104
Knee Airbags............................................. 67
Passenger Airbag Off Indicator .................. 76
Sensors ..................................................... 59
Side Airbags .............................................. 70
Side Curtain Airbags.................................. 73
All-Wheel Drive (AWD) ............................ 479
AM/FM Radio .................................... 249, 296
Android Auto ................................... 267, 336
Anti-lock Brake System (ABS) .................. 580
Indicator.................................................. 103
Apple CarPlay ................................... 263, 329
Armrest ..................................................... 215
AT&T Hotspot ........................................... 328
Audio ........................................................ 124 Audio Remote Controls
........................... 242
Audio System ........................... 238, 246, 271
Adjusting the Sound ....................... 247, 290
Android Auto.................................. 267, 336
Audio/Information Screen ....................... 273
Display Setup .................................. 248, 291
Error Messages ....................................... 345
General Information................................ 347
Home Screen .......................................... 278
How to Update ....................................... 284
How to Update Wirelessly ....................... 288
How to Update with a USB Device .......... 289
iPod ................................................ 251, 311
Limitations for Manual Operation ............................. 292, 402, 422
MP3/WMA/AAC ............................. 254, 314
Power Flow ............................................. 342
Reactivating ............................................ 241
Recommended Devices ........................... 348
Remote Controls ..................................... 242
Security Code ......................................... 241
Selecting an Audio Source ...................... 292
Start Up .................................................. 272
Status Area ............................................. 283
System Updates ...................................... 284
System Updates Settings ......................... 285
Theft Protection ...................................... 241
USB Flash Drives...................................... 348
USB Ports ................................................ 239
Wallpaper Setup ..................................... 276
Audio/Information Screen ....................... 273