2023 HONDA CRV ECO mode
[x] Cancel search: ECO modePage 609 of 719

608
uuMaintenance MinderTMuTo Use Maintenance MinderTM
Maintenance
U.S. models
· Adjust the valves during services A, B, 1, 2, or 3 if they are noisy.
*1: If a Maintenance Minder message does not appear more than 12 months after the display is reset,
change the engine oil every year.
# : See information on maintenance and emissions warranty in the first column on page 701.
CODEMaintenance Main Items
A
●Replace engine oil*1
B●Replace engine oil*1 and oil filter●Inspect front and rear brakes●Check expiration date for temporary tire repair kit
bottle
●Inspect these items: • Tie rod ends, steering gearbox, and boots
• Suspension components
• Driveshaft boots
• Brake hoses and lines (including ABS/VSA®)
• All fluid levels and condition of fluids
• Exhaust system
#
•Fuel lines and connections#
*2: If you drive in dusty conditions, replace the air cleaner element every 15,000 miles (24,000 km).
*3: If you drive primarily in urban areas that have high concentrations of soot in the air from industry and
from diesel-powered vehicles, replace the dust and pollen filter every 15,000 miles (24,000 km).
*4: Driving in mountainous areas at very low vehicle speeds results in higher transmission temperatures. This requires transmission fluid changes more frequently than recommended by the Maintenance
Minder. If you regularly drive your vehicle under these conditions, have the transmission fluid changed
every 47,500 miles (76,000 km) or 3 years.
*5: If a Maintenance Minder message does not appear more than 36 months after the display for item 7 is reset, change the brake fluid every 3 years.
CODEMaintenance Sub Items
1
●Rotate tires
2●Replace air cleaner element*2
●Replace dust and pollen filter*3
3●Replace transmission fluid*4
4●Replace spark plugs
5
●Replace engine coolant
6●Replace rear differential fluid*
7●Replace brake fluid*5
* Not available on all models
Page 610 of 719

609
uuMaintenance MinderTMuTo Use Maintenance MinderTM
Continued
Maintenance
Canadian models
· Adjust the valves during services A, 0, 9, 1, 2, or 3 if they are noisy.
*1: If a Maintenance Minder message does not appear more than 12 months after the display is reset,
change the engine oil every year.
*2: If you drive in dusty conditions, replace the air cleaner element every 24,000 km (15,000 miles).
*3: If you drive primarily in urban areas that have high concentrations of soot in the air from industry and from diesel-powered vehicles, replace the dust and pollen filter every 24,000 km (15,000 miles).
*4: Driving in mountainous areas at very low vehicle speeds results in higher transmission temperatures. This requires transmission fluid changes more frequently than recommended by the Maintenance
Minder. If you regularly drive your vehicle under these conditions, have the transmission fluid changed
every 76,000 km (47,500 miles) or 3 years.
*5: If a Maintenance Minder message does not appear more than 36 months after the display for item 7 is reset, change the brake fluid every 3 years.
# : See information on maintenance and emissions warranty in the first column on page 701.
CODEMaintenance Main Items
A
●Replace engine oil*1
0●Replace engine oil*1 and oil filter
CODEMaintenance Sub Items
1
●Rotate tires
2●Replace air cleaner element*2
●Replace dust and pollen filter*3
3●Replace transmission fluid*4
4●Replace spark plugs
5
●Replace engine coolant
6●Replace rear differential fluid
7
●Replace brake fluid*5
9●Service front and rear brakes●Check expiration date for temporary tire repair kit
bottle
●Inspect these items: • Tie rod ends, steering gearbox, and boots
• Suspension components
• Driveshaft boots
• Brake hoses and lines (including ABS/VSA ®)
• All fluid levels and condition of fluids
• Exhaust system
#
•Fuel lines and connections#
Page 611 of 719
uuMaintenance MinderTMuTo Use Maintenance MinderTM
610
Maintenance
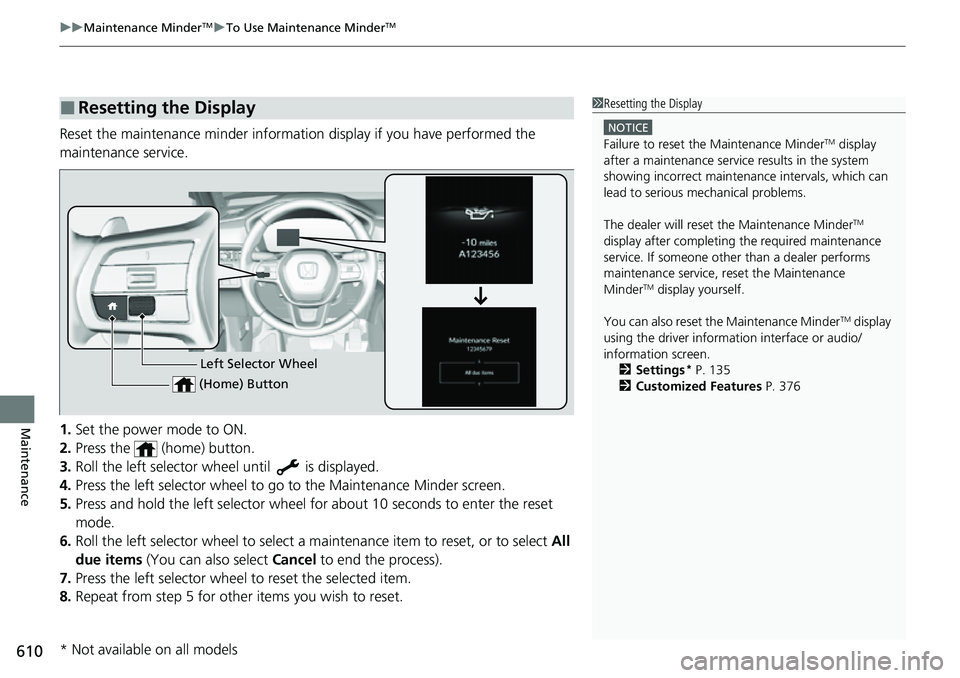
Reset the maintenance minder informat ion display if you have performed the
maintenance service.
1. Set the power mode to ON.
2. Press the (home) button.
3. Roll the left selector wheel until is displayed.
4. Press the left selector wheel to go to the Maintenance Minder screen.
5. Press and hold the left selector wheel fo r about 10 seconds to enter the reset
mode.
6. Roll the left selector wheel to select a ma intenance item to reset, or to select All
due items (You can also select Cancel to end the process).
7. Press the left selector wheel to reset the selected item.
8. Repeat from step 5 for other items you wish to reset.
■Resetting the Display1Resetting the Display
NOTICE
Failure to reset the Maintenance MinderTM display
after a maintenance servic e results in the system
showing incorrect maintenance intervals, which can
lead to serious mechanical problems.
The dealer will reset the Maintenance Minder
TM
display after completing th e required maintenance
service. If someone other than a dealer performs
maintenance service, reset the Maintenance
Minder
TM display yourself.
You can also reset the Maintenance Minder
TM display
using the driver information interface or audio/
information screen. 2 Settings
* P. 135
2 Customized Features P. 376Left Selector Wheel
(Home) Button
* Not available on all models
Page 628 of 719
627Continued
Maintenance
Checking and Maintaining Wiper Blades
Checking Wiper Blades
If the wiper blade rubber has deteriorated, it will leave streaks, become noisy, and
the hard surfaces of the blade may scratch the window glass.
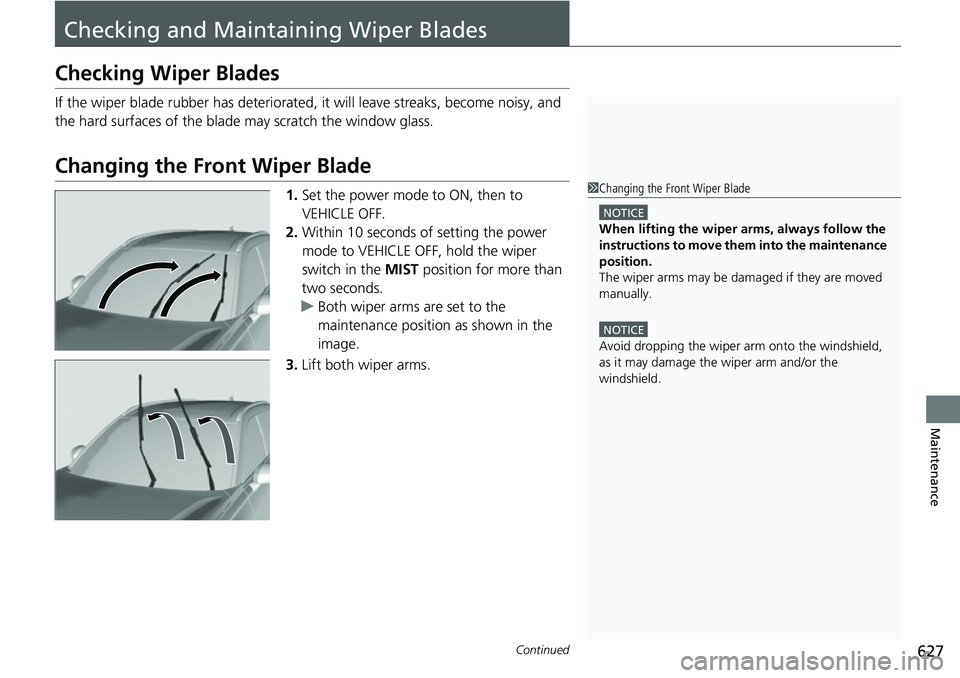
Changing the Front Wiper Blade
1.Set the power mode to ON, then to
VEHICLE OFF.
2. Within 10 seconds of setting the power
mode to VEHICLE OFF, hold the wiper
switch in the MIST position for more than
two seconds.
u Both wiper arms are set to the
maintenance position as shown in the
image.
3. Lift both wiper arms.1Changing the Front Wiper Blade
NOTICE
When lifting the wiper arms, always follow the
instructions to move them into the maintenance
position.
The wiper arms may be damaged if they are moved
manually.
NOTICE
Avoid dropping the wiper arm onto the windshield,
as it may damage the wiper arm and/or the
windshield.
Page 632 of 719
631
Maintenance
Checking and Maintaining Tires
Checking Tires
To safely operate your vehicle, your tires must be of the proper type and size, in
good condition with adequate tread, and properly inflated.
■Inflation guidelines
Properly inflated tires provid e the best combination of hand ling, tread life, and comfort.
Refer to the driver’s doorjamb label or spec ifications page for the specified pressure.
Underinflated tires wear unev enly, adversely affect handling and fuel economy, and
are more likely to fail from overheating.
Overinflated tires make your vehicle ride ha rshly, are more prone to road hazards,
and wear unevenly.
Every day before you drive, look at each of the tires. If one looks lower than the
others, check the pressure with a tire gauge.
At least once a month or before long trips , use a gauge to measure the pressure in
all tires. Even tires in good condition can lose 1–2 psi (10–20 kPa, 0.1–0.2 kgf/cm
2)
per month.
■Inspection guidelines
Every time you check inflation, also examine the tires and valve stems.
Look for:
• Bumps or bulges on the side or in the tread. Replace the tire if you find any cuts,
splits, or cracks in the side of the tire . Replace it if you see fabric or cord.
• Remove any foreign objects and inspect for air leaks.
• Uneven tread wear. Have a deal er check the wheel alignment.
• Excessive tread wear.
2 Wear Indicators P. 636
•Cracks or other damage around valve stem.
1Checking Tires
Measure the air pressure when tires are cold. This
means the vehicle has been parked for at least three
hours, or driven less than 1 mile (1.6 km). If
necessary, add or releas e air until the specified
pressure is reached.
If checked when hot, tire pressure can be as much as
4–6 psi (30–40 kPa, 0.3–0.4 kgf/cm
2) higher than if
checked when cold.
Whenever tire pressure is adjusted, you must
calibrate the TPMS. 2 Tire Pressure Monitoring System (TPMS)
P. 480
Have a dealer check the tires if you feel a consistent
vibration while driving. Ne w tires and any that have
been removed and reinst alled should be properly
balanced.
3WARNING
Using tires that are excessively worn or
improperly inflated can cause a crash in
which you can be seriously hurt or killed.
Follow all instruction s in this owner’s
manual regarding ti re inflation and
maintenance.
U.S. models
Page 640 of 719
639
uuChecking and Maintaining Tires uWinter Tires
Maintenance
Winter Tires
If driving on snowy or frozen roads, mount all season marked M+S tires, snow tires,
or tire chains; reduce speed; and maintain sufficient distance between vehicles when
driving.
Be particularly careful wh en operating the steering wheel or brakes to prevent
skidding.
Use tire chains, snow tires, or all season tires when necessary or according to the law.
When mounting, refer to the following points.
For winter tires:
• Select the size and load ranges that are the same as the original tires.
• Mount the tires to all four wheels.
For tire chains:
• Install them on the front tires only.
• Because your vehicle has limited tire clea rance, we strongly recommend using the
chains listed below:
• Follow the chain manufactur er's instruction when installing. Mount them as
tightly as you can.
• Check that the chains do not touc h the brake lines or suspension.
• Drive slowly.
Cable-type: SCC RADIAL CHAIN TC2212MM
Cable-type: SCC RADIAL CHAIN TC2111MM
1Winter Tires
NOTICE
Traction devices that are the wrong size or improperly
installed can damage your vehicle's brake lines,
suspension, body, and wheels. Stop driving if they are
hitting any part of the vehicle.
When tire chains are mounted, follow the chain
manufacturer's instructi ons regarding vehicle
operational limits.
If your vehicle is equipp ed with summer tires, be
aware that these tires are not designed for winter
driving conditions. For more information, contact a
dealer.
3WARNING
Using the wrong chains, or not properly
installing chains, can damage the brake
lines and cause a crash in which you can be
seriously injured or killed.
Follow all instruction s in this owner's
manual regarding the selection and use of
tire chains.
Models with 235/60R18 tires
Models with 235/55R19 tires
Page 642 of 719
641
uu12-Volt Battery uCharging the 12-Volt Battery
Maintenance
Charging the 12-Volt Battery
Disconnect both battery cables to prevent damaging your vehicle's electrical system.
Always disconnect the negative (–) cable first, and reconnect it last.112-Volt Battery
When you find corrosion, cl ean the battery terminals
by applying a baking powder and water solution.
Clean the terminals with a damp towel. Cloth/towel
dry the battery. Coat the terminals with grease to
help prevent future corrosion.
When replacing the battery, the replacement must be
of the same specifications.
Consult a dealer for more information.
The Vehicle Stability Assist
TM (VSA ®) system, brake
system (Amber), Adaptive Cruise Control (ACC) with
Low Speed Follow, low tire pressure/ TPMS
* and
safety support indicators may come on in amber
along with a message in the gauge when you set the
power mode to ON after reconnecting the 12-volt
battery.
Drive a short distance at mo re than 12 mph (20 km/h).
Each indicator should go off. If any do not, have your
vehicle checked by a dealer.
* Not available on all models
Page 644 of 719
643
Maintenance
Climate Control System Maintenance
Air Conditioning
To ensure proper and safe operation, the Society of Automotive Engineers (SAE
J2845) recommends that the refrigerant system only be serviced by trained and
certified technicians.
Never repair or replace the air conditio ning evaporator (cooling coil) with one
removed from a used or salvaged vehicle.
New replacement mobile air conditioning evaporators must be certified (and
labeled) as meeting SAE Standard J2842.
Dust and Pollen Filter
The climate control system is equipped with a dust and pollen filter that collects
pollen, dust, and other debris in the air. The Maintenance MinderTM messages will let
you know when to replace the filter.
We recommend that you repl ace the dust and pollen filter sooner when using your
vehicle in areas with high concentrations of dust.
1 Climate Control System Maintenance
NOTICE
Vented refrigerant is harmful to the environment.
To avoid refrigerant from venting, never replace the
evaporator with one re moved from a used or
salvaged vehicle.
Refrigerant in your vehicle’ s air conditioning system is
flammable and can be igni ted during servicing if
proper procedures are not followed.
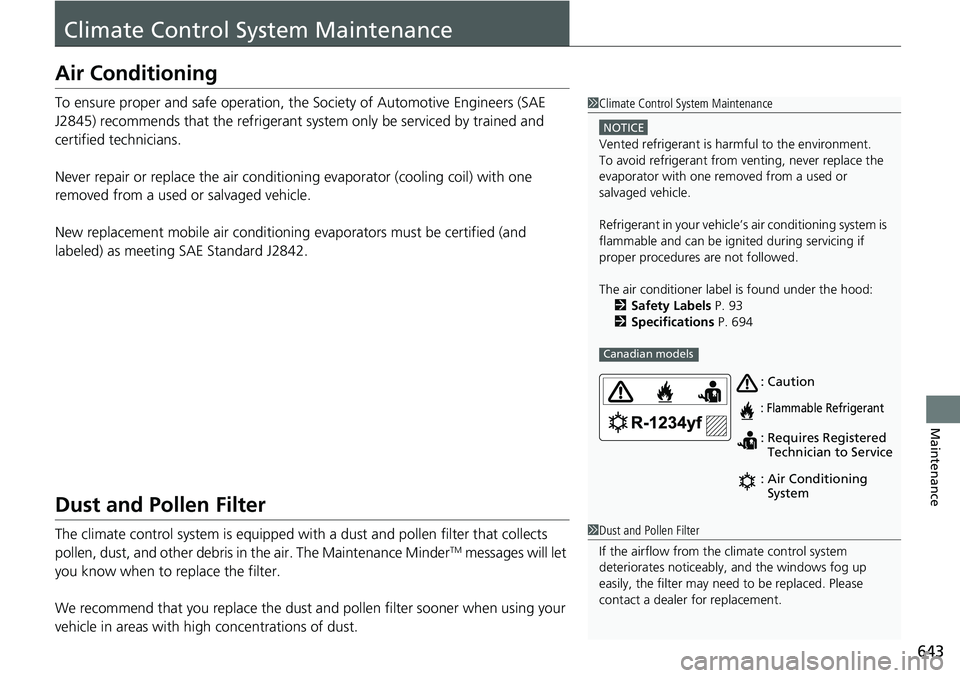
The air conditioner labe l is found under the hood:
2 Safety Labels P. 93
2 Specifications P. 694
Canadian models
: Caution
: Flammable Refrigerant
:
: Requires Registered
Technician to Service
Air Conditioning
System
1
Dust and Pollen Filter
If the airflow from the climate control system
deteriorates noticeably, and the windows fog up
easily, the filter may need to be replaced. Please
contact a dealer for replacement.