Page 336 of 430
GMC Sierra/Sierra Denali 2500 HD/3500 HD Owner Manual (GMNA-
Localizing-U.S./Canada-16504257) - 2023 - CRC - 5/18/22
Vehicle Care 335
To access the back of the fuse block:
1. Push the tab at the top of fuseblock down.
2. Pull the top of the fuse block outward.
3. Reverse Steps 1–2 to reinstall.
Back
The vehicle may not be equipped with all of
the fuses, relays, and features shown.
Page 337 of 430
GMC Sierra/Sierra Denali 2500 HD/3500 HD Owner Manual (GMNA-
Localizing-U.S./Canada-16504257) - 2023 - CRC - 5/18/22
336 Vehicle Care
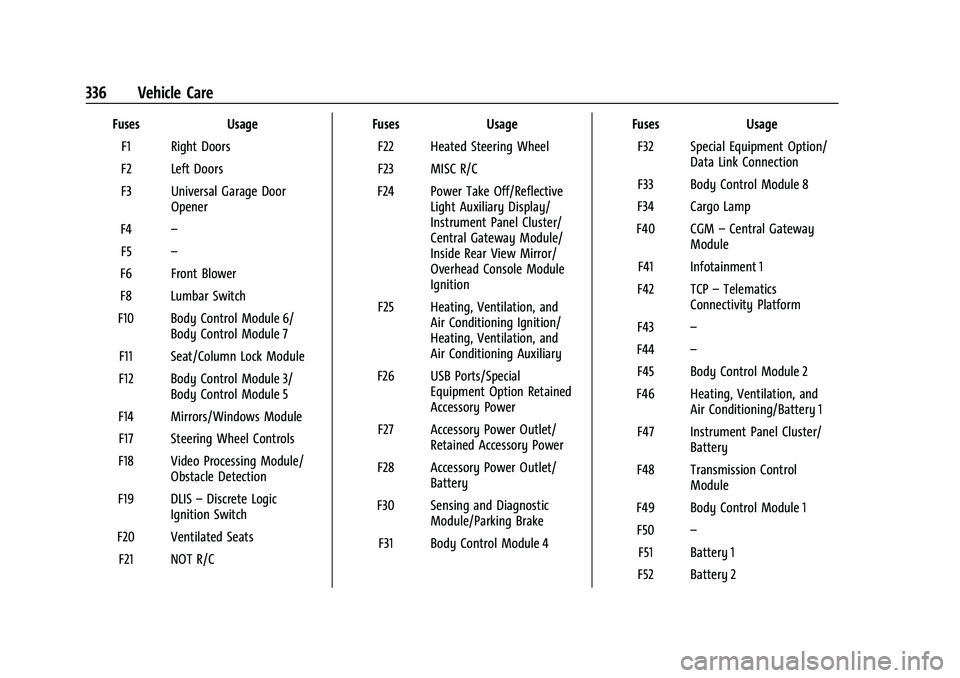
FusesUsage
F1 Right Doors
F2 Left Doors
F3 Universal Garage Door Opener
F4 –
F5 –
F6 Front Blower
F8 Lumbar Switch
F10 Body Control Module 6/ Body Control Module 7
F11 Seat/Column Lock Module
F12 Body Control Module 3/ Body Control Module 5
F14 Mirrors/Windows Module F17 Steering Wheel Controls
F18 Video Processing Module/ Obstacle Detection
F19 DLIS –Discrete Logic
Ignition Switch
F20 Ventilated Seats F21 NOT R/C Fuses
Usage
F22 Heated Steering Wheel
F23 MISC R/C
F24 Power Take Off/Reflective Light Auxiliary Display/
Instrument Panel Cluster/
Central Gateway Module/
Inside Rear View Mirror/
Overhead Console Module
Ignition
F25 Heating, Ventilation, and Air Conditioning Ignition/
Heating, Ventilation, and
Air Conditioning Auxiliary
F26 USB Ports/Special Equipment Option Retained
Accessory Power
F27 Accessory Power Outlet/ Retained Accessory Power
F28 Accessory Power Outlet/ Battery
F30 Sensing and Diagnostic Module/Parking Brake
F31 Body Control Module 4 Fuses
Usage
F32 Special Equipment Option/ Data Link Connection
F33 Body Control Module 8
F34 Cargo Lamp
F40 CGM –Central Gateway
Module
F41 Infotainment 1
F42 TCP –Telematics
Connectivity Platform
F43 –
F44 –
F45 Body Control Module 2
F46 Heating, Ventilation, and Air Conditioning/Battery 1
F47 Instrument Panel Cluster/ Battery
F48 Transmission Control Module
F49 Body Control Module 1 F50 –
F51 Battery 1
F52 Battery 2
Page 354 of 430

GMC Sierra/Sierra Denali 2500 HD/3500 HD Owner Manual (GMNA-
Localizing-U.S./Canada-16504257) - 2023 - CRC - 5/18/22
Vehicle Care 353
If the vehicle tires must be replaced
with a tire that does not have a TPC
Spec number, make sure they are the
same size, load range, speed rating, and
construction (radial) as the original
tires.
The Tire and Loading Information label
indicates the original equipment tires
on the vehicle. SeeVehicle Load Limits
0 215.
Different Size Tires and Wheels
If wheels or tires are installed that are a
different size than the original equipment
wheels and tires, vehicle performance,
including its braking, ride and handling
characteristics, stability, and resistance to
rollover may be affected. If the vehicle has
electronic systems such as antilock brakes,
rollover airbags, traction control, electronic
stability control, or All-Wheel Drive, the
performance of these systems can also be
affected.
{Warning
If different sized wheels are used, there
may not be an acceptable level of
performance and safety if tires not
recommended for those wheels are
selected. This increases the chance of a
crash and serious injury. Only use GM
specific wheel and tire systems developed
for the vehicle, and have them properly
installed by a GM certified technician.
See Buying New Tires 0352 and
Accessories and Modifications 0302.
Uniform Tire Quality Grading
The following information relates to the
system developed by the United States
National Highway Traffic Safety
Administration (NHTSA), which grades
tires by treadwear, traction, and
temperature performance. This applies
only to vehicles sold in the United
States. The grades are molded on the
sidewalls of most passenger car tires.
The Uniform Tire Quality Grading
(UTQG) system does not apply to deep
tread, winter tires, compact spare tires, tires with nominal rim diameters of
10 to 12 inches (25 to 30 cm), or to some
limited-production tires.
While the tires available on General
Motors passenger cars and light trucks
may vary with respect to these grades,
they must also conform to federal
safety requirements and additional
General Motors Tire Performance
Criteria (TPC) standards.
Quality grades can be found where
applicable on the tire sidewall between
tread shoulder and maximum section
width. For example:Treadwear 200 Traction AA Temperature A
All Passenger Car Tires Must Conform to
Federal Safety Requirements In Addition
To These Grades.
Treadwear
The treadwear grade is a comparative
rating based on the wear rate of the
tire when tested under controlled
conditions on a specified government
test course. For example, a tire graded
150 would wear one and one-half (1½)
Page 358 of 430
GMC Sierra/Sierra Denali 2500 HD/3500 HD Owner Manual (GMNA-
Localizing-U.S./Canada-16504257) - 2023 - CRC - 5/18/22
Vehicle Care 357
Warning (Continued)
4. Turn off the engine and do notrestart while the vehicle is raised.
5. Do not allow passengers to remain in the vehicle.
6. Place wheel blocks, if equipped, on both sides of the tire at the opposite
corner of the tire being changed.
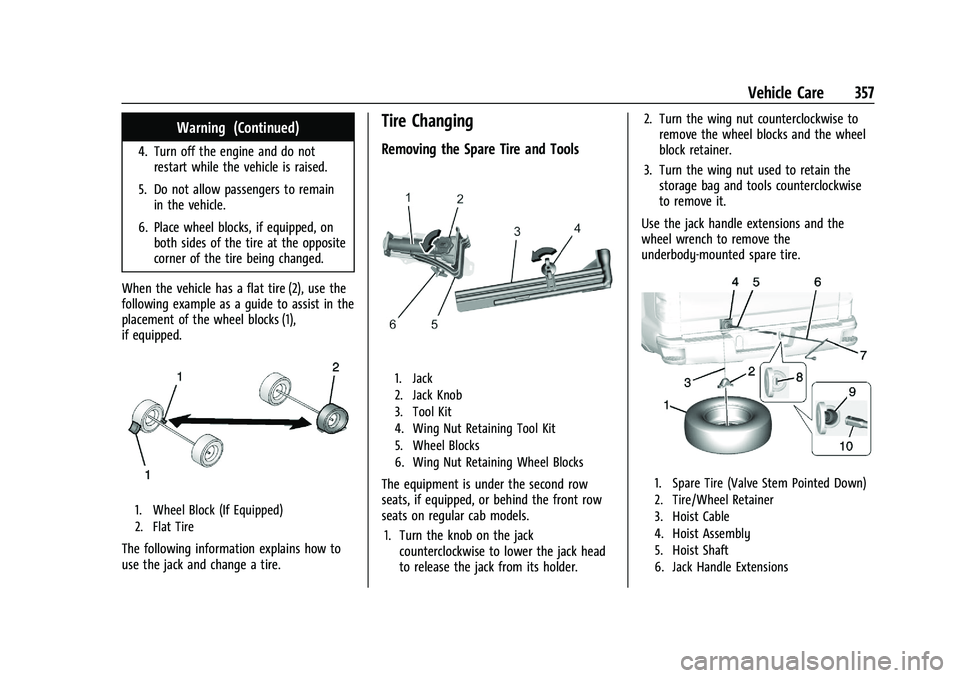
When the vehicle has a flat tire (2), use the
following example as a guide to assist in the
placement of the wheel blocks (1),
if equipped.
1. Wheel Block (If Equipped)
2. Flat Tire
The following information explains how to
use the jack and change a tire.
Tire Changing
Removing the Spare Tire and Tools
1. Jack
2. Jack Knob
3. Tool Kit
4. Wing Nut Retaining Tool Kit
5. Wheel Blocks
6. Wing Nut Retaining Wheel Blocks
The equipment is under the second row
seats, if equipped, or behind the front row
seats on regular cab models. 1. Turn the knob on the jack counterclockwise to lower the jack head
to release the jack from its holder. 2. Turn the wing nut counterclockwise to
remove the wheel blocks and the wheel
block retainer.
3. Turn the wing nut used to retain the storage bag and tools counterclockwise
to remove it.
Use the jack handle extensions and the
wheel wrench to remove the
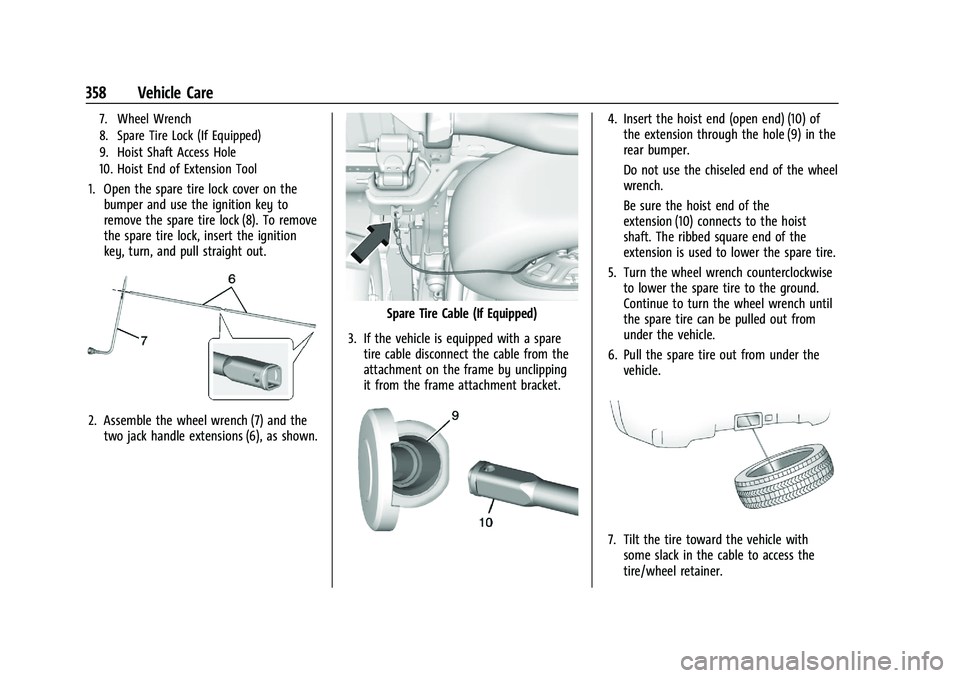
underbody-mounted spare tire.1. Spare Tire (Valve Stem Pointed Down)
2. Tire/Wheel Retainer
3. Hoist Cable
4. Hoist Assembly
5. Hoist Shaft
6. Jack Handle Extensions
Page 359 of 430
GMC Sierra/Sierra Denali 2500 HD/3500 HD Owner Manual (GMNA-
Localizing-U.S./Canada-16504257) - 2023 - CRC - 5/18/22
358 Vehicle Care
7. Wheel Wrench
8. Spare Tire Lock (If Equipped)
9. Hoist Shaft Access Hole
10. Hoist End of Extension Tool
1. Open the spare tire lock cover on thebumper and use the ignition key to
remove the spare tire lock (8). To remove
the spare tire lock, insert the ignition
key, turn, and pull straight out.
2. Assemble the wheel wrench (7) and thetwo jack handle extensions (6), as shown.
Spare Tire Cable (If Equipped)
3. If the vehicle is equipped with a spare tire cable disconnect the cable from the
attachment on the frame by unclipping
it from the frame attachment bracket.
4. Insert the hoist end (open end) (10) ofthe extension through the hole (9) in the
rear bumper.
Do not use the chiseled end of the wheel
wrench.
Be sure the hoist end of the
extension (10) connects to the hoist
shaft. The ribbed square end of the
extension is used to lower the spare tire.
5. Turn the wheel wrench counterclockwise to lower the spare tire to the ground.
Continue to turn the wheel wrench until
the spare tire can be pulled out from
under the vehicle.
6. Pull the spare tire out from under the vehicle.
7. Tilt the tire toward the vehicle withsome slack in the cable to access the
tire/wheel retainer.
Page 360 of 430
GMC Sierra/Sierra Denali 2500 HD/3500 HD Owner Manual (GMNA-
Localizing-U.S./Canada-16504257) - 2023 - CRC - 5/18/22
Vehicle Care 359
Tilt the retainer and pull it through the
center of the wheel along with the cable
and spring.
8. Put the spare tire near the flat tire.
9. If equipped with a spare tire cable remove the cable from the spare tire by
passing the clip through the looped end
of the cable.
Removing the Flat Tire and Installing the
Spare Tire
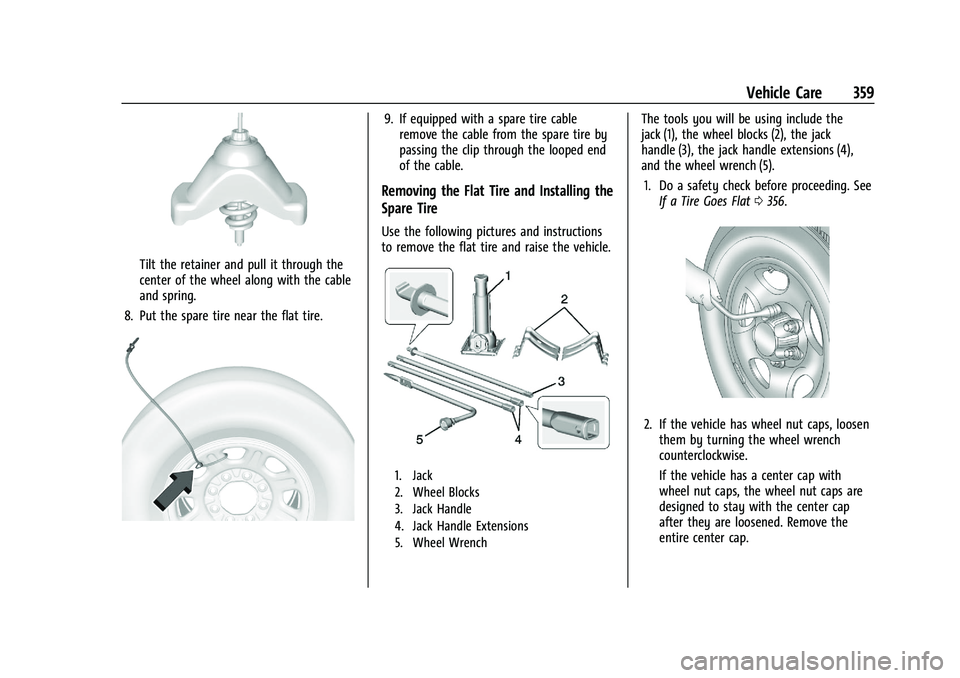
Use the following pictures and instructions
to remove the flat tire and raise the vehicle.
1. Jack
2. Wheel Blocks
3. Jack Handle
4. Jack Handle Extensions
5. Wheel Wrench
The tools you will be using include the
jack (1), the wheel blocks (2), the jack
handle (3), the jack handle extensions (4),
and the wheel wrench (5).
1. Do a safety check before proceeding. See If a Tire Goes Flat 0356.
2. If the vehicle has wheel nut caps, loosen
them by turning the wheel wrench
counterclockwise.
If the vehicle has a center cap with
wheel nut caps, the wheel nut caps are
designed to stay with the center cap
after they are loosened. Remove the
entire center cap.
Page 361 of 430
GMC Sierra/Sierra Denali 2500 HD/3500 HD Owner Manual (GMNA-
Localizing-U.S./Canada-16504257) - 2023 - CRC - 5/18/22
360 Vehicle Care
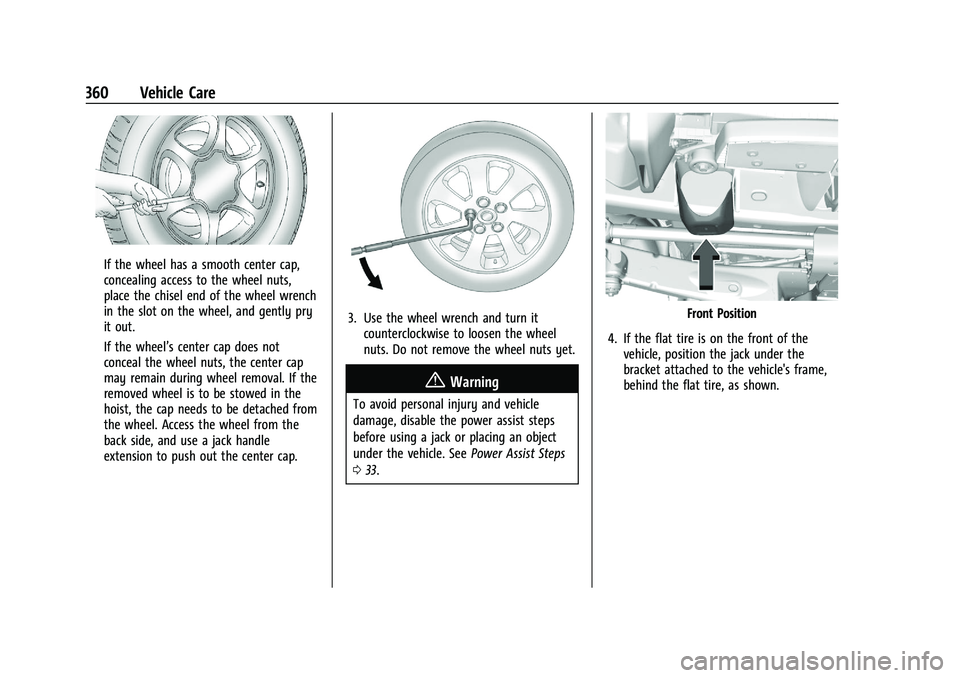
If the wheel has a smooth center cap,
concealing access to the wheel nuts,
place the chisel end of the wheel wrench
in the slot on the wheel, and gently pry
it out.
If the wheel’s center cap does not
conceal the wheel nuts, the center cap
may remain during wheel removal. If the
removed wheel is to be stowed in the
hoist, the cap needs to be detached from
the wheel. Access the wheel from the
back side, and use a jack handle
extension to push out the center cap.
3. Use the wheel wrench and turn itcounterclockwise to loosen the wheel
nuts. Do not remove the wheel nuts yet.
{Warning
To avoid personal injury and vehicle
damage, disable the power assist steps
before using a jack or placing an object
under the vehicle. See Power Assist Steps
0 33.
Front Position
4. If the flat tire is on the front of the vehicle, position the jack under the
bracket attached to the vehicle's frame,
behind the flat tire, as shown.
Page 362 of 430
GMC Sierra/Sierra Denali 2500 HD/3500 HD Owner Manual (GMNA-
Localizing-U.S./Canada-16504257) - 2023 - CRC - 5/18/22
Vehicle Care 361
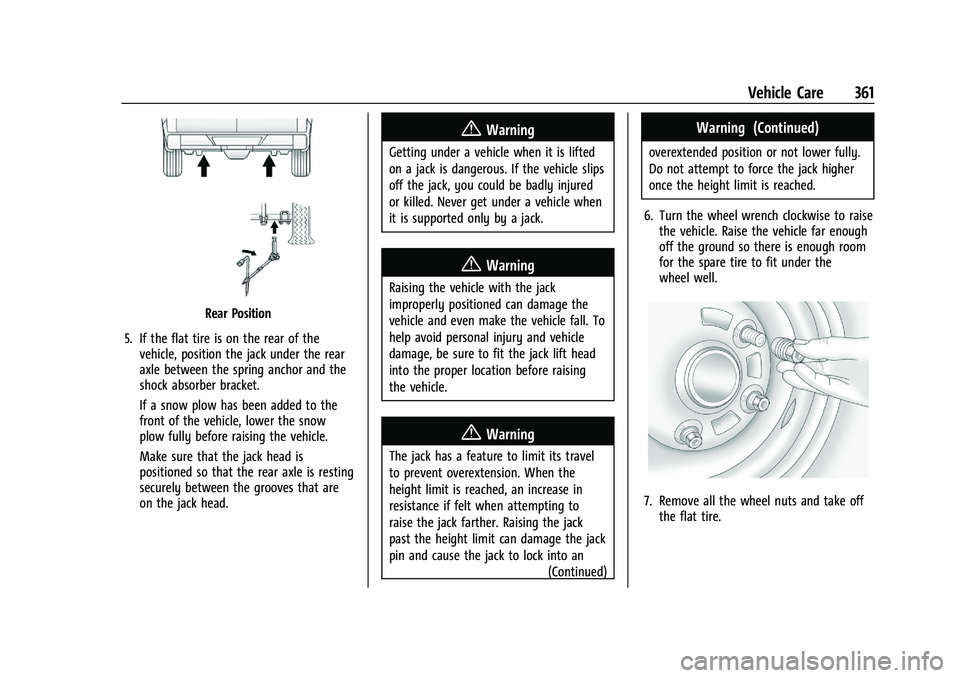
Rear Position
5. If the flat tire is on the rear of the vehicle, position the jack under the rear
axle between the spring anchor and the
shock absorber bracket.
If a snow plow has been added to the
front of the vehicle, lower the snow
plow fully before raising the vehicle.
Make sure that the jack head is
positioned so that the rear axle is resting
securely between the grooves that are
on the jack head.
{Warning
Getting under a vehicle when it is lifted
on a jack is dangerous. If the vehicle slips
off the jack, you could be badly injured
or killed. Never get under a vehicle when
it is supported only by a jack.
{Warning
Raising the vehicle with the jack
improperly positioned can damage the
vehicle and even make the vehicle fall. To
help avoid personal injury and vehicle
damage, be sure to fit the jack lift head
into the proper location before raising
the vehicle.
{Warning
The jack has a feature to limit its travel
to prevent overextension. When the
height limit is reached, an increase in
resistance if felt when attempting to
raise the jack farther. Raising the jack
past the height limit can damage the jack
pin and cause the jack to lock into an
(Continued)
Warning (Continued)
overextended position or not lower fully.
Do not attempt to force the jack higher
once the height limit is reached.
6. Turn the wheel wrench clockwise to raise the vehicle. Raise the vehicle far enough
off the ground so there is enough room
for the spare tire to fit under the
wheel well.
7. Remove all the wheel nuts and take offthe flat tire.