2023 FORD SUPER DUTY remove seats
[x] Cancel search: remove seatsPage 45 of 738
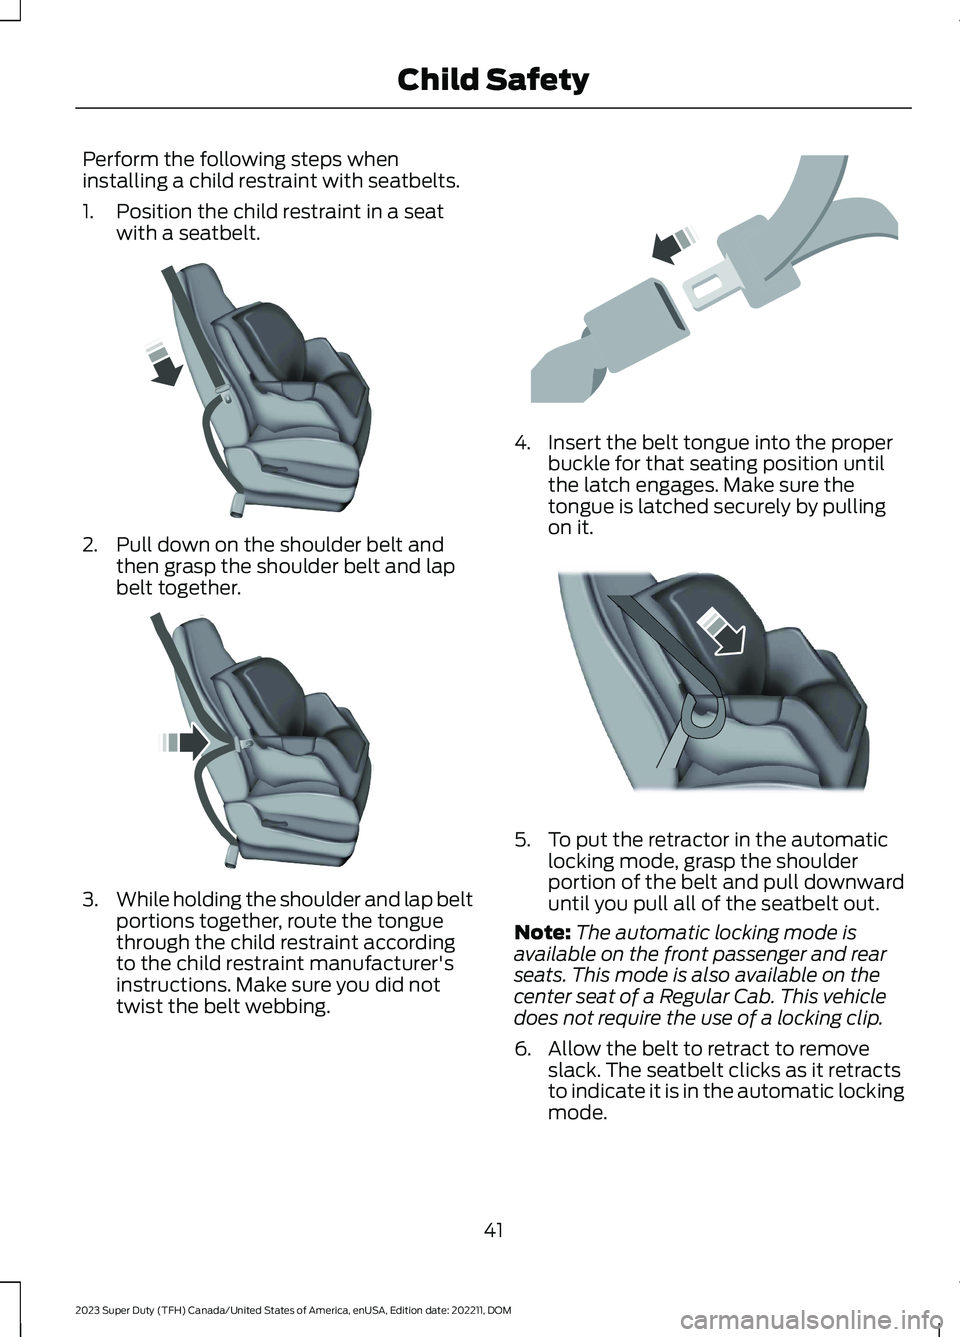
Perform the following steps wheninstalling a child restraint with seatbelts.
1.Position the child restraint in a seatwith a seatbelt.
2.Pull down on the shoulder belt andthen grasp the shoulder belt and lapbelt together.
3.While holding the shoulder and lap beltportions together, route the tonguethrough the child restraint accordingto the child restraint manufacturer'sinstructions. Make sure you did nottwist the belt webbing.
4.Insert the belt tongue into the properbuckle for that seating position untilthe latch engages. Make sure thetongue is latched securely by pullingon it.
5.To put the retractor in the automaticlocking mode, grasp the shoulderportion of the belt and pull downwarduntil you pull all of the seatbelt out.
Note:The automatic locking mode isavailable on the front passenger and rearseats. This mode is also available on thecenter seat of a Regular Cab. This vehicledoes not require the use of a locking clip.
6.Allow the belt to retract to removeslack. The seatbelt clicks as it retractsto indicate it is in the automatic lockingmode.
41
2023 Super Duty (TFH) Canada/United States of America, enUSA, Edition date: 202211, DOMChild SafetyE142529 E142530 E142531 E142875
Page 51 of 738
If you did not properly anchor the childrestraint, the risk of a child being injured ina crash greatly increases.
If your child restraint system has a tetherstrap, and the child restraint manufacturerrecommends its use, we also recommendits use.
BOOSTER SEATS
Use a belt-positioning booster seat forchildren who have outgrown or no longerproperly fit in a child restraint and meetthe following criteria.
•Generally children who are less than57 in (1.45 m) tall.
•Are greater than age four (4) and lessthan age twelve (12).
•Are between 40 lb (18 kg) and 80 lb(36 kg) and upward to 100 lb (45 kg).
Many state and provincial laws require thatchildren use approved booster seats untilthey reach age eight, a height of 57 in(1.45 m) tall, or 80 lb (36 kg).
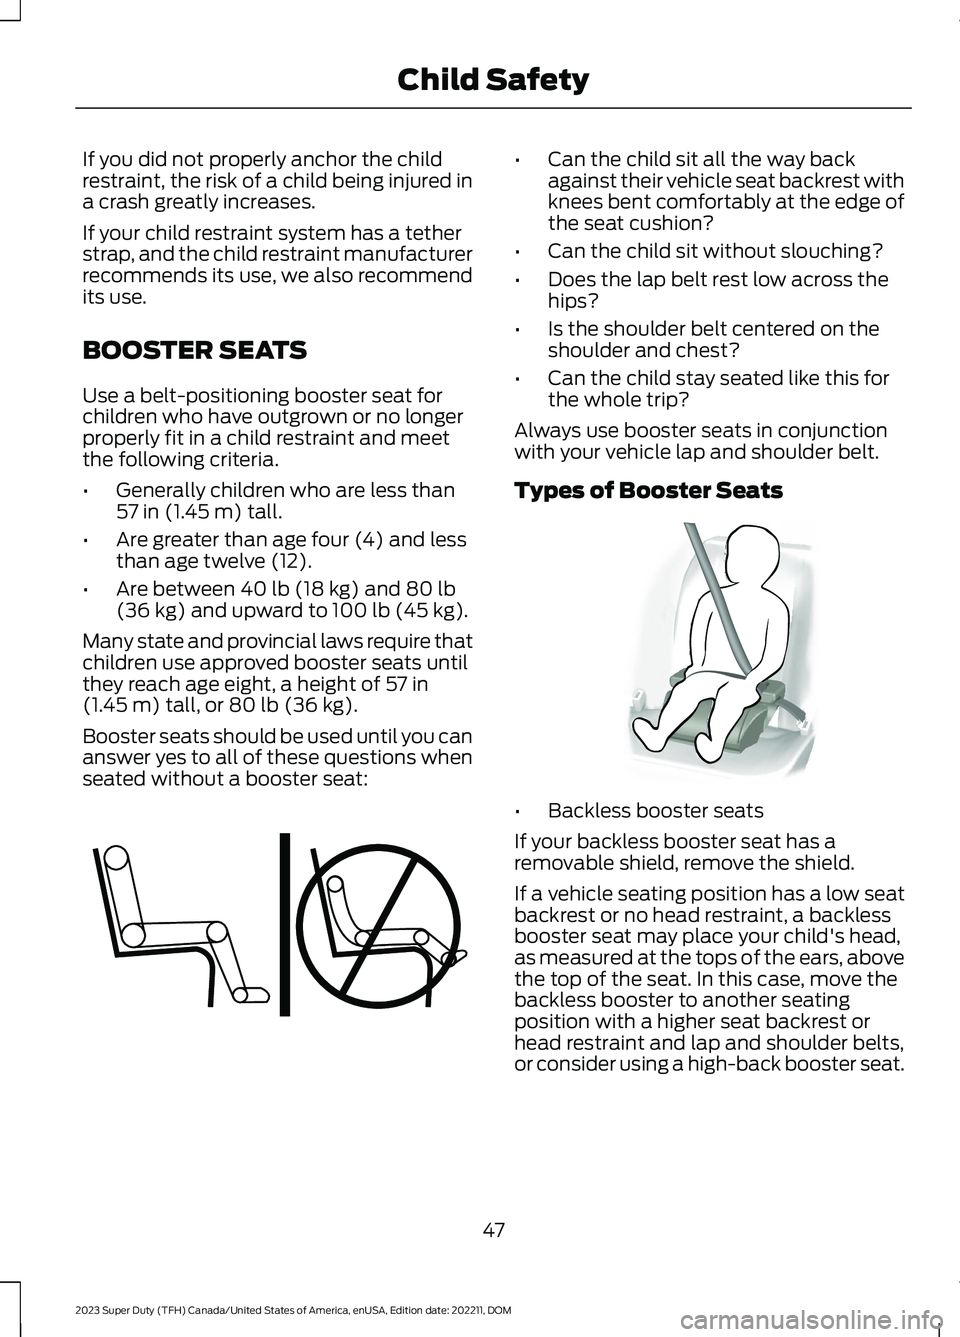
Booster seats should be used until you cananswer yes to all of these questions whenseated without a booster seat:
•Can the child sit all the way backagainst their vehicle seat backrest withknees bent comfortably at the edge ofthe seat cushion?
•Can the child sit without slouching?
•Does the lap belt rest low across thehips?
•Is the shoulder belt centered on theshoulder and chest?
•Can the child stay seated like this forthe whole trip?
Always use booster seats in conjunctionwith your vehicle lap and shoulder belt.
Types of Booster Seats
•Backless booster seats
If your backless booster seat has aremovable shield, remove the shield.
If a vehicle seating position has a low seatbackrest or no head restraint, a backlessbooster seat may place your child's head,as measured at the tops of the ears, abovethe top of the seat. In this case, move thebackless booster to another seatingposition with a higher seat backrest orhead restraint and lap and shoulder belts,or consider using a high-back booster seat.
47
2023 Super Duty (TFH) Canada/United States of America, enUSA, Edition date: 202211, DOMChild SafetyE142595 E68924
Page 65 of 738
Switching the Passenger AirbagOff
WARNING: If the light does notilluminate when the passenger airbagswitch is off and you switch the ignitionon, have the passenger airbag switchserviced immediately by a qualifiedtechnician.
WARNING: To avoid switching onthe airbag, always remove the ignitionkey with the switch in the off position.
WARNING: If your vehicle has rearseats, always transport children who are12 and younger in the rear seat. Alwaysuse seatbelts and child restraintsproperly. Do not place a child in a rearfacing infant seat in the front seat unlessyour vehicle is equipped with an airbagon and off switch and the passengerairbag is turned off. This is because theback of the infant seat is too close to theinflating airbag and the risk of a fatalinjury to the infant when the airbaginflates is substantial.
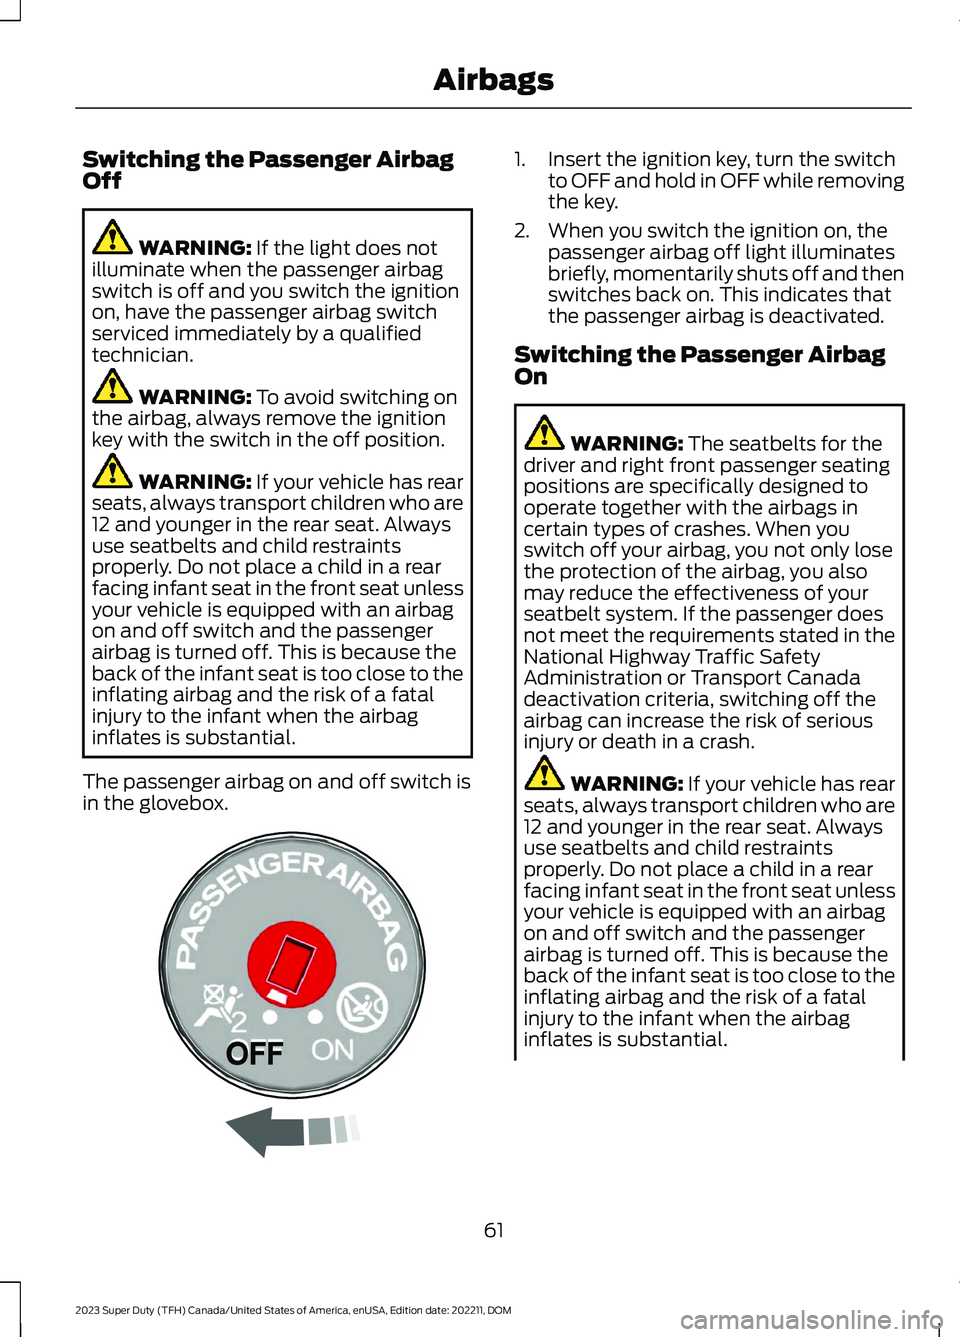
The passenger airbag on and off switch isin the glovebox.
1.Insert the ignition key, turn the switchto OFF and hold in OFF while removingthe key.
2.When you switch the ignition on, thepassenger airbag off light illuminatesbriefly, momentarily shuts off and thenswitches back on. This indicates thatthe passenger airbag is deactivated.
Switching the Passenger AirbagOn
WARNING: The seatbelts for thedriver and right front passenger seatingpositions are specifically designed tooperate together with the airbags incertain types of crashes. When youswitch off your airbag, you not only losethe protection of the airbag, you alsomay reduce the effectiveness of yourseatbelt system. If the passenger doesnot meet the requirements stated in theNational Highway Traffic SafetyAdministration or Transport Canadadeactivation criteria, switching off theairbag can increase the risk of seriousinjury or death in a crash.
WARNING: If your vehicle has rearseats, always transport children who are12 and younger in the rear seat. Alwaysuse seatbelts and child restraintsproperly. Do not place a child in a rearfacing infant seat in the front seat unlessyour vehicle is equipped with an airbagon and off switch and the passengerairbag is turned off. This is because theback of the infant seat is too close to theinflating airbag and the risk of a fatalinjury to the infant when the airbaginflates is substantial.
61
2023 Super Duty (TFH) Canada/United States of America, enUSA, Edition date: 202211, DOMAirbagsE181522
Page 158 of 738
Turn the control on the right-hand side ofthe climate control to set the right-handtemperature.
DIRECTING THE FLOW OF AIR
Directing Air to the Windshield AirVents
Press the button to activate theselection screen.
Press the button on thetouchscreen.
Directing Air to the InstrumentPanel Air Vents
Press the button to activate theselection screen.
Press the button on thetouchscreen.
Directing Air to the Footwell AirVents
Press the button to activate theselection screen.
Press the button on thetouchscreen.
AUTO MODE
SWITCHING AUTO MODE ON ANDOFF
Press the button to switch automode on. Repeatedly press thebutton to adjust auto mode.
Note:When you switch auto mode on,lights on the blower motor control do notilluminate to indicate the blower motorspeed.
Adjust the blower motor control or airdistribution control to switch auto modeoff.
SWITCHING DUAL MODE ON ANDOFF
Press the button.
CLIMATE CONTROL HINTS
General Hints
•Prolonged use of recirculated air maycause the windows to fog up.
•You may feel a small amount of airfrom the footwell air vents regardlessof the air distribution setting.
•To reduce humidity build-up inside yourvehicle, do not drive with the systemswitched off or with recirculated airalways switched on.
•Do not place objects under the frontseats as this may interfere with theairflow to the rear seats.
•Remove any snow, ice or leaves fromthe air intake area at the base of thewindshield.
•To improve the time to reach acomfortable temperature in hotweather, drive with the windows openuntil you feel cold air through the airvents.
154
2023 Super Duty (TFH) Canada/United States of America, enUSA, Edition date: 202211, DOMClimate Control - Vehicles With: Automatic Temperature
ControlE265283 E265283 E244097 E265283 E244098 E265280
Page 162 of 738
Note:Do not clean the mirror housing orglass with harsh abrasives, fuel or otherpetroleum-based cleaning products. Thevehicle warranty may not cover damagecaused to the mirror housing or glass.
Note:The engine must be running or yourvehicle must be ready to drive to switch thesystem on.
SETTING THE TEMPERATURE
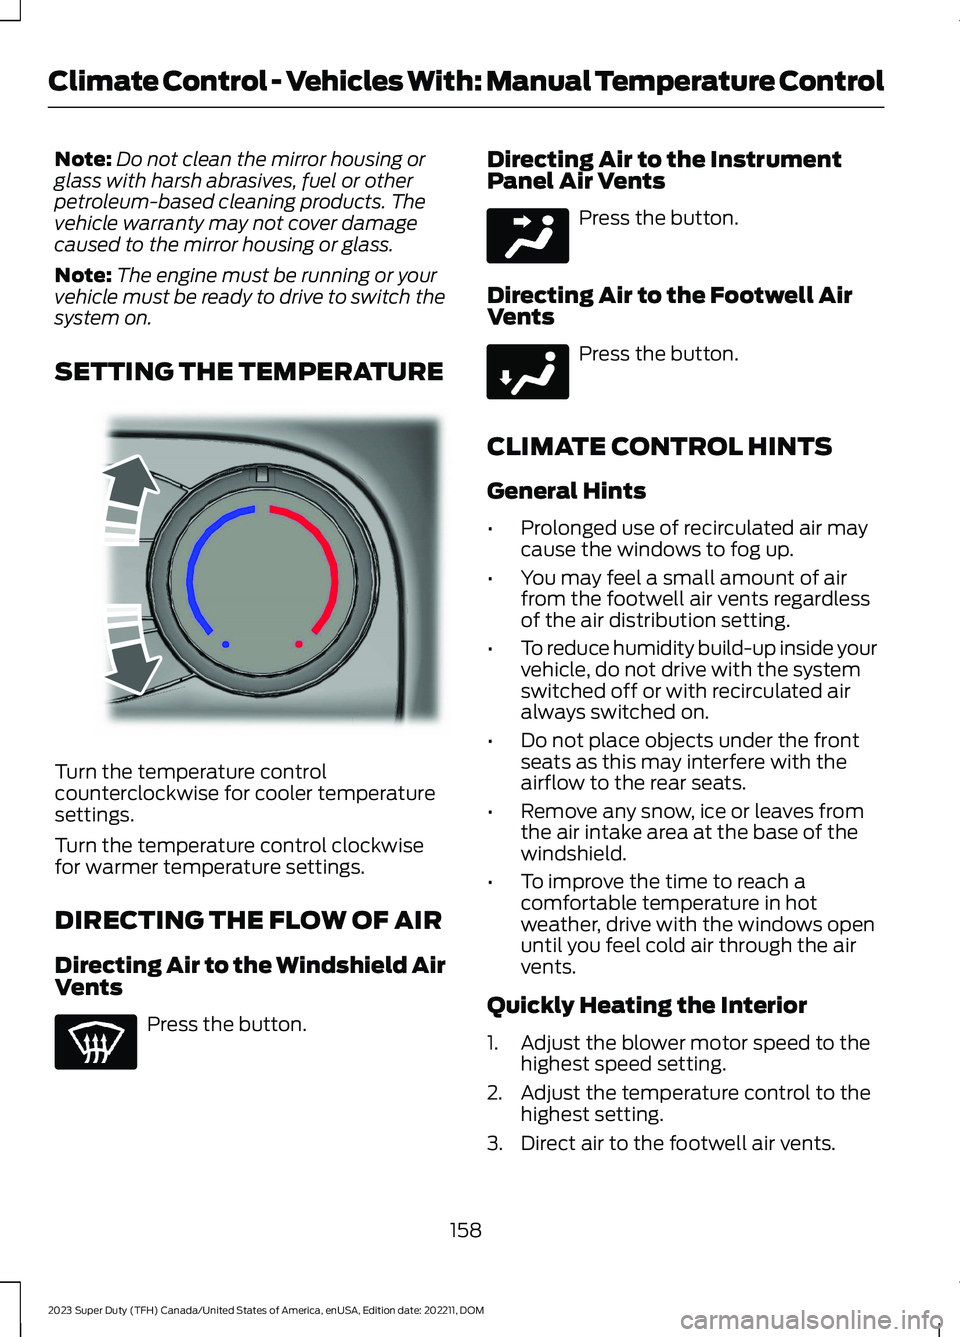
Turn the temperature controlcounterclockwise for cooler temperaturesettings.
Turn the temperature control clockwisefor warmer temperature settings.
DIRECTING THE FLOW OF AIR
Directing Air to the Windshield AirVents
Press the button.
Directing Air to the InstrumentPanel Air Vents
Press the button.
Directing Air to the Footwell AirVents
Press the button.
CLIMATE CONTROL HINTS
General Hints
•Prolonged use of recirculated air maycause the windows to fog up.
•You may feel a small amount of airfrom the footwell air vents regardlessof the air distribution setting.
•To reduce humidity build-up inside yourvehicle, do not drive with the systemswitched off or with recirculated airalways switched on.
•Do not place objects under the frontseats as this may interfere with theairflow to the rear seats.
•Remove any snow, ice or leaves fromthe air intake area at the base of thewindshield.
•To improve the time to reach acomfortable temperature in hotweather, drive with the windows openuntil you feel cold air through the airvents.
Quickly Heating the Interior
1.Adjust the blower motor speed to thehighest speed setting.
2.Adjust the temperature control to thehighest setting.
3.Direct air to the footwell air vents.
158
2023 Super Duty (TFH) Canada/United States of America, enUSA, Edition date: 202211, DOMClimate Control - Vehicles With: Manual Temperature ControlE244106 E244097 E244098
Page 166 of 738
•Bend your legs slightly so that you canpress the pedals fully.
•Position the shoulder strap of theseatbelt over the center of yourshoulder and position the lap straptightly across your hips.
Make sure that your driving position iscomfortable and that you can maintain fullcontrol of your vehicle.
MANUAL SEATS
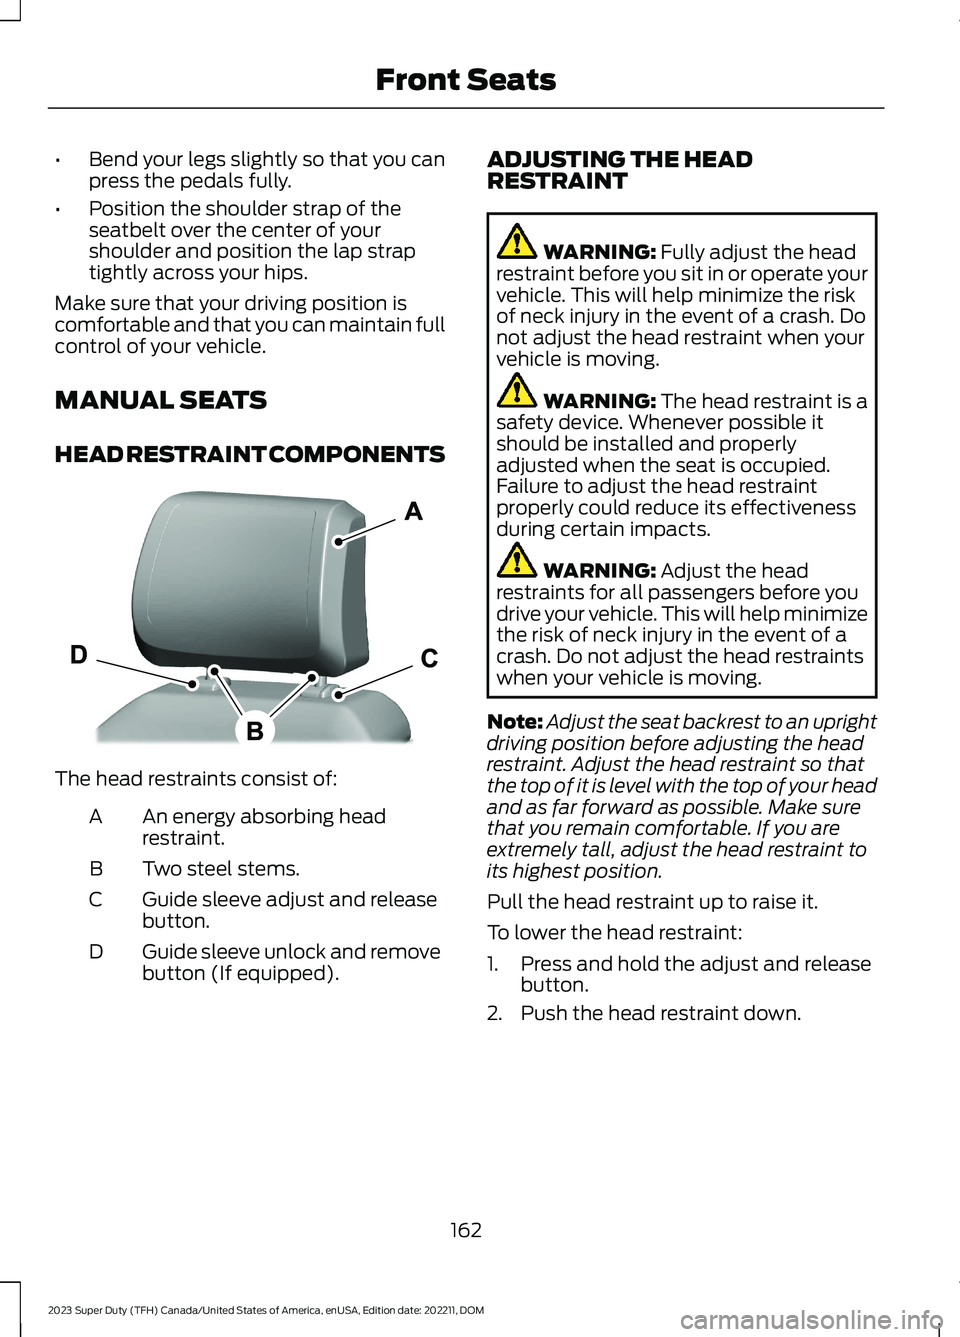
HEAD RESTRAINT COMPONENTS
The head restraints consist of:
An energy absorbing headrestraint.A
Two steel stems.B
Guide sleeve adjust and releasebutton.C
Guide sleeve unlock and removebutton (If equipped).D
ADJUSTING THE HEADRESTRAINT
WARNING: Fully adjust the headrestraint before you sit in or operate yourvehicle. This will help minimize the riskof neck injury in the event of a crash. Donot adjust the head restraint when yourvehicle is moving.
WARNING: The head restraint is asafety device. Whenever possible itshould be installed and properlyadjusted when the seat is occupied.Failure to adjust the head restraintproperly could reduce its effectivenessduring certain impacts.
WARNING: Adjust the headrestraints for all passengers before youdrive your vehicle. This will help minimizethe risk of neck injury in the event of acrash. Do not adjust the head restraintswhen your vehicle is moving.
Note:Adjust the seat backrest to an uprightdriving position before adjusting the headrestraint. Adjust the head restraint so thatthe top of it is level with the top of your headand as far forward as possible. Make surethat you remain comfortable. If you areextremely tall, adjust the head restraint toits highest position.
Pull the head restraint up to raise it.
To lower the head restraint:
1.Press and hold the adjust and releasebutton.
2.Push the head restraint down.
162
2023 Super Duty (TFH) Canada/United States of America, enUSA, Edition date: 202211, DOMFront SeatsE327921
Page 167 of 738
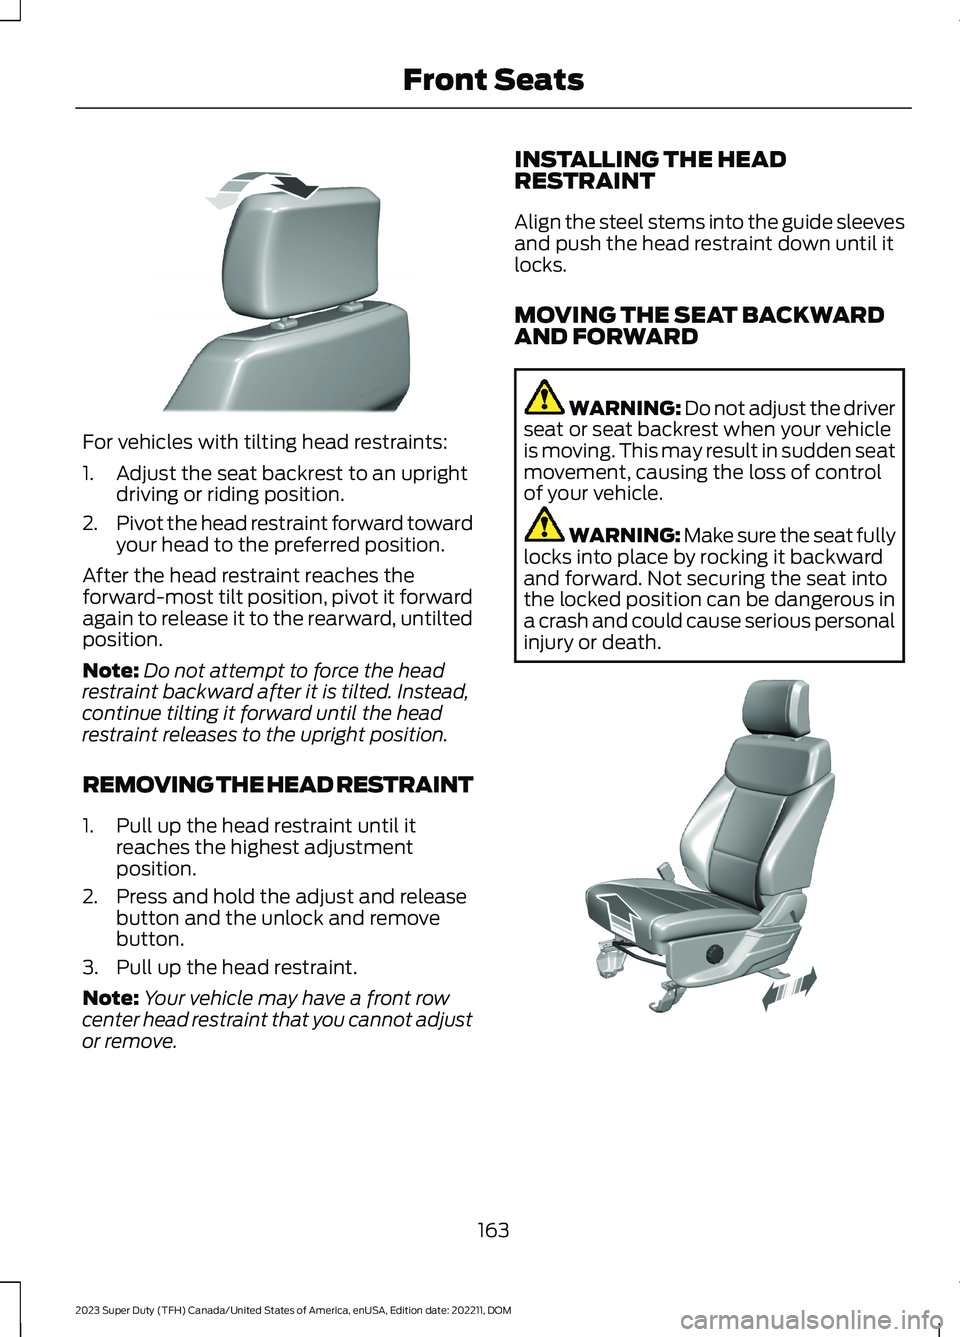
For vehicles with tilting head restraints:
1.Adjust the seat backrest to an uprightdriving or riding position.
2.Pivot the head restraint forward towardyour head to the preferred position.
After the head restraint reaches theforward-most tilt position, pivot it forwardagain to release it to the rearward, untiltedposition.
Note:Do not attempt to force the headrestraint backward after it is tilted. Instead,continue tilting it forward until the headrestraint releases to the upright position.
REMOVING THE HEAD RESTRAINT
1.Pull up the head restraint until itreaches the highest adjustmentposition.
2.Press and hold the adjust and releasebutton and the unlock and removebutton.
3.Pull up the head restraint.
Note:Your vehicle may have a front rowcenter head restraint that you cannot adjustor remove.
INSTALLING THE HEADRESTRAINT
Align the steel stems into the guide sleevesand push the head restraint down until itlocks.
MOVING THE SEAT BACKWARDAND FORWARD
WARNING: Do not adjust the driverseat or seat backrest when your vehicleis moving. This may result in sudden seatmovement, causing the loss of controlof your vehicle.
WARNING: Make sure the seat fullylocks into place by rocking it backwardand forward. Not securing the seat intothe locked position can be dangerous ina crash and could cause serious personalinjury or death.
163
2023 Super Duty (TFH) Canada/United States of America, enUSA, Edition date: 202211, DOMFront SeatsE327919 E308316
Page 168 of 738
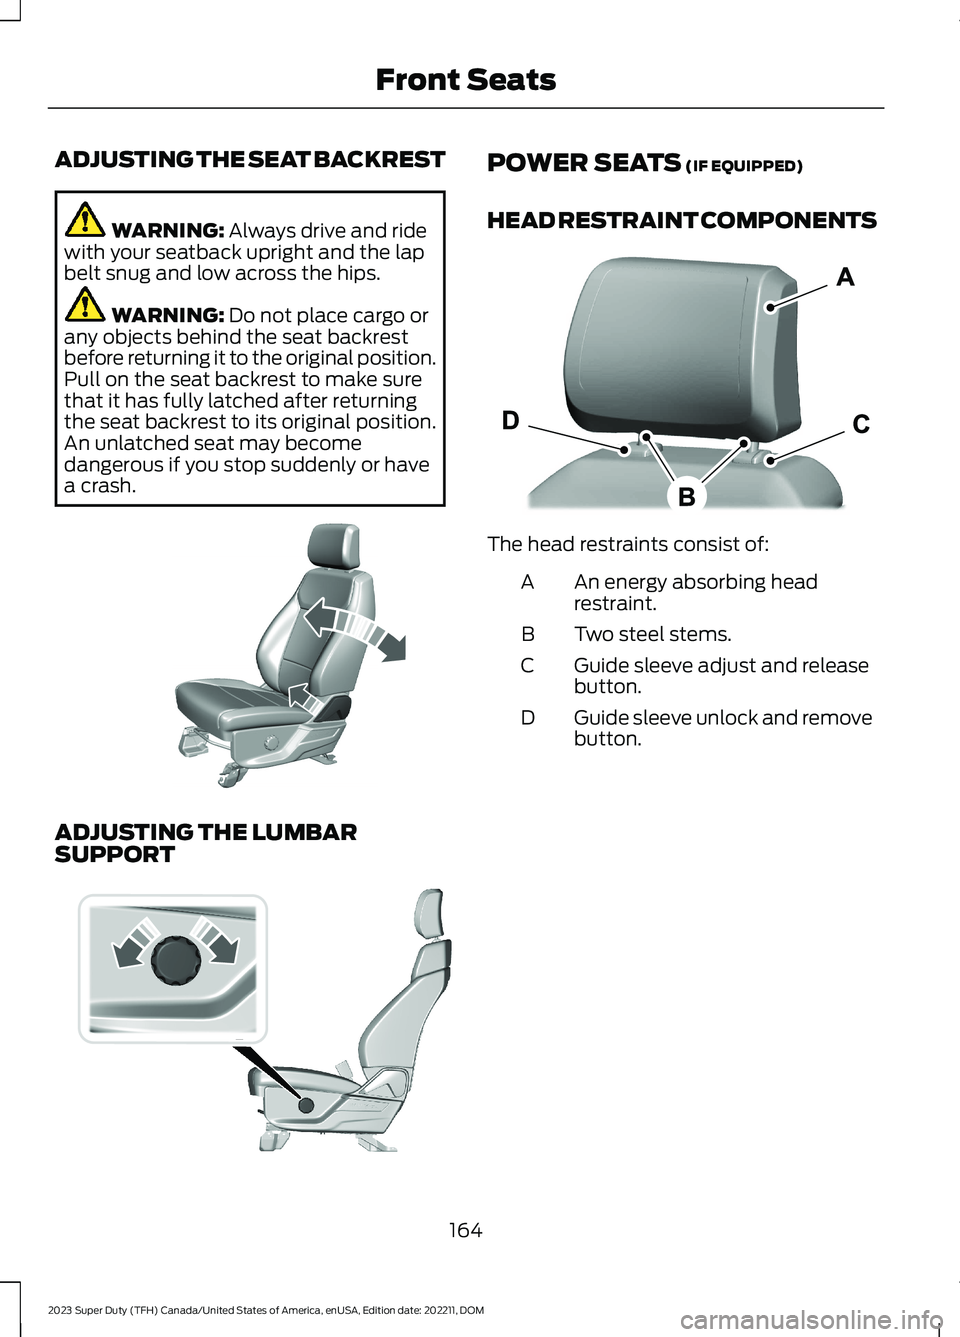
ADJUSTING THE SEAT BACKREST
WARNING: Always drive and ridewith your seatback upright and the lapbelt snug and low across the hips.
WARNING: Do not place cargo orany objects behind the seat backrestbefore returning it to the original position.Pull on the seat backrest to make surethat it has fully latched after returningthe seat backrest to its original position.An unlatched seat may becomedangerous if you stop suddenly or havea crash.
ADJUSTING THE LUMBARSUPPORT
POWER SEATS (IF EQUIPPED)
HEAD RESTRAINT COMPONENTS
The head restraints consist of:
An energy absorbing headrestraint.A
Two steel stems.B
Guide sleeve adjust and releasebutton.C
Guide sleeve unlock and removebutton.D
164
2023 Super Duty (TFH) Canada/United States of America, enUSA, Edition date: 202211, DOMFront SeatsE327922 E308334 E327921