2023 FORD SUPER DUTY reset
[x] Cancel search: resetPage 480 of 738
PREPARING YOUR VEHICLE
FOR STORAGE
If you plan on storing your vehicle for 30days or more, the following maintenancerecommendations ensures your vehiclestays in good operating condition.
Under various conditions, long-termstorage may lead to degraded engineperformance or failure unless you usespecific precautions to preserve yourvehicle.
General
•Store all vehicles in a dry, ventilatedplace.
•If vehicles are stored outside, theyrequire regular maintenance to protectagainst rust and weather damage.
•Make sure all linkages, cables, leversand pins under your vehicle are coveredwith grease to prevent rust.
•Move vehicles at least 25 ft (7.5 m)every 15 days to lubricate working partsand prevent corrosion.
•Fill the fuel tank with high-quality fueluntil the first automatic shutoff of thefuel pump nozzle.
Engine
•Change the engine oil and filter prior tostorage because used engine oilcontains contaminants which maycause engine damage.
•Start the engine every 15 days for aminimum of 15 minutes. Run at fastidle with the climate controls set todefrost until the engine reaches normaloperating temperature.
•With your foot on the brake, shiftthrough all the gears while the engineis running.
Body
•Wash your vehicle thoroughly toremove dirt, grease, oil, tar or mud fromexterior surfaces, rear wheel housingsand the underside of front fenders.
•Periodically wash your vehicle if it isstored in exposed locations.
•Touch-up exposed or primed metal toprevent rust.
•Cover chrome and stainless steel partswith a thick coat of auto wax to preventdiscoloration. Rewax as necessarywhen you wash your vehicle.
•Lubricate all hood, door and luggagecompartment hinges and latches witha light grade oil.
•Cover interior trim to prevent fading.
•Keep all rubber parts free from oil andsolvents.
12 Volt Battery
•When storing your vehicle for longerthan 30 days the state of chargeshould be approximately 50%.Additionally, we recommend todisconnect the 12v battery to reducesystem loads on the battery, or you canuse a trickle charger for longer storageperiods.
•Check and recharge as necessary. Keepconnections clean.
Note:It is necessary to reset memoryfeatures if you disconnect the batterycables.
476
2023 Super Duty (TFH) Canada/United States of America, enUSA, Edition date: 202211, DOMStoring Your Vehicle
Page 481 of 738
Tires
•Maintain recommended air pressure.
•To minimize flat spots on the tires,inflate all four tires to therecommended cold pressures listed onthe Safety Compliance Certificationlabel or Tire Label affixed to yourvehicle. When the vehicle is taken outof storage, reset the tire pressures asnecessary to the recommended levelslisted on the Safety ComplianceCertification label or Tire Label affixedto your vehicle.
Note:If you store your vehicle in a locationwith low ambient temperatures, follow theinstructions for care of summer tires.
Brakes
Make sure the brakes and parking brakefully release.
Note:If you intend on parking your vehiclefor an extended period after cleaning thewheels with a wheel cleaner, drive yourvehicle for a few minutes before doing so toreduce the risk of increased corrosion of thebrake discs, brake pads and linings.
REMOVING YOUR VEHICLE
FROM STORAGE
When your vehicle is ready to come out ofstorage, do the following:
•We recommend that you change theengine oil before you use your vehicleagain.
•Wash your vehicle to remove any dirtor grease film build-up on windowsurfaces.
•Check windshield wipers for anydeterioration.
•Check the underhood for any foreignmaterials such as mice or squirrelnests.
•Check the exhaust for any foreignmaterials.
•Check tire pressures and set tireinflation per the Tire Label.
•Check brake pedal operation. Corrodedbrake rotors could cause brake noise.Drive your vehicle and gently apply andrelease the brakes repeatedly over a10-minute drive to reduce the corrosionfrom the brakes.
•Check fluid levels (including coolant,oil and gas) to make sure there are noleaks, and fluids are at recommendedlevels.
•If you remove the battery, clean thebattery cable ends and check fordamage.
Contact an authorized dealer if you haveany concerns or issues.
477
2023 Super Duty (TFH) Canada/United States of America, enUSA, Edition date: 202211, DOMStoring Your Vehicle
Page 503 of 738
perform the system resetprocedure after tire rotation. Ifyou do not reset the system, itmay not provide a low tirepressure warning whennecessary.
Rotating your tires at therecommended interval will helpyour tires wear more evenly,providing better tire performanceand longer tire life.
Note:If your tires show any unevenwear have the alignment checkedby an authorized dealer beforerotating tires.
Note:If you have a dissimilar sparewheel and tire assembly, it isintended for temporary use onlyand should not be used in a tirerotation.
Note:After having your tiresrotated, inflation pressure must bechecked and adjusted to thevehicle requirements.
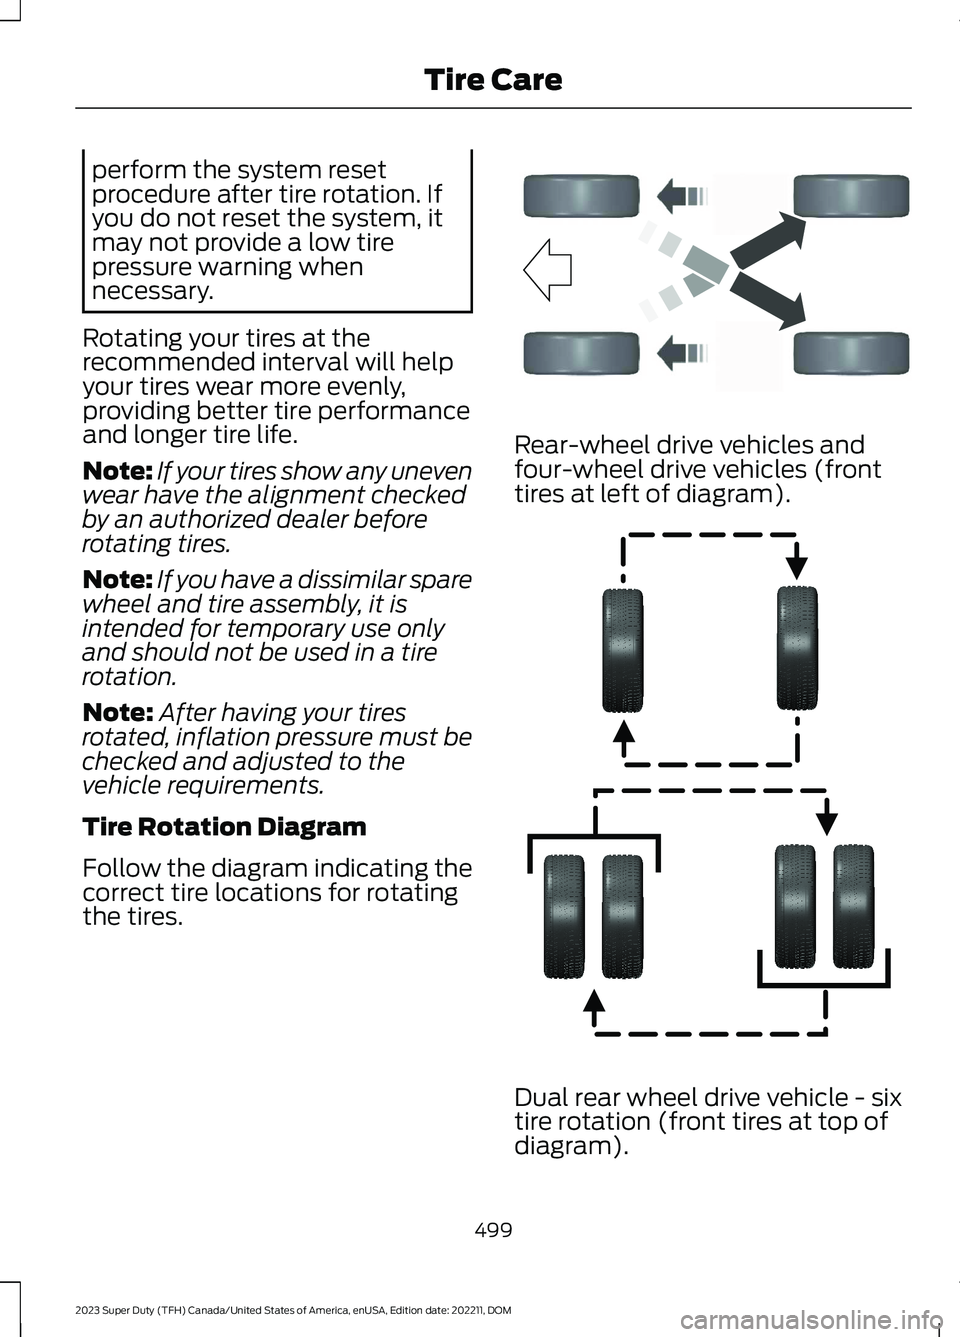
Tire Rotation Diagram
Follow the diagram indicating thecorrect tire locations for rotatingthe tires.
Rear-wheel drive vehicles andfour-wheel drive vehicles (fronttires at left of diagram).
Dual rear wheel drive vehicle - six
tire rotation (front tires at top ofdiagram).
499
2023 Super Duty (TFH) Canada/United States of America, enUSA, Edition date: 202211, DOMTire CareE142548 E166988
Page 507 of 738
VIEWING THE TIRE
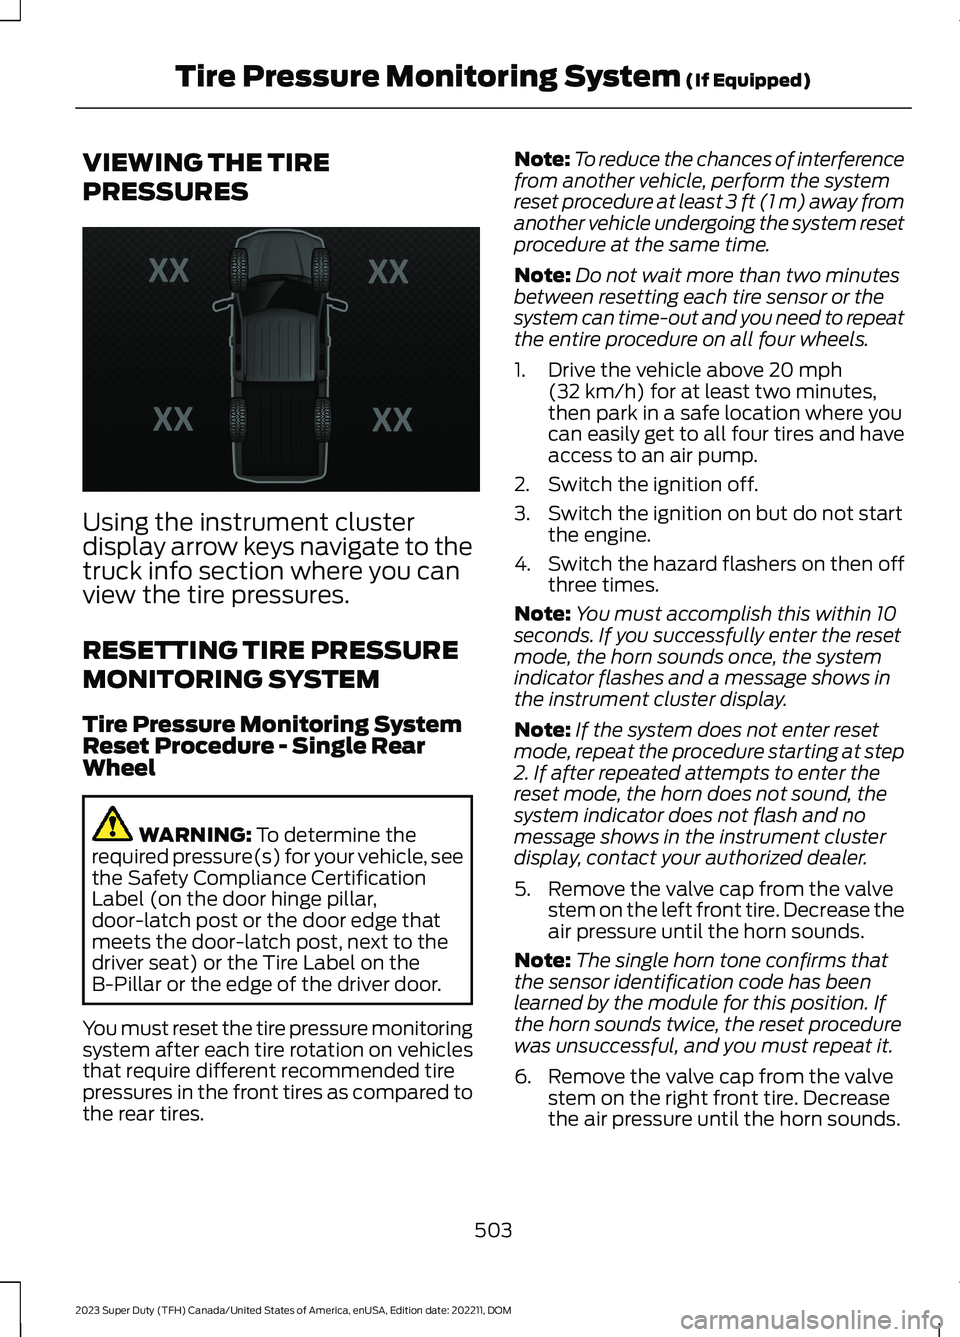
PRESSURES
Using the instrument clusterdisplay arrow keys navigate to thetruck info section where you canview the tire pressures.
RESETTING TIRE PRESSURE
MONITORING SYSTEM
Tire Pressure Monitoring SystemReset Procedure - Single RearWheel
WARNING: To determine therequired pressure(s) for your vehicle, seethe Safety Compliance CertificationLabel (on the door hinge pillar,door-latch post or the door edge thatmeets the door-latch post, next to thedriver seat) or the Tire Label on theB-Pillar or the edge of the driver door.
You must reset the tire pressure monitoringsystem after each tire rotation on vehiclesthat require different recommended tirepressures in the front tires as compared tothe rear tires.
Note:To reduce the chances of interferencefrom another vehicle, perform the systemreset procedure at least 3 ft (1 m) away fromanother vehicle undergoing the system resetprocedure at the same time.
Note:Do not wait more than two minutesbetween resetting each tire sensor or thesystem can time-out and you need to repeatthe entire procedure on all four wheels.
1.Drive the vehicle above 20 mph(32 km/h) for at least two minutes,then park in a safe location where youcan easily get to all four tires and haveaccess to an air pump.
2.Switch the ignition off.
3.Switch the ignition on but do not startthe engine.
4.Switch the hazard flashers on then offthree times.
Note:You must accomplish this within 10seconds. If you successfully enter the resetmode, the horn sounds once, the systemindicator flashes and a message shows inthe instrument cluster display.
Note:If the system does not enter resetmode, repeat the procedure starting at step2. If after repeated attempts to enter thereset mode, the horn does not sound, thesystem indicator does not flash and nomessage shows in the instrument clusterdisplay, contact your authorized dealer.
5.Remove the valve cap from the valvestem on the left front tire. Decrease theair pressure until the horn sounds.
Note:The single horn tone confirms thatthe sensor identification code has beenlearned by the module for this position. Ifthe horn sounds twice, the reset procedurewas unsuccessful, and you must repeat it.
6.Remove the valve cap from the valvestem on the right front tire. Decreasethe air pressure until the horn sounds.
503
2023 Super Duty (TFH) Canada/United States of America, enUSA, Edition date: 202211, DOMTire Pressure Monitoring System (If Equipped)E224333
Page 508 of 738
7.Repeat the previous step on the rightrear tire and then on the left rear tire.
8.Switch the ignition off.
Note:If the horn sounds twice again afterswitching the ignition off, and repeating theprocedure, contact your authorized dealerand have your vehicle checked as soon aspossible.
9.Set all four tires to the recommendedair pressure as indicated on the SafetyCompliance Certification Label.
Tire Pressure Monitoring SystemReset Procedure - Dual Rear Wheel
For further information seeUnderstanding Your Tire PressureMonitoring System and refer to DualRear Wheel, earlier in this section.
Read the entire procedure beforeattempting.
1.Drive the vehicle above 20 mph(32 km/h) for at least two minutes,then park in a safe location where youcan easily get to all six tires and haveaccess to an air pump.
2.Place the ignition in the off position andkeep the key in the ignition.
3.Cycle the ignition to the on positionwith the engine off.
4.Turn the hazard flashers on then offthree times. You must accomplish thiswithin 10 seconds. If you successfullyenter the reset mode, the horn soundsonce, the system indicator flashes anda message shows in the instrumentcluster display. If this does not occur,repeat the procedure starting at step2. If after repeated attempts to enterthe reset mode, the horn does notsound, the system indicator does notflash and no message shows in theinstrument cluster display, contact yourauthorized dealer as soon as possible.
5.Train the tire pressure monitoringsystem sensors in the tires using thefollowing system reset sequencestarting with the left front tire in thefollowing order: Left front - driver sidefront tire, Right front - passenger sidefront tire, Right outer rear -passengerside rear outer tire, Right inner rear -passenger side rear inner tire, Left outerrear - driver side rear outer tire, Leftinner rear - driver side rear inner tire.
6.Remove the valve cap from the valvestem on the left front tire. Decrease theair pressure until the horn sounds.
Note:The single horn chirp confirms thatthe sensor identification code has beenlearned by the module for this position. If adouble horn is heard, the reset procedurewas unsuccessful, and you must repeat it.
7.Remove the valve cap from the valvestem on the right front tire. Decreasethe air pressure until the horn sounds.
8.Remove the valve cap from the valvestem on the right outer rear tire.Decrease the air pressure until the hornsounds.
9.Remove the valve cap from the valvestem on the right inner rear tire.Decrease the air pressure until the hornsounds.
10.Remove the valve cap from the valvestem on the left outer rear tire.Decrease the air pressure until thehorn sounds.
11.Remove the valve cap from the valvestem on the left inner rear tire.Decrease the air pressure until thehorn sounds. Training is completeafter the horn sounds for the last tiretrained, the system indicator stopsflashing, and a message is shown inthe instrument cluster display.
504
2023 Super Duty (TFH) Canada/United States of America, enUSA, Edition date: 202211, DOMTire Pressure Monitoring System (If Equipped)
Page 509 of 738
12.Turn the ignition off. If two short hornbeeps are heard, the reset procedurewas unsuccessful and you mustrepeat it. If after repeating theprocedure and two short beeps areheard when the ignition is turned tooff, contact your authorized dealer assoon as possible.
13.Set all six tires to the recommendedair pressure as indicated on theSafety Compliance CertificationLabel, affixed to either the door hingepillar, door-latch post, or the dooredge that meets the door-latch post,next to the driver seating position ortire label located on the B-pillar orthe edge of the driver door.
Trailer Tire Pressure MonitoringSystem (If Equipped)
Note:Additional equipment may berequired for your vehicle to support trailertire pressure and temperature monitoring.See your authorized dealer for moreinformation.
Note:The trailer tire pressure monitoringsystem is not a substitute for proper tiremaintenance. It is your responsibility tomaintain correct tire pressures at all times.
Note:Replace the screw and valve on thetrailer tire pressure sensor anytime the trailertire is repaired, replaced or in for service. Seeyour authorized dealer for details.
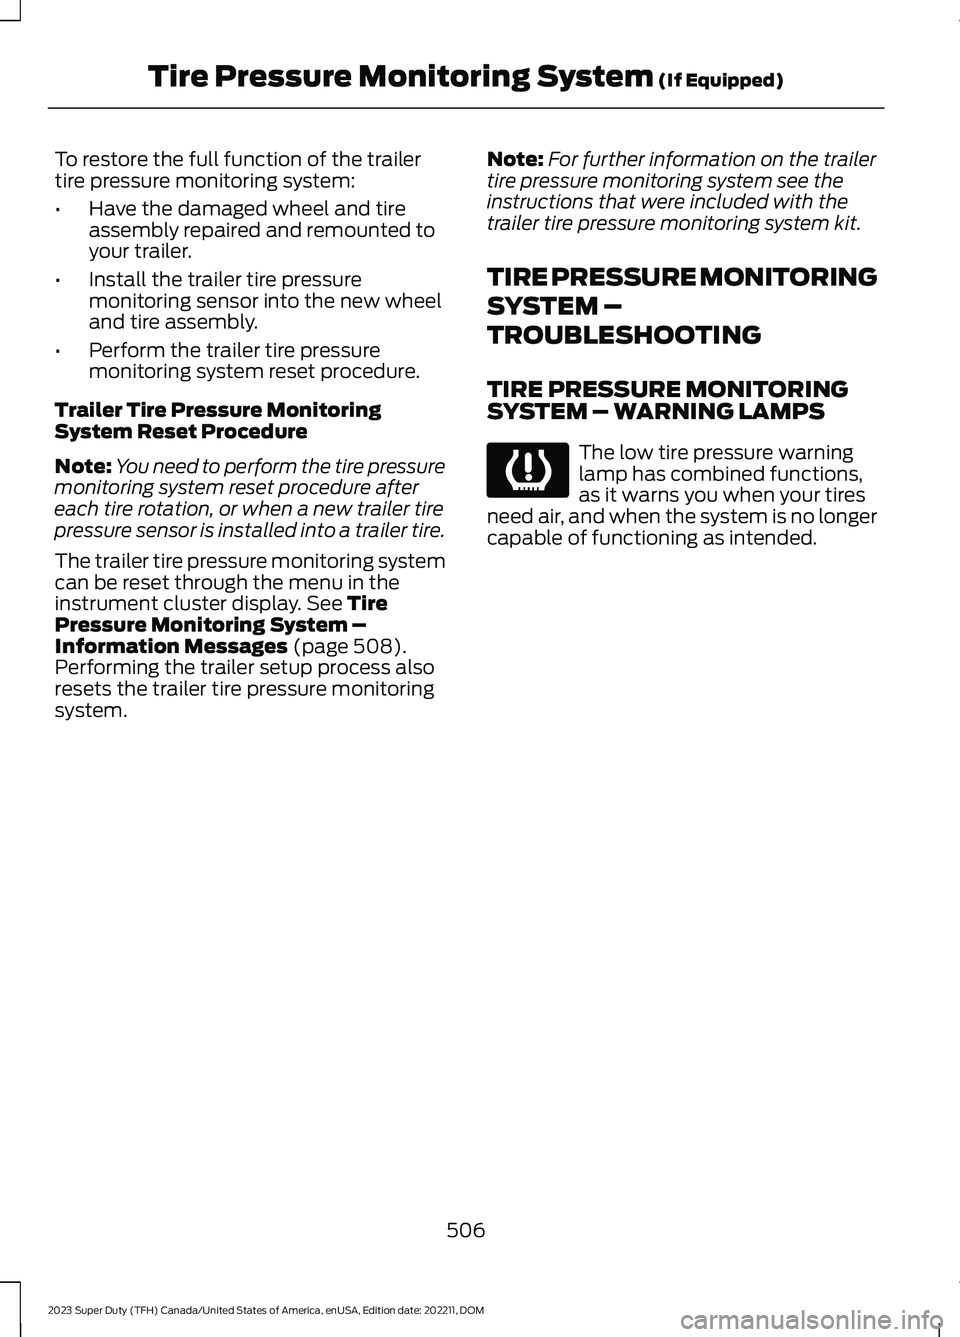
The trailer tire pressure monitoring systemis an added safety feature that allows youto view your trailer tire pressures andtemperatures through the instrumentcluster display. See Tire PressureMonitoring System – InformationMessages (page 508). Tire pressuresensors are mounted into each tire on yourtrailer. The sensors send a message to yourvehicle indicating the current trailer tirepressure and temperature.
If the trailer tire pressure monitoringsystem detects that a tire is low, a warningmessage appears in the instrument clusterdisplay. The trailer tire information screenin the instrument cluster display highlightsthe tire with a low pressure.
If the trailer tire pressure monitoringsystem detects that a tire temperature isover temp, a warning message appears inthe instrument cluster display. The trailertire information screen in the instrumentcluster display highlights the tire with ahigh temperature.
The main function of the trailer tirepressure monitoring system is to warn youwhen your trailer tires need air or if the tiresare experiencing high temperatures. It canalso warn you if the system is no longercapable of functioning as intended. SeeTire Pressure Monitoring System –Information Messages (page 508).
When a Temporary Spare or New Tireis Installed
If you have replaced a trailer tire with a newor spare tire, a warning message appearsand pressure readings are no longerdisplayed for that tire.
505
2023 Super Duty (TFH) Canada/United States of America, enUSA, Edition date: 202211, DOMTire Pressure Monitoring System (If Equipped)E235807
Page 510 of 738
To restore the full function of the trailertire pressure monitoring system:
•Have the damaged wheel and tireassembly repaired and remounted toyour trailer.
•Install the trailer tire pressuremonitoring sensor into the new wheeland tire assembly.
•Perform the trailer tire pressuremonitoring system reset procedure.
Trailer Tire Pressure MonitoringSystem Reset Procedure
Note:You need to perform the tire pressuremonitoring system reset procedure aftereach tire rotation, or when a new trailer tirepressure sensor is installed into a trailer tire.
The trailer tire pressure monitoring systemcan be reset through the menu in theinstrument cluster display. See TirePressure Monitoring System –Information Messages (page 508).Performing the trailer setup process alsoresets the trailer tire pressure monitoringsystem.
Note:For further information on the trailertire pressure monitoring system see theinstructions that were included with thetrailer tire pressure monitoring system kit.
TIRE PRESSURE MONITORING
SYSTEM –
TROUBLESHOOTING
TIRE PRESSURE MONITORINGSYSTEM – WARNING LAMPS
The low tire pressure warninglamp has combined functions,as it warns you when your tiresneed air, and when the system is no longercapable of functioning as intended.
506
2023 Super Duty (TFH) Canada/United States of America, enUSA, Edition date: 202211, DOMTire Pressure Monitoring System (If Equipped)E139232
Page 555 of 738
CREATING A VEHICLE WI-FI
HOTSPOT
You can create a Wi-Fi hotspot in yourvehicle and allow devices to connect to itfor access to the Internet.
Select the settings option on thefeature bar.
1.Press Vehicle Hotspot.
Note:The vehicle hotspot default settingis on.
2.Press Settings.
3.Press Edit.
4.Press Hotspot visibility.
Note:The hotspot visibility default settingis on.
Finding the Wi-Fi Hotspot Nameand Password
Select the settings option on thefeature bar.
1.Press Vehicle Hotspot.
2.Press Settings.
Note:The network name is the hotspotname.
3.Press View Password.
Connecting a Device to the Wi-FiHotspot
1.On your device, switch Wi-Fi on andselect the hotspot from the list ofavailable Wi-Fi networks.
2.When prompted, enter the password.
Purchasing a Data Plan
1.Connect a device to the hotspot.
Note:The vehicle network carrier’s portalopens on your device.
2.If the portal does not open on yourdevice, open a website and it redirectsto the vehicle network carrier’s portal.
Note:Secure websites do not redirect.
3.Follow the instructions on the carrierportal to purchase a plan.
Note:If you have an active plan, the systemdoes not redirect to the vehicle networkcarrier’s portal when you connect a device.Visit the vehicle network carrier’s websiteto purchase more data.
Note:If data usage information is availablein the vehicle hotspot menu, it isapproximate.
Note:If you carry out a master reset, thesystem does not remove your vehicle fromyour vehicle network carrier’s account. Toremove your vehicle from the account,contact your vehicle network carrier.
Note:The vehicle network carrier providesVehicle Hotspot services, subject to yourvehicle network carrier agreement, coverageand availability.
CHANGING THE VEHICLE WI-
FI HOTSPOT NAME OR
PASSWORD
Select the settings option on thefeature bar.
1.Press Vehicle Hotspot.
2.Press Settings.
3.Press Edit.
4.Press Change Network Name.
5.Enter your required network name.
6.Press Done.
7.Press Change Password.
8.Enter your required password.
9.Press Done.
551
2023 Super Duty (TFH) Canada/United States of America, enUSA, Edition date: 202211, DOMVehicle Wi-Fi HotspotE280315 E280315 E280315