2023 FORD MAVERICK lock
[x] Cancel search: lockPage 275 of 556
WHAT IS THE MAXIMUM LOADEDTRAILER WEIGHT
The maximum loaded trailerweight is the highest possibleweight of a fully loaded trailer thevehicle can tow.
CALCULATING THE MAXIMUMLOADED TRAILER WEIGHT FORYOUR VEHICLE
1.Start with the gross combinedweight rating for your vehiclemodel and axle ratio.
2.Subtract all of the followingthat apply to your vehicle:
•Vehicle curb weight.
•Hitch hardware weight, forexample a draw bar, ball, locksor weight distributing hardware.
•Driver weight.
•Passenger weight.
•Payload, cargo and luggageweight.
•Aftermarket equipment weight.
This equals the maximum loadedtrailer weight for this combination.
Note:The trailer tongue load isconsidered part of the payload foryour vehicle. Reduce the totalpayload by the final trailer tongueweight.
Note:Consult an authorized dealerto determine the maximum trailerweight allowed for your vehicle ifyou are not sure.
271
2023 Maverick (CFE) Canada/United States of America, enUSA, Edition date: 202208, First-PrintingTowing a Trailer
Page 276 of 556
WHAT IS THE INTEGRATED
TRAILER BRAKE CONTROLLER
The trailer brake controller assists insmooth and effective trailer braking basedon the towing vehicle’s brake pressure.
INTEGRATED TRAILER BRAKE
CONTROLLER PRECAUTIONS
WARNING: Use the integratedtrailer brake controller to properly adjustthe trailer brakes and check allconnections before towing a trailer.Failure to follow this instruction couldresult in the loss of control of yourvehicle, personal injury or death.
•Only use the manual control lever forproper adjustment of the gain duringtrailer setup. Misuse, such asapplication during trailer sway, couldcause instability of trailer or towvehicle.
•Avoid towing in adverse weatherconditions. The trailer brake controllerdoes not provide anti-lock control ofthe trailer wheels. Trailer wheels canlock up on slippery surfaces, resultingin reduced stability of trailer and towvehicle.
•The trailer brake controller is only afactory-installed or dealer-installeditem. Ford is not responsible forwarranty or performance of thecontroller due to misuse or customerinstallation.
Note:Do not attempt removal of the trailerbrake controller without consulting theWorkshop Manual. Damage to the unit mayresult.
Note:Make sure to set the integrated trailerbrake controller gain to 0 if you are using anaftermarket trailer brake controller.
USING THE INTEGRATED
TRAILER BRAKE CONTROLLER
1.Make sure the trailer brakes are in goodworking condition, functioning normallyand properly adjusted. See your trailerdealer if necessary.
Note:An authorized dealer can diagnosethe trailer brake controller to determineexactly which trailer fault has occurred. Yourvehicle warranty does not cover issues withyour trailer.
2.Hook up the trailer and make theelectrical connections according to thetrailer manufacturer's instructions.
Note:Select default mode if the trailer hassurge brakes, or no brakes at all. The systemhas no effect on the braking performanceof the trailer in either of these cases.
Note:If a trailer is connected by a four-pinconnector, the trailer braking function willnot be supported.
3.When you plug in a trailer with electricor electric-over-hydraulic brakes, amessage confirming connectionappears in the information display.
4.Use the gain adjustment to find thedesired starting point. A gain setting of6.0 is a good starting point for heavierloads.
Note:Use the following steps to adjust thegain setting whenever road, weather andtrailer, or vehicle loading conditions, changefrom when you initially set the gain.
5.In a traffic-free environment, tow thetrailer on a dry, level surface andsqueeze the manual control levercompletely.
272
2023 Maverick (CFE) Canada/United States of America, enUSA, Edition date: 202208, First-PrintingIntegrated Trailer Brake Controller (If Equipped)
Page 277 of 556
6.If the trailer wheels lock up, indicatedby squealing tires, reduce the gainsetting. If the trailer wheels turn freely,increase the gain setting. Repeat Steps5 and 6 until the gain setting is at apoint just below trailer wheel lock-up.If towing a heavier trailer, trailer wheellock-up may not be attainable evenwith the maximum gain setting of 10.
Note:Only perform this procedure atspeeds of approximately 20–25 mph(30–40 km/h).
Note:The trailer brake controller reducesoutput at vehicle speeds below 11 mph(18 km/h) so that trailer and vehicle brakingis not jerky or harsh. This feature is onlyavailable when applying the brakes usingyour vehicle's brake pedal, not thecontroller.
Note:Your vehicle's brake system and thetrailer brake system work independently ofeach other. Changing the gain setting on thecontroller does not affect the operation ofyour vehicle's brakes whether you attach atrailer or not.
Note:With the proper electrical connection,pressing your vehicle brake pedal or usingthe manual control lever illuminates bothtrailer and vehicle brake lamps.
Note:When you switch the engine off, thecontroller output is disabled and the displayand module shut down. The controllermodule and display turn on when you switchthe ignition on.
Note:Trailer braking is suspended duringstop/start events to minimize battery draw.
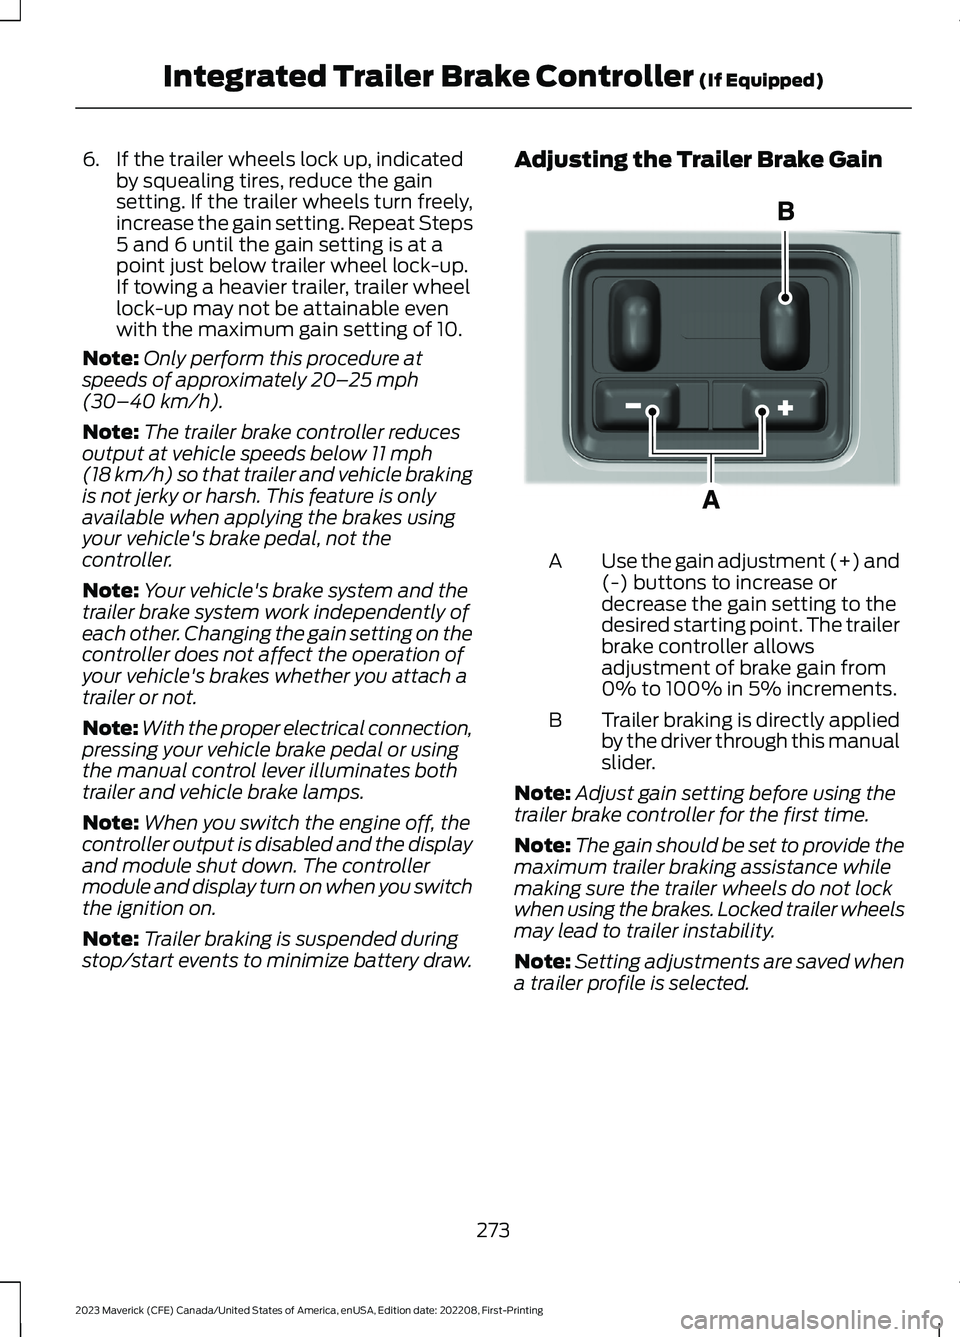
Adjusting the Trailer Brake Gain
Use the gain adjustment (+) and(-) buttons to increase ordecrease the gain setting to thedesired starting point. The trailerbrake controller allowsadjustment of brake gain from0% to 100% in 5% increments.
A
Trailer braking is directly appliedby the driver through this manualslider.
B
Note:Adjust gain setting before using thetrailer brake controller for the first time.
Note:The gain should be set to provide themaximum trailer braking assistance whilemaking sure the trailer wheels do not lockwhen using the brakes. Locked trailer wheelsmay lead to trailer instability.
Note:Setting adjustments are saved whena trailer profile is selected.
273
2023 Maverick (CFE) Canada/United States of America, enUSA, Edition date: 202208, First-PrintingIntegrated Trailer Brake Controller (If Equipped)E333154
Page 282 of 556
COLD WEATHER
PRECAUTIONS
The functional operation of somecomponents and systems can be affectedat temperatures below approximately-13°F (-25°C).
DRIVING ON SNOW AND ICE
WARNING: If you are driving inslippery conditions that require tirechains or cables, then it is critical thatyou drive cautiously. Keep speeds down,allow for longer stopping distances andavoid aggressive steering to reduce thechances of a loss of vehicle controlwhich can lead to serious injury or death.If the rear end of your vehicle slides whilecornering, steer in the direction of theslide until you regain control of yourvehicle.
On ice and snow, you should drive moreslowly than usual. Your vehicle has a fourwheel anti-lock brake system, do not pumpthe brake pedal. See Anti-Lock BrakingSystem Limitations (page 191).
BREAKING-IN
Your vehicle requires a break-in period. Forthe first 1,000 mi (1,600 km), avoid drivingat high speeds, heavy braking, aggressiveshifting or using your vehicle to tow. Duringthis time, your vehicle may exhibit someunusual driving characteristics.
DRIVING ECONOMICALLY
The following helps to improve fuelconsumption:
•Drive smoothly, accelerate gently andanticipate the road ahead to avoidheavy braking.
•Regularly check your tire pressures andmake sure that they are inflated to thecorrect pressure.
•Follow the recommended maintenanceschedule and carry out therecommended checks.
•Plan your journey and check the trafficbefore you set off. It is more efficientto combine errands into a single tripwhenever possible.
•Avoid idling the engine in cold weatheror for extended periods. Start theengine only when you are ready to setoff.
•Do not carry unnecessary weight in yourvehicle as extra weight wastes fuel.
•Do not add unnecessary accessoriesto the exterior of your vehicle, forexample running boards. If you use aroof rack, remember to fold it down orremove it when not in use.
•Do not shift into neutral when you arebraking or when your vehicle is slowingdown.
•Shut all windows when driving at highspeeds.
•Switch off all electric systems whennot in use, for example air conditioning.Make sure that you unplug anyaccessories from the auxiliary powerpoints when not in use.
278
2023 Maverick (CFE) Canada/United States of America, enUSA, Edition date: 202208, First-PrintingDriving Hints
Page 283 of 556

DRIVING IN SPECIAL
CONDITIONS
DRIVING THROUGH MUD ANDWATER
Mud
Be cautious of sudden changes in vehiclespeed or direction when you are driving inmud. Even all-wheel drive and four-wheeldrive vehicles can lose traction in mud. Ifyour vehicle slides, steer in the direction ofthe slide until you regain control of yourvehicle. After driving through mud, cleanoff residue stuck to rotating driveshaftsand tires. Excess residue can cause animbalance that could damage drivecomponents.
Note:If your vehicle gets stuck in mud, itcould be rocked out by shifting betweenforward and reverse gears, stoppingbetween shifts in a steady pattern. Presslightly on the accelerator in each gear.
Note:Do not rock your vehicle if the engineis not at normal operating temperature, asdamage to the transmission could occur.
Note:Do not rock your vehicle for morethan a minute, as damage to thetransmission and tires could occur or theengine could overheat.
Water
If you must drive though deep water, driveslowly. The water could limit traction orbrake capability. See Driving ThroughShallow Water (page 280).
When driving though water, determine thedepth and avoid water higher than thecenter of the wheel.
Once through water, always try the brakes.Wet brakes do not stop your vehicle asquickly as dry brakes. Apply light pressureto the brake pedal while slowly moving thevehicle to dry the brakes.
Note:Driving through deep water couldcause damage to the transmission. If thefront or rear axle is submerged in water,have the axle lubricant and power transferunit lubricant checked and changed ifnecessary.
DRIVING ON HILLY OR SLOPINGTERRAIN
WARNING: Extreme care shouldbe used when steering the vehicle inreverse down a slope so as not to causethe vehicle to swerve out of control.
Although natural obstacles could make itnecessary to travel diagonally up or downa hill or steep incline, you should try to drivestraight up or straight down.
Note: Avoid turning on steep slopes or hills.A danger lies in losing traction, slippingsideways and possible vehicle roll over.Whenever driving on a hill, determinebeforehand the route you can use. Do notdrive over the crest of a hill without seeingwhat conditions are on the other side. Donot drive in reverse over a hill without theaid of an observer.
Apply just enough power to the wheels toclimb the hill. Too much power causes thetires to slip, spin or lose traction, and youcould lose control of your vehicle. Whendescending a steep hill, do not descendthe hill in neutral. Avoid sudden hardbraking to keep the front wheels rolling andto maintain your vehicle's steering.
Note:Your vehicle has anti-lock brakes,apply the brakes steadily. Do not pump thebrakes.
279
2023 Maverick (CFE) Canada/United States of America, enUSA, Edition date: 202208, First-PrintingDriving Hints
Page 285 of 556
WARNING: Pedals that cannotmove freely can cause loss of vehiclecontrol and increase the risk of seriouspersonal injury.
WARNING: Secure the floor matto both retention devices so that itcannot slip out of position and interferewith the pedals. Failure to follow thisinstruction could result in the loss ofcontrol of your vehicle, personal injury ordeath.
WARNING: Do not place additionalfloor mats or any other covering on topof the original floor mats. This couldresult in the floor mat interfering with theoperation of the pedals. Failure to followthis instruction could result in the loss ofcontrol of your vehicle, personal injury ordeath.
WARNING: Always make sure thatobjects cannot fall into the driver footwell while your vehicle is moving. Objectsthat are loose can become trappedunder the pedals causing a loss ofvehicle control.
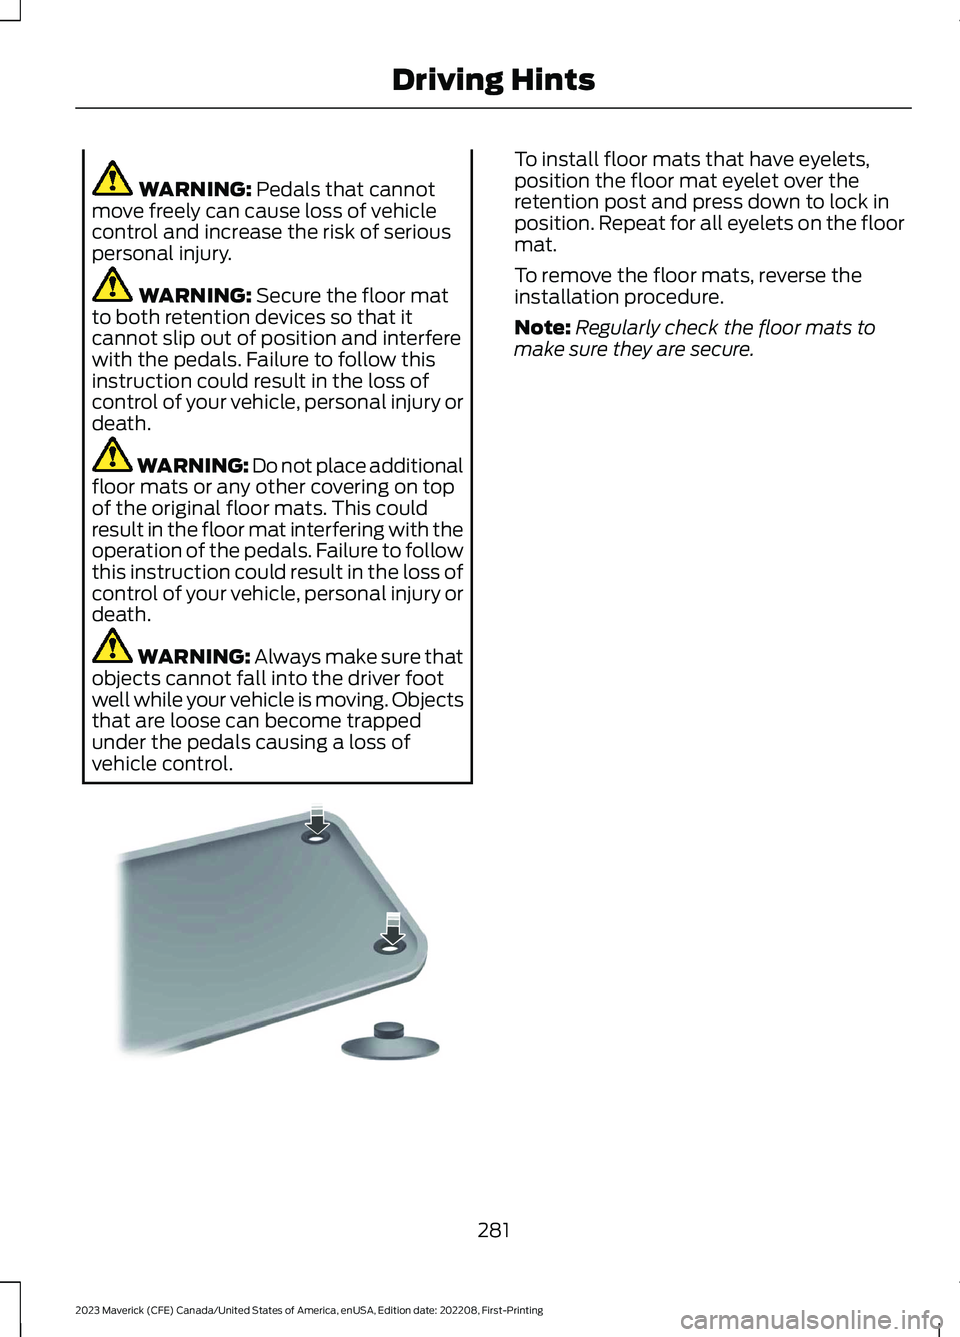
To install floor mats that have eyelets,position the floor mat eyelet over theretention post and press down to lock inposition. Repeat for all eyelets on the floormat.
To remove the floor mats, reverse theinstallation procedure.
Note:Regularly check the floor mats tomake sure they are secure.
281
2023 Maverick (CFE) Canada/United States of America, enUSA, Edition date: 202208, First-PrintingDriving HintsE142666
Page 286 of 556
ROADSIDE ASSISTANCE
Vehicles Sold in the United States:Getting Roadside Assistance
To fully assist you should you have avehicle concern, Ford Motor Companyoffers a complimentary roadsideassistance program. This program isseparate from the New Vehicle LimitedWarranty.
The service is available:
•24 hours a day, seven days a week.
•For the coverage period supplied withyour vehicle.
Roadside Assistance covers:
•A flat tire change with a good spare(except vehicles supplied with a tireinflation kit).
•Battery jump start.
•Lock-out assistance (key replacementcost is the customer's responsibility).
•Fuel delivery — independent servicecontractors, if not prohibited by state,local or municipal law, shall deliver upto 2 gal (8 L) of gasoline or 5 gal (20 L)of diesel fuel to a disabled vehicle.Roadside assistance limits fuel deliveryservice to two no-charge occurrenceswithin a 12-month period.
•Winch out — available within 100 ft(30 m) of a paved or countymaintained road, no recoveries.
•Towing — independent servicecontractors, if not prohibited by state,local or municipal law, shall tow Fordeligible vehicles to an authorized dealerwithin 35 mi (56 km) of thedisablement location or to the nearestauthorized dealer. If a memberrequests a tow to an authorized dealerthat is more than 35 mi (56 km) fromthe disablement location, the membershall be responsible for any mileagecosts in excess of 35 mi (56 km).
•Roadside Assistance includes up to$200 for a towed trailer if the disabledeligible vehicle requires service at thenearest authorized dealer. If the towingvehicle is operational but the trailer isnot, then the trailer does not qualify forany roadside services.
Vehicles Sold in the United States:Using Roadside Assistance
Complete the roadside assistanceidentification card and place it in yourwallet for quick reference. This card is inthe Owner's Manual kit.
United States vehicle customers whorequire Roadside Assistance, call1-800-241-3673.
If you need to arrange roadside assistancefor yourself, Ford Motor Companyreimburses a reasonable amount fortowing to the nearest dealership within35 mi (56 km). To obtain reimbursementinformation, United States vehiclecustomers call 1-800-241-3673.Customers need to submit their originalreceipts.
282
2023 Maverick (CFE) Canada/United States of America, enUSA, Edition date: 202208, First-PrintingCrash and Breakdown Information
Page 292 of 556
HOW DOES THE POST-CRASHALERT SYSTEM WORK
The system is designed to turn the hazardflashers on, turn the courtesy lamps on,intermittently sound the horn and unlockall doors in the event of a serious impactthat deploys an airbag or the seatbeltpretensioners.
POST-CRASH ALERT SYSTEMLIMITATIONS
Depending on applicable laws in thecountry your vehicle was built for, the horndoes not sound in the event of a seriousimpact.
SWITCHING THE POST-CRASHALERT SYSTEM OFF
Press the hazard flasher switch, the unlockbutton on the remote control, the panicbutton on the remote control or cycle theignition to switch the system off.
Note:The alert turns off when the vehiclebattery runs out of charge.
POST IMPACT BRAKING
HOW DOES POST IMPACTBRAKING WORK
In the event of a moderate to severe crash,the braking system reduces the vehicle’sspeed to prevent or reduce the impact ofa potential secondary crash.
POST IMPACT BRAKINGLIMITATIONS
Post impact braking does not activate ifany of the following occur:
•The anti-lock braking system isdamaged during the collision.
•Electronic stability control is disabled.
OVERRIDING POST IMPACTBRAKING
You can override post impact braking bypressing the brake or accelerator pedal.
POST IMPACT BRAKINGINDICATORS
It flashes when a post impactbraking event is occurring.
AUTOMATIC CRASH SHUTOFF
WHAT IS AUTOMATIC CRASHSHUTOFF
The automatic crash shutoff is designedto stop the fuel going to the engine in theevent of a moderate or severe crash.
Note:Not every impact causes a shutoff.
AUTOMATIC CRASH SHUTOFFPRECAUTIONS
WARNING: If your vehicle has beeninvolved in a crash, have the fuel systemchecked. Failure to follow this instructioncould result in fire, personal injury ordeath.
RE-ENABLING YOUR VEHICLE
1.Switch the ignition off.
2.Attempt to start your vehicle.
3.Switch the ignition off.
4.Attempt to start your vehicle.
288
2023 Maverick (CFE) Canada/United States of America, enUSA, Edition date: 202208, First-PrintingCrash and Breakdown InformationE138639