2023 FORD F650/750 ESP
[x] Cancel search: ESPPage 81 of 378
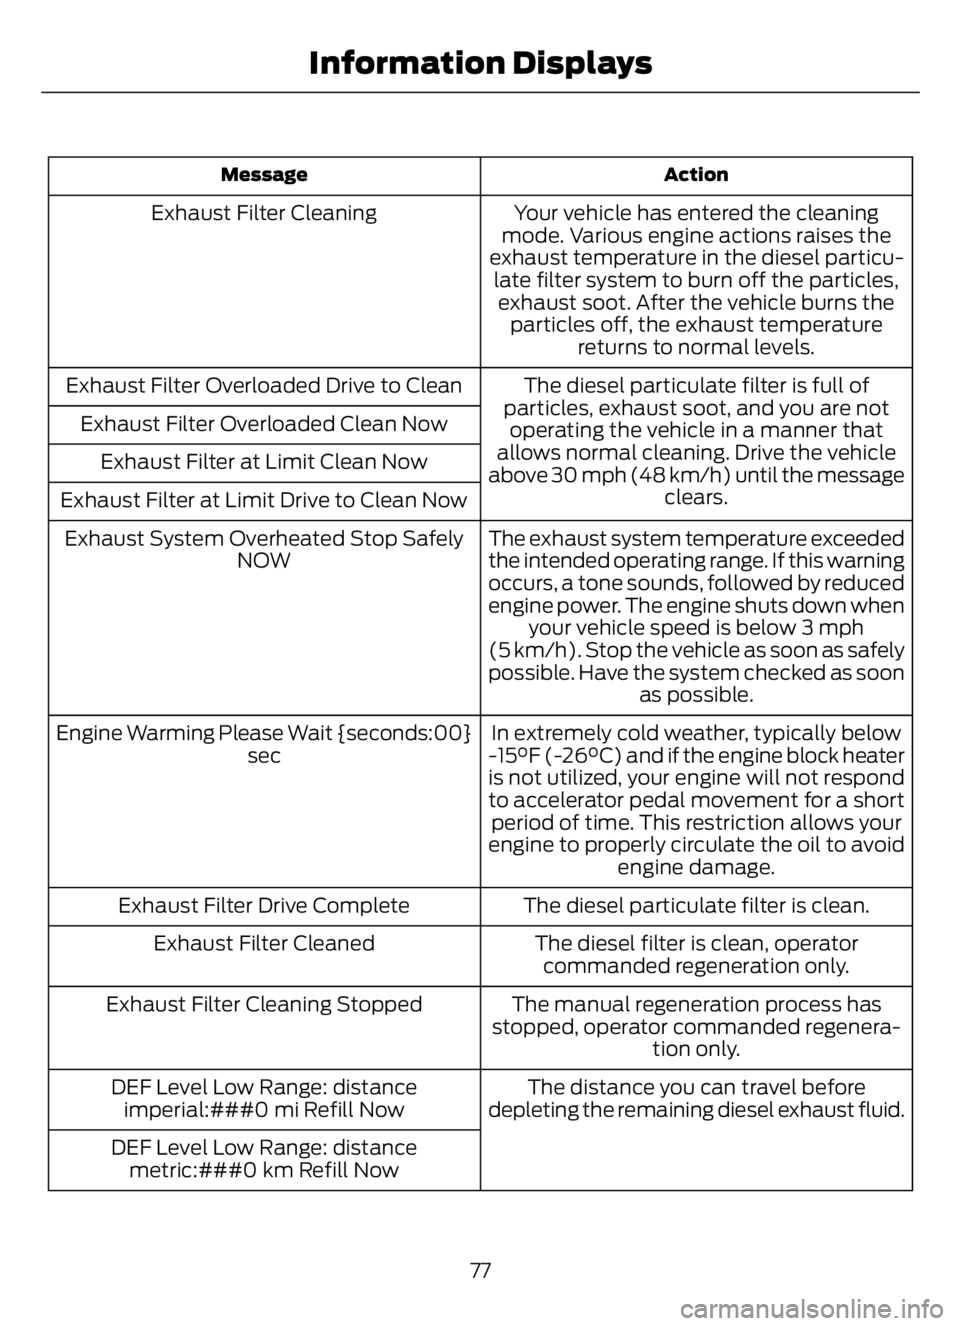
Action Message
Your vehicle has entered the cleaning
mode. Various engine actions raises the
exhaust temperature in the diesel particu-
late filter system to burn off the particles,
exhaust soot. After the vehicle burns the
particles off, the exhaust temperature
returns to normal levels. Exhaust Filter Cleaning
The diesel particulate filter is full of
particles, exhaust soot, and you are not
operating the vehicle in a manner that
allows normal cleaning. Drive the vehicle
above 30 mph (48 km/h) until the message
clears. Exhaust Filter Overloaded Drive to Clean
Exhaust Filter Overloaded Clean Now
Exhaust Filter at Limit Clean Now
Exhaust Filter at Limit Drive to Clean Now
The exhaust system temperature exceeded
the intended operating range. If this warning
occurs, a tone sounds, followed by reduced
engine power. The engine shuts down when
your vehicle speed is below 3 mph
(5 km/h). Stop the vehicle as soon as safely
possible. Have the system checked as soon
as possible. Exhaust System Overheated Stop Safely
NOW
In extremely cold weather, typically below
-15°F (-26°C) and if the engine block heater
is not utilized, your engine will not respond
to accelerator pedal movement for a short
period of time. This restriction allows your
engine to properly circulate the oil to avoid
engine damage. Engine Warming Please Wait {seconds:00}
sec
The diesel particulate filter is clean. Exhaust Filter Drive Complete
The diesel filter is clean, operator
commanded regeneration only. Exhaust Filter Cleaned
The manual regeneration process has
stopped, operator commanded regenera-
tion only. Exhaust Filter Cleaning Stopped
The distance you can travel before
depleting the remaining diesel exhaust fluid. DEF Level Low Range: distance
imperial:###0 mi Refill Now
DEF Level Low Range: distance
metric:###0 km Refill Now
77
Information Displays
Page 101 of 378
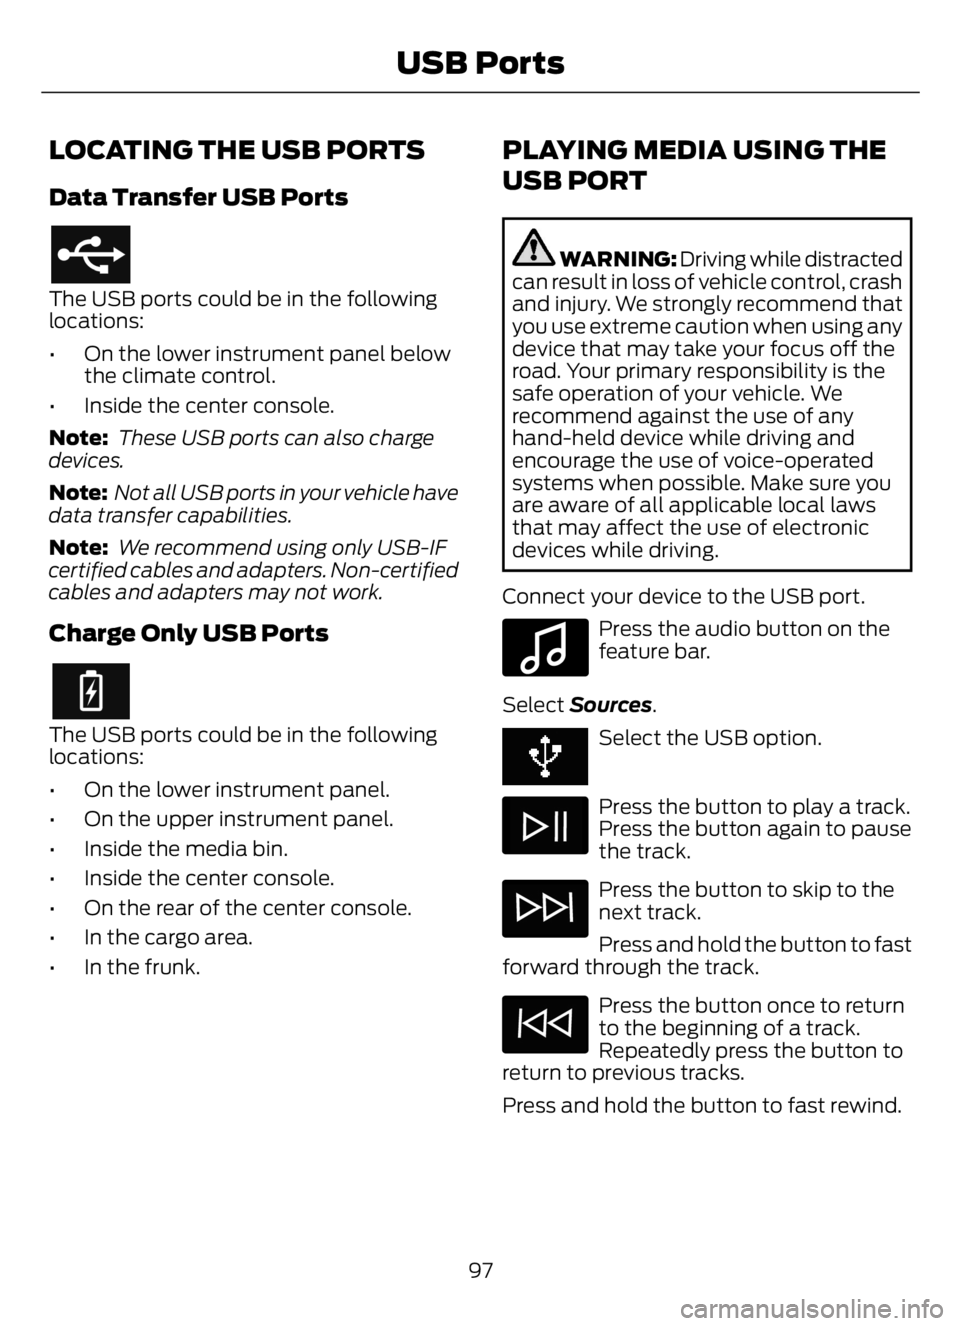
LOCATING THE USB PORTS
Data Transfer USB Ports
The USB ports could be in the following
locations:
• On the lower instrument panel below
the climate control.
• Inside the center console.
Note: These USB ports can also charge
devices.
Note: Not all USB ports in your vehicle have
data transfer capabilities.
Note: We recommend using only USB-IF
certified cables and adapters. Non-certified
cables and adapters may not work.
Charge Only USB Ports
The USB ports could be in the following
locations:
• On the lower instrument panel.
• On the upper instrument panel.
• Inside the media bin.
• Inside the center console.
• On the rear of the center console.
• In the cargo area.
• In the frunk.
PLAYING MEDIA USING THE
USB PORT
WARNING: Driving while distracted
can result in loss of vehicle control, crash
and injury. We strongly recommend that
you use extreme caution when using any
device that may take your focus off the
road. Your primary responsibility is the
safe operation of your vehicle. We
recommend against the use of any
hand-held device while driving and
encourage the use of voice-operated
systems when possible. Make sure you
are aware of all applicable local laws
that may affect the use of electronic
devices while driving.
Connect your device to the USB port.
E100027
Press the audio button on the
feature bar.
Select Sources.
Select the USB option.
Press the button to play a track.
Press the button again to pause
the track.
Press the button to skip to the
next track.
Press and hold the button to fast
forward through the track.
Press the button once to return
to the beginning of a track.
Repeatedly press the button to
return to previous tracks.
Press and hold the button to fast rewind.
97
USB Ports
Page 107 of 378

When the engine idle shutdown process
has started:
• A chime sounds and a message
appears in the information display
showing a timer counting down from
30 seconds.
• You can reset the timer by pressing the
brake pedal, accelerator pedal, or by
shifting into another gear.
• If you do not intervene within 30
seconds, the engine shuts down and a
message appears in the information
display alerting you that the engine has
shut down.
• Shortly after the engine has shut down,
the electrical system simulates a key
off and even though the ignition is still
on, the electrical system simulates a
normal accessory delay period before
shutting down.
• You must switch the ignition off to
reset the system before restarting your
vehicle.
The engine idle shutdown timer does not
start if:
• The engine is operating in battery
charge protect or power take-off mode.
• The exhaust emission control device is
regenerating.
ENGINE BLOCK HEATER (IF
EQUIPPED)
WARNING: Failure to follow engine
block heater instructions could result in
property damage or serious personal
injury.
WARNING: Do not use your heater
with ungrounded electrical systems or
two-pronged adapters. There is a risk of
electrical shock.
WARNING: Do not fully close the
hood, or allow it to drop under its own
weight when using the engine block
heater. This could damage the power
cable and may cause an electrical short
resulting in fire, injury and property
damage.
Note:The heater is most effective when
outdoor temperatures are below 0°F
(-18°C).
The heater acts as a starting aid by
warming the engine coolant. This allows
the climate control system to respond
quickly. The equipment includes a heater
element (installed in the engine block) and
a wire harness. You can connect the
system to a grounded 120-volt AC
electrical source.
We recommend that you do the following
for a safe and correct operation:
• Use a 16-gauge outdoor extension cord
that is product certified by
Underwriter’s Laboratory (UL) or
Canadian Standards Association
(CSA). This extension cord must be
suitable for use outdoors, in cold
temperatures, and be clearly marked
Suitable for Use with Outdoor
Appliances. Do not use an indoor
extension cord outdoors. This could
result in an electric shock or become a
fire hazard.
• Use as short an extension cord as
possible.
• Do not use multiple extension cords.
• Make sure that when in operation, the
extension cord plug and heater cord
plug connections are free and clear of
water. This could cause an electric
shock or fire.
• Make sure your vehicle is parked in a
clean area, clear of combustibles.
103
Starting and Stopping the Engine
Page 109 of 378
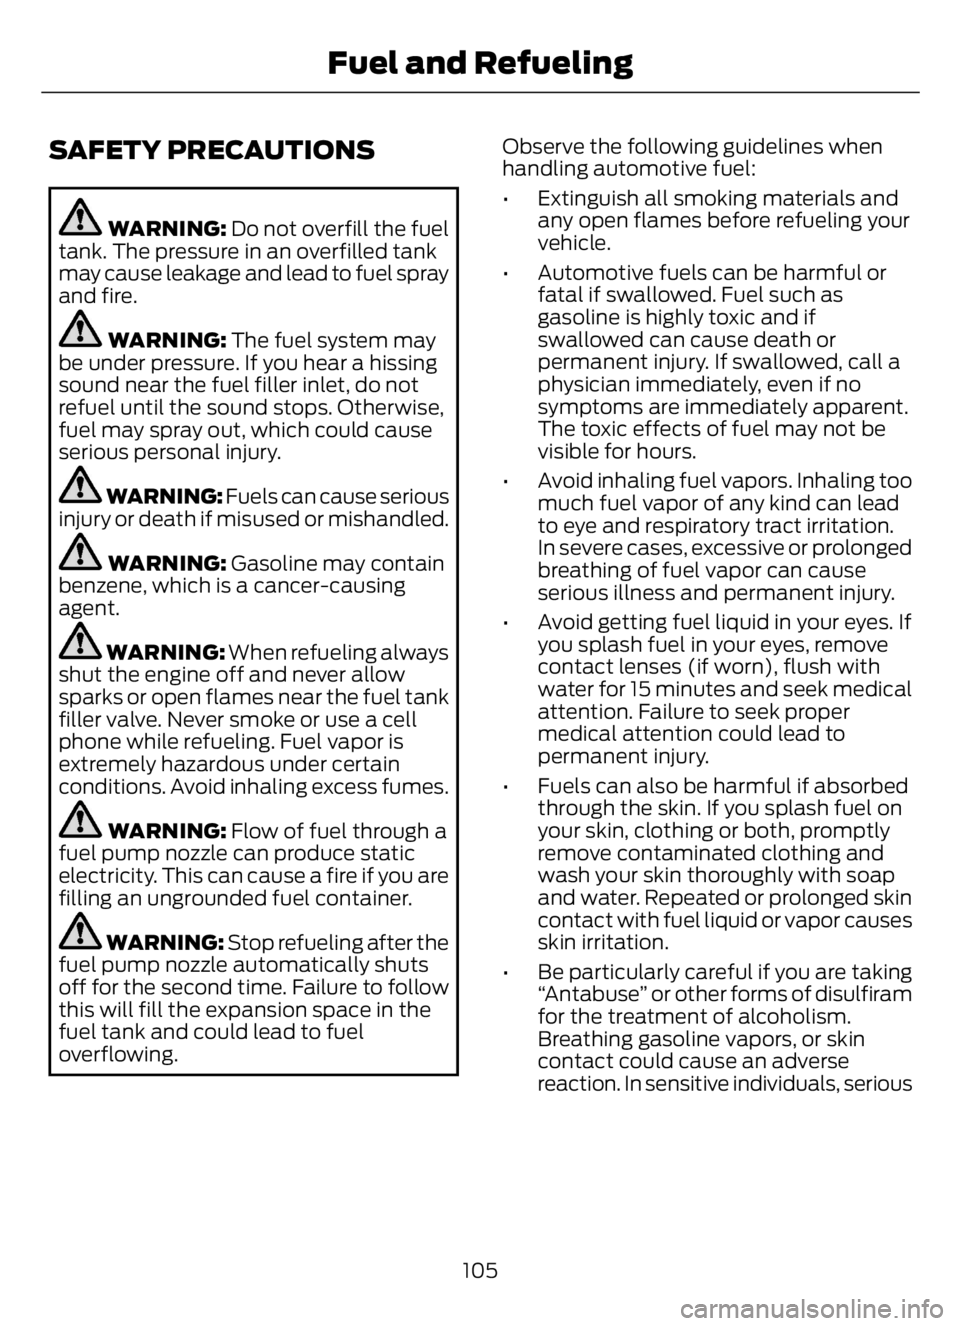
SAFETY PRECAUTIONS
WARNING: Do not overfill the fuel
tank. The pressure in an overfilled tank
may cause leakage and lead to fuel spray
and fire.
WARNING: The fuel system may
be under pressure. If you hear a hissing
sound near the fuel filler inlet, do not
refuel until the sound stops. Otherwise,
fuel may spray out, which could cause
serious personal injury.
WARNING: Fuels can cause serious
injury or death if misused or mishandled.
WARNING: Gasoline may contain
benzene, which is a cancer-causing
agent.
WARNING: When refueling always
shut the engine off and never allow
sparks or open flames near the fuel tank
filler valve. Never smoke or use a cell
phone while refueling. Fuel vapor is
extremely hazardous under certain
conditions. Avoid inhaling excess fumes.
WARNING: Flow of fuel through a
fuel pump nozzle can produce static
electricity. This can cause a fire if you are
filling an ungrounded fuel container.
WARNING: Stop refueling after the
fuel pump nozzle automatically shuts
off for the second time. Failure to follow
this will fill the expansion space in the
fuel tank and could lead to fuel
overflowing.Observe the following guidelines when
handling automotive fuel:
• Extinguish all smoking materials and
any open flames before refueling your
vehicle.
• Automotive fuels can be harmful or
fatal if swallowed. Fuel such as
gasoline is highly toxic and if
swallowed can cause death or
permanent injury. If swallowed, call a
physician immediately, even if no
symptoms are immediately apparent.
The toxic effects of fuel may not be
visible for hours.
• Avoid inhaling fuel vapors. Inhaling too
much fuel vapor of any kind can lead
to eye and respiratory tract irritation.
In severe cases, excessive or prolonged
breathing of fuel vapor can cause
serious illness and permanent injury.
• Avoid getting fuel liquid in your eyes. If
you splash fuel in your eyes, remove
contact lenses (if worn), flush with
water for 15 minutes and seek medical
attention. Failure to seek proper
medical attention could lead to
permanent injury.
• Fuels can also be harmful if absorbed
through the skin. If you splash fuel on
your skin, clothing or both, promptly
remove contaminated clothing and
wash your skin thoroughly with soap
and water. Repeated or prolonged skin
contact with fuel liquid or vapor causes
skin irritation.
• Be particularly careful if you are taking
“Antabuse” or other forms of disulfiram
for the treatment of alcoholism.
Breathing gasoline vapors, or skin
contact could cause an adverse
reaction. In sensitive individuals, serious
105
Fuel and Refueling
Page 137 of 378
Note:Do not rock your vehicle for more
than a minute or damage to the
transmission and tires could occur, or the
engine could overheat.
If your vehicle is stuck in mud or snow, you
could rock it out by shifting between
forward and reverse gears, stopping
between shifts in a steady pattern. Press
lightly on the accelerator in each gear.
POWER TAKE-OFF (IF EQUIPPED)
Auxiliary equipment called power take-off,
or PTO, is often added to the engine or
transmission to operate utility equipment.
Examples include a wheel-lift for tow
trucks, cranes, tools for construction or tire
service and pumping fluids. PTO
applications draw auxiliary horsepower
from the powertrain, often while the
vehicle is stationary or mobile. In the
stationary condition, there is limited
cooling air flow through the radiator and
around the vehicle that normally occurs
when a vehicle is moving. The aftermarket
PTO system installer, having the most
knowledge of the final application, is
responsible for determining whether
additional chassis heat protection or
powertrain cooling is required and alerting
the user to the safe and proper operation.
Your vehicle is approved for use as a
Stationary Mode, SplitShaft Mode or
Mobile Mode power source within the limits
and operating guidelines detailed in the
Ford Truck Body Builders Layout Book,
found at https://fordbbas.com/home and
through the Ford Truck Body Builders
Advisory Service. The transmission power
source modes are engine specific.
133
Transmission
Page 145 of 378

5. Tighten the nut until the spring is fully
caged and brakes released. Do not
loosen or remove the release stud and
nut unless you completely assemble
and securely clamp the brake chamber.
6. After restoring the air pressure,
unscrew and remove the release stud
and install in the carrying pocket. Install
the access plug.
HILL START ASSIST
WARNING: The system does not
replace the parking brake. When you
leave your vehicle, always apply the
parking brake.
WARNING: You must remain in
your vehicle when the system turns on.
At all times, you are responsible for
controlling your vehicle, supervising the
system and intervening, if required.
Failure to take care may result in the loss
of control of your vehicle, serious
personal injury or death.
WARNING: The system will turn
off if a malfunction is apparent or if you
rev the engine excessively. Failure to take
care may result in the loss of control of
your vehicle, serious personal injury or
death.
The system makes it easier to pull away
when your vehicle is on a slope without the
need to use the parking brake.
When the system is active, your vehicle
remains stationary on the slope for two to
three seconds after you release the brake
pedal. This allows time to move your foot
from the brake to the accelerator pedal.
The system releases the brakes
automatically once the engine hasdeveloped sufficient torque to prevent your
vehicle from rolling down the slope. This
is an advantage when pulling away on a
slope, for example from a car park ramp,
traffic lights or when reversing uphill into
a parking space.
The system activates on any slope that
causes your vehicle to roll.
Note:There is no warning light to indicate
the system is either on or off.
Using Hill Start Assist
1. Press the brake pedal to bring your
vehicle to a complete standstill. Keep
the brake pedal pressed and shift into
first gear when facing uphill or reverse
(R) when facing downhill.
2. If the sensors detect that your vehicle
is on a slope, the system activates
automatically.
3. When you remove your foot from the
brake pedal, your vehicle remains on
the slope without rolling away for
about two to three seconds. This hold
time automatically extends if you are
in the process of driving off.
4. Drive off in the normal manner. The
system releases the brakes
automatically.
Note:When you remove your foot from the
brake pedal and press the pedal again when
the system is active, you will experience
significantly reduced brake pedal travel. This
is normal.
Switching the System On and Off
Vehicles with Manual Transmission
You can switch this feature on or off in the
information display. The system
remembers the last setting when you start
your vehicle.
141
Brakes
Page 158 of 378
• Your load shifts due to improper
retention, accident damage or the
inherently mobile nature of some loads,
for example, hanging meat, live
animals or partially laden tankers.
• Your vehicle or load has an unusually
high or off-set center of gravity.
• Your brakes are not properly adjusted
or maintained.
• One side of your vehicle drops off the
pavement at an angle that is too great
to be counteracted by a reduction in
speed.
To Maximize the Effectiveness Of
Stability Control
• Make sure that the weight of your load
is evenly distributed, from front to back,
side to side and you secure it properly
at all times.
• Exercise extreme caution at all times
while driving and avoid sharp turns,
sudden steering inputs or abrupt lane
changes at high speeds, particularly if:
• Hauling loads that can shift.
• Your vehicle or load has a high or
off-set center of gravity when
loaded.
• You are towing doubles or triples.
Electronic Stability Control Usage with
Tractor/Trailer
The electronic stability control system is
designed to work with trailer air brake
systems. We do not recommend its use
with any other trailer brake system.
Electronic Stability Control and Towing
with Non-tractor Trucks (Straight or
Kick-up Frame)
Non-tractor trucks (straight or kick-up
frame) with air brake electronic stability
control, should not be used for towing any
type of trailer.Chassis Modifications
Stability control is specifically calibrated
and validated only for your vehicle's
original configuration. If you alter your
vehicle's chassis components, for example,
a wheel base extension or reduction, tag
axle addition or removal, a major body
change such as conversion of a tractor into
a truck. Ford Motor Company is not
responsible for the performance of the
stability control system if you modify any
major components such as axle,
suspension or steering system.
154
Stability Control
Page 159 of 378

USING ADAPTIVE CRUISE
CONTROL
WARNING: You are responsible for
controlling your vehicle at all times. The
system is designed to be an aid and does
not relieve you of your responsibility to
drive with due care and attention. Failure
to follow this instruction could result in
the loss of control of your vehicle,
personal injury or death.
WARNING: Do not use adaptive
cruise control on winding roads, in heavy
traffic or when the road surface is
slippery. This could result in loss of
vehicle control, serious injury or death.
WARNING: Pay close attention to
changing road conditions such as
entering or leaving a highway, on roads
with intersections or roundabouts, roads
without visible lanes of travel, roads that
are unpaved, or steep slopes. Failure to
follow this instruction could result in the
loss of control of your vehicle, personal
injury or death.
WARNING: Do not use the system
in poor visibility, for example fog, heavy
rain, spray or snow.
WARNING: Do not use the system
when towing a trailer that has
aftermarket electronic trailer brake
controls. Failure to follow this instruction
could result in the loss of control of your
vehicle, personal injury or death.
WARNING: Do not use tire sizes
other than those recommended because
this can affect the normal operation of
the system. Failure to do so may result
in a loss of vehicle control, which could
result in serious injury.
WARNING: The system may not
detect stationary or slow moving
vehicles below 6 mph (10 km/h).
WARNING: The system does not
detect pedestrians or objects in the road.
WARNING: The system does not
detect oncoming vehicles in the same
lane.
WARNING: The system is not a
crash warning or avoidance system.
WARNING: Do not use the system
with a snow plow blade installed.
The system adjusts your vehicle speed to
maintain the set gap between you and the
vehicle in front of you in the same lane.
You can select four gap settings.
The system uses a radar sensor that
projects a beam directly in front of your
vehicle.
E262918
The adaptive cruise controls are on the
steering wheel.
Switching Adaptive Cruise Control
On
E265296
Press and release the button.
155
Cruise Control - Vehicles With: Adaptive Cruise Control