2023 FORD F650/750 manual transmission
[x] Cancel search: manual transmissionPage 6 of 378

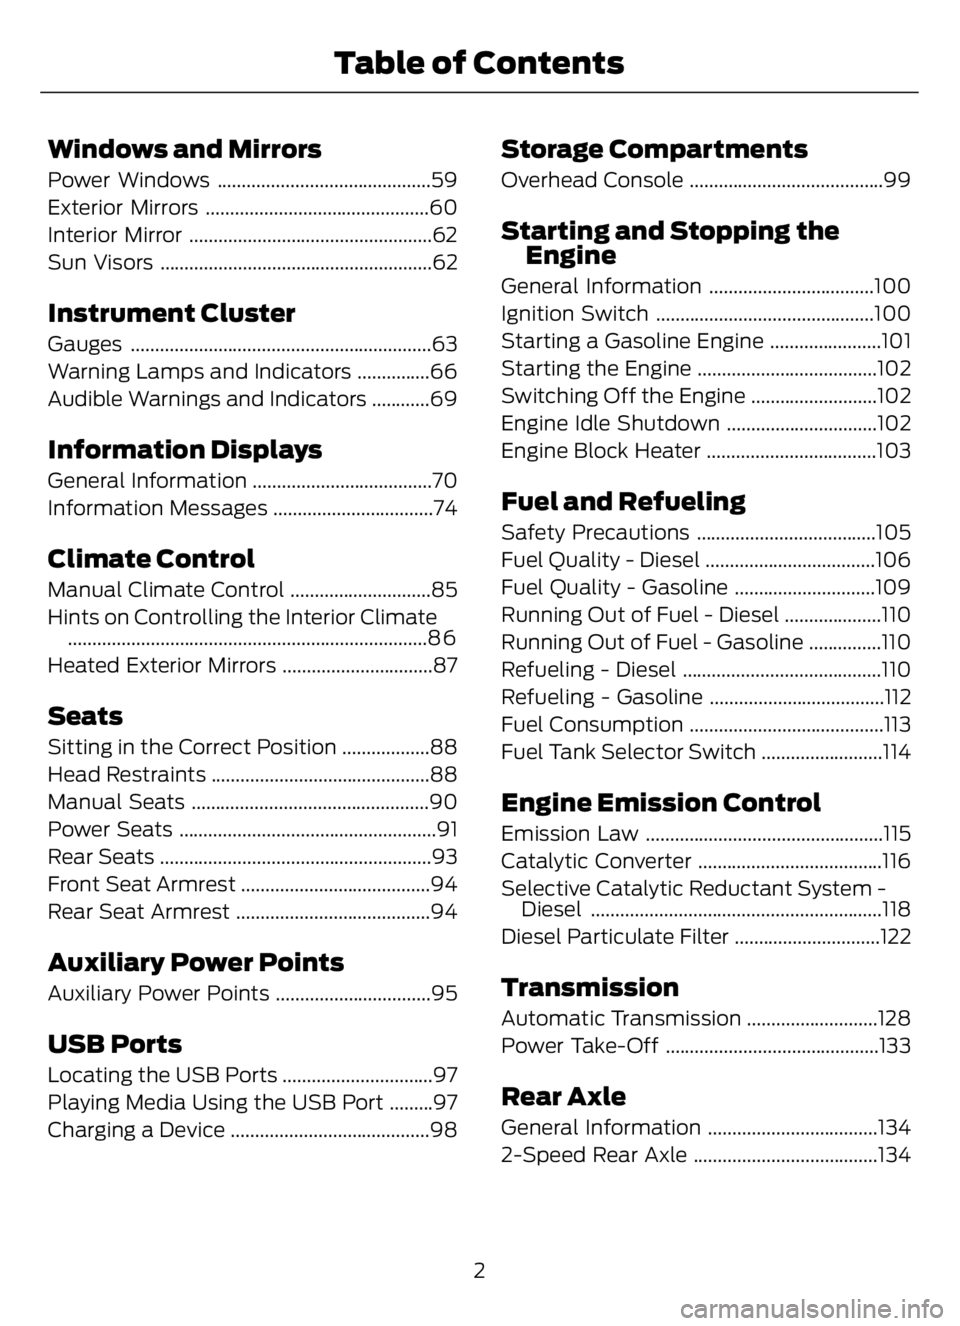
Windows and Mirrors
Power Windows ............................................59
Exterior Mirrors ..............................................60
Interior Mirror ..................................................62
Sun Visors ........................................................62
Instrument Cluster
Gauges ..............................................................63
Warning Lamps and Indicators ...............66
Audible Warnings and Indicators ............69
Information Displays
General Information .....................................70
Information Messages .................................74
Climate Control
Manual Climate Control .............................85
Hints on Controlling the Interior Climate
..........................................................................8 6
Heated Exterior Mirrors ...............................87
Seats
Sitting in the Correct Position ..................88
Head Restraints .............................................88
Manual Seats .................................................90
Power Seats .....................................................91
Rear Seats ........................................................93
Front Seat Armrest .......................................94
Rear Seat Armrest ........................................94
Auxiliary Power Points
Auxiliary Power Points ................................95
USB Ports
Locating the USB Ports ...............................97
Playing Media Using the USB Port .........97
Charging a Device .........................................98
Storage Compartments
Overhead Console ........................................99
Starting and Stopping the
Engine
General Information ..................................100
Ignition Switch .............................................100
Starting a Gasoline Engine .......................101
Starting the Engine .....................................102
Switching Off the Engine ..........................102
Engine Idle Shutdown ...............................102
Engine Block Heater ...................................103
Fuel and Refueling
Safety Precautions .....................................105
Fuel Quality - Diesel ...................................106
Fuel Quality - Gasoline .............................109
Running Out of Fuel - Diesel ....................110
Running Out of Fuel - Gasoline ...............110
Refueling - Diesel .........................................110
Refueling - Gasoline ....................................112
Fuel Consumption ........................................113
Fuel Tank Selector Switch .........................114
Engine Emission Control
Emission Law .................................................115
Catalytic Converter ......................................116
Selective Catalytic Reductant System -
Diesel ............................................................118
Diesel Particulate Filter ..............................122
Transmission
Automatic Transmission ...........................128
Power Take-Off ............................................133
Rear Axle
General Information ...................................134
2-Speed Rear Axle ......................................134
2
Table of Contents
Page 11 of 378

ABOUT THIS MANUAL
Thank you for choosing Ford. We
recommend that you take some time to
get to know your vehicle by reading this
manual. The more that you know about
your vehicle, the greater the safety and
pleasure you will get from driving it.
WARNING: Driving while distracted
can result in loss of vehicle control, crash
and injury. We strongly recommend that
you use extreme caution when using any
device that may take your focus off the
road. Your primary responsibility is the
safe operation of your vehicle. We
recommend against the use of any
hand-held device while driving and
encourage the use of voice-operated
systems when possible. Make sure you
are aware of all applicable local laws
that may affect the use of electronic
devices while driving.
Note: Always use and operate your vehicle
in line with all applicable laws and
regulations.
Note: Pass on this manual when selling
your vehicle. It is an integral part of your
vehicle.
Note:Your vehicle’s powertrain control
systems can detect and store information
about vehicle modifications that increase
horsepower and torque output such as
whether or not performance-enhancing
powertrain components commonly referred
to as performance chips have been used.
This information will stay in the system’s
memory and cannot be erased even if the
modification is removed. Ford Motor
Company, Ford of Canada, Ford of Mexico
and service or repair facilities can retrieve
this information when servicing your vehicle.
Ford Motor Company may use this
information to determine if your warranty
covers any needed repairs.Note:Some aftermarket products may
cause severe engine/transmission and/or
exhaust system damage; refer to your
warranty information for more information.
Your new diesel engine will feel, drive and
function somewhat differently than a
gasoline engine. Therefore it is very
important that you read and thoroughly
familiarize yourself and others operating
the vehicle with this guide. There is a
special procedure for turning off the diesel
engine. See Starting a Diesel Engine
(page 102). It is important to read and
understand this material in order to
maintain the best service life for your
engine.
Ford may discontinue models or change
specifications without any notice and
without incurring obligations.
Note:Either Ford Motor Company or an
authorized Ford dealer may have originally
sold this incomplete vehicle to a vehicle
modifier who upfitted it. As a result, some
of the options and features on this vehicle
may differ from what we describe in this
manual.
This manual may qualify the location of a
component as left-hand side or right-hand
side. The side is determined when facing
forward in the seat.
7
Introduction
Page 22 of 378

The Ford Warranty may not cover damage
caused to your vehicle as a result of failed
non-Ford parts.
For additional information, refer to the
terms and conditions of the Ford Warranty.
SPECIAL NOTICES
New Vehicle Limited Warranty
Vehicles sold in the United States and
Canada
For a detailed description of what is
covered by your New Vehicle Limited
Warranty, see your warranty guide that is
available online. For more information,
refer to our website and download your
copy of the warranty guide.
Vehicles sold outside the United States
and Canada
For a detailed description of what is
covered by your New Vehicle Limited
Warranty, see the warranty guide that is
provided to you along with your Owner’s
Manual.
Special Instructions
For your added safety, your vehicle comes
with sophisticated electronic controls.
WARNING: You risk death, fire, or
serious injury to yourself and others if you
do not follow the instruction highlighted
by the warning symbol.
WARNING: NEVER use a rearward
facing child restraint on a seat protected
by an ACTIVE AIRBAG in front of it,
DEATH or SERIOUS INJURY to the CHILD
can occur.
On Board Diagnostics Data Link
Connector
WARNING: Do not connect
wireless plug-in devices to the data link
connector. Unauthorized third parties
could gain access to vehicle data and
impair the performance of safety related
systems. Only allow repair facilities that
follow our service and repair instructions
to connect their equipment to the data
link connector.
Your vehicle has an OBD Data Link
Connector that is used in conjunction with
a diagnostic scan tool for vehicle
diagnostics, repairs and reprogramming
services. Installing an aftermarket device
that uses the data link connector during
normal driving for purposes such as remote
insurance company monitoring,
transmission of vehicle data to other
devices or entities, or altering the
performance of the vehicle, may cause
interference with or even damage to
vehicle systems. We do not recommend
or endorse the use of unapproved
aftermarket plug-in devices. The vehicle
warranty does not cover damage caused
by an aftermarket plug-in device.
Notice to Owners of Pickup Trucks
and Utility Type Vehicles
WARNING: Utility vehicles have a
significantly higher rollover rate than
other types of vehicles.
18
Introduction
Page 60 of 378

DAYTIME RUNNING LAMPS -
VEHICLES WITH: DAYTIME
RUNNING LAMPS (DRL)
WARNING: The daytime running
lamps system does not activate the rear
lamps and may not provide adequate
lighting during low visibility driving
conditions. Make sure you switch the
headlamps on, as appropriate, during all
low visibility conditions. Failure to do so
may result in a crash.
The system turns the lamps on in daylight
conditions.
To switch the system on, switch the
lighting control to any position except
headlamps.
DAYTIME RUNNING LAMPS -
VEHICLES WITH:
CONFIGURABLE DAYTIME
RUNNING LAMPS
WARNING: The daytime running
lamps system does not activate the rear
lamps and may not provide adequate
lighting during low visibility driving
conditions. Make sure you switch the
headlamps on, as appropriate, during all
low visibility conditions. Failure to do so
may result in a crash.
Switch the daytime running lamps on or
off using the information display. See
General Information (page 70).
The daytime running lamps turn on when:
1. The lamps are on in the information
display.
2. You switch the ignition on.3. The transmission is not in park (P) for
vehicles with automatic transmissions
or you release the parking brake for
vehicles with manual transmissions.
4. The lighting control is in the autolamps
position.
5. The headlamps are off.
The other lighting control switch positions
do not turn on the daytime running lamps.
If the daytime running lamps are off in the
information display, the lamps stay off in
all switch positions.
AUTOMATIC HIGH BEAM
CONTROL
(IF EQUIPPED)
WARNING: The system does not
relieve you of your responsibility to drive
with due care and attention. You may
need to override the system if it does not
turn the high beams on or off.
The system turns on high beams if it is dark
enough and no other traffic is present. If it
detects an approaching vehicle’s
headlamps or tail lamps, or street lighting
ahead, the system turns off high beams
before they can distract other road users.
Low beams remain on.
Note:The system may not operate properly
if the sensor is blocked. Keep the windshield
free from obstruction or damage.
Note:The system may not operate properly
in cold or inclement conditions. You can
switch on the high beams by overriding the
system.
Note:If the system detects a blockage, for
example bird droppings, bug splatter, snow
or ice, the system goes into low beam mode
until you clear the blockage. A message may
appear in the information display if the
camera is blocked.
56
Lighting
Page 87 of 378

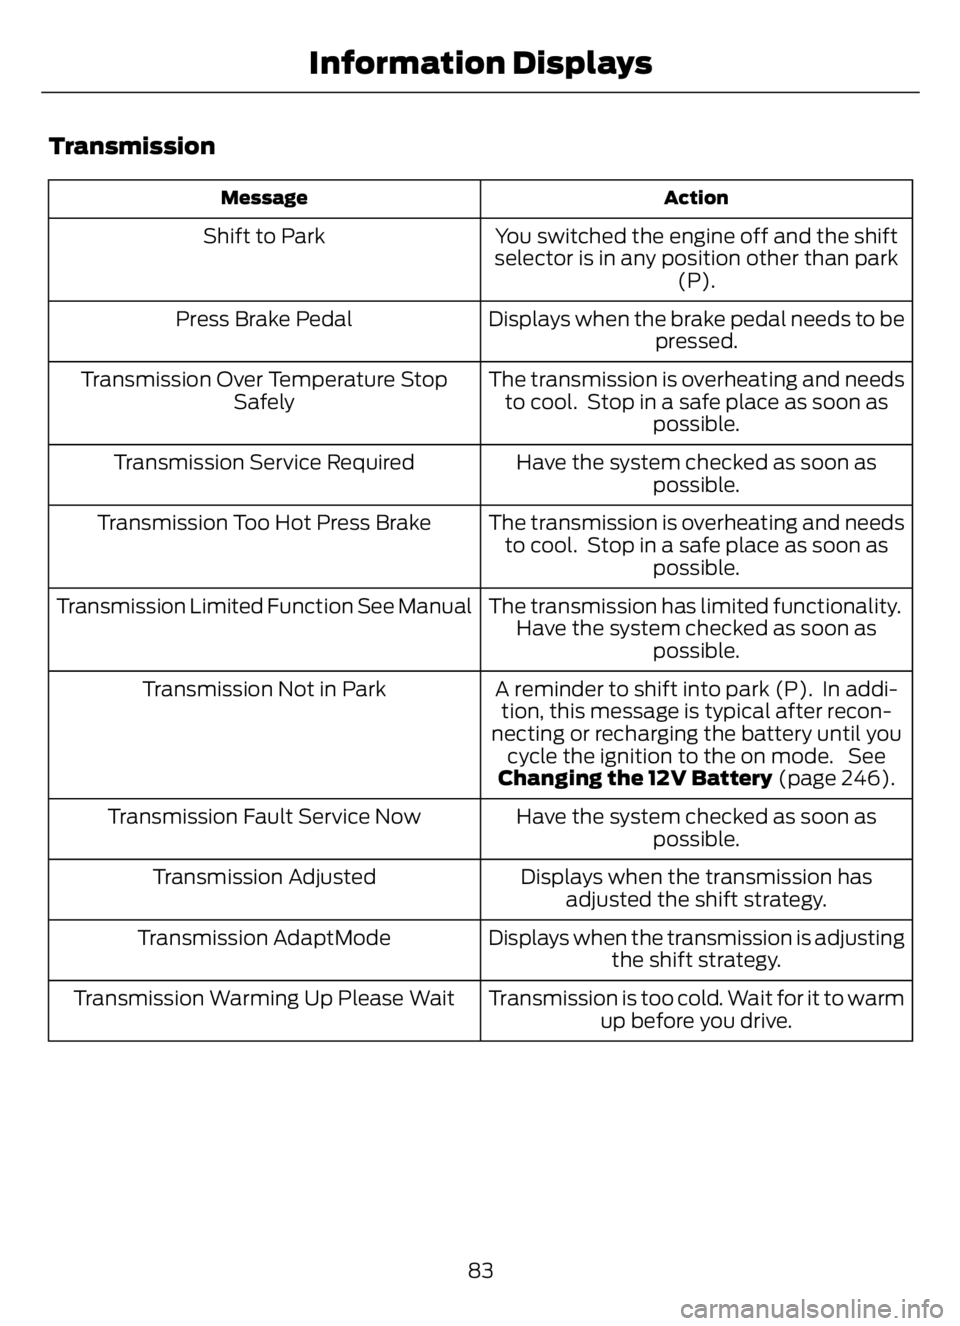
Transmission
Action Message
You switched the engine off and the shift
selector is in any position other than park
(P). Shift to Park
Displays when the brake pedal needs to be
pressed. Press Brake Pedal
The transmission is overheating and needs
to cool. Stop in a safe place as soon as
possible. Transmission Over Temperature Stop
Safely
Have the system checked as soon as
possible. Transmission Service Required
The transmission is overheating and needs
to cool. Stop in a safe place as soon as
possible. Transmission Too Hot Press Brake
The transmission has limited functionality.
Have the system checked as soon as
possible. Transmission Limited Function See Manual
A reminder to shift into park (P). In addi-
tion, this message is typical after recon-
necting or recharging the battery until you
cycle the ignition to the on mode. See
Changing the 12V Battery (page 246). Transmission Not in Park
Have the system checked as soon as
possible. Transmission Fault Service Now
Displays when the transmission has
adjusted the shift strategy. Transmission Adjusted
Displays when the transmission is adjusting
the shift strategy. Transmission AdaptMode
Transmission is too cold. Wait for it to warm
up before you drive. Transmission Warming Up Please Wait
83
Information Displays
Page 132 of 378

AUTOMATIC TRANSMISSION
WARNING: Apply the parking
brake, shift into park (P), switch the
ignition off and remove the key before
you leave your vehicle. Failure to follow
this instruction could result in personal
injury or death.
WARNING: Do not apply the brake
pedal and accelerator pedal
simultaneously. Applying both pedals
simultaneously for more than a few
seconds will limit engine performance,
which may result in difficulty maintaining
speed in traffic and could lead to serious
injury.
Understanding the Shift Positions
of a 6–Speed Automatic
Transmission
E163183
E307627E307627
PRNDM21
Putting your vehicle in or out of gear:
1. Fully press the brake pedal.2. Move the gearshift lever into the
preferred gear.
3. When you finish driving, come to a
complete stop.
4. Move the gearshift lever and securely
latch it in park (P) or neutral (N).
The instrument cluster displays the current
gear.
Park (P)
If your transmission has a park (P) position,
this position locks the transmission and
prevents the rear wheels from turning.
Reverse (R)
With the gearshift lever in reverse (R), your
vehicle moves backward. Always come to
a complete stop before shifting into and
out of reverse (R).
Neutral (N)
With the gearshift lever in neutral (N), you
can start your vehicle and it is free to roll.
Hold the brake pedal down when in this
position.
Drive (D)
Drive (D) is the normal driving position for
the best fuel economy. The overdrive
function allows automatic upshifts and
downshifts through gears one through six.
Manual (M)
With the gearshift lever in manual (M), the
driver can change gears up or down as
preferred. By moving the gearshift lever
from drive (D) to manual (M), you now
have control of selecting the gear you
prefer using the buttons on the shift lever.
See Understanding Your SelectShift
Automatic™ Transmission later in this
section.
128
Transmission
Page 133 of 378

To return to normal drive (D) position,
move the shift lever back from manual (M)
to drive (D).
The transmission operates in gears one
through six.
Second (2)
The transmission operates in second (2)
gear only. Use second (2) gear to just start
on slippery roads.
First (1)
• The transmission operates in first (1)
gear only.
• Provides maximum engine braking.
• Allows upshifts by moving gearshift
lever.
• Does not downshift into first (1) gear
at high speeds; allows for first (1) gear
when vehicle reaches slower speeds.
Forced downshifts
• Allowed in drive (D) with the tow/haul
feature on or off.
• Press the accelerator to the floor.
• Allows transmission to select an
appropriate gear.
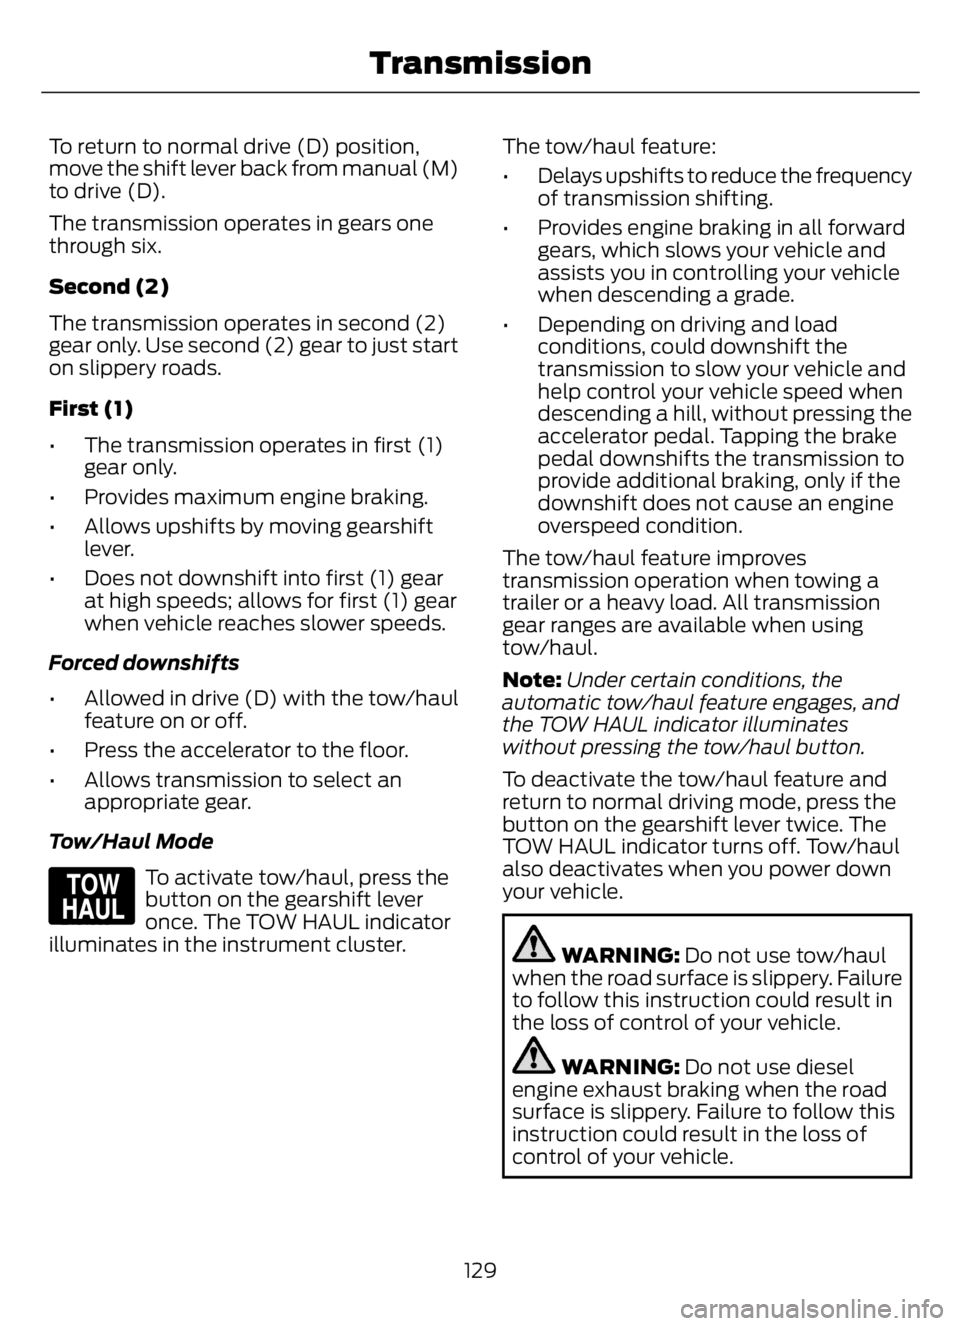
Tow/Haul Mode
E161509
To activate tow/haul, press the
button on the gearshift lever
once. The TOW HAUL indicator
illuminates in the instrument cluster.The tow/haul feature:
• Delays upshifts to reduce the frequency
of transmission shifting.
• Provides engine braking in all forward
gears, which slows your vehicle and
assists you in controlling your vehicle
when descending a grade.
• Depending on driving and load
conditions, could downshift the
transmission to slow your vehicle and
help control your vehicle speed when
descending a hill, without pressing the
accelerator pedal. Tapping the brake
pedal downshifts the transmission to
provide additional braking, only if the
downshift does not cause an engine
overspeed condition.
The tow/haul feature improves
transmission operation when towing a
trailer or a heavy load. All transmission
gear ranges are available when using
tow/haul.
Note:Under certain conditions, the
automatic tow/haul feature engages, and
the TOW HAUL indicator illuminates
without pressing the tow/haul button.
To deactivate the tow/haul feature and
return to normal driving mode, press the
button on the gearshift lever twice. The
TOW HAUL indicator turns off. Tow/haul
also deactivates when you power down
your vehicle.
WARNING: Do not use tow/haul
when the road surface is slippery. Failure
to follow this instruction could result in
the loss of control of your vehicle.
WARNING: Do not use diesel
engine exhaust braking when the road
surface is slippery. Failure to follow this
instruction could result in the loss of
control of your vehicle.
129
Transmission
Page 134 of 378

Understanding Your SelectShift™
Automatic Transmission
Your vehicle has a SelectShift automatic
transmission gearshift lever. SelectShift
automatic transmission gives you the
ability to change gears up or down, without
a clutch.
E318028E318028
Use the buttons on the shifter to lock or
unlock gears and manually select gears.
Press the (+) button to upshift or the (…)
button to downshift.
E163183
With the gearshift lever in drive (D), press
the (–) button to activate SelectShift. The
instrument cluster indicates the available
and selected gears.
All available gears display with the current
gear indicated. Press the (–) button again
to lock out gears beginning with the highest
gear. For example, press the (–) button
twice to lock out 6th and 5th gears. Only
the available gears display, and the
transmission shifts between the available
gears. Press the (+) button to unlock gears.
By moving the gearshift lever from the drive
(D) position to the manual (M) position,
you could now manually select the gear
you prefer. Only the current gear displays.
Press the (+) button or the (–) button to
upshift or downshift. If you press the (–)
button at a vehicle speed that would cause
an engine overspeed, the requested gear
flashes, then disappears, and the
transmission remains in the current gear.
Recommended shift speeds
Upshift according to the following chart:
Upshifts when accelerating (recommended for best fuel economy)
Diesel engines Gasoline engines Shift from:
12 mph (20 km/h) 15 mph (24 km/h) 1 – 2
19 mph (31 km/h) 25 mph (40 km/h) 2 – 3
26 mph (42 km/h) 40 mph (64 km/h) 3 – 4
34 mph (55 km/h) 45 mph (72 km/h) 4 – 5
46 mph (74 km/h) 50 mph (80 km/h) 5 – 6
130
Transmission