2023 FORD F650/750 brake
[x] Cancel search: brakePage 223 of 378

GENERAL INFORMATION
WARNING: Making modifications
to various parts, components and
systems of the vehicle, such as brake and
steering systems, can adversely affect
the quality, reliability and operation of
your vehicle and could result in property
damage, personal injury or death. Such
modifications must be avoided.
WARNING: Failure to properly
perform maintenance and servicing
procedures could result in vehicle
damage, personal injury or death.
WARNING: Take care when
performing any maintenance, system
check or service on your vehicle. Some
of the materials may also be hazardous
if used, serviced or handled improperly
and could result in property damage,
personal injury or death.
If the owner or operator of the vehicle is a
skilled technician and intends on
performing the vehicle maintenance and
service, he is strongly urged to purchase a
service manual.
Always use care when performing vehicle
maintenance, repairs or system checks.
Improper or incomplete service could result
in your vehicle not working properly which
may result in personal injury or damage to
your vehicle or equipment. It is the
operator’s responsibility to see that your
vehicle receives proper care and
maintenance. If you have any questions
about performing service, have the service
done by a qualified technician.
To help you service your vehicle, we
provide scheduled maintenance
information which makes tracking routine
service easy. See Scheduled
Maintenance (page 319).If your vehicle requires professional service,
an authorized dealer can provide the
necessary parts and service. Check your
warranty information to find out which
parts and services are covered.
Use only recommended fuels, lubricants,
fluids and service parts conforming to
specifications. Motorcraft® parts are
designed and built to provide the best
performance in your vehicle.
Servicing Guidelines
WARNING: The use of inferior parts
can adversely affect the quality and
reliability of your vehicle and could result
in property damage, personal injury or
death.
When servicing your vehicle:
• Always wear safety glasses for eye
protection.
• Always set the parking brake or chock
the wheels.
• Always use support stands, not a jack,
when working under a raised vehicle.
• Always turn off the ignition unless a
procedure requires the engine to be
running.
• Always avoid contact with hot metal
parts. Allow the components to cool
before working with, or around, them.
• Always operate the engine in a
well-ventilated area.
• Do not wear loose-fitting clothing,
hanging jewelry, watches or rings.
• Do not smoke.
• Do not work on the brakes or the clutch
unless you take the proper precautions
to avoid inhaling friction material dust.
219
Maintenance
Page 224 of 378

Quality service parts are available through
an authorized dealer. If dealer parts are not
used, make sure the replacement parts are
of equivalent quality.
Working with the Engine Off
1. Set the parking brake and shift to
neutral (N) or park (P).
2. Switch off the engine.
3. Block the wheels.
Working with the Engine On
WARNING: To reduce the risk of
vehicle damage and/or personal burn
injuries, do not start your engine with the
air cleaner removed and do not remove
it while the engine is running.
1. Set the parking brake and shift to
neutral (N) or park (P).
2. Block the wheels
Supporting Your Vehicle for
Service
WARNING: Do not use a jack when
working under a vehicle. It may give way,
causing the vehicle to fall and result in
property damage, personal injury or
death. Always use floor stands to
support the vehicle.
Prepare your vehicle for service repairs by
doing the following:
1. Park your vehicle on a level, concrete
floor.
2. Set the parking brake and block the
wheels to prevent your vehicle from
moving.
3. Select a jack with a rated capacity
sufficient to lift and hold up your
vehicle.4. Raise your vehicle with the jack applied
to the axle(s). Do not use the bumper
as a lifting point.
5. Support your vehicle with floor stands
under the axle(s). When servicing the
axle or the suspension, support your
vehicle with floor stands under the
frame side-members, preferably
between the axles.
OPENING AND CLOSING THE
HOOD
WARNING: Before opening the
hood, fully apply the parking brake, shift
into park (P) or neutral (N) and switch
the ignition off.
WARNING: Do not stand under the
hood when you raise or lower it. Failure
to follow this warning could result in
serious personal injury or death.
WARNING: If the engine is running
while the hood is open, stay clear of
moving engine components. Failure to
follow this warning could result in serious
personal injury or death.
220
Maintenance
Page 226 of 378

UNDER HOOD OVERVIEW - 6.7L DIESEL
E313700E313700
Engine compartment fuse box. See Fuses (page 200). A
Windshield washer fluid reservoir. See Washer Fluid Check (page 249). B
Automatic transmission fluid dipstick. See Automatic Transmission Fluid
Check (page 242). C
Secondary Cooling System Reservoir. See Engine Coolant Check (page 233). D
Engine coolant reservoir. See Engine Coolant Check (page 233). E
Secondary fuel filter. See Draining the Fuel Filter Water Trap (page 232). F
Engine oil separator. See Changing the Engine Oil and Oil Filter (page 226). G
Engine oil filler cap. See Engine Oil Check (page 224). H
Brake fluid reservoir. See Brake Fluid Check (page 244). I
Power steering fluid reservoir. See Power Steering Fluid Check (page 245). J
Air brake compressor. See Brake System Inspection (page 255). K
Engine oil dipstick. See Engine Oil Dipstick (page 224). L
Air cleaner assembly. See Changing the Engine Oil and Oil Filter (page 226). M
222
Maintenance
Page 227 of 378

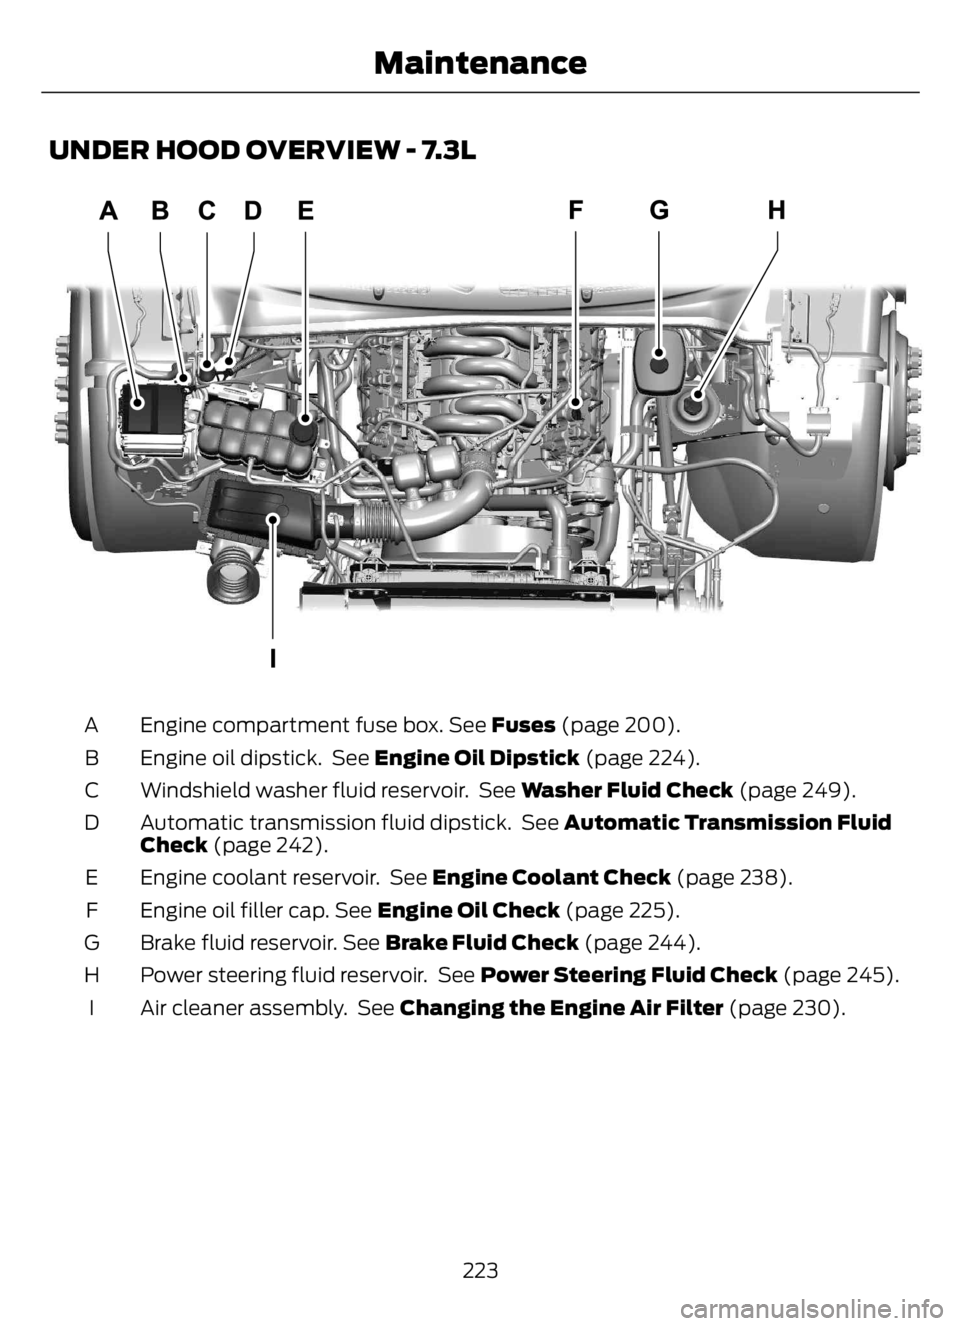
UNDER HOOD OVERVIEW - 7.3L
E330964E330964
Engine compartment fuse box. See Fuses (page 200). A
Engine oil dipstick. See Engine Oil Dipstick (page 224). B
Windshield washer fluid reservoir. See Washer Fluid Check (page 249). C
Automatic transmission fluid dipstick. See Automatic Transmission Fluid
Check (page 242). D
Engine coolant reservoir. See Engine Coolant Check (page 238). E
Engine oil filler cap. See Engine Oil Check (page 225). F
Brake fluid reservoir. See Brake Fluid Check (page 244). G
Power steering fluid reservoir. See Power Steering Fluid Check (page 245). H
Air cleaner assembly. See Changing the Engine Air Filter (page 230). I
223
Maintenance
Page 228 of 378

ENGINE OIL DIPSTICK - 6.7L
DIESEL
E249448
Minimum. A
Nominal. B
Maximum. C
ENGINE OIL DIPSTICK - 7.3L
E250320E250320
Minimum. A
Nominal. B
Maximum. C
ENGINE OIL CHECK - 6.7L
DIESEL
To check the engine oil level consistently
and accurately, do the following:1. Make sure the parking brake is on. Make
sure the transmission is in park (P) or
neutral (N).
2. Run engine until it reaches normal
operating temperature.
3. Make sure that your vehicle is on level
ground.
4. Switch the engine off and wait 15
minutes for the oil to drain into the oil
pan. Checking the engine oil level too
soon after you switch the engine off
may result in an inaccurate reading.
5. Open the hood. See Opening and
Closing the Hood (page 220).
6. Remove the dipstick and wipe it with
a clean, lint-free cloth. See Under
Hood Overview (page 222).
7. Replace the dipstick and remove it
again to check the oil level. See
Engine Oil Dipstick (page 224).
8. Make sure that the oil level is between
the maximum and minimum marks. If
the oil level is at the minimum mark,
add oil immediately. See Engine Oil
Capacity and Specification (page
292).
9. If the oil level is correct, replace the
dipstick and make sure it is fully seated.
Note:Do not remove the dipstick when the
engine is running.
Note: If the oil level is between the
maximum and minimum marks, the oil level
is acceptable. Do not add oil.
Note:The oil consumption of new engines
reaches its normal level after approximately
3,000 mi (5,000 km).
Adding Engine Oil
WARNING: Do not remove the filler
cap when the engine is running.
224
Maintenance
Page 245 of 378

change as you drive. This is to be expected
as being normal to the operation of your
vehicle. High levels of fan noise might also
be heard when your engine is first started,
and should normally decrease after driving
for a short time.
Fail-Safe Cooling
Fail-safe cooling allows you to temporarily
drive your vehicle before any incremental
component damage occurs. The fail-safe
distance depends on ambient
temperature, vehicle load and terrain.
How Fail-Safe Cooling Works
If the engine begins to overheat, the
coolant temperature gauge moves toward
the red zone:
A warning lamp illuminates and
a message may appear in the
information display.
If the engine reaches a preset
over-temperature condition, the engine
switches to alternating cylinder operation.
Each disabled cylinder acts as an air pump
and cools the engine.
When this occurs, your vehicle still
operates, however:
• Engine power is limited.
• The air conditioning system turns off.
Continued operation increases the engine
temperature, causing the engine to
completely shut down. Your steering and
braking effort increases in this situation.
When the engine temperature cools, you
can re-start the engine. Have your vehicle
checked as soon as possible to minimize
engine damage.When Fail-Safe Mode Is Activated
WARNING: Fail-safe mode is for
use during emergencies only. Operate
your vehicle in fail-safe mode only as
long as necessary to bring your vehicle
to rest in a safe location and seek
immediate repairs. When in fail-safe
mode, your vehicle will have limited
power, will not be able to maintain
high-speed operation, and may
completely shut down without warning,
potentially losing engine power, power
steering assist, and power brake assist,
which may increase the possibility of a
crash resulting in serious injury.
WARNING: Do not remove the
coolant reservoir cap when the engine is
on or the cooling system is hot. Wait 10
minutes for the cooling system to cool
down. Cover the coolant reservoir cap
with a thick cloth to prevent the
possibility of scalding and slowly remove
the cap. Failure to follow this instruction
could result in personal injury.
Your vehicle has limited engine power
when in the fail-safe mode, drive your
vehicle with caution. Your vehicle does not
maintain high-speed operation and the
engine may operate poorly.
Remember that the engine is capable of
shutting down to prevent engine damage.
In this situation:
1. Pull off the road as soon as safely
possible and switch the engine off.
2. If you are a member of a roadside
assistance program, we recommend
that you contact your roadside
assistance service provider.
3. If this is not possible, wait a short
period for the engine to cool.
241
Maintenance
Page 247 of 378

1. Drive the vehicle until it reaches normal
operating temperature. This may take
up to 20 mi (30 km). Make sure that
the transmission fluid temperature
gauge on the instrument cluster is
within normal operating temperature
196–215°F (91–102°C) before
checking.
2. Make sure that your vehicle is on level
ground.
3. With the engine running, parking brake
engaged and your foot on the brake
pedal, move the gearshift lever through
all of the gear ranges. Allow sufficient
time for each gear to engage.
4. Make sure the parking brake is on. Make
sure the transmission is in park (P) or
neutral (N) and leave the engine
running.
5. Open the hood. See Opening and
Closing the Hood (page 220).
6. Remove the dipstick and wipe it with
a clean, lint-free cloth. See Under
Hood Overview (page 222).
7. Replace the dipstick and remove it
again to check the fluid level.
8. If the fluid level is correct, replace the
dipstick and make sure it is fully seated.
Note:If the fluid level is between the
maximum and minimum marks, the fluid
level is acceptable. Do not add fluid.Transmission Fluid Level
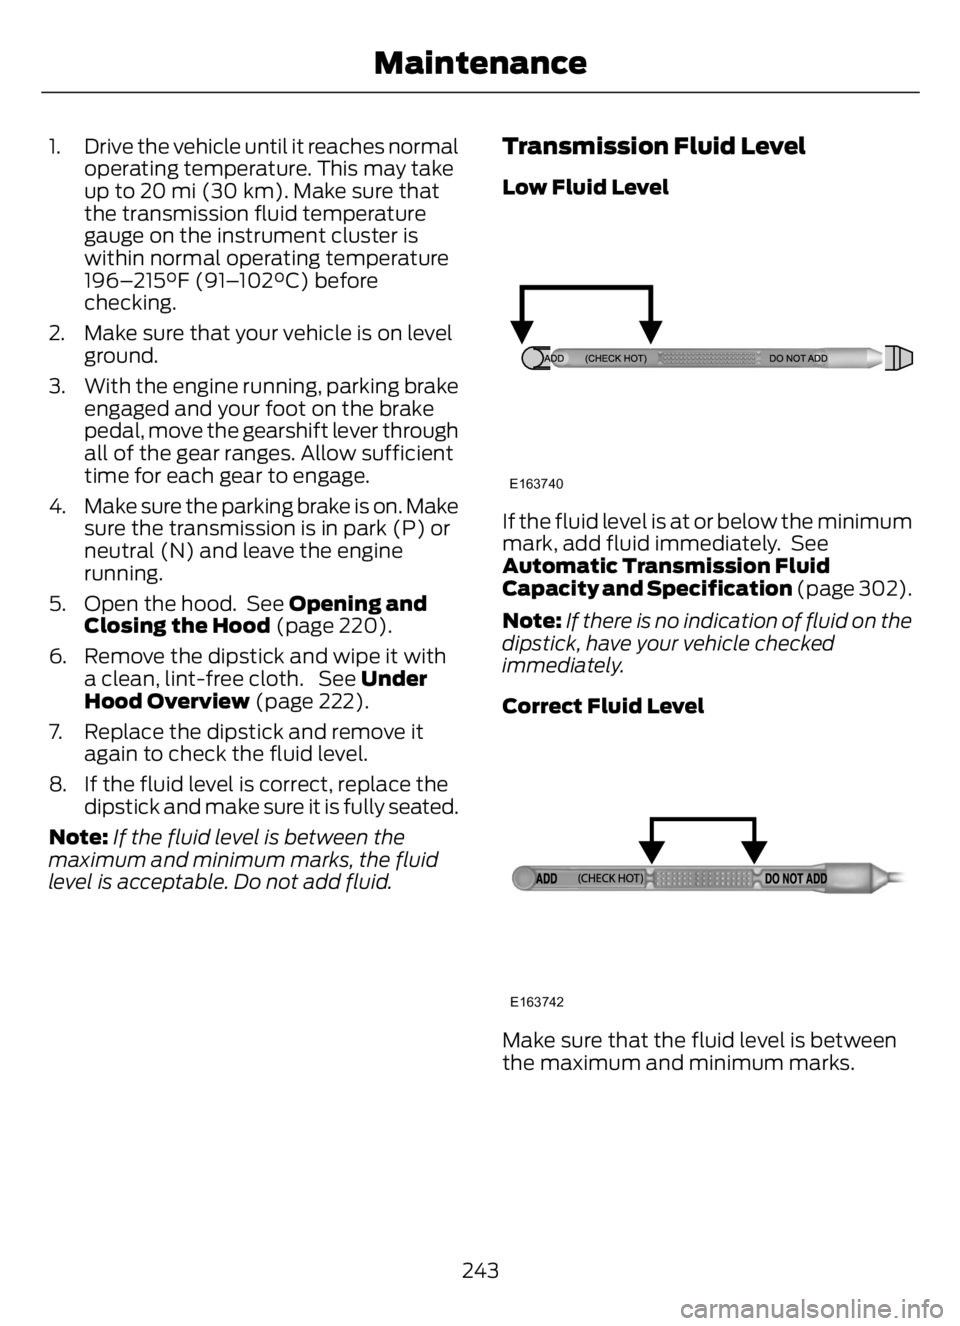
Low Fluid Level
E163740
If the fluid level is at or below the minimum
mark, add fluid immediately. See
Automatic Transmission Fluid
Capacity and Specification (page 302).
Note:If there is no indication of fluid on the
dipstick, have your vehicle checked
immediately.
Correct Fluid Level
E163742
Make sure that the fluid level is between
the maximum and minimum marks.
243
Maintenance
Page 248 of 378

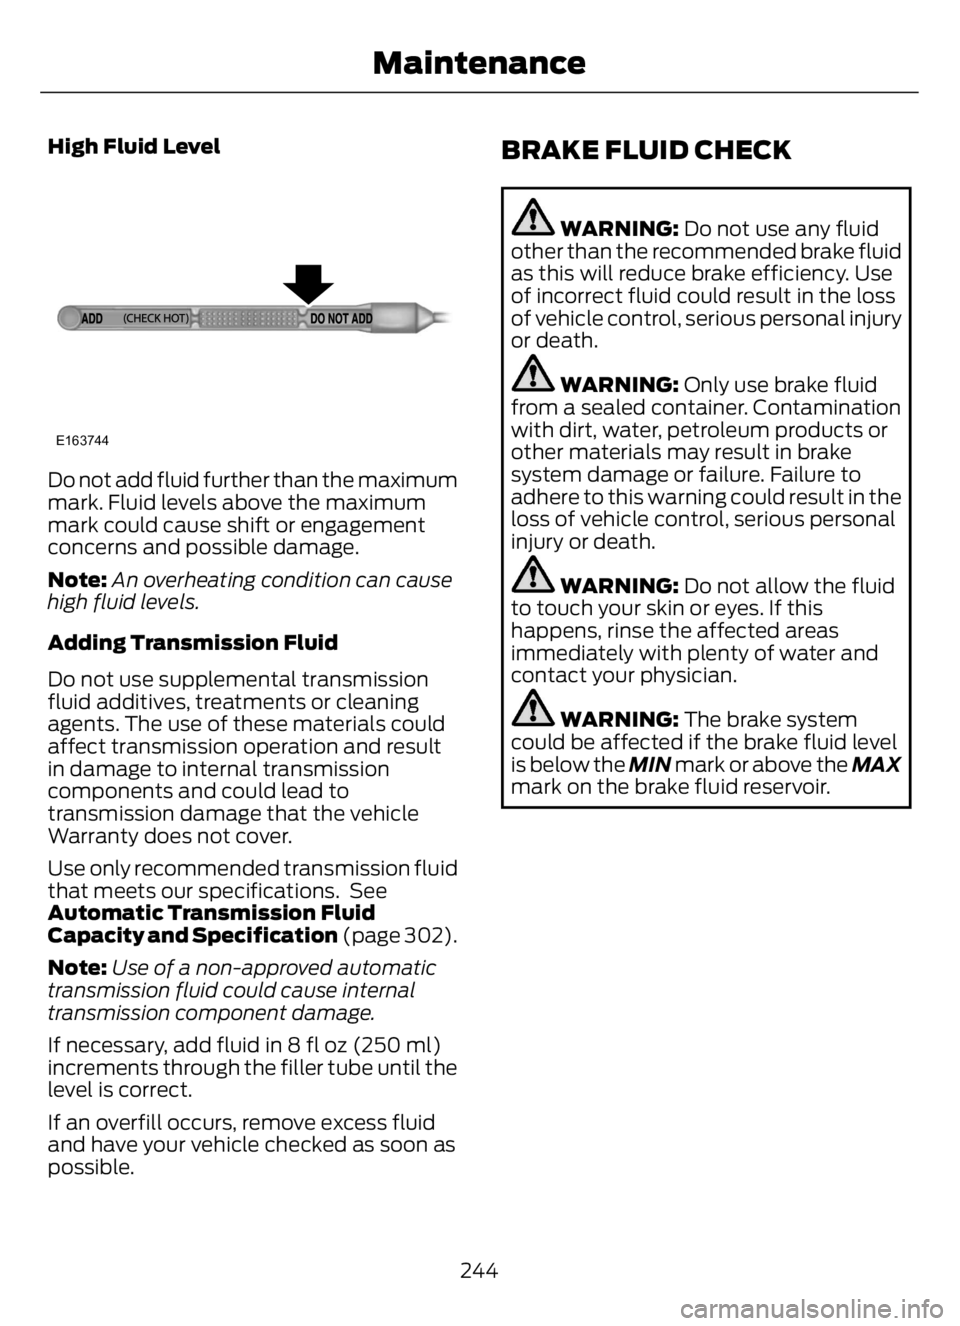
High Fluid Level
E163744
Do not add fluid further than the maximum
mark. Fluid levels above the maximum
mark could cause shift or engagement
concerns and possible damage.
Note:An overheating condition can cause
high fluid levels.
Adding Transmission Fluid
Do not use supplemental transmission
fluid additives, treatments or cleaning
agents. The use of these materials could
affect transmission operation and result
in damage to internal transmission
components and could lead to
transmission damage that the vehicle
Warranty does not cover.
Use only recommended transmission fluid
that meets our specifications. See
Automatic Transmission Fluid
Capacity and Specification (page 302).
Note:Use of a non-approved automatic
transmission fluid could cause internal
transmission component damage.
If necessary, add fluid in 8 fl oz (250 ml)
increments through the filler tube until the
level is correct.
If an overfill occurs, remove excess fluid
and have your vehicle checked as soon as
possible.
BRAKE FLUID CHECK
WARNING: Do not use any fluid
other than the recommended brake fluid
as this will reduce brake efficiency. Use
of incorrect fluid could result in the loss
of vehicle control, serious personal injury
or death.
WARNING: Only use brake fluid
from a sealed container. Contamination
with dirt, water, petroleum products or
other materials may result in brake
system damage or failure. Failure to
adhere to this warning could result in the
loss of vehicle control, serious personal
injury or death.
WARNING: Do not allow the fluid
to touch your skin or eyes. If this
happens, rinse the affected areas
immediately with plenty of water and
contact your physician.
WARNING: The brake system
could be affected if the brake fluid level
is below the MIN mark or above the MAX
mark on the brake fluid reservoir.
244
Maintenance