2023 FORD EXPLORER ECO mode
[x] Cancel search: ECO modePage 373 of 573

•To reduce the chances of interferencefrom another vehicle, perform thesystem reset procedure at least 3 ft(1 m) away from another Ford MotorCompany vehicle undergoing thesystem reset procedure at the sametime.
•Do not wait more than two minutesbetween resetting each tire sensor orthe system can time-out and you haveto repeat the entire procedure on allfour wheels.
•A double horn sounds indicating theneed to repeat the procedure.
Performing the System Reset Procedure
Read the entire procedure beforeattempting.
1.Drive the vehicle above 20 mph(32 km/h) for at least two minutes,then park in a safe location where youcan easily get to all four tires and haveaccess to an air pump.
2.Place the ignition in the off position andkeep the key in the ignition.
3.Cycle the ignition to the on positionwith the engine off.
4.Turn the hazard flashers on then offthree times. You must accomplish thiswithin 10 seconds. If you successfullyenter the reset mode, the horn soundsonce, the system indicator flashes anda message shows in the informationdisplay. If this does not occur, pleasetry again starting at step 2. If afterrepeated attempts to enter the resetmode, the horn does not sound, thesystem indicator does not flash and nomessage shows in the informationdisplay, seek service from yourauthorized dealer.
5.Train the tire pressure monitoringsystem sensors in the tires using thefollowing system reset sequencestarting with the left front tire in thefollowing clockwise order: Left front -driver side front tire, Right front -passenger side front tire, Right rear -passenger side rear tire, Left rear -driver side rear tire.
6.Remove the valve cap from the valvestem on the left front tire. Decrease theair pressure until the horn sounds.
Note:The single horn tone confirms thatthe sensor identification code has beenlearned by the module for this position. If adouble horn is heard, the reset procedurewas unsuccessful, and you must repeat it.
7.Remove the valve cap from the valvestem on the right front tire. Decreasethe air pressure until the horn sounds.
8.Remove the valve cap from the valvestem on the right rear tire. Decrease theair pressure until the horn sounds.
9.Remove the valve cap from the valvestem on the left rear tire. Decrease theair pressure until the horn sounds.Training is complete after the hornsounds for the last tire trained, driverside rear tire, the system indicatorstops flashing, and a message showsin the information display.
10.Turn the ignition off. If two short hornbeeps are heard, the reset procedurewas unsuccessful and you mustrepeat it. If after repeating theprocedure and two short beeps areheard when the ignition is turned tooff, seek assistance from yourauthorized dealer.
369
2023 Explorer (CTW) Canada/United States of America, enUSA, Edition date: 202209, First-PrintingWheels and Tires
Page 379 of 573

18.Remove the jack and fully tighten thelug nuts in the order shown. SeeTechnical Specifications (page376).
19.If you enabled the Air SuspensionService Mode, switch the mode offprior to driving.
20.Remove the wheel blocks.
Stowing the jack
1.To store the folded wrench on the jack,engage the bracket of the jack baseand the lug wrench pin, swing thewrench upwards, adjust jack heightuntil the wrench hook engages the holeon jack. Tighten the hex nut clockwiseby hand until secure.
2.Place the jack in the spare tirecompartment, install the wing nut andtighten clockwise by hand until secure.
Stowing the flat tire
You cannot store the full-sized road wheelin the temporary spare tire well.
1.Find the flat tire retainer strap tuckedinside the jack channel. Lower thecarpeted load floor.
2.Stow the flat tire in the cargo area onthe load floor with the wheel facing up.Secure the flat tire with the retainerstrap by following the next steps.
3.Locate the rear left side and right sidecargo tie-down rings. Push the loop endof the retainer strap through one cargotie-down ring. Thread the non-loop endthrough the loop.
4.Weave the retainer strap through thewheel openings.
375
2023 Explorer (CTW) Canada/United States of America, enUSA, Edition date: 202209, First-PrintingWheels and Tires12345E306781 E176165 E142906 E294325
Page 388 of 573
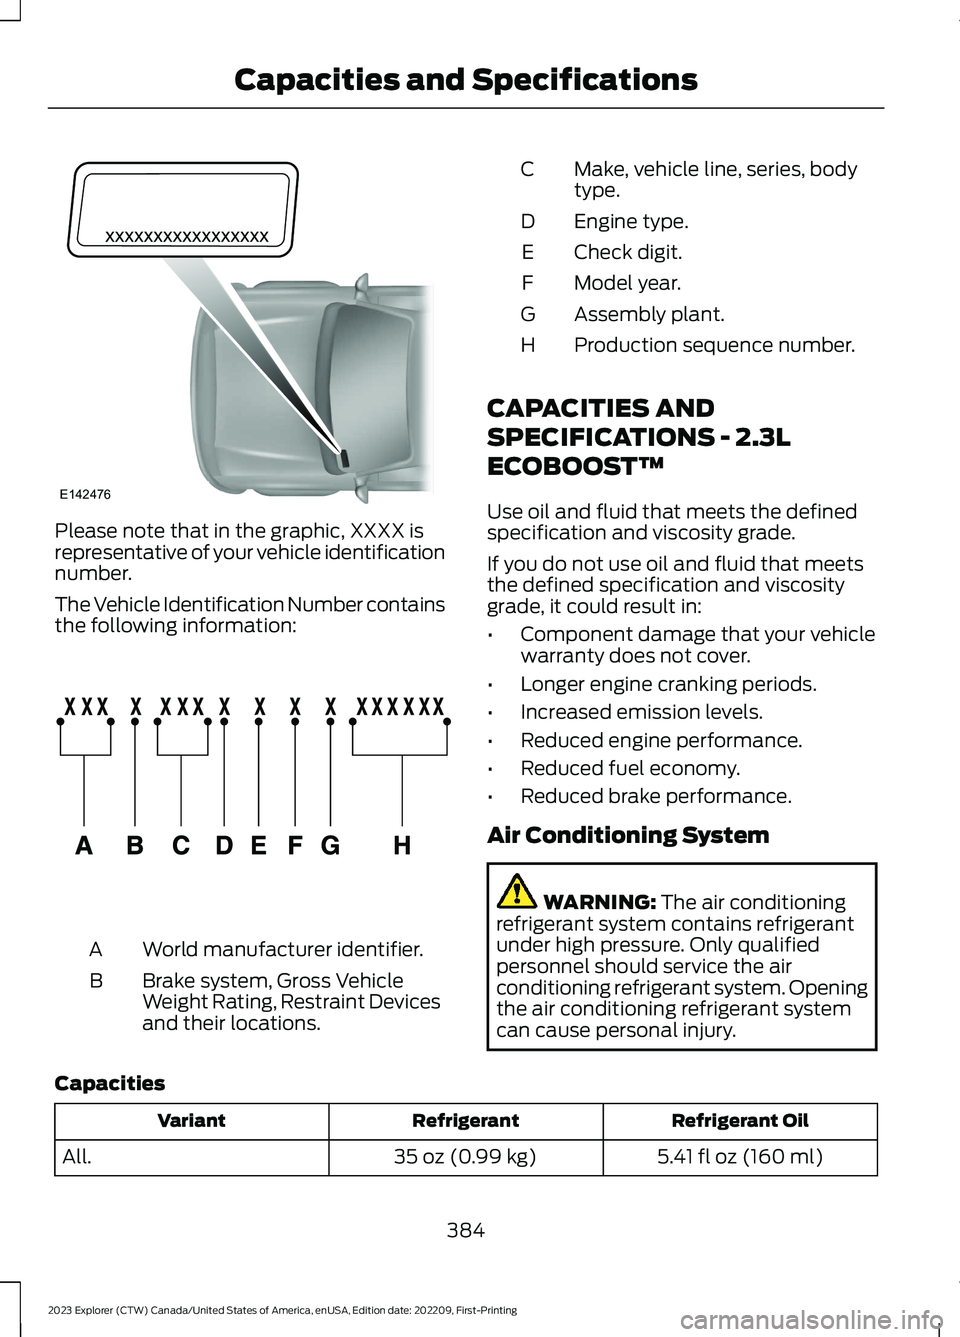
Please note that in the graphic, XXXX isrepresentative of your vehicle identificationnumber.
The Vehicle Identification Number containsthe following information:
World manufacturer identifier.A
Brake system, Gross VehicleWeight Rating, Restraint Devicesand their locations.
B
Make, vehicle line, series, bodytype.C
Engine type.D
Check digit.E
Model year.F
Assembly plant.G
Production sequence number.H
CAPACITIES AND
SPECIFICATIONS - 2.3L
ECOBOOST™
Use oil and fluid that meets the definedspecification and viscosity grade.
If you do not use oil and fluid that meetsthe defined specification and viscositygrade, it could result in:
•Component damage that your vehiclewarranty does not cover.
•Longer engine cranking periods.
•Increased emission levels.
•Reduced engine performance.
•Reduced fuel economy.
•Reduced brake performance.
Air Conditioning System
WARNING: The air conditioningrefrigerant system contains refrigerantunder high pressure. Only qualifiedpersonnel should service the airconditioning refrigerant system. Openingthe air conditioning refrigerant systemcan cause personal injury.
Capacities
Refrigerant OilRefrigerantVariant
5.41 fl oz (160 ml)35 oz (0.99 kg)All.
384
2023 Explorer (CTW) Canada/United States of America, enUSA, Edition date: 202209, First-PrintingCapacities and SpecificationsE142476 E142477
Page 419 of 573
CONNECTED VEHICLE – TROUBLESHOOTING - VEHICLES WITH:
MODEM
Possible Cause and ResolutionSymptom
I cannot confirm theconnection of my FordPassaccount to the modem.
–Modem is not enabled.
•Switch connectivity features on.
–Weak network signal.
•Move your vehicle closer to a place where thenetwork signal is not obstructed.
415
2023 Explorer (CTW) Canada/United States of America, enUSA, Edition date: 202209, First-PrintingConnected Vehicle
Page 447 of 573

FunctionButton
For MP3 CDs, this button allows you to toggle through repeatoff, repeat one track (a small number one displays), and repeatcurrent folder (a small folder displays).
Select the shuffle symbol to have the audio on the disk playin random order.Shuffle
You can use the forward, reverse, pause orplay buttons to control the audio playback.Bluetooth® Stereo or USB
Bluetooth® Stereo and USB allow you toaccess media that you store on yourBluetooth® device or USB device such asmusic, audio books or podcasts.
The following buttons are available for Bluetooth® and USB:
FunctionButton
Pressing the repeat button toggles the repeat setting throughthree modes: repeat off (button not highlighted), repeat all(button highlighted) and repeat track (button highlighted witha small number one).
Repeat
Play the tracks in random order.Shuffle
You can use the forward, reverse, pause orplay buttons to control the audio playback.
To get more information about thecurrently playing track, press the cover artor Info button.
For some devices, SYNC 3 is able toprovide 30-second skip buttons when youlisten to audio books or podcasts. Thesebuttons allow you to skip forward orbackward within a track.
While playing audio from a USB device youcan look for certain music by selecting thefollowing:
FunctionButton
If available, displays the list of tracks in theNow Playing playlist.Browse
This option, which is available underbrowse, allows you to play all tracks or tofilter the available media into one of thebelow categories.
New Search
Play All
443
2023 Explorer (CTW) Canada/United States of America, enUSA, Edition date: 202209, First-PrintingSYNC™ 3
Page 450 of 573
A/C: Touch to switch the air conditioningon or off. Use A/C with recirculated air toimprove cooling performance andefficiency.
Note:In certain conditions, such asmaximum defrost, the air conditioningcompressor may continue to operate eventhough you switch off the air conditioning.
Switching the Climate Control Onand Off
Touch the button.
Switching the Climate ControlledSeats On and Off
Touch the button to cyclethrough the various climatecontrolled seat settings.
Switching Dual Zone Mode On andOff
Touch the button to switch ontemperature control for theright-hand side of the vehicle.
Switching the Heated ExteriorMirrors On and Off
Touch the button.
Switching the Heated WindshieldOn and Off
Touch the button to clear thewindshield of thin ice and fog.The heated windshield turns offafter a short period of time.
Switching the Heated RearWindow On and Off
Touch the button to clear therear window of thin ice and fog.
Switching the Heated Seats Onand Off
Touch the button to cyclethrough the various heatsettings.
Switching the Heated SteeringWheel On and Off
Touch the button.
Switching Maximum AirConditioning On and Off
Touch the button for maximumcooling.
Recirculated air flows through theinstrument panel air vents, air conditioningturns on and the blower motor adjusts tothe highest speed.
Switching Maximum Defrost Onand Off
Touch the button for maximumdefrosting.
Air flows through the windshield air vents,and the blower motor adjusts to thehighest speed.
You can also use this setting to defog andclear the windshield of a thin covering ofice.
Note:To prevent window fogging, youcannot select recirculated air whenmaximum defrost is on.
446
2023 Explorer (CTW) Canada/United States of America, enUSA, Edition date: 202209, First-PrintingSYNC™ 3 E265282 E265280 E266189 E184884 E256621
Page 451 of 573
Note:The heated rear window also turnson when you select maximum defrost.
Note:Depending on your region, airconditioning turns on.
Switching Recirculated Air On andOff
Touch the button to switchbetween outside air andrecirculated air.
The air currently in the passengercompartment recirculates. This mayreduce the time needed to cool the interior,when used with A/C, and reduce unwantedodors from entering your vehicle.
Note: Recirculated air may turn off, orprevent you from switching on, in all air flowmodes except MAX A/C to reduce the riskof fogging. Recirculation may also turn onand off in various air distribution controlcombinations during hot weather to improvecooling efficiency.
Switching the Ventilated Seats Onand Off
Touch the button to cyclethrough the various ventilatedseat settings.
Accessing Rear Climate Controls
Touch the button to accessadditional controls for the rearclimate system.
Rear Climate Control LockIndicator
Touch the button.
When on, you can only operatethe rear passenger settingsthrough the front controls.
Switching Rear Auto Mode On andOff
Touch the button to switch onrear automatic operation, thenset the temperature.
PHONE
WARNING: Driving while distractedcan result in loss of vehicle control, crashand injury. We strongly recommend thatyou use extreme caution when using anydevice that may take your focus off theroad. Your primary responsibility is thesafe operation of your vehicle. Werecommend against the use of anyhand-held device while driving andencourage the use of voice-operatedsystems when possible. Make sure youare aware of all applicable local lawsthat may affect the use of electronicdevices while driving.
Check the compatibility of your device onthe regional website.
Pairing Your Cell Phone for theFirst Time
Go to the settings menu on your device andswitch Bluetooth® on.
Select the phone option on thefeature bar.
1.Select Add Phone.
Note:A prompt alerts you to search for yourvehicle on your cell phone.
2.Select your vehicle on your cell phone.
Note:A number appears on your cell phoneand on the touchscreen.
3.Confirm that the number on your cellphone matches the number on thetouchscreen.
447
2023 Explorer (CTW) Canada/United States of America, enUSA, Edition date: 202209, First-PrintingSYNC™ 3 E268558 E270447 E265289
Page 484 of 573
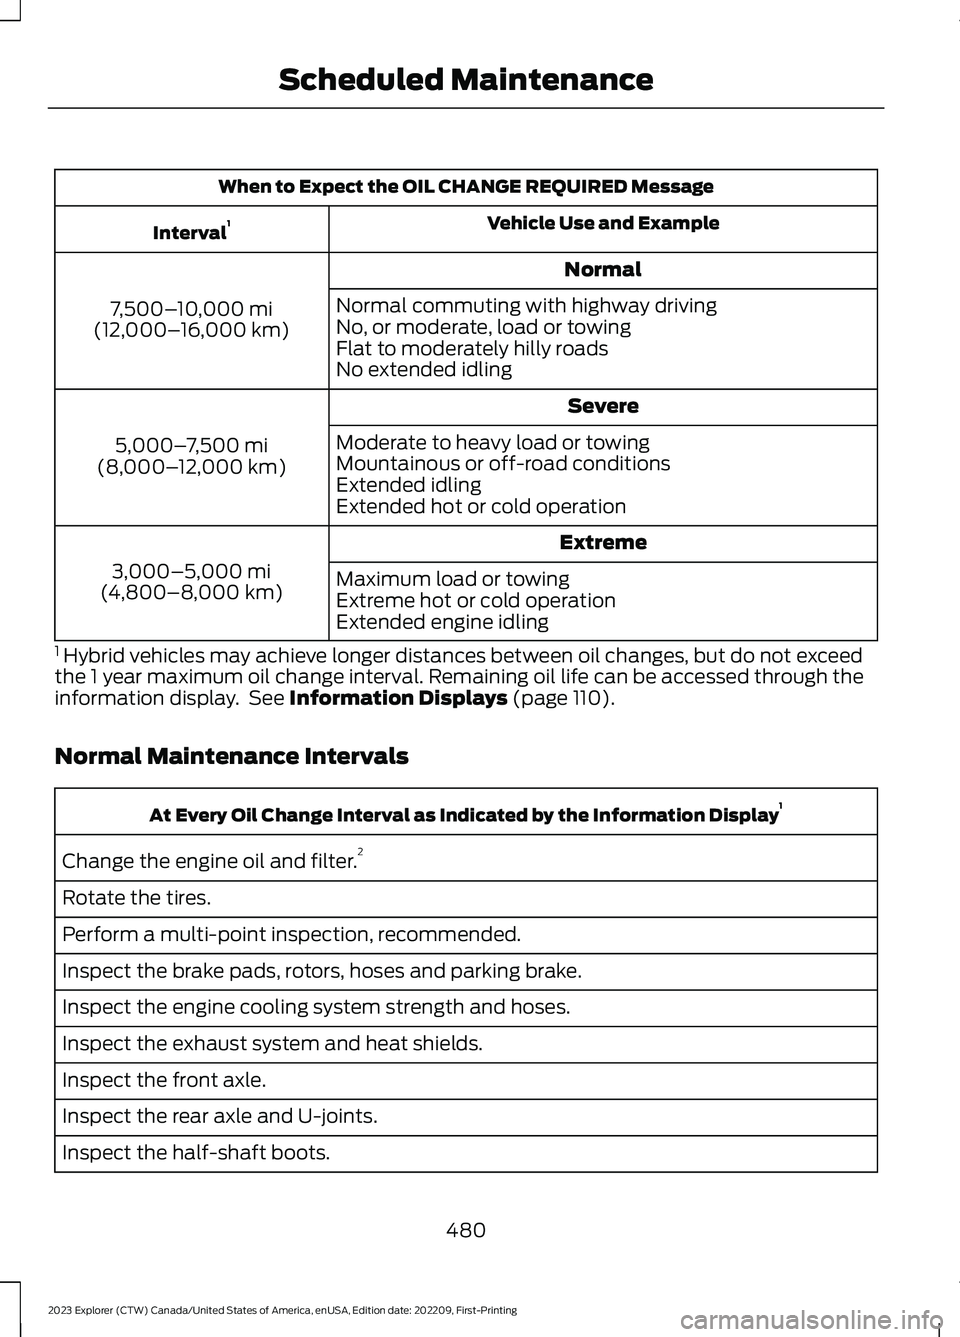
When to Expect the OIL CHANGE REQUIRED Message
Vehicle Use and ExampleInterval1
Normal
7,500–10,000 mi(12,000–16,000 km)
Normal commuting with highway drivingNo, or moderate, load or towingFlat to moderately hilly roadsNo extended idling
Severe
5,000–7,500 mi(8,000–12,000 km)
Moderate to heavy load or towingMountainous or off-road conditionsExtended idlingExtended hot or cold operation
Extreme
3,000–5,000 mi(4,800–8,000 km)Maximum load or towingExtreme hot or cold operationExtended engine idling
1 Hybrid vehicles may achieve longer distances between oil changes, but do not exceedthe 1 year maximum oil change interval. Remaining oil life can be accessed through theinformation display. See Information Displays (page 110).
Normal Maintenance Intervals
At Every Oil Change Interval as Indicated by the Information Display1
Change the engine oil and filter.2
Rotate the tires.
Perform a multi-point inspection, recommended.
Inspect the brake pads, rotors, hoses and parking brake.
Inspect the engine cooling system strength and hoses.
Inspect the exhaust system and heat shields.
Inspect the front axle.
Inspect the rear axle and U-joints.
Inspect the half-shaft boots.
480
2023 Explorer (CTW) Canada/United States of America, enUSA, Edition date: 202209, First-PrintingScheduled Maintenance