2023 FORD EXPLORER lock
[x] Cancel search: lockPage 31 of 573

5.To put the retractor in the automaticlocking mode, grasp the shoulderportion of the belt and pull downwarduntil you pull all of the belt out.
Note:The automatic locking mode isavailable on the front passenger and rearseats.
6.Allow the belt to retract to removeslack. The belt clicks as it retracts toindicate it is in the automatic lockingmode.
7.Try to pull the belt out of the retractorto make sure the retractor is in theautomatic locking mode. You shouldnot be able to pull more belt out. If theretractor did not lock, unbuckle the beltand repeat Steps 5 and 6.
8.Remove remaining slack from the belt.Force the seat down with extra weight,for example, by pressing down orkneeling on the child restraint as youpull up on the shoulder belt to forceslack from the belt. This is necessaryto remove the remaining slack thatexists once you add the extra weightof the child to the child restraint. It alsohelps to achieve the proper snugnessof the child restraint to your vehicle.Sometimes, a slight lean toward thebuckle provides extra help to removeremaining slack from the belt.
9.If the child restraint has a tether strap,attach it now.
10.Before placing the child in the seat,forcibly move the seat forward andback to make sure you have the seatsecurely held in place. To check this,grab the seat at the belt path andattempt to move it side to side andforward and back. There should beno more than 1 in (2.5 cm) ofmovement for proper installation.
We recommend checking with a NHTSACertified Child Passenger SafetyTechnician to make sure you properlyinstalled the child restraint. In Canada,check with Transport Canada for referralto a Child Car Seat Clinic.
27
2023 Explorer (CTW) Canada/United States of America, enUSA, Edition date: 202209, First-PrintingChild SafetyE142875 E142533 E142534
Page 32 of 573

Using Lower Anchors and Tethersfor CHildren (LATCH)
WARNING: Do not attach two childsafety restraints to the same anchor. Ina crash, one anchor may not be strongenough to hold two child safety restraintattachments and may break, causingserious injury or death.
WARNING: Depending on whereyou secure a child restraint, anddepending on the child restraint design,you may block access to certain seatbeltbuckle assemblies and LATCH loweranchors, rendering those featurespotentially unusable. To avoid risk ofinjury, make sure occupants only useseating positions where they are able tobe properly restrained.
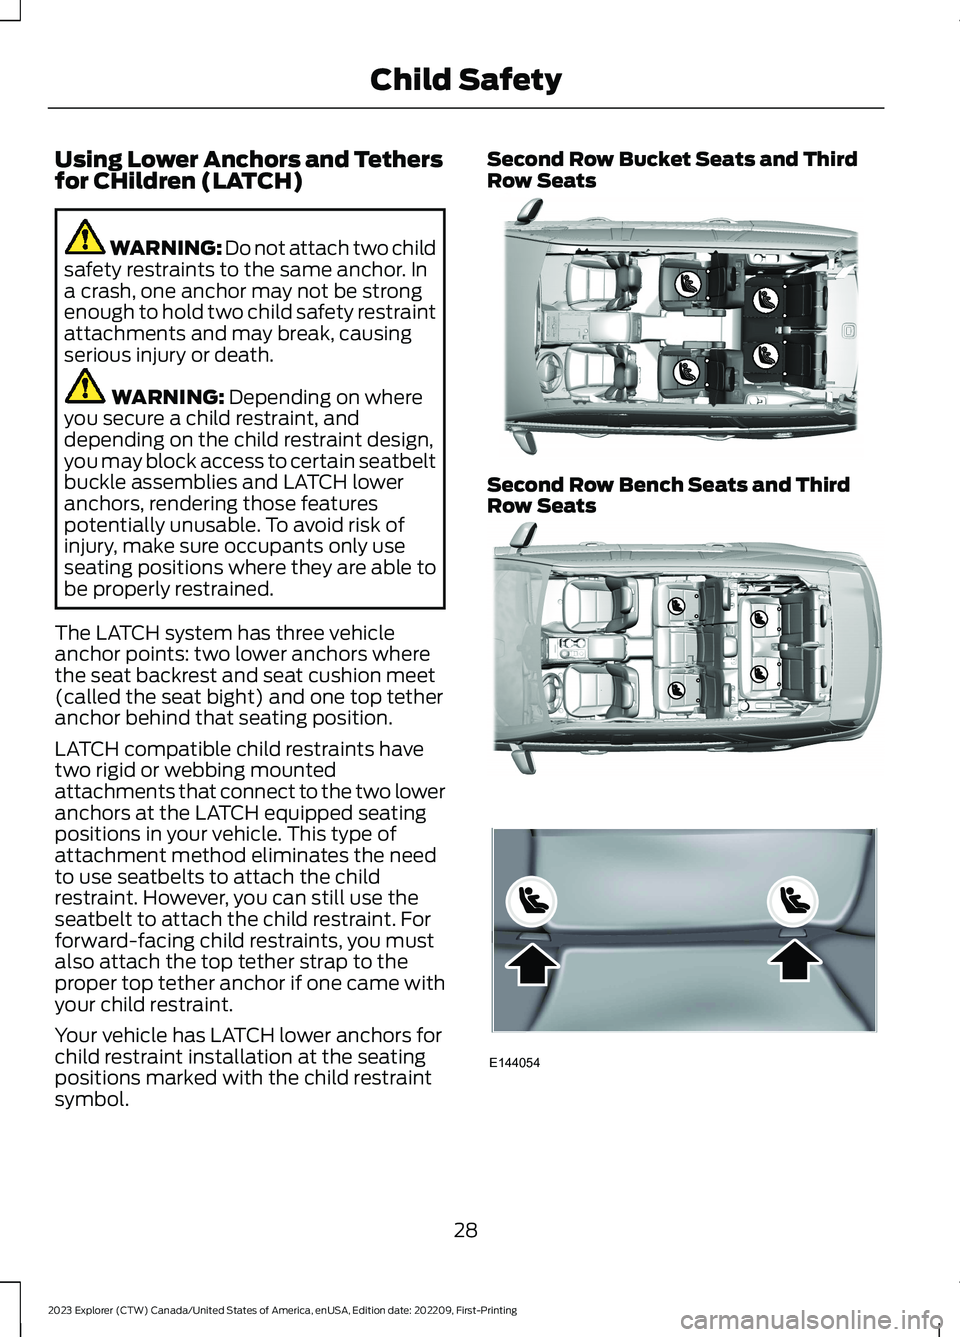
The LATCH system has three vehicleanchor points: two lower anchors wherethe seat backrest and seat cushion meet(called the seat bight) and one top tetheranchor behind that seating position.
LATCH compatible child restraints havetwo rigid or webbing mountedattachments that connect to the two loweranchors at the LATCH equipped seatingpositions in your vehicle. This type ofattachment method eliminates the needto use seatbelts to attach the childrestraint. However, you can still use theseatbelt to attach the child restraint. Forforward-facing child restraints, you mustalso attach the top tether strap to theproper top tether anchor if one came withyour child restraint.
Your vehicle has LATCH lower anchors forchild restraint installation at the seatingpositions marked with the child restraintsymbol.
Second Row Bucket Seats and ThirdRow Seats
Second Row Bench Seats and ThirdRow Seats
28
2023 Explorer (CTW) Canada/United States of America, enUSA, Edition date: 202209, First-PrintingChild SafetyE319061 E325445 E144054
Page 40 of 573

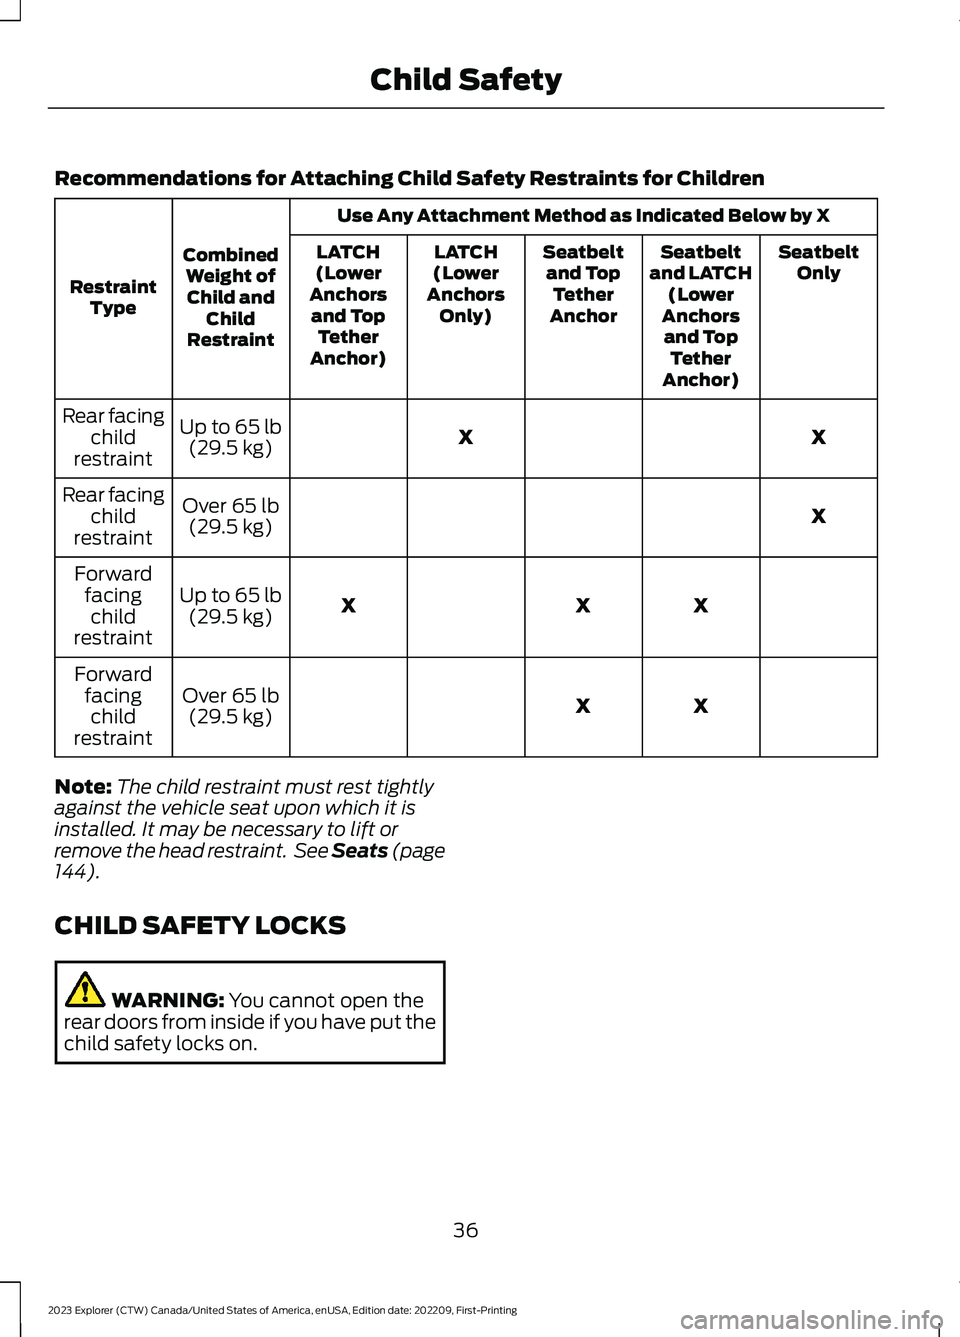
Recommendations for Attaching Child Safety Restraints for Children
Use Any Attachment Method as Indicated Below by X
CombinedWeight ofChild andChildRestraint
RestraintType
SeatbeltOnlySeatbeltand LATCH(LowerAnchorsand TopTetherAnchor)
Seatbeltand TopTetherAnchor
LATCH(LowerAnchorsOnly)
LATCH(LowerAnchorsand TopTetherAnchor)
XXUp to 65 lb(29.5 kg)
Rear facingchildrestraint
XOver 65 lb(29.5 kg)
Rear facingchildrestraint
XXXUp to 65 lb(29.5 kg)
Forwardfacingchildrestraint
XXOver 65 lb(29.5 kg)
Forwardfacingchildrestraint
Note:The child restraint must rest tightlyagainst the vehicle seat upon which it isinstalled. It may be necessary to lift orremove the head restraint. See Seats (page144).
CHILD SAFETY LOCKS
WARNING: You cannot open therear doors from inside if you have put thechild safety locks on.
36
2023 Explorer (CTW) Canada/United States of America, enUSA, Edition date: 202209, First-PrintingChild Safety
Page 41 of 573

A child safety lock is on the rear edge ofeach rear door. You must set the childsafety lock separately on each door.
Left-Hand Side
Turn the key clockwise to switch the childlock on and counter clockwise to switch itoff.
Right-Hand Side
Turn the key counter clockwise to switchthe child lock on and clockwise to switchit off.
Note:To make sure the child safety lock ison, pull the inside door handle twice to verifythe door does not open.
Note:To open the rear doors from insidethe vehicle when the child lock is engaged,roll down the rear window and use theoutside door handle. Or have someoneoutside the vehicle open the door.
37
2023 Explorer (CTW) Canada/United States of America, enUSA, Edition date: 202209, First-PrintingChild Safety E287259
Page 42 of 573

PRINCIPLE OF OPERATION
WARNING: Always drive and ridewith your seatback upright and the lapbelt snug and low across the hips.
WARNING: Children must alwaysbe properly restrained.
WARNING: Do not allow apassenger to hold a child on their lapwhen your vehicle is moving. Failure tofollow this instruction could result inpersonal injury or death in the event of asudden stop or crash.
WARNING: All occupants of yourvehicle, including the driver, shouldalways properly wear their seatbelts,even when an airbag supplementalrestraint system is provided. Failure toproperly wear your seatbelt couldseriously increase the risk of injury ordeath.
WARNING: It is extremelydangerous to ride in a cargo area, insideor outside of a vehicle. In a crash, peopleriding in these areas are more likely to beseriously injured or killed. Do not allowpeople to ride in any area of your vehiclethat is not equipped with seats andseatbelts. Make sure everyone in yourvehicle is in a seat and properly using aseatbelt. Failure to follow this warningcould result in serious personal injury ordeath.
WARNING: In a rollover crash, anunbelted person is significantly morelikely to die than a person wearing aseatbelt.
WARNING: Each seating positionin your vehicle has a specific seatbeltassembly made up of one buckle andone tongue designed to be used as a pair.Use the shoulder belt on the outsideshoulder only. Never wear the shoulderbelt under the arm. Never use a singleseatbelt for more than one person.
WARNING: Even with advancedrestraints systems, properly restrainchildren 12 and under in a rear seatingposition. Failure to follow this couldseriously increase the risk of injury ordeath.
WARNING: Seatbelts and seatsmay be hot in a vehicle that is in thesunshine. The hot seatbelts or seats mayburn a small child. Check seat covers andbuckles before you place a childanywhere near them.
All seating positions in your vehicle havelap and shoulder seatbelts. All occupantsof the vehicle should always properly weartheir seatbelts, even when an airbagsupplemental restraint system is provided.
The seatbelt system consists of:
•Lap and shoulder seatbelts.
•Shoulder seatbelt with automaticlocking mode, (except driver seatbelt).
•Height adjuster at the front outermostseating positions.
•Seatbelt pretensioners at the frontoutermost and second row outermostseating positions.
•Belt tension sensor at the frontoutermost passenger seating position.
•Seatbelt warning light and chime.
38
2023 Explorer (CTW) Canada/United States of America, enUSA, Edition date: 202209, First-PrintingSeatbeltsE71880
Page 44 of 573

Pregnant women should always wear theirseatbelt. Position the lap belt portion of acombination lap and shoulder belt lowacross the hips below the belly and wornas tight as comfort allows. Position theshoulder belt to cross the middle of theshoulder and the center of the chest.
Seatbelt Locking Modes
WARNING: If your vehicle isinvolved in a crash, have the seatbeltsand associated components inspectedas soon as possible. Failure to follow thisinstruction could result in personal injuryor death.
All safety restraints in the vehicle arecombination lap and shoulder belts. Thedriver seatbelt has the first type of lockingmode, and the front outboard passengerand rear seat seatbelts have both types oflocking modes described as follows:
Vehicle Sensitive Mode
This is the normal retractor mode, whichallows free shoulder belt lengthadjustment to your movements andlocking in response to vehicle movement.For example, if the driver brakes suddenlyor turns a corner sharply, or the vehiclereceives an impact of about 5 mph(8 km/h) or more, the combinationseatbelts lock to help reduce forwardmovement of the driver and passengers.
In addition, the design of the retractor is tolock if you pull the webbing out too quickly.If the seatbelt retractor locks, slowly lowerthe height adjuster to allow the seatbeltto retract. If the retractor does not unlock,pull the seatbelt out slowly then feed a
small length of webbing back toward thestowed position. For rear seatbelts, reclinethe rear seat backrest or push the seatbackrest cushion away from the seatbelt.Feed a small length of webbing backtoward the stowed position.
Automatic Locking Mode
In this mode, the shoulder beltautomatically pre-locks. The belt retractsto remove any slack in the shoulder belt.The automatic locking mode is notavailable on the driver seatbelt.
When to Use the Automatic LockingMode
Use this mode any time you install a childsafety seat, except a booster, in passengerfront or rear seating positions. Properlyrestrain children 12 years old and under ina rear seating position whenever possible.See Child Safety (page 23).
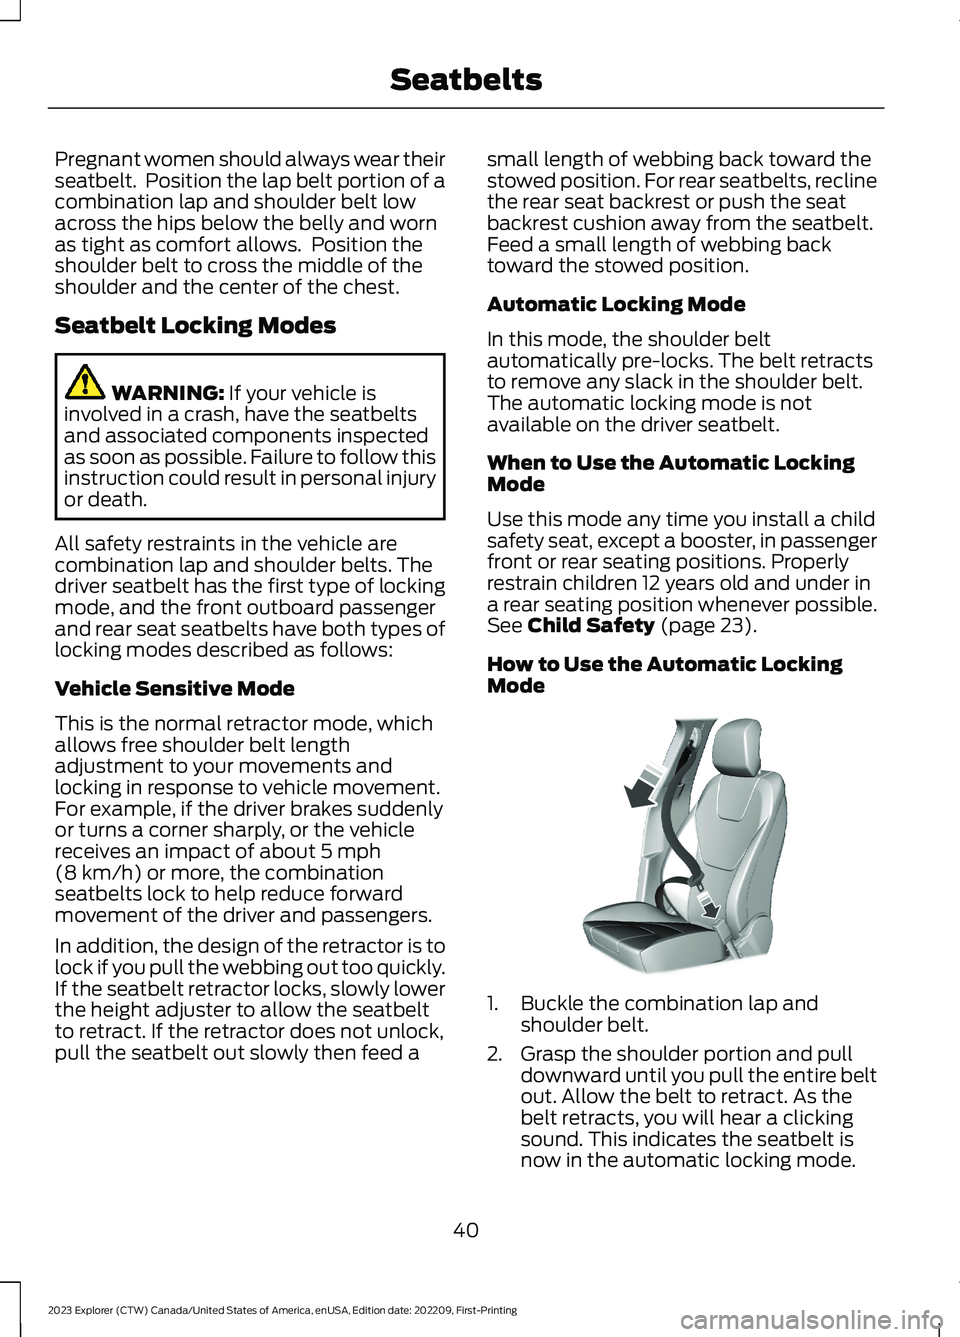
How to Use the Automatic LockingMode
1.Buckle the combination lap andshoulder belt.
2.Grasp the shoulder portion and pulldownward until you pull the entire beltout. Allow the belt to retract. As thebelt retracts, you will hear a clickingsound. This indicates the seatbelt isnow in the automatic locking mode.
40
2023 Explorer (CTW) Canada/United States of America, enUSA, Edition date: 202209, First-PrintingSeatbeltsE142591
Page 45 of 573

How to Disengage the AutomaticLocking Mode
Unbuckle the combination lap andshoulder belt and allow it to retractcompletely to disengage the automaticlocking mode and turn on the vehiclesensitive (emergency) locking mode.
SEATBELT HEIGHT
ADJUSTMENT
WARNING: Position the seatbeltheight adjuster so that the seatbelt restsacross the middle of your shoulder.Failure to adjust the seatbelt correctlycould reduce its effectiveness andincrease the risk of injury in a crash.
1.Adjust the height of the shoulder beltso the belt rests across the middle ofyour shoulder.
2.Slide the adjuster up to raise the belt.Press the button and slide it down tolower the belt.
SEATBELT WARNING LAMP
AND INDICATOR CHIME
This lamp illuminates and anindicator chime will sound if thedriver seatbelt has not beenfastened when the vehicle's ignition isturned on.
Conditions of operation
ThenIf
The seatbelt warning lamp illuminates andthe indicator chime sounds for a fewseconds.
The driver seatbelt is not buckled beforethe ignition switch is turned to the on posi-tion...
The seatbelt warning lamp and indicatorchime turn off.The driver seatbelt is buckled while thewarning lamp is illuminated and the indic-ator chime is sounding...
The seatbelt warning lamp and indicatorchime remain off.The driver seatbelt is buckled before theignition switch is turned to the on position...
41
2023 Explorer (CTW) Canada/United States of America, enUSA, Edition date: 202209, First-PrintingSeatbeltsE201573 E71880
Page 61 of 573

GENERAL INFORMATION ON
RADIO FREQUENCIES
This device complies with Part 15 of theFCC Rules and with Industry Canadalicense-exempt RSS standard(s).Operation is subject to the following twoconditions: (1) This device may not causeharmful interference, and (2) This devicemust accept any interference received,including interference that may causeundesired operation.
WARNING: Changes ormodifications not expressively approvedby the party responsible for compliancecould void the user's authority to operatethe equipment. The term "IC:" before theradio certification number only signifiesthat Industry Canada technicalspecifications were met.
The typical operating range for yourtransmitter is approximately 33 ft (10 m).Vehicles with the remote start feature willhave a greater range.
One of the following could cause adecrease in operating range:
•Weather conditions.
•Nearby radio towers.
•Structures around the vehicle.
•Other vehicles parked next to yourvehicle.
The radio frequency used by your remotecontrol can also be used by other radiotransmitters, for example amateur radios,medical equipment, wireless headphones,wireless remote controls, cell phones,battery chargers and alarm systems. If thefrequencies are jammed, you will not beable to use your remote control. You canlock and unlock the doors with the key.
Note:Make sure to lock your vehicle beforeleaving it unattended.
Note:If you are in range, the remote controlwill operate if you press any buttonunintentionally.
Note:The remote control contains sensitiveelectrical components. Exposure to moistureor impact may cause permanent damage.
Intelligent Access (If Equipped)
The system uses a radio frequency signalto communicate with your vehicle andauthorize your vehicle to unlock when oneof the following conditions are met:
•You activate the front exterior doorhandle switch.
•You press the luggage compartmentbutton.
•You press a button on the transmitter.
If excessive radio frequency interferenceis present in the area or if the transmitterbattery is low, you may need tomechanically unlock your door. You canuse the mechanical key blade in yourintelligent access key to open the driverdoor in this situation. See RemoteControl (page 57).
REMOTE CONTROL
Integrated Keyhead Transmitter
Use the key blade to start your vehicle andunlock or lock the driver door from outsideyour vehicle. The integrated keyheadtransmitter functions as a programmedignition key that operates all the locks andstarts your vehicle, as well as a remotecontrol.
57
2023 Explorer (CTW) Canada/United States of America, enUSA, Edition date: 202209, First-PrintingKeys and Remote Controls