2023 FORD EXPEDITION engine
[x] Cancel search: enginePage 395 of 658
Note:If your vehicle gets stuck driving onhilly or sloping terrain, it could be rocked outby shifting between forward and reversegears, stopping between shifts in a steadypattern. Press lightly on the accelerator ineach gear.
Note:Do not rock your vehicle if the engineis not at normal operating temperature, asdamage to the transmission could occur.
Note:Do not rock your vehicle for morethan a minute, as damage to thetransmission and tires could occur or theengine could overheat.
DRIVING IN SAND
When driving over sand, try to keep all fourwheels on the most solid area of the trail.Steadily drive through the terrain. Applythe accelerator slowly and avoid excessivewheel slip. Do not drive your vehicle indeep sand for an extended period of time.This could overheat the system. Amessage appears in the instrument clusterdisplay.
Note:If your vehicle gets stuck driving onhilly or sloping terrain, it could be rocked outby shifting between forward and reversegears, stopping between shifts in a steadypattern. Press lightly on the accelerator ineach gear.
Note:Do not rock your vehicle if the engineis not at normal operating temperature, asdamage to the transmission could occur.
Note:Do not rock your vehicle for morethan a minute, as damage to thetransmission and tires could occur or theengine could overheat
DRIVING THROUGH SHALLOW
WATER
WARNING: Do not attempt tocross a deep or flowing body of water.Failure to follow this instruction couldresult in the loss of control of yourvehicle, personal injury or death.
Note:Driving through standing water cancause vehicle damage.
Note:Engine damage can occur if waterenters the air filter.
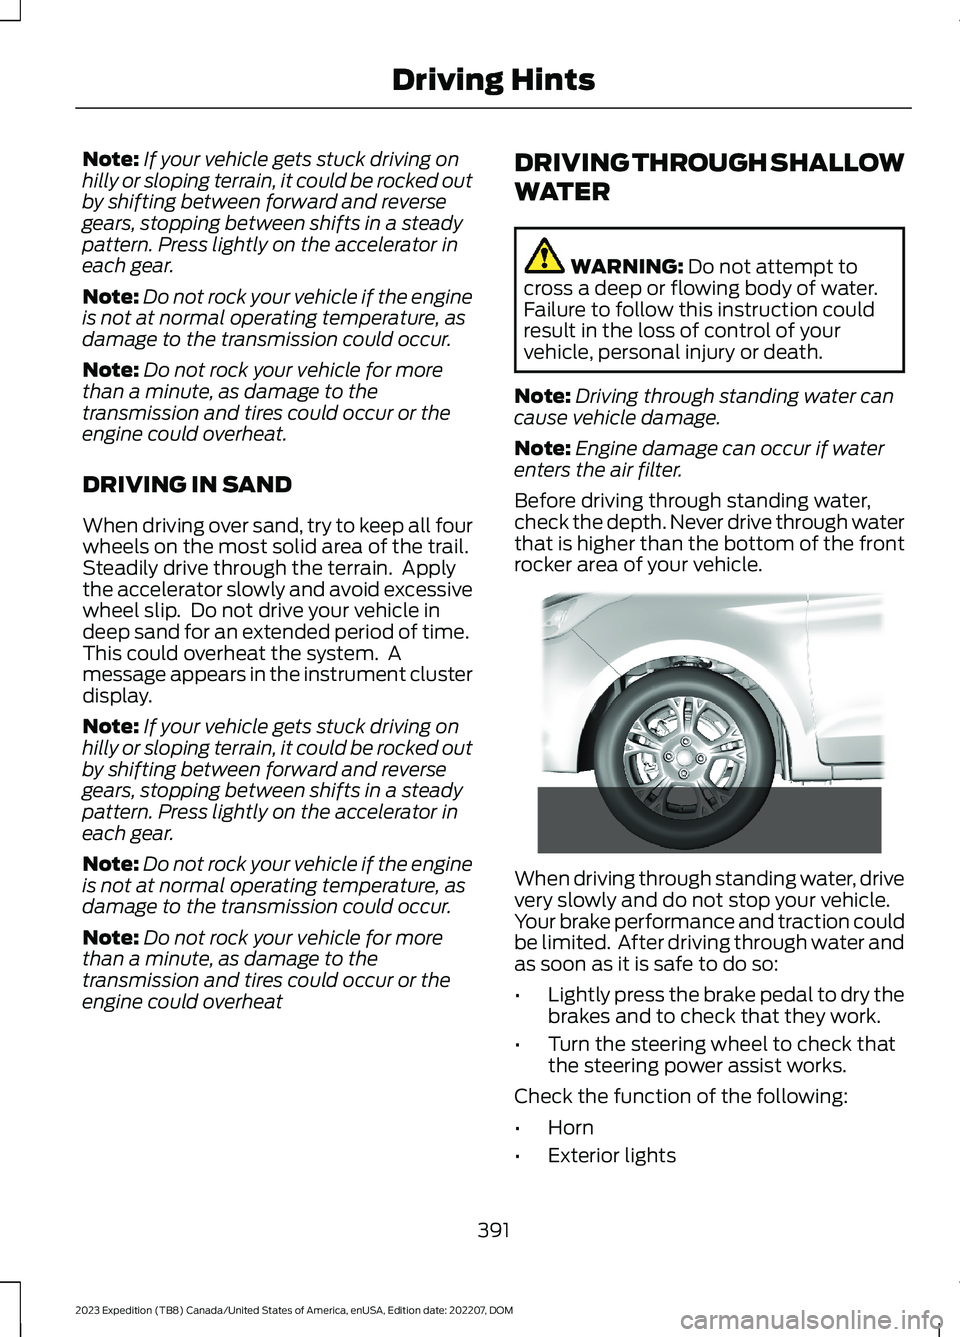
Before driving through standing water,check the depth. Never drive through waterthat is higher than the bottom of the frontrocker area of your vehicle.
When driving through standing water, drivevery slowly and do not stop your vehicle.Your brake performance and traction couldbe limited. After driving through water andas soon as it is safe to do so:
•Lightly press the brake pedal to dry thebrakes and to check that they work.
•Turn the steering wheel to check thatthe steering power assist works.
Check the function of the following:
•Horn
•Exterior lights
391
2023 Expedition (TB8) Canada/United States of America, enUSA, Edition date: 202207, DOMDriving Hints E266447
Page 398 of 658
Vehicles Sold in Canada: GettingRoadside Assistance
To fully assist you should you have avehicle concern, Ford Motor Company ofCanada, Limited offers a complimentaryroadside assistance program. Thisprogram is eligible within Canada or thecontinental United States.
The service is available 24 hours a day,seven days a week.
This program is separate from the NewVehicle Limited Warranty, but the coverageis concurrent with the powertrain coverageperiod of your vehicle. Canadian roadsidecoverage and benefits may differ from theU.S. coverage.
If you require more information, please callus in Canada at 1-800-665-2006, or visitour website at www.ford.ca.
SWITCHING THE HAZARD
FLASHERS ON AND OFF
The hazard flasher button is onthe instrument panel. Press thebutton to switch the hazardflashers on if your vehicle is creating asafety hazard for other road users.
When you switch the hazard flashers on,all front and rear direction indicators flash.
Note:The hazard flashers operate whenthe ignition is in any position, or if the key isnot in the ignition. The battery loses chargeand could have insufficient power to restartyour vehicle.
Press the button again to switch them off.
JUMP STARTING THE VEHICLE
JUMP STARTING PRECAUTIONS
WARNING: Batteries normallyproduce explosive gases which cancause personal injury. Therefore, do notallow flames, sparks or lightedsubstances to come near the battery.When working near the battery, alwaysshield your face and protect your eyes.Always provide correct ventilation.
WARNING: Keep batteries out ofreach of children. Batteries containsulfuric acid. Avoid contact with skin,eyes or clothing. Shield your eyes whenworking near the battery to protectagainst possible splashing of acidsolution. In case of acid contact with skinor eyes, flush immediately with water fora minimum of 15 minutes and get promptmedical attention. If acid is swallowed,call a physician immediately.
WARNING: Use only adequatelysized cables with insulated clamps.
WARNING: Make sure that thecables are clear of any moving parts andfuel delivery system parts.
WARNING: Connect batteries withonly the same nominal voltage.
WARNING: If the engine is runningwhile the hood is open, stay clear ofmoving engine components. Failure tofollow this warning could result in seriouspersonal injury or death.
Do not attempt to push-start an automatictransmission vehicle. This could causetransmission damage.
394
2023 Expedition (TB8) Canada/United States of America, enUSA, Edition date: 202207, DOMCrash and Breakdown InformationE75790
Page 399 of 658
Do not disconnect the battery of thedisabled vehicle. This could damage yourvehicle's electrical system.
PREPARING THE VEHICLE
Use only a 12 volt supply to start yourvehicle.
Park the booster vehicle close to the hoodof the disabled vehicle, making sure thetwo vehicles do not touch.
JUMP STARTING THE VEHICLE
Connecting the Jumper Cables
WARNING: Do not connect thenegative jumper cable to any other partof your vehicle. Use the ground point.
Note:If you are using a jump pack orbooster box, follow the manufacturer'sinstructions.
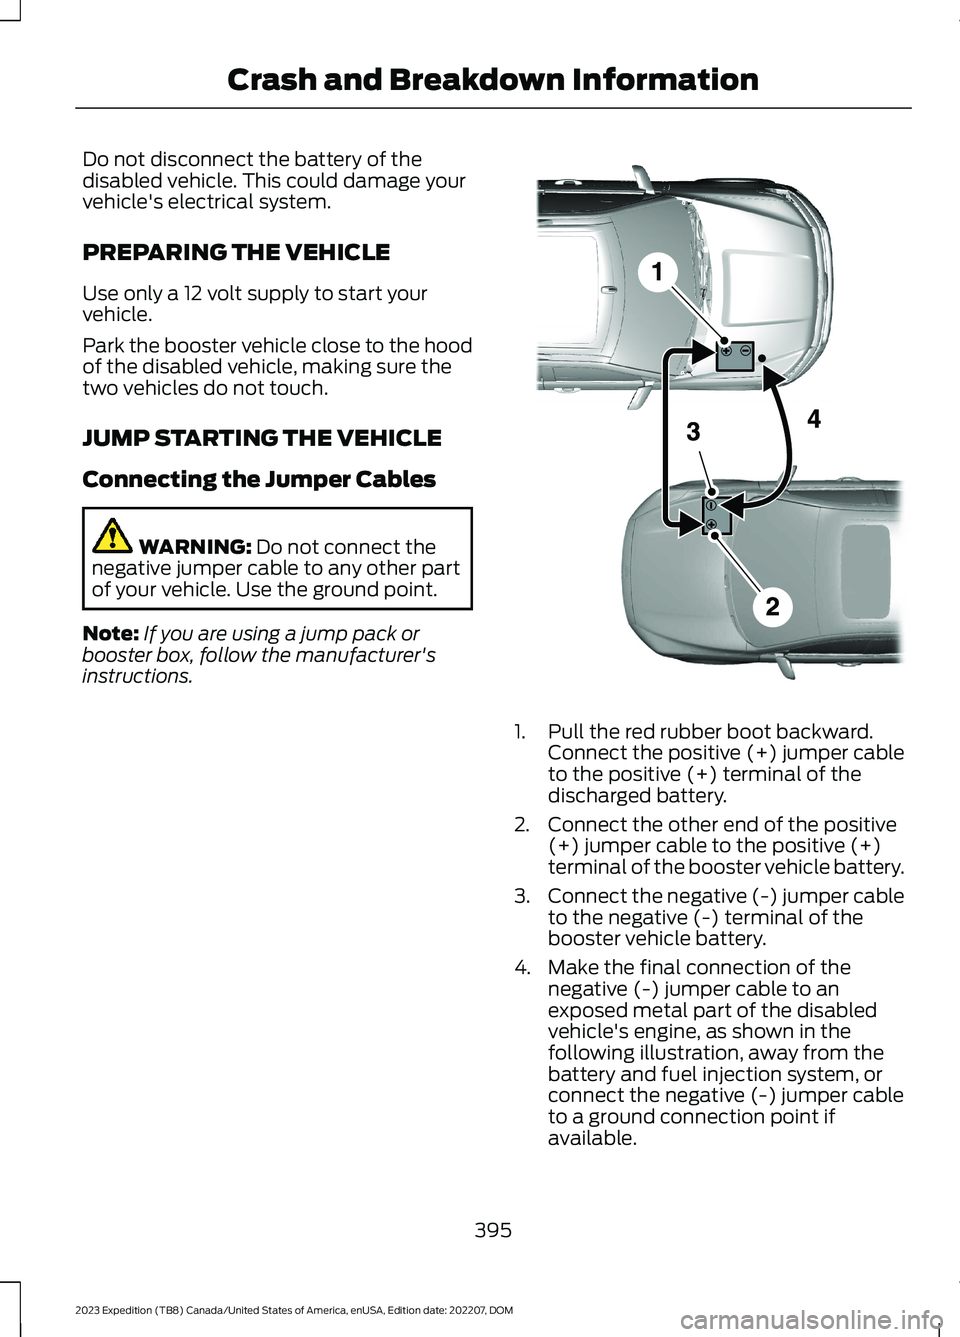
1.Pull the red rubber boot backward.Connect the positive (+) jumper cableto the positive (+) terminal of thedischarged battery.
2.Connect the other end of the positive(+) jumper cable to the positive (+)terminal of the booster vehicle battery.
3.Connect the negative (-) jumper cableto the negative (-) terminal of thebooster vehicle battery.
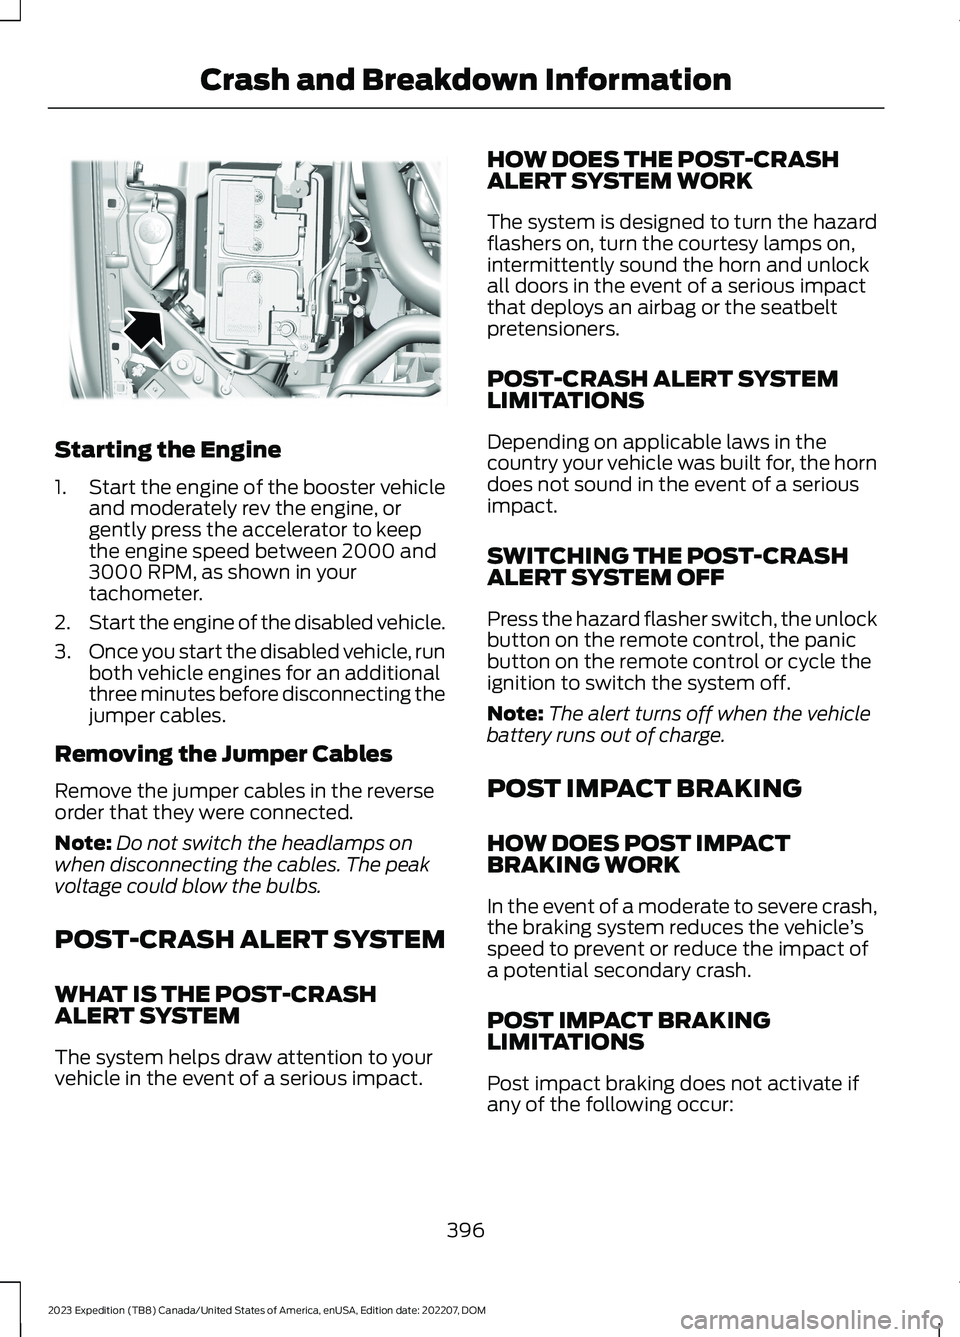
4.Make the final connection of thenegative (-) jumper cable to anexposed metal part of the disabledvehicle's engine, as shown in thefollowing illustration, away from thebattery and fuel injection system, orconnect the negative (-) jumper cableto a ground connection point ifavailable.
395
2023 Expedition (TB8) Canada/United States of America, enUSA, Edition date: 202207, DOMCrash and Breakdown InformationE355173
Page 400 of 658
Starting the Engine
1.Start the engine of the booster vehicleand moderately rev the engine, orgently press the accelerator to keepthe engine speed between 2000 and3000 RPM, as shown in yourtachometer.
2.Start the engine of the disabled vehicle.
3.Once you start the disabled vehicle, runboth vehicle engines for an additionalthree minutes before disconnecting thejumper cables.
Removing the Jumper Cables
Remove the jumper cables in the reverseorder that they were connected.
Note:Do not switch the headlamps onwhen disconnecting the cables. The peakvoltage could blow the bulbs.
POST-CRASH ALERT SYSTEM
WHAT IS THE POST-CRASHALERT SYSTEM
The system helps draw attention to yourvehicle in the event of a serious impact.
HOW DOES THE POST-CRASHALERT SYSTEM WORK
The system is designed to turn the hazardflashers on, turn the courtesy lamps on,intermittently sound the horn and unlockall doors in the event of a serious impactthat deploys an airbag or the seatbeltpretensioners.
POST-CRASH ALERT SYSTEMLIMITATIONS
Depending on applicable laws in thecountry your vehicle was built for, the horndoes not sound in the event of a seriousimpact.
SWITCHING THE POST-CRASHALERT SYSTEM OFF
Press the hazard flasher switch, the unlockbutton on the remote control, the panicbutton on the remote control or cycle theignition to switch the system off.
Note:The alert turns off when the vehiclebattery runs out of charge.
POST IMPACT BRAKING
HOW DOES POST IMPACTBRAKING WORK
In the event of a moderate to severe crash,the braking system reduces the vehicle’sspeed to prevent or reduce the impact ofa potential secondary crash.
POST IMPACT BRAKINGLIMITATIONS
Post impact braking does not activate ifany of the following occur:
396
2023 Expedition (TB8) Canada/United States of America, enUSA, Edition date: 202207, DOMCrash and Breakdown InformationE355168
Page 401 of 658
•The anti-lock braking system isdamaged during the collision.
•Electronic stability control is disabled.
•Vehicle speed is below 5 mph(10 km/h).
OVERRIDING POST IMPACTBRAKING
You can override post impact braking bypressing the brake or accelerator pedal.
POST IMPACT BRAKINGINDICATORS
It flashes when a post impactbraking event is occurring.
AUTOMATIC CRASH SHUTOFF
WHAT IS AUTOMATIC CRASHSHUTOFF
The automatic crash shutoff is designedto stop the fuel going to the engine in theevent of a moderate or severe crash.
Note:Not every impact causes a shutoff.
AUTOMATIC CRASH SHUTOFFPRECAUTIONS
WARNING: If your vehicle has beeninvolved in a crash, have the fuel systemchecked. Failure to follow this instructioncould result in fire, personal injury ordeath.
RE-ENABLING YOUR VEHICLE
1.Switch the ignition off.
2.Attempt to start your vehicle.
3.Switch the ignition off.
4.Attempt to start your vehicle.
Note:If your vehicle does not start after thethird attempt, have your vehicle checked assoon as possible.
RECOVERY TOWING -
VEHICLES WITH: FRONT TOW
HOOK (IF EQUIPPED)
ACCESSING THE FRONT TOWINGPOINT
WARNING: Using recovery hooksis dangerous and should only be done bya person familiar with proper vehiclerecovery safety practices. Improper useof recovery hooks may cause hook failureor separation from the vehicle and couldresult in serious injury or death.
WARNING: Slowly remove theslack from the recovery strap prior topulling. Failure to do so can introducesignificantly higher loads which cancause the recovery hooks to break off, orthe recovery strap to fail which can causeserious injury or death.
WARNING: Never link two strapstogether with a clevis pin. These heavymetal objects could become projectilesif the strap breaks and can cause seriousinjury or death.
WARNING: Switch the ignition offbefore removing the recovery hook.Failure to do so could result in personalinjury.
397
2023 Expedition (TB8) Canada/United States of America, enUSA, Edition date: 202207, DOMCrash and Breakdown InformationE138639
Page 405 of 658
6.Press and hold the brake pedal.
7.Using the instrument cluster controlson the steering wheel, select Settings.
8.Select Neutral Tow.
9.Press and hold the OK button until aconfirmation message appears in theinformation display.
Note: If completed successfully, theinformation display shows Neutral TowEnabled Leave Transmission in Neutral.This indicates that your vehicle is safe totow with all wheels on the ground.
Note:If you do not see a confirmationmessage in the instrument cluster display,you must perform the procedure again fromthe beginning.
Note:You may hear noise as the transfercase shifts into its neutral position. This isnormal.
10.Release the brake pedal.
11.Leave the transmission in neutral (N)and switch your vehicle off bypressing the push button ignitionswitch once without pressing thebrake pedal or turning the key as fartoward the off position.
Note:Vehicles with keys do not turn to theoff position when the transmission is inneutral (N). You must leave the key in theignition when towing. Use the keyless entrykeypad or an extra set of keys to lock andunlock your vehicle.
Switching Neutral Tow Off
1.With your vehicle properly secured tothe tow vehicle, press and hold thebrake pedal and start the engine.
2.Switch your vehicle off by pressing thepush button ignition switch once orturning the key as far towards the offposition and release the brake pedal.
3.Place your vehicle in accessory modeby pressing the push button ignitionswitch once without pressing the brakepedal or by turning the ignition key tothe on position.
4.Press and hold the brake pedal.
5.Shift into park (P).
6.Release the brake pedal.
Note:If completed successfully, theinstrument cluster displays 2H and NeutralTow Disabled.
Note:You must perform the switchingneutral tow on and switching neutral towoff procedures again from the beginning ifthe indicator light and message do notdisplay.
Note:You may hear a noise as the transfercase shifts out of its neutral position. Thisis normal.
7.Apply the parking brake, thendisconnect your vehicle from the towvehicle.
8.Release the parking brake, start theengine, and shift into drive (D) to makesure the transfer case is out of theneutral tow position.
9.If the transfer case does notsuccessfully shift out of its neutralposition, set the parking brake. Haveyour vehicle checked as soon aspossible.
Resolving the Shift Delayed DriveForward Message
1.Press and hold the brake pedal.
2.Start your vehicle.
3.Shift into neutral (N).
4.With the vehicle running, shift into drive(D) and let the vehicle roll forward upto 3 ft (1 m).
401
2023 Expedition (TB8) Canada/United States of America, enUSA, Edition date: 202207, DOMTowing Your Vehicle
Page 416 of 658
MAINTENANCE PRECAUTIONS
Service your vehicle regularly to helpmaintain its roadworthiness and resalevalue. There is a large network ofauthorized dealers that are there to helpyou with their professional servicingexpertise. We believe that their speciallytrained technicians are best qualified toservice your vehicle properly and expertly.They are supported by a wide range ofhighly specialized tools developedspecifically for servicing your vehicle.
If your vehicle requires professional service,an authorized dealer can provide thenecessary parts and service. Check yourwarranty information to find out whichparts and services are covered.
Use only recommended fuels, lubricants,fluids and service parts conforming tospecifications. See Capacities andSpecifications (page 463).
•Do not work on a hot engine.
•Make sure that nothing gets caught inmoving parts.
•Do not work on a vehicle with theengine running in an enclosed space,unless you are sure you have enoughventilation.
•Keep all open flames and other burningmaterial, such as cigarettes, away fromthe battery and all fuel related parts.
•Set the parking brake, shift thetransmission to park (P) and block thewheels.
OPENING AND CLOSING THE
HOOD
WARNING: Make sure that you fullylatch the hood before driving. Failure tofollow this instruction could result inpersonal injury or death.
1.Pull the hood release handle under theleft-hand side of the instrument panel.
2.Pull the secondary release lever underthe front of the hood near the centerof your vehicle.
3.Raise the hood until the lift cylindershold it open.
4.To close, lower the hood and makesure that it fully latches.
412
2023 Expedition (TB8) Canada/United States of America, enUSA, Edition date: 202207, DOMMaintenanceE337831 E190266
Page 417 of 658

UNDER HOOD OVERVIEW
Windshield washer fluid reservoir. See Adding Washer Fluid (page 113).A
Engine compartment fuse box. See Accessing the Under Hood Fuse Box(page 403).B
Battery. See Changing the 12V Battery (page 420).C
Engine oil filler cap. See Adding Engine Oil (page 414).D
Engine oil dipstick. See Engine Oil Dipstick Overview (page 414).E
Brake fluid reservoir. See Checking the Brake Fluid (page 229).F
Air filter. See Changing the Engine Air Filter (page 419).G
Engine coolant reservoir. See Checking the Coolant (page 415).H
413
2023 Expedition (TB8) Canada/United States of America, enUSA, Edition date: 202207, DOMMaintenanceE372162