Page 161 of 292
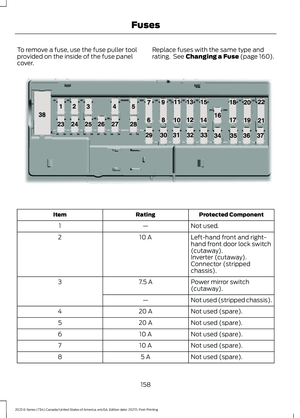
To remove a fuse, use the fuse puller toolprovided on the inside of the fuse panelcover.
Replace fuses with the same type andrating. See Changing a Fuse (page 160).
Protected ComponentRatingItem
Not used.—1
Left-hand front and right-hand front door lock switch(cutaway).
10 A2
Inverter (cutaway).Connector (strippedchassis).
Power mirror switch(cutaway).7.5 A3
Not used (stripped chassis).—
Not used (spare).20 A4
Not used (spare).20 A5
Not used (spare).10 A6
Not used (spare).10 A7
Not used (spare).5 A8
158
2023 E-Series (TE4) Canada/United States of America, enUSA, Edition date: 202111, First-PrintingFusesE145984
Page 162 of 292
Protected ComponentRatingItem
Not used (spare).5 A9
Not used.—10
Not used.—11
Smart datalink connector.7.5 A12
Cluster.7.5 A13Steering column controlmodule.
Not used (spare).15 A14
Not used (spare).15 A15
Not used.—16
Not used.7.5 A17
R/S feed for Front blendactuator/climate modeswitch (cutaway).
7.5 A18
R/S feed to strip chassisconnector (strippedchassis).
Radio transceiver moduleand telematics control unit.5 A19
Telematics control unit.
Ignition switch.5 A20
Not used.5 A21
Body builder B-pillarconnector (cutaway).5 A22
Not used (stripped chassis).5 A
Not used (spare).30 A23
Not used (spare).30 A24
Not used (spare).20 A25
Not used (spare).30 A26
Not used (spare).30 A27
Not used (spare).30 A28
159
2023 E-Series (TE4) Canada/United States of America, enUSA, Edition date: 202111, First-PrintingFuses
Page 163 of 292
Protected ComponentRatingItem
Upfitter interface module(cutaway).15 A29
Not used (stripped chassis).—
Not used (spare).5 A30
Smart datalink connector.10 A31
Radio (cutaway).20 A32
Not used.—33
Not used (spare).30 A34
Tow haul switch.5 A35
Rear view mirror (cutaway).15 A36Camera lane departure(cutaway).
Not used (stripped chassis).—
Not used (spare).20 A37
Power window switches andmotors (cutaway).30 A38
Not used (stripped chassis).—
Note:Spare fuse amperage may vary.
CHANGING A FUSE
Fuses
WARNING: Always replace a fusewith one that has the specifiedamperage rating. Using a fuse with ahigher amperage rating can cause severewire damage and could start a fire.If electrical components in the vehicle arenot working, a fuse may have blown. Blownfuses are identified by a broken wire withinthe fuse. Check the appropriate fusesbefore replacing any electricalcomponents.
160
2023 E-Series (TE4) Canada/United States of America, enUSA, Edition date: 202111, First-PrintingFusesE217331
Page 164 of 292
Fuse Types
Micro 2.A
Micro 3.B
Maxi.C
Mini.D
M Case.E
J Case.F
J Case Low Profile.G
Slotted M Case.H
161
2023 E-Series (TE4) Canada/United States of America, enUSA, Edition date: 202111, First-PrintingFuses E267379
Page 165 of 292

GENERAL INFORMATION
Have your vehicle serviced regularly to helpmaintain its roadworthiness and resalevalue. There is a large network ofauthorized dealers that are there to helpyou with their professional servicingexpertise. We believe that their speciallytrained technicians are best qualified toservice your vehicle properly and expertly.They are supported by a wide range ofhighly specialized tools developedspecifically for servicing your vehicle.
If your vehicle requires professional service,an authorized dealer can provide thenecessary parts and service. Check yourwarranty information to find out whichparts and services are covered.
Use only recommended fuels, lubricants,fluids and service parts conforming tospecifications. Motorcraft® parts aredesigned and built to provide the bestperformance in your vehicle.
Precautions
•Do not work on a hot engine.
•Make sure that nothing gets caught inmoving parts.
•Do not work on a vehicle with theengine running in an enclosed space,unless you are sure you have enoughventilation.
•Keep all open flames and other burningmaterial (such as cigarettes) awayfrom the battery and all fuel relatedparts.
Working with the Engine Off
1.Set the parking brake and shift thetransmission to park (P).
2.Switch off the engine.
3.Block the wheels.
Working with the Engine On
WARNING: To reduce the risk ofvehicle damage and personal burninjuries, do not start your engine with theair cleaner removed and do not removeit while the engine is running.
1.Set the parking brake and shift thetransmission to park (P).
2.Block the wheels.
OPENING AND CLOSING THE
HOOD
1.Inside the vehicle, pull the hood releasehandle located under the bottom leftcorner of the instrument panel.
2.Go to the front of the vehicle and pushthe auxiliary latch, located in the centerof the top grille, to the left in order torelease the hood.
3.Lift the hood and secure it with theprop rod.
4.To close, lower the hood and makesure that it is closed properly and fullylatched.
162
2023 E-Series (TE4) Canada/United States of America, enUSA, Edition date: 202111, First-PrintingMaintenanceE196351
Page 166 of 292
UNDER HOOD OVERVIEW
Windshield washer fluid reservoir. See Washer Fluid Check (page 177).A
Automatic transmission fluid dipstick. See Automatic Transmission FluidCheck (page 170).B
Engine oil dipstick. See Engine Oil Dipstick (page 164).C
Air cleaner assembly. See Changing the Engine Air Filter (page 165).D
Engine oil filler cap. See Engine Oil Check (page 164).E
Brake fluid reservoir. See Brake Fluid Check (page 173).F
Engine coolant reservoir. See Engine Coolant Check (page 166).G
Engine compartment fuse box. See Fuses (page 152).H
Power steering fluid reservoir. See Power Steering Fluid Check (page 174).I
Battery. See Changing the 12V Battery (page 174).J
163
2023 E-Series (TE4) Canada/United States of America, enUSA, Edition date: 202111, First-PrintingMaintenanceE312299
Page 167 of 292

ENGINE OIL DIPSTICK
Minimum.A
Nominal.B
Maximum.C
ENGINE OIL CHECK
1.Make sure that your vehicle is on levelground.
2.Check the oil level before starting theengine, or switch the engine off afterwarm up and wait 10 minutes for theoil to drain into the oil pan.
3.Remove the dipstick and wipe it witha clean, lint-free cloth.
4.Reinstall the dipstick and make sure itis fully seated.
5.Remove the dipstick again to check theoil level.
Note: If the oil level is between themaximum and minimum marks, the oil levelis acceptable. Do not add oil.
6.If the oil level is at the minimum mark,immediately add oil.
7.Reinstall the dipstick. Make sure it isfully seated.
Note:The oil consumption of new enginesreaches its normal level after approximately3,000 mi (5,000 km).
Adding Engine Oil
WARNING: Do not add engine oilwhen the engine is hot. Failure to followthis instruction could result in personalinjury.
WARNING: Do not remove the fillercap when the engine is running.
Do not use supplemental engine oiladditives because they are unnecessaryand could lead to engine damage that thevehicle warranty may not cover.
1.Clean the area surrounding the engineoil filler cap before you remove it.
2.Remove the engine oil filler cap.
3.Add engine oil that meets ourspecifications. See Capacities andSpecifications (page 224).
4.Reinstall the engine oil filler cap. Turnit clockwise until you feel a strongresistance.
Note: Do not add oil further than themaximum mark. Oil levels above themaximum mark may cause engine damage.
Note:Immediately soak up any oil spillagewith an absorbent cloth.
Engine Oil Pressure Warning Lamp
WARNING: If it illuminates whenyou are driving do not continue yourjourney, even if the oil level is correct.Have your vehicle checked.
It illuminates when you switchthe ignition on.
164
2023 E-Series (TE4) Canada/United States of America, enUSA, Edition date: 202111, First-PrintingMaintenanceE250320
Page 168 of 292

If it illuminates when the engine is runningthis indicates a malfunction. Stop yourvehicle as soon as it is safe to do so andswitch the engine off. Check the engine oillevel. If the oil level is sufficient, thisindicates a system malfunction. Have yourvehicle checked as soon as possible.
OIL CHANGE INDICATOR
RESET
Base Cluster
Use the information display controls onthe steering wheel to reset the oil changeindicator.
From the main menu scroll to:
Action and DescriptionMessage
Press the right arrow button,then from this menu scrolldown to the followingmessage.
Driverassist
Press the right arrow button,then from this menu scrolldown to the followingmessage.
Mainten-anceMonitor
Press and hold the OKbutton until the instrumentcluster displays thefollowing message.
Oil Life %Hold toReset
Reset Complete
If the instrument clusterdisplays the followingmessage, repeat theprocess.
Reset Cancelled
High Series Cluster
Use the information display controls onthe steering wheel to reset the oil changeindicator.
From the main menu scroll to:
Action and DescriptionMessage
Press the down arrowbutton, then from this menuscroll to the followingmessage.
Truck Info
Press the OK button.Mainten-anceMonitor
Press the down arrowbutton, then from this menuscroll to the followingmessage.
Oil Life:xxx%
Press the OK button.Oil Life
Press and hold the OKbutton until the instrumentcluster displays thefollowing message.
Oil LifeHold OK toReset
Oil Life: 100%
When the oil change indic-ator resets, the instrumentcluster displays 100%.
Repeat the process if the oilchange indicator does notreset.
CHANGING THE ENGINE AIR
FILTER
WARNING: To reduce the risk ofvehicle damage and personal burninjuries, do not start your engine with theair cleaner removed and do not removeit while the engine is running.
165
2023 E-Series (TE4) Canada/United States of America, enUSA, Edition date: 202111, First-PrintingMaintenance