2023 DODGE CHARGER pairing phone
[x] Cancel search: pairing phonePage 140 of 292

138MULTIMEDIA
MEDIA MODE
Operating Media Mode
Uconnect 4 With 7-inch Display Operating Media Mode
Audio Source Selection
Once in Media Mode, press the Source or Source Select
button on the touchscreen and the desired mode button
on the touchscreen. USB, AUX, and Bluetooth® are the
Media sources available. When available, you can select
the Browse button on the touchscreen to be given these
options:
Now Playing
Artists
Albums
Genres
Songs
Playlists
Folders
You can press the Source, Pause/Play, or the Info button
on the touchscreen for artist information on the current
song playing.
Types of Media Modes
USB MODE
Overview
USB Mode is entered by inserting a USB device into the
USB port, by selecting the USB button on the left side of
the touchscreen, or by selecting the Source Select/Select
Source button and then selecting USB 1 or 2 (if equipped).
BLUETOOTH® MODE
Overview
Bluetooth® Streaming Audio or Bluetooth® Mode is
entered by pairing a Bluetooth® device, containing music,
to the Uconnect system.
Before proceeding, the Bluetooth® device must be paired
to the Uconnect Phone to communicate with the Uconnect
system.
To access Bluetooth® Mode, press the Bluetooth® button
on the left side of the touchscreen or under the Source
Select/Select Source button (if equipped).
Uconnect 4 With 7-inch Display Select Source
1 — Repeat
2 — Select Source
3 — Track Time
4 — Shuffle
5 — Info
6 — Browse
7 — Tracks
23_LD_OM_EN_USC_t.book Page 138
Page 142 of 292
140MULTIMEDIA
Tracks
In USB Mode, press the Tracks button on the touchscreen
to display a pop-up with the Song List. The song currently
playing is indicated by an arrow and lines above and below
the song title. When in the Tracks List screen you can
rotate the TUNE/SCROLL knob to highlight a track
(indicated by the line above and below the track name)
and then push the ENTER/BROWSE knob to start playing
that track.
In Bluetooth® Mode, if the Bluetooth® device supports
this feature, press the Tracks button on the touchscreen
to display a pop-up with the Song List. The currently
playing song is indicated by a red arrow and lines above
and below the song title.
Pressing the Tracks button on the touchscreen while the
pop-up is displayed will close the pop-up.
MEDIA VOICE COMMANDS
Uconnect offers connections via USB, Bluetooth®, and
auxiliary (AUX) ports. Voice operation is only available for
connected USB and AUX devices.
Push the VR button located on the steering wheel.
After the beep, say one of the following commands and
follow the prompts to switch your media source or choose
an artist:
“Change source to Bluetooth®”
“Change source to AUX”
“Change source to USB”
“Play artist Beethoven”; “ Play album Greatest Hits”;
“ Play song Moonlight Sonata”; “ Play genre Classical” Did You Know:
Press the Browse button on the
touchscreen to see all of the music on your USB device.
Your Voice Command must match exactly how the artist,
album, song, and genre information is displayed.
PHONE MODE
Overview
Uconnect Phone is a voice-activated, hands-free,
in-vehicle communications system. It allows you to dial a
phone number with your mobile phone.
The feature supports the following:
Voice Activated Features
Hands-Free dialing via Voice
(“Call John Smith Mobile” or “Dial 248-555-1212”).
Hands-Free text-to-speech listening of your incoming
SMS messages.
Hands-Free Text Message Replying: Forward one of
18 predefined SMS messages to incoming calls/text
messages.
Redialing last dialed numbers (“Redial”).
Calling Back the last incoming call number
(“Call Back”).
Viewing call logs on screen (“Show Incoming Calls,”
“Show Outgoing Calls,” “Show Missed Calls,” or
“Show Recent Calls”).
Searching Contacts phone number
(“Search for John Smith Mobile”). Screen Activated Features
Dialing via Keypad using touchscreen.
Viewing and Calling contacts from Phonebooks
displayed on the touchscreen.
Setting Favorite Contact phone numbers so they are
easily accessible on the Main Phone screen.
Viewing and Calling contacts from Recent Call logs.
Reviewing your recent Incoming SMS Messages.
Pairing up to 10 phones/audio devices for easy access
to connect to them quickly.
NOTE:Your phone must be capable of SMS messaging via Blue -
tooth® for messaging features to work properly.
Your mobile phone’s audio is transmitted through your
vehicle’s audio system; the system will automatically mute
your radio when using the Uconnect Phone.
For Uconnect customer support:
US visit UconnectPhone.com or call 877-855-8400
Canada visit UconnectPhone.com or call
800-465-2001 (English) or (French) call
800-387-9983
Uconnect Phone allows you to transfer calls between the
system and your mobile phone as you enter or exit your
vehicle and enables you to mute the system's microphone
for private conversation.
23_LD_OM_EN_USC_t.book Page 140
Page 144 of 292
142MULTIMEDIA
HELP COMMAND
If you need assistance at any prompt, or if you want to
know your options at any prompt, say “Help” following the
beep.
To activate the Uconnect Phone from idle, simply push the
Phone button (if active) on your steering wheel and say a
command or say “Help”. All Phone sessions begin with a
push of the VR button or the Phone button.
CANCEL COMMAND
At any prompt, after the beep, you can say “Cancel” and
you will be returned to the main menu.
You can also push the VR button or Phone button on your
steering wheel when the system is listening for a
command and be returned to the main or previous menu.
PAIR (LINK) UCONNECT PHONE TO A MOBILE
PHONE
Use this QR code to access your digital
experience.
To begin using your Uconnect Phone,
you must pair your compatible
Bluetooth®-enabled mobile phone.
Mobile phone pairing is the process of
establishing a wireless connection
between a cellular phone and the
Uconnect system.
To complete the pairing process, you will need to
reference your mobile phone’s manual. Please visit
UconnectPhone.com for complete mobile phone
compatibility information.
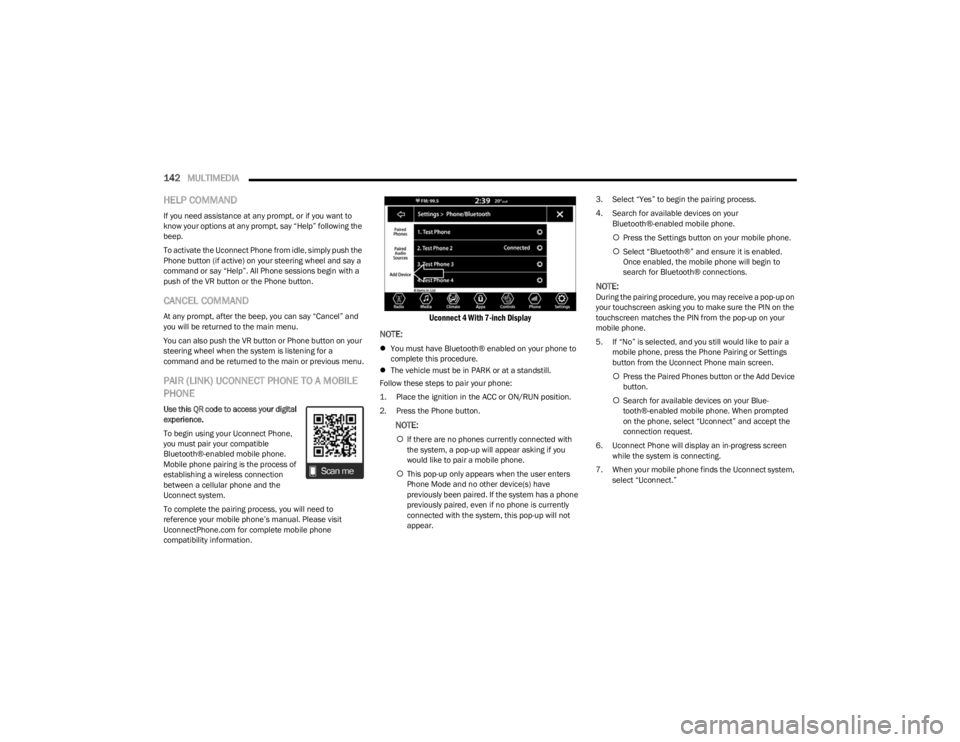
Uconnect 4 With 7-inch Display
NOTE:
You must have Bluetooth® enabled on your phone to
complete this procedure.
The vehicle must be in PARK or at a standstill.
Follow these steps to pair your phone:
1. Place the ignition in the ACC or ON/RUN position.
2. Press the Phone button.
NOTE:
If there are no phones currently connected with
the system, a pop-up will appear asking if you
would like to pair a mobile phone.
This pop-up only appears when the user enters
Phone Mode and no other device(s) have
previously been paired. If the system has a phone
previously paired, even if no phone is currently
connected with the system, this pop-up will not
appear. 3. Select “Yes” to begin the pairing process.
4. Search for available devices on your
Bluetooth®-enabled mobile phone.
Press the Settings button on your mobile phone.
Select “Bluetooth®” and ensure it is enabled.
Once enabled, the mobile phone will begin to
search for Bluetooth® connections.
NOTE:During the pairing procedure, you may receive a pop-up on
your touchscreen asking you to make sure the PIN on the
touchscreen matches the PIN from the pop-up on your
mobile phone.
5. If “No” is selected, and you still would like to pair a
mobile phone, press the Phone Pairing or Settings
button from the Uconnect Phone main screen.
Press the Paired Phones button or the Add Device
button.
Search for available devices on your Blue -
tooth®-enabled mobile phone. When prompted
on the phone, select “Uconnect” and accept the
connection request.
6. Uconnect Phone will display an in-progress screen while the system is connecting.
7. When your mobile phone finds the Uconnect system, select “Uconnect.”
23_LD_OM_EN_USC_t.book Page 142
Page 145 of 292
MULTIMEDIA143
8. When prompted on the mobile phone, accept the
connection request from Uconnect.
9. When the pairing process has successfully completed, the system will prompt you to choose
whether or not this is your favorite phone. Selecting
“Yes” will make this phone the highest priority. This
phone will take precedence over other paired phones
within range and will connect to the Uconnect system
automatically when entering the vehicle. Only one
mobile phone and/or one Bluetooth® audio device
can be connected to the Uconnect system at a time.
If “No” is selected, simply select “Uconnect” from the
mobile phone/audio device Bluetooth® screen, and
the Uconnect system will reconnect to the
Bluetooth® device.
NOTE:For phones which are not made a favorite, the phone
priority is determined by the order in which it was paired.
The most recent phone paired will have the higher priority.
NOTE:During the pairing procedure, you may receive a pop-up on
your mobile phone for the Uconnect system to access your
“messages” and “contacts”. Selecting “Ok” or “Allow” will
sync your contacts with the Uconnect system.
You can also use the VR command “Show Paired Phones”
to bring up the Paired Phone screen from any screen on
the radio.
NOTE:Software updates on your phone or the Uconnect system
may interfere with the Bluetooth® connection. If this
happens, simply repeat the pairing process. However, first
make sure to delete the device from the list of phones on
your Uconnect system. Next, be sure to remove Uconnect
from the list of devices in your phone’s Bluetooth®
settings.
PAIR A BLUETOOTH® STREAMING AUDIO
DEVICE
1. Press the Media button on the touchscreen to begin.
2. Change the source to “Bluetooth®”.
3. Press the Bluetooth® button on the touchscreen to display the Paired Audio Devices screen.
4. Press the Add Device button on the touchscreen.
NOTE:If there is no device currently connected with the system,
a pop-up will appear.
5. Search for available devices on your Bluetooth®-enabled audio device. When prompted
on the device, confirm the PIN shown on the
Uconnect screen.
6. Uconnect Phone will display an in-process screen while the system is connecting. 7. When the pairing process has successfully
completed, the system will prompt you to choose
whether or not this is your favorite device. Selecting
“Yes” will make this device the highest priority. This
device will take precedence over other paired devices
within range.
NOTE:For devices which are not made a favorite, the device
priority is determined by the order in which it was paired.
The most recent device paired will have the higher priority.
You can also use the VR command “Show Paired Phones”
to bring up a list of paired audio devices.
CONNECTING TO A PARTICULAR MOBILE
PHONE OR AUDIO DEVICE AFTER PAIRING
Uconnect Phone will automatically connect to the highest
priority paired phone and/or Audio Device within range.
If you need to choose a particular phone or audio device
follow these steps:
1. Press the
Settings
button on the touchscreen.
2. Press the Paired Phones or Audio Sources button. 3. Press to select the particular phone or the particular audio device. A pop-up menu will appear; press
“Connect Phone”.
4. Press the X to exit out of the Settings screen.
5
23_LD_OM_EN_USC_t.book Page 143
Page 146 of 292
144MULTIMEDIA
DISCONNECTING OR DELETING A PHONE OR
AUDIO DEVICE
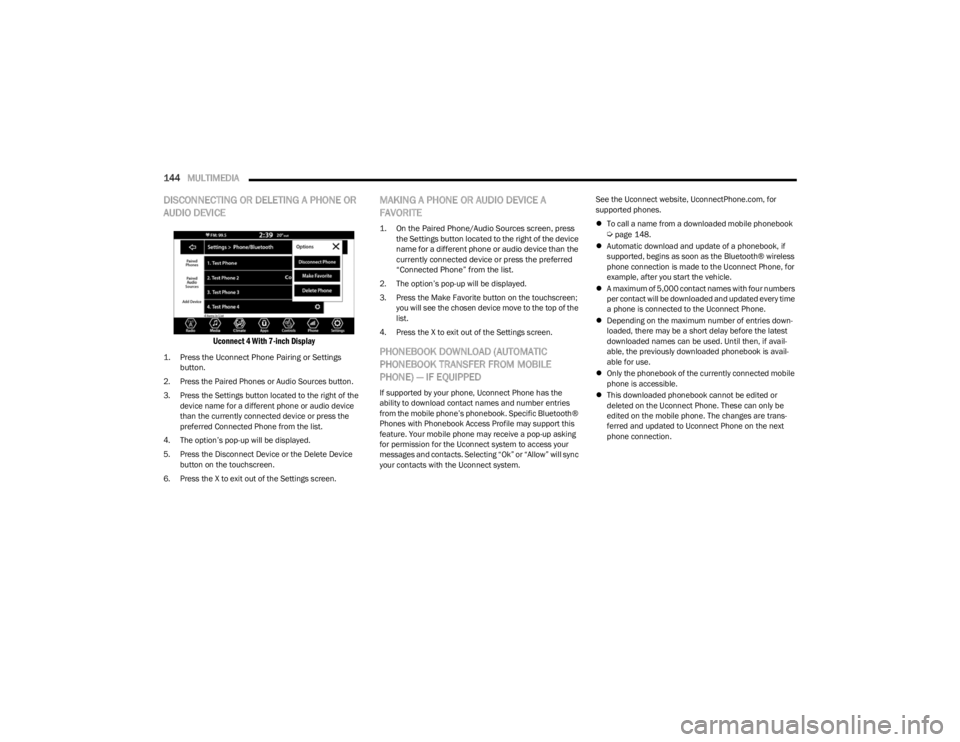
Uconnect 4 With 7-inch Display
1. Press the Uconnect Phone Pairing or Settings
button.
2. Press the Paired Phones or Audio Sources button. 3. Press the Settings button located to the right of the device name for a different phone or audio device
than the currently connected device or press the
preferred Connected Phone from the list.
4. The option’s pop-up will be displayed.
5. Press the Disconnect Device or the Delete Device button on the touchscreen.
6. Press the X to exit out of the Settings screen.
MAKING A PHONE OR AUDIO DEVICE A
FAVORITE
1. On the Paired Phone/Audio Sources screen, press the Settings button located to the right of the device
name for a different phone or audio device than the
currently connected device or press the preferred
“Connected Phone” from the list.
2. The option’s pop-up will be displayed.
3. Press the Make Favorite button on the touchscreen; you will see the chosen device move to the top of the
list.
4. Press the X to exit out of the Settings screen.
PHONEBOOK DOWNLOAD (AUTOMATIC
PHONEBOOK TRANSFER FROM MOBILE
PHONE) — IF EQUIPPED
If supported by your phone, Uconnect Phone has the
ability to download contact names and number entries
from the mobile phone’s phonebook. Specific Bluetooth®
Phones with Phonebook Access Profile may support this
feature. Your mobile phone may receive a pop-up asking
for permission for the Uconnect system to access your
messages and contacts. Selecting “Ok” or “Allow” will sync
your contacts with the Uconnect system. See the Uconnect website, UconnectPhone.com, for
supported phones.
To call a name from a downloaded mobile phonebook
Úpage 148.
Automatic download and update of a phonebook, if
supported, begins as soon as the Bluetooth® wireless
phone connection is made to the Uconnect Phone, for
example, after you start the vehicle.
A maximum of 5,000 contact names with four numbers
per contact will be downloaded and updated every time
a phone is connected to the Uconnect Phone.
Depending on the maximum number of entries down -
loaded, there may be a short delay before the latest
downloaded names can be used. Until then, if avail -
able, the previously downloaded phonebook is avail -
able for use.
Only the phonebook of the currently connected mobile
phone is accessible.
This downloaded phonebook cannot be edited or
deleted on the Uconnect Phone. These can only be
edited on the mobile phone. The changes are trans -
ferred and updated to Uconnect Phone on the next
phone connection.
23_LD_OM_EN_USC_t.book Page 144
Page 150 of 292
148MULTIMEDIA
Even though the system is designed for many languages
and accents, the system may not always work for some.
NOTE:It is recommended that you do not store names in your
Favorites phonebook while the vehicle is in motion.
Number and name recognition rate is optimized when the
entries are not similar. You can say “O” (letter “O”) for “0”
(zero).
Even though international dialing for most number
combinations is supported, some shortcut dialing number
combinations may not be supported.
Audio Performance
Audio quality is maximized under:
Low-To-Medium Blower Setting
Low-To-Medium Vehicle Speed
Low Road Noise
Smooth Road Surface
Fully Closed Windows
Dry Weather Conditions
Operation From The Driver's Seat
Performance such as audio clarity, echo, and loudness to
a large degree rely on the phone and network, and not the
Uconnect Phone.
Echo at the far end can sometimes be reduced by lowering
the in-vehicle audio volume. Phone Voice Commands
Making and answering hands-free phone calls is easy with
Uconnect. When the Phonebook button is illuminated on
your touchscreen, your system is ready. Check
UconnectPhone.com for mobile phone compatibility and
pairing instructions.
Push the Phone button and wait for the beep to say a
command. Here are some examples:
“Call John Smith”
“Dial 123 456 7890”
“Redial ” (call previous outgoing phone number)
“Call back ” (call previously answered incoming phone
number)
Did You Know: When providing a Voice Command, push
the Phone button and say “ Call”, then pronounce the
name exactly as it appears in your phonebook. When a
contact has multiple phone numbers, you can say “ Call
John Smith work”.
Voice Text Reply — If Equipped
Uconnect can announce incoming text messages. Push
the VR button or Phone button and say:
1. “
Listen
” to have the system read an incoming text
message. (Must have compatible mobile phone
paired to Uconnect system.)
2. “ Reply” after an incoming text message has been
read.
Listen to the Uconnect prompts. After the beep, re -
peat one of the predefined messages and follow the
system prompts.
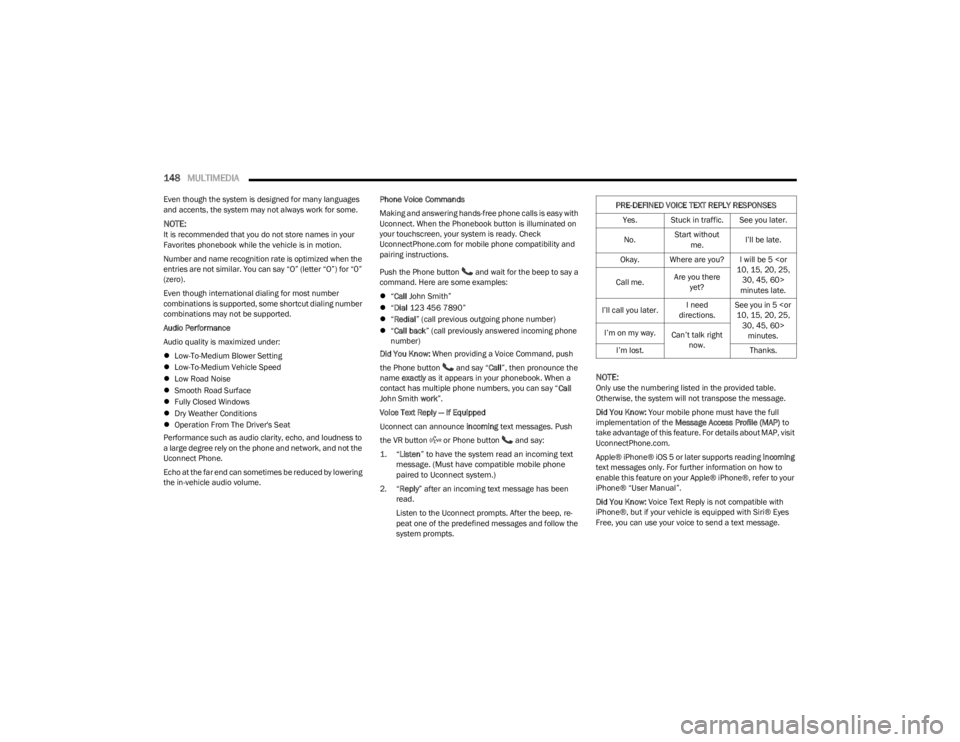
NOTE:Only use the numbering listed in the provided table.
Otherwise, the system will not transpose the message.
Did You Know: Your mobile phone must have the full
implementation of the Message Access Profile (MAP) to
take advantage of this feature. For details about MAP, visit
UconnectPhone.com.
Apple® iPhone® iOS 5 or later supports reading incoming
text messages only. For further information on how to
enable this feature on your Apple® iPhone®, refer to your
iPhone® “User Manual”.
Did You Know: Voice Text Reply is not compatible with
iPhone®, but if your vehicle is equipped with Siri® Eyes
Free, you can use your voice to send a text message.
PRE-DEFINED VOICE TEXT REPLY RESPONSES
Yes. Stuck in traffic. See you later.
No. Start without
me. I’ll be late.
Okay. Where are you? I will be 5
minutes late.
Call me.
Are you there
yet?
I’ll call you later. I need
directions. See you in 5
I’m on my way.
Can’t talk right
now.
I’m lost. Thanks.
23_LD_OM_EN_USC_t.book Page 148
Page 154 of 292

152MULTIMEDIA
Messages
Push and hold the VR button on the steering
wheel to activate a Siri voice recognition
session. Apple CarPlay® allows you to use Siri
to send or reply to text messages. Siri can also
read incoming text messages, but drivers will not be able
to read messages, as everything is done via voice.
Maps
Push and hold the VR button on the steering
wheel until the beep or tap the Microphone
icon to ask Apple® Siri to take you to a desired
destination by voice. You can also touch the
Navigation icon in Apple CarPlay® to access Apple®
Maps.
Apps
The Apple CarPlay® App plays all compatible apps that are
available to use, every time it is launched. You must have
the compatible app downloaded, and you must be signed
in to the app through your mobile device for it to work with
Apple CarPlay®.
Refer to http://www.apple.com/ios/carplay/ (US) or
https://www.apple.com/ca/ios/carplay/ (Canada) to see
the latest list of available apps for Apple CarPlay®.
Apple CarPlay® Voice Command
NOTE:Feature availability depends on your carrier and mobile
phone maker. Some Apple CarPlay® features may not be
available in every region and/or language.
Apple CarPlay® allows you to use your voice to interact
with Siri through your vehicle’s voice recognition system,
and use your smartphone’s data plan to project your
iPhone® and a number of its apps onto your Uconnect
touchscreen. Connect your iPhone® 5 or higher to one of
the media USB ports, using the factory-provided Lightning
cable, and press the new Apple CarPlay® icon that
replaces your Phone icon on the main menu bar to begin
Apple CarPlay®. Push and hold the VR button on the
steering wheel, or press and hold the Home button within
Apple CarPlay®, to activate Siri, which recognizes natural
voice commands to use a list of your iPhone® features:
Phone
Music
Messages
Maps — If Equipped
Additional Apps — If Equipped
NOTE:Apple CarPlay® is a trademark of Apple® Inc. iPhone® is
a trademark of Apple® Inc., registered in the US and other
countries. Apple® terms of use and privacy statements
apply.
ANDROID AUTO™ AND APPLE
C
ARPLAY® TIPS AND TRICKS
Android Auto™ And Apple CarPlay® Automatic Bluetooth®
Pairing
After connecting to Android Auto™ or Apple CarPlay® for
the first time and undergoing the setup procedure, the
smartphone pairs to the Uconnect system via Bluetooth®
without any setup required every time it is within range, if
Bluetooth® is turned on.
NOTE:Apple CarPlay® uses a USB connection while Android
Auto™ uses both USB and Bluetooth® connections to
function. The connected device is unavailable to other
devices when connected using Android Auto™ or Apple
CarPlay®.
Multiple Devices Connecting To The Uconnect System —
If Equipped
It is possible to have multiple devices connected to the
Uconnect system. For example, if using Android Auto™/
Apple CarPlay®, the connected device will be used to
place hands-free phone calls or send hands-free text
messages. However, another device can also be paired to
the Uconnect system, via Bluetooth®, as an audio source,
so the passenger can stream music.
NOTE:Apple CarPlay® and Android Auto™ can only be launched
from the front and center console USB ports.
23_LD_OM_EN_USC_t.book Page 152
Page 281 of 292

279
BluetoothConnecting To A Particular Mobile PhoneOr Audio Device After Pairing ............................ 143
Body Mechanism Lubrication...................................... 231
B-Pillar Location ........................................................... 252
Brake Assist System .................................................... 165
Brake Control System .................................................. 165
Brake Fluid .......................................................... 236
, 272
Brake System ...................................................... 236, 267
Fluid Check..................................................... 236, 272
Master Cylinder ....................................................... 236
Parking ....................................................................... 79
Warning Light ................................................... 68
, 267
Brake/Transmission Interlock........................................81
Break-In Recommendations, New Vehicle .................... 79
Brightness, Interior Lights .............................................. 45
Bulb Replacement ....................................................... 246
Bulbs, Light.......................................................... 201
, 246
CCamera, Rear ............................................................... 100
Capacities, Fluid ........................................................... 270
Caps, Filler Oil (Engine) .............................................................. 225
Radiator (Coolant Pressure)................................... 235
Car Washes .................................................................. 265
Carbon Monoxide Warning .......................................... 201
Cargo Vehicle Loading....................................................... 102
Cargo Area Cover ............................................................60
Cargo Compartment ....................................................... 60
Cargo Net .........................................................................60
CD.................................................................................. 138
Certification Label ........................................................ 102 Chains, Tire ...................................................................262
Chart, Tire Sizing ...........................................................249
Check Engine Light (Malfunction Indicator Light) ........ 75
Checking Your Vehicle For Safety ................................ 199
Checks, Safety .............................................................. 199
Child Restraint .............................................................. 190
Child Restraints Booster Seats .......................................................... 192
Child Seat Installation ............................................. 197How To Stow An unused ALR Seat Belt .................196Infant And Child Restraints ..................................... 191
Lower Anchors And Tethers For Children............... 193
Older Children And Child Restraints....................... 191
Seating Positions ..................................................... 193
Child Safety Locks .......................................................... 24
Clean Air Gasoline ........................................................ 268
Cleaning Wheels .....................................................................260
Climate Control ............................................................... 46 Automatic ................................................................... 47
Manual ....................................................................... 49
Coin Holder ..................................................................... 53
Cold Weather Operation ................................................. 78
Compact Spare Tire ...................................................... 259
Console Floor ........................................................................... 53
Contract, Service .......................................................... 275
Controls ......................................................................... 130
Cooling Pressure Cap (Radiator Cap) ..........................235
Cooling System ............................................................. 234 Adding Coolant (Antifreeze) ....................................235
Coolant Level ................................................. 234
, 235
Cooling Capacity ...................................................... 270
Disposal Of Used Coolant ....................................... 235 Drain, Flush, And Refill............................................234 Inspection ................................................................ 235
Points To Remember .............................................. 236
Pressure Cap ........................................................... 235
Radiator Cap............................................................ 235
Selection Of Coolant (Antifreeze) ........ 234
, 270, 271
Corrosion Protection .................................................... 264
Cruise Control (Speed Control) ............................... 85
, 87
Cruise Light .............................................................. 73, 74
Customer Assistance ................................................... 273
Customer Programmable Features ............................. 112
Cybersecurity ................................................................ 111
DDaytime Running Lights ................................................. 41 Deck Lid Power Release........................................................... 59
Defroster, Windshield .................................................. 200
De-Icer, Remote Start .................................................... 18
Deleting A Phone .......................................................... 144
Deluxe Security Alarm .................................................... 19
Diagnostic System, Onboard ......................................... 74 Dimmer Switch Headlight ................................................................... 41
Dipsticks Oil (Engine) .............................................................. 227
Disabled Vehicle Towing .............................................. 219
Disc Drive ...................................................................... 138
Disconnecting ............................................................... 144
Disposal Antifreeze (Engine Coolant) .................................... 235
Disturb........................................................................... 146
Door Ajar ......................................................................... 69
Door Ajar Light ................................................................ 69
11
23_LD_OM_EN_USC_t.book Page 279