2023 DODGE CHARGER instrument panel
[x] Cancel search: instrument panelPage 81 of 292
STARTING AND OPERATING79
(Continued)
ENGINE BREAK-IN RECOMMENDATIONS —
3.6L & 5.7L
A long break-in period is not required for the drivetrain
(engine, transmission, clutch, and rear axle) in your new
vehicle.
Drive moderately during the first 300 miles (500 km).
After the initial 60 miles (100 km), speeds up to 50 or
55 mph (80 or 90 km/h) are desirable.
While cruising, brief full-throttle acceleration within the
limits of local traffic laws contributes to a good break-in.
However, wide-open throttle acceleration in low gear can
be detrimental and should be avoided.
The engine oil, transmission fluid, and axle lubricant
installed at the factory is high-quality and
energy-conserving. Oil, fluid, and lubricant changes should
be consistent with anticipated climate and conditions
under which vehicle operations will occur. For the
recommended viscosity and quality grades
Úpage 271.
NOTE:A new engine may consume some oil during its first few
thousand miles (kilometers) of operation. This should be
considered a normal part of the break-in and not inter -
preted as an indication of difficulty. Please check your oil
level with the engine oil indicator often during the break in
period. Add oil as required.
PARKING BRAKE
Before leaving the vehicle, make sure that the parking
brake is fully applied and place the gear selector in the
PARK position.
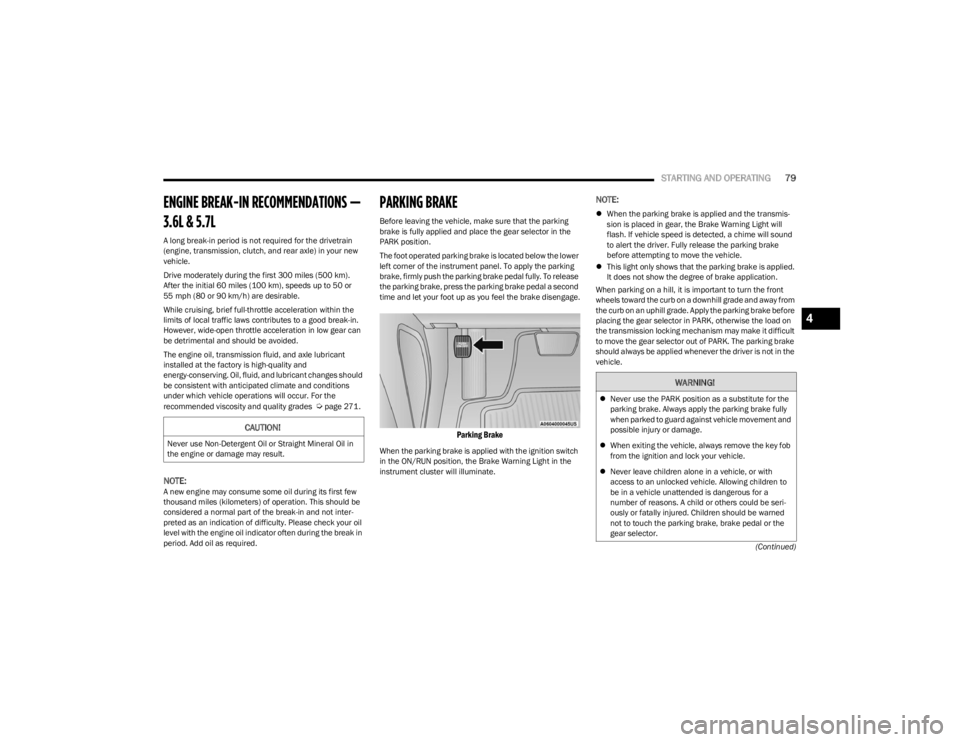
The foot operated parking brake is located below the lower
left corner of the instrument panel. To apply the parking
brake, firmly push the parking brake pedal fully. To release
the parking brake, press the parking brake pedal a second
time and let your foot up as you feel the brake disengage.
Parking Brake
When the parking brake is applied with the ignition switch
in the ON/RUN position, the Brake Warning Light in the
instrument cluster will illuminate.
NOTE:
When the parking brake is applied and the transmis -
sion is placed in gear, the Brake Warning Light will
flash. If vehicle speed is detected, a chime will sound
to alert the driver. Fully release the parking brake
before attempting to move the vehicle.
This light only shows that the parking brake is applied.
It does not show the degree of brake application.
When parking on a hill, it is important to turn the front
wheels toward the curb on a downhill grade and away from
the curb on an uphill grade. Apply the parking brake before
placing the gear selector in PARK, otherwise the load on
the transmission locking mechanism may make it difficult
to move the gear selector out of PARK. The parking brake
should always be applied whenever the driver is not in the
vehicle.
CAUTION!
Never use Non-Detergent Oil or Straight Mineral Oil in
the engine or damage may result.
WARNING!
Never use the PARK position as a substitute for the
parking brake. Always apply the parking brake fully
when parked to guard against vehicle movement and
possible injury or damage.
When exiting the vehicle, always remove the key fob
from the ignition and lock your vehicle.
Never leave children alone in a vehicle, or with
access to an unlocked vehicle. Allowing children to
be in a vehicle unattended is dangerous for a
number of reasons. A child or others could be seri -
ously or fatally injured. Children should be warned
not to touch the parking brake, brake pedal or the
gear selector.
4
23_LD_OM_EN_USC_t.book Page 79
Page 86 of 292
84STARTING AND OPERATING
NOTE:
Tapping one of the steering wheel-mounted shift
paddles (+/-), if equipped, while the gear selector is in
DRIVE, will activate a temporary AutoStick mode.
Tapping (-) to enter AutoStick mode will downshift the
transmission to the next lower gear, while tapping (+) to
enter AutoStick mode will retain the current gear. The
current gear will be displayed in the instrument cluster,
but the “M” will not be highlighted. The transmission
will revert back to normal operation (if the gear selector
remains in DRIVE) after a period of time, depending on
accelerator pedal activity.
In some models, the shift paddles may be disabled (or
re-enabled, as desired) using Drive Mode Set-Up,
accessed by selecting Performance Control.
In AutoStick mode, the transmission will shift up or down
when (+/-) is manually selected by the driver (using the
gear selector, or the shift paddles [if equipped]), unless an
engine lugging or overspeed condition would result. It will
remain in the selected gear until another upshift or
downshift is chosen, except as follows:
If normal AutoStick mode is engaged (gear selector in
MANUAL position), manual gear selection will be main -
tained until the gear selector is returned to DRIVE, or as
described in the following conditions. The transmission
will not upshift automatically at redline in this mode,
nor will downshifts be obtained if the accelerator pedal
is pressed to the floor.
The transmission will automatically downshift as the
vehicle slows (to prevent engine lugging) and will
display the current gear.
The transmission will automatically downshift to FIRST
gear when coming to a stop. After a stop, the driver
should manually upshift (+) the transmission as the
vehicle is accelerated.
You can start out, from a stop, in FIRST or SECOND
gear. Tapping (+) (at a stop) will allow starting in
SECOND gear. Starting out in SECOND gear can be
helpful in snowy or icy conditions.
If a requested downshift would cause the engine to
over-speed, that shift will not occur.
The system will ignore attempts to upshift at too low of
a vehicle speed and an indication will display.
Holding the (-) paddle pressed (if equipped), or holding
the gear selector in the (-) position, will downshift the
transmission to the lowest gear possible at the current
speed.
Transmission shifting will be more noticeable when
AutoStick is enabled.
The system may revert to automatic shift mode if a
fault or overheat condition is detected.
To disengage AutoStick mode, return the gear selector to
the DRIVE position, or press and hold the (+) shift paddle
(if equipped, and the gear selector is already in DRIVE)
until “D” is once again indicated in the instrument cluster.
You can shift in or out of the AutoStick mode at any time
without taking your foot off the accelerator pedal.SPORT MODE — WITHOUT PERFORMANCE
CONTROL
Your vehicle is equipped with a SPORT Mode feature. This
mode is a configuration set up for typical enthusiast
driving. The engine, transmission, and steering systems
are all set to their SPORT settings. SPORT Mode will
provide improved throttle response and modified shifting
for an enhanced driving experience, as well the greatest
amount of steering feel. This mode may be activated and
deactivated by pushing the Sport button on the instrument
panel switch bank.
For vehicles equipped with Drive Modes or a SUPER
TRACK PAK button, refer to Drive Modes Supplement for
further information.
FUEL SAVER TECHNOLOGY 5.7L ONLY— IF
EQUIPPED
This feature offers improved fuel economy by shutting off
four of the engine's eight cylinders during light load and
cruise conditions. The system is automatic with no driver
inputs or additional driving skills required.
NOTE:This system may take some time to return to full function -
ality after a battery disconnect.
WARNING!
Do not downshift for additional engine braking on a
slippery surface. The drive wheels could lose their grip
and the vehicle could skid, causing a collision or
personal injury.
23_LD_OM_EN_USC_t.book Page 84
Page 114 of 292
112MULTIMEDIA
UCONNECT SETTINGS
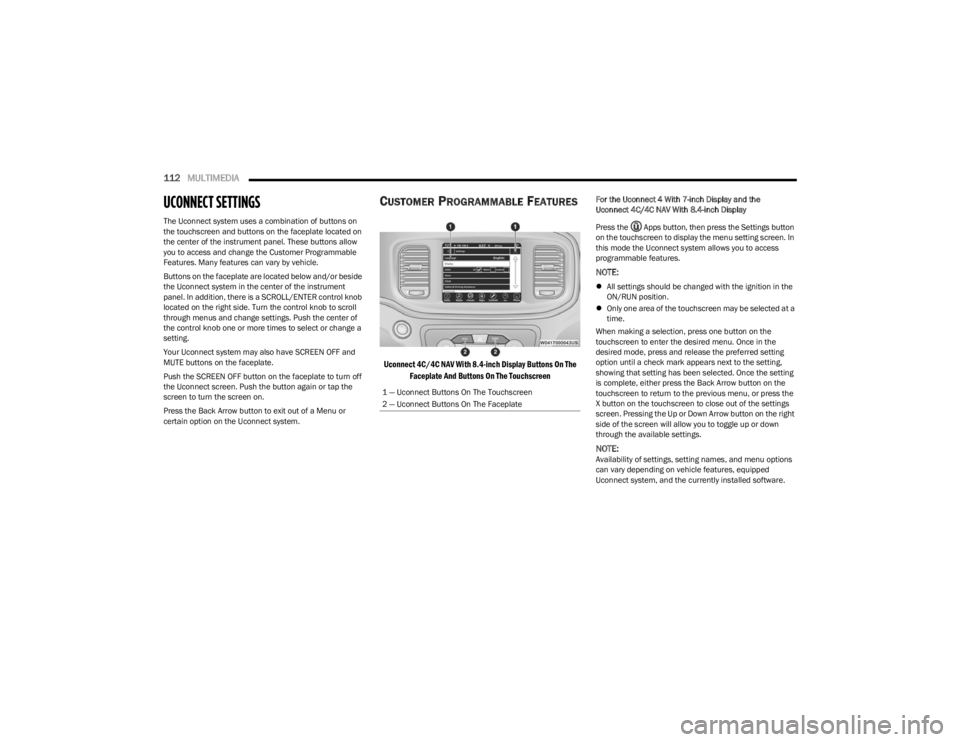
The Uconnect system uses a combination of buttons on
the touchscreen and buttons on the faceplate located on
the center of the instrument panel. These buttons allow
you to access and change the Customer Programmable
Features. Many features can vary by vehicle.
Buttons on the faceplate are located below and/or beside
the Uconnect system in the center of the instrument
panel. In addition, there is a SCROLL/ENTER control knob
located on the right side. Turn the control knob to scroll
through menus and change settings. Push the center of
the control knob one or more times to select or change a
setting.
Your Uconnect system may also have SCREEN OFF and
MUTE buttons on the faceplate.
Push the SCREEN OFF button on the faceplate to turn off
the Uconnect screen. Push the button again or tap the
screen to turn the screen on.
Press the Back Arrow button to exit out of a Menu or
certain option on the Uconnect system.
CUSTOMER PROGRAMMABLE FEATURES
Uconnect 4C/4C NAV With 8.4-inch Display Buttons On The
Faceplate And Buttons On The Touchscreen
For the Uconnect 4 With 7-inch Display and the
Uconnect 4C/4C NAV With 8.4-inch Display
Press the Apps button, then press the Settings button
on the touchscreen to display the menu setting screen. In
this mode the Uconnect system allows you to access
programmable features.
NOTE:
All settings should be changed with the ignition in the
ON/RUN position.
Only one area of the touchscreen may be selected at a
time.
When making a selection, press one button on the
touchscreen to enter the desired menu. Once in the
desired mode, press and release the preferred setting
option until a check mark appears next to the setting,
showing that setting has been selected. Once the setting
is complete, either press the Back Arrow button on the
touchscreen to return to the previous menu, or press the
X button on the touchscreen to close out of the settings
screen. Pressing the Up or Down Arrow button on the right
side of the screen will allow you to toggle up or down
through the available settings.
NOTE:Availability of settings, setting names, and menu options
can vary depending on vehicle features, equipped
Uconnect system, and the currently installed software.
1 — Uconnect Buttons On The Touchscreen
2 — Uconnect Buttons On The Faceplate
23_LD_OM_EN_USC_t.book Page 112
Page 163 of 292

MULTIMEDIA161
NOTE:
Launch Control should not be used on public roads.
Always check track conditions and the surrounding
area.
Launch Control is not available for the first 500 miles
(805 km) of the vehicle’s life.
Launch Control should only be used when the engine
and transmission are at operating temperature.
Launch Control is intended to be used on dry, paved
road surfaces only. Use on slippery or loose surfaces
may cause damage to vehicle components and is not
recommended.
Launch Control is not available in ESC Full Off Mode.
Sport Mode
Sport Mode
Sport Mode is a configuration set-up for typical enthusiast
driving. The Transmission and Steering are both set to
their Sport settings. The steering wheel Paddle switches
are enabled. Traction Control defaults to Normal. Any of
these four settings may be changed to the driver’s
preferences by pressing the buttons on the touchscreen.
Push the Sport button on the instrument panel switch
bank to put the vehicle in Sport Mode and activate these
settings. The customized settings will only be active when
the Sport button is active.
Sport Mode Set-Up
Possible Performance Control configurations are listed
with accompanying descriptions. The information
contained in the list can also be accessed from within the
mode Set-Up menus. To access the information, press the
Info button on the touchscreen from the mode Set-Up
menu, and use the Left/Right arrows to toggle through
available descriptions. The title for each system in the
Set-Up menu can be pressed, which provides the
descriptions for each function of that system.
ENGINE/TRANS (IF EQUIPPED WITH
AUTOMATIC TRANSMISSION)
Engine/Trans
SPORT
Press the Sport button on the touchscreen for
improved throttle response and modified shifting for an
enhanced driving experience.
NORMAL
Press the Normal button on the touchscreen for a
balance of throttle response, shift comfort and
economy for normal driving.
5
23_LD_OM_EN_USC_t.book Page 161
Page 185 of 292
SAFETY183
How To Engage The Automatic Locking Mode
1. Buckle the combination lap and shoulder belt.
2. Grab the shoulder portion and pull downward until
the entire seat belt is extracted.
3. Allow the seat belt to retract. As the seat belt retracts, you will hear a clicking sound. This indicates the seat
belt is now in the Automatic Locking Mode.
How To Disengage The Automatic Locking Mode
Unbuckle the combination lap/shoulder belt and allow it
to retract completely to disengage the Automatic Locking
Mode and activate the vehicle sensitive (emergency)
locking mode.
SUPPLEMENTAL RESTRAINT SYSTEMS
(SRS)
Some of the safety features described in this section may
be standard equipment on some models, or may be
optional equipment on others. If you are not sure, ask an
authorized dealer.
The air bag system must be ready to protect you in a
collision. The Occupant Restraint Controller (ORC)
monitors the internal circuits and interconnecting wiring
associated with the electrical Air Bag System Components. Your vehicle may be equipped with the
following Air Bag System Components:
Air Bag System Components
Occupant Restraint Controller (ORC)
Air Bag Warning Light
Steering Wheel and Column
Instrument Panel
Knee Impact Bolsters
Driver and Front Passenger Air Bags
Seat Belt Buckle Switch
Supplemental Side Air Bags
Supplemental Knee Air Bags
Front and Side Impact Sensors
Seat Belt Pretensioners
Seat Track Position Sensors
Air Bag Warning Light
The Occupant Restraint Controller (ORC)
monitors the readiness of the electronic parts
of the air bag system whenever the ignition
switch is in the START or ON/RUN position.
If the ignition switch is in the OFF position or in the ACC
position, the air bag system is not on and the air bags will
not inflate.
The ORC contains a backup power supply system that may
deploy the air bag system even if the battery loses power
or it becomes disconnected prior to deployment.
WARNING!
Never place a rear-facing child restraint in front of an
air bag. A deploying passenger front air bag can
cause death or serious injury to a child 12 years or
younger, including a child in a rear-facing child
restraint.
Never install a rear-facing child restraint in the front
seat of a vehicle. Only use a rear-facing child
restraint in the rear seat. If the vehicle does not have
a rear seat, do not transport a rear-facing child
restraint in that vehicle.
WARNING!
The seat belt assembly must be replaced if the
switchable Automatic Locking Retractor (ALR)
feature or any other seat belt function is not working
properly when checked according to the procedures
in the Service Manual.
Failure to replace the seat belt assembly could
increase the risk of injury in collisions.
Do not use the Automatic Locking Mode to restrain
occupants who are wearing the seat belt or children
who are using booster seats. The locked mode is only
used to install rear-facing or forward-facing child
restraints that have a harness for restraining the
child.
6
23_LD_OM_EN_USC_t.book Page 183
Page 186 of 292
184SAFETY
(Continued)
The ORC turns on the Air Bag Warning Light in the
instrument panel for approximately four to eight seconds
for a self-check when the ignition switch is first in the
ON/RUN position. After the self-check, the Air Bag Warning
Light will turn off. If the ORC detects a malfunction in any
part of the system, it turns on the Air Bag Warning Light,
either momentarily or continuously. A single chime will
sound to alert you if the light comes on again after initial
startup.
The ORC also includes diagnostics that will illuminate the
instrument panel Air Bag Warning Light if a malfunction is
detected that could affect the air bag system. The
diagnostics also record the nature of the malfunction.
While the air bag system is designed to be maintenance
free, if any of the following occurs, have an authorized
dealer service the air bag system immediately.
The Air Bag Warning Light does not come on during the
four to eight seconds when the ignition switch is first in
the ON/RUN position.
The Air Bag Warning Light remains on after the four to
eight-second interval.
The Air Bag Warning Light comes on intermittently or
remains on while driving.
NOTE:If the speedometer, tachometer, or any engine related
gauges are not working, the Occupant Restraint Controller
(ORC) may also be disabled. In this condition the air bags
may not be ready to inflate for your protection. Have an
authorized dealer service the air bag system immediately.
Redundant Air Bag Warning Light
If a fault with the Air Bag Warning Light is
detected, which could affect the Supplemental
Restraint System (SRS), the Redundant Air Bag
Warning Light will illuminate on the instrument
panel. The Redundant Air Bag Warning Light will stay on
until the fault is cleared. In addition, a single chime will
sound to alert you that the Redundant Air Bag Warning
Light has come on and a fault has been detected. If the
Redundant Air Bag Warning Light comes on intermittently
or remains on while driving have an authorized dealer
service the vehicle immediately
Úpage 68.
Front Air Bags
This vehicle has front air bags and lap/shoulder belts for
both the driver and front passenger. The front air bags are
a supplement to the seat belt restraint systems. The driver
front air bag is mounted in the center of the steering
wheel. The passenger front air bag is mounted in the
instrument panel, above the glove compartment. The
words “SRS AIRBAG” or “AIRBAG” are embossed on the air
bag covers.
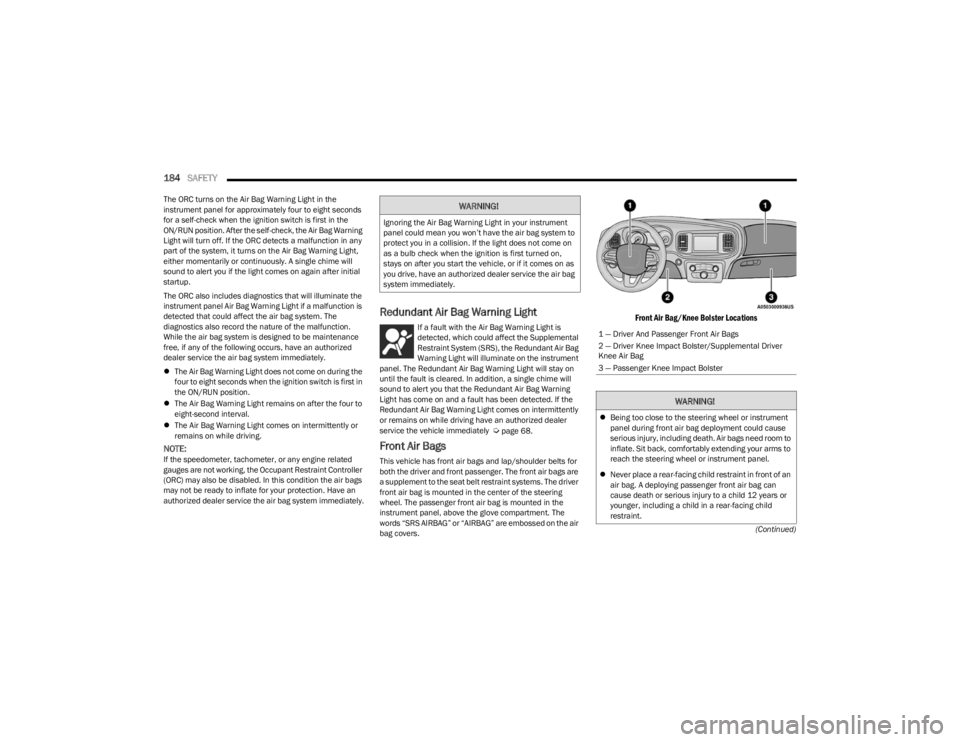
Front Air Bag/Knee Bolster Locations
WARNING!
Ignoring the Air Bag Warning Light in your instrument
panel could mean you won’t have the air bag system to
protect you in a collision. If the light does not come on
as a bulb check when the ignition is first turned on,
stays on after you start the vehicle, or if it comes on as
you drive, have an authorized dealer service the air bag
system immediately.
1 — Driver And Passenger Front Air Bags
2 — Driver Knee Impact Bolster/Supplemental Driver
Knee Air Bag
3 — Passenger Knee Impact Bolster
WARNING!
Being too close to the steering wheel or instrument
panel during front air bag deployment could cause
serious injury, including death. Air bags need room to
inflate. Sit back, comfortably extending your arms to
reach the steering wheel or instrument panel.
Never place a rear-facing child restraint in front of an
air bag. A deploying passenger front air bag can
cause death or serious injury to a child 12 years or
younger, including a child in a rear-facing child
restraint.
23_LD_OM_EN_USC_t.book Page 184
Page 187 of 292
SAFETY185
Driver And Passenger Front Air Bag
Features
The Advanced Front Air Bag system has multistage driver
and front passenger air bags. This system provides output
appropriate to the severity and type of collision as
determined by the Occupant Restraint Controller (ORC),
which may receive information from the front impact
sensors (if equipped) or other system components.
The first stage inflator is triggered immediately during an
impact that requires air bag deployment. A low energy
output is used in less severe collisions. A higher energy
output is used for more severe collisions.
This vehicle may be equipped with a driver and/or front
passenger seat belt buckle switch that detects whether
the driver or front passenger seat belt is buckled. The seat
belt buckle switch may adjust the inflation rate of the
Advanced Front Air Bags.
This vehicle may be equipped with driver and/or front
passenger seat track position sensors that may adjust the
inflation rate of the Advanced Front Air Bags based upon
seat position.
Front Air Bag Operation
Front Air Bags are designed to provide additional
protection by supplementing the seat belts. Front air bags
are not expected to reduce the risk of injury in rear, side,
or rollover collisions. The front air bags will not deploy in all
frontal collisions, including some that may produce
substantial vehicle damage — for example, some pole
collisions, truck underrides, and angle offset collisions. On the other hand, depending on the type and location of
impact, front air bags may deploy in crashes with little
vehicle front-end damage but that produce a severe initial
deceleration.
Because air bag sensors measure vehicle deceleration
over time, vehicle speed and damage by themselves are
not good indicators of whether or not an air bag should
have deployed.
Seat belts are necessary for your protection in all
collisions, and also are needed to help keep you in
position, away from an inflating air bag.
When the Occupant Restraint Controller (ORC) detects a
collision requiring the front air bags, it signals the inflator
units. A large quantity of non-toxic gas is generated to
inflate the front air bags.
The steering wheel hub trim cover and the upper
passenger side of the instrument panel separate and fold
out of the way as the air bags inflate to their full size. The
front air bags fully inflate in less time than it takes to blink
your eyes. The front air bags then quickly deflate while
helping to restrain the driver and front passenger.
Never install a rear-facing child restraint in the front
seat of a vehicle. Only use a rear-facing child
restraint in the rear seat. If the vehicle does not have
a rear seat, do not transport a rear-facing child
restraint in that vehicle.
WARNING!WARNING!
No objects should be placed over or near the air bag
on the instrument panel or steering wheel because
any such objects could cause harm if the vehicle is in
a collision severe enough to cause the air bag to
inflate.
Do not put anything on or around the air bag covers
or attempt to open them manually. You may damage
the air bags and you could be injured because the air
bags may no longer be functional. The protective
covers for the air bag cushions are designed to open
only when the air bags are inflating.
Relying on the air bags alone could lead to more
severe injuries in a collision. The air bags work with
your seat belt to restrain you properly. In some colli -
sions, air bags won’t deploy at all. Always wear your
seat belts even though you have air bags.
6
23_LD_OM_EN_USC_t.book Page 185
Page 188 of 292
186SAFETY
Knee Impact Bolsters
The Knee Impact Bolsters help protect the knees of the
driver and front passenger, and position the front
occupants for improved interaction with the front air bags.
Supplemental Driver Knee Air Bag
This vehicle is equipped with a Supplemental Driver Knee
Air Bag mounted in the instrument panel below the
steering column. The Supplemental Driver Knee Air Bag
provides enhanced protection during a frontal impact by
working together with the seat belts, pretensioners, and
front air bags.
Supplemental Side Air Bags
Supplemental Seat-Mounted Side Air Bags (SABs)
This vehicle is equipped with Supplemental Seat-Mounted
Side Air Bags (SABs).
Supplemental Seat-Mounted Side Air Bags (SABs) are
located in the outboard side of the front seats. The SABs
are marked with “SRS AIRBAG” or “AIRBAG” on a label or
on the seat trim on the outboard side of the seats. The SABs may help to reduce the risk of occupant injury
during certain side impacts, in addition to the injury
reduction potential provided by the seat belts and body
structure.
Front Supplemental Seat-Mounted Side Air Bag Label
When the SAB deploys, it opens the seam on the outboard
side of the seatback’s trim cover. The inflating SAB
deploys through the seat seam into the space between the
occupant and the door. The SAB moves at a very high
speed and with such a high force that it could injure
occupants if they are not seated properly, or if items are
positioned in the area where the SAB inflates. Children are
at an even greater risk of injury from a deploying air bag.
Supplemental Side Air Bag Inflatable Curtains (SABICs)
This vehicle is equipped with Supplemental Side Air Bag
Inflatable Curtains (SABICs).
Supplemental Side Air Bag Inflatable Curtains (SABICs)
are located above the side windows. The trim covering the
SABICs is labeled “SRS AIRBAG” or “AIRBAG.”
Supplemental Side Air Bag Inflatable Curtain (SABIC) Label
Location
SABICs may help reduce the risk of head and other injuries
to front and rear seat outboard occupants in certain side
impacts, in addition to the injury reduction potential
provided by the seat belts and body structure.
The SABIC deploys downward, covering the side windows.
An inflating SABIC pushes the outside edge of the
headliner out of the way and covers the window. The
SABICs inflate with enough force to injure occupants if
they are not belted and seated properly, or if items are
positioned in the area where the SABICs inflate.
Children are at an even greater risk of injury from a
deploying air bag.
WARNING!
Do not drill, cut, or tamper with the knee impact
bolsters in any way.
Do not mount any accessories to the knee impact
bolsters such as alarm lights, stereos, citizen band
radios, etc.
WARNING!
Do not use accessory seat covers or place objects
between you and the Side Air Bags; the performance
could be adversely affected and/or objects could be
pushed into you, causing serious injury.
23_LD_OM_EN_USC_t.book Page 186