2023 DODGE CHARGER turn signal
[x] Cancel search: turn signalPage 93 of 292
STARTING AND OPERATING91
To increase the distance setting, push the Distance
Setting Increase button and release. Each time the button
is pushed, the distance setting increases by one bar
(longer).
To decrease the distance setting, push the Distance
Setting Decrease button and release. Each time the
button is pushed, the distance setting decreases by one
bar (shorter).
If there is no vehicle ahead, the vehicle will maintain the
set speed. If a slower moving vehicle is detected in the
same lane, the instrument cluster display will show the
ACC Set With Target Detected Indicator Light, and the
system will adjust the vehicle speed automatically to
maintain the distance setting, regardless of the set speed.
The vehicle will then maintain the set distance until:
The vehicle ahead accelerates to a speed above the
set speed.
The vehicle ahead moves out of your lane or view of the
sensor.
The distance setting is changed.
The system disengages
Úpage 88.
The maximum braking applied by ACC is limited; however,
the driver can always apply the brakes manually, if
necessary.
NOTE:The brake lights will illuminate whenever the ACC system
applies the brakes. A Proximity Warning will alert the driver if ACC predicts that
its maximum braking level is not sufficient to maintain the
set distance. If this occurs, a visual alert “BRAKE!” will
flash in the instrument cluster display and a chime will
sound while ACC continues to apply its maximum braking
capacity.
NOTE:The “BRAKE!” screen in the instrument cluster display is a
warning for the driver to take action and does not neces
-
sarily mean that the Forward Collision Warning system is
applying the brakes autonomously.
Overtake Aid
When driving with Adaptive Cruise Control (ACC) engaged
and following a vehicle, the system will provide an
additional acceleration up to the ACC set speed to assist
in passing the vehicle. This additional acceleration is
triggered when the driver utilizes the left turn signal and
will only be active when passing on the left hand side.
ACC Operation At Stop
In the event that the ACC system brings your vehicle to a
standstill while following the vehicle in front, if the vehicle
in front starts moving within two seconds of your vehicle
coming to a standstill, your vehicle will resume motion
without the need for any driver action.
If the vehicle in front does not start moving within two
seconds of your vehicle coming to a standstill, the ACC
with Stop system will cancel and the brakes will release. A
cancel message will display on the instrument cluster
display and produce a warning chime. Driver intervention
will be required at this moment. While ACC with Stop is holding your vehicle at a standstill,
if the driver seat belt is unbuckled or the driver door is
opened, the ACC with Stop system will cancel and the
brakes will release. A cancel message will display on the
instrument cluster display and produce a warning chime.
Driver intervention will be required at this moment.
Display Warnings And Maintenance
“WIPE FRONT RADAR SENSOR IN FRONT OF
VEHICLE” WARNING
The “ACC/FCW Unavailable Wipe Front Radar Sensor”
warning will display and a chime will sound when
conditions temporarily limit system performance.
This most often occurs at times of poor visibility, such as
in snow or heavy rain. The ACC system may also become
temporarily blinded due to obstructions, such as mud, dirt
or ice. In these cases, the instrument cluster display will
display the above message and the system will deactivate.
This message can sometimes be displayed while driving in
highly reflective areas (i.e. ice and snow, or tunnels with
reflective tiles). The ACC system will recover after the
vehicle has left these areas. Under rare conditions, when
the radar is not tracking any vehicles or objects in its path
this warning may temporarily occur.
WARNING!
When the ACC system is resumed, the driver must
ensure that there are no pedestrians, vehicles or
objects in the path of the vehicle. Failure to follow these
warnings can result in a collision and death or serious
personal injury.
4
23_LD_OM_EN_USC_t.book Page 91
Page 100 of 292

98STARTING AND OPERATING
LANESENSE — IF EQUIPPED
LANESENSE OPERATION
The LaneSense system is operational at speeds above
37 mph (60 km/h) and below 112 mph (180 km/h). The
LaneSense system uses a forward looking camera to
detect lane markings and measure vehicle position within
the lane boundaries.
When both lane markings are detected and the driver
unintentionally drifts out of the lane (no turn signal
applied), the LaneSense system provides a haptic warning
in the form of torque applied to the steering wheel to
prompt the driver to remain within the lane boundaries. If
the driver unintentionally drifts out of the lane, the
LaneSense system provides a visual warning through the
instrument cluster display to prompt the driver to remain
within the lane boundaries. The driver may manually override the haptic warning by
applying torque to the steering wheel at any time.
When only a single lane marking is detected and the driver
drifts across the lane marking (no turn signal applied), the
LaneSense system provides visual warnings through the
instrument cluster display to prompt the driver to remain
within the lane. When only a single lane marking is
detected, a haptic or a torque warning will not be provided.
NOTE:When operating conditions have been met, the Lane
-
Sense system will monitor if the driver’s hands are on the
steering wheel and provide an audible warning to the
driver if removed. The system will cancel if the driver does
not return their hands to the wheel.
TURNING LANESENSE ON OR OFF
The LaneSense button is located on the
center stack below the Uconnect display.
To turn the LaneSense system on, push the
LaneSense button (LED turns off). A
“LaneSense On” message is shown in the instrument
cluster display.
To turn the LaneSense system off, push the LaneSense
button once (LED turns on).
NOTE:The LaneSense system will retain the last system state, on
or off, from the last ignition cycle when the ignition is
placed in the ON/RUN position.
LANESENSE WARNING MESSAGE
The LaneSense system will indicate the current lane drift
condition through the instrument cluster display.
When the LaneSense system is on, the lane lines are gray
when both of the lane boundaries have not been detected
and the LaneSense telltale is solid white.
System On (Gray Lines/White Telltale)
Left Lane Departure — Only Left Lane Detected
When the LaneSense system is on, the LaneSense tell -
tale is solid white when only the left lane marking has
been detected and the system is ready to provide
visual warnings in the instrument cluster display if a
lane departure occurs.
CAUTION!
ParkSense is only a parking aid and it is unable to
recognize every obstacle, including small obstacles.
Parking curbs might be temporarily detected or not
detected at all. Obstacles located above or below the
sensors will not be detected when they are in close
proximity.
The vehicle must be driven slowly when using Park -
Sense in order to be able to stop in time when an
obstacle is detected. It is recommended that the
driver looks over his/her shoulder when using Park -
Sense.
23_LD_OM_EN_USC_t.book Page 98
Page 102 of 292

100STARTING AND OPERATING
When the LaneSense system senses the lane has been
approached and is in a lane departure situation, the
left lane line flashes yellow (on/off). The LaneSense
telltale changes from solid yellow to flashing yellow. At
this time torque is applied to the steering wheel in the
opposite direction of the lane boundary.
For example, if approaching the left side of the lane the
steering wheel will turn to the right.
Lane Approached With Flashing Yellow Line/Flashing Yellow
Telltale
NOTE:
The LaneSense system operates with similar behavior for
a right lane departure.
CHANGING LANESENSE STATUS
The LaneSense system has settings to adjust the intensity
of the torque warning and the warning zone sensitivity
(early/med/late) that you can configure through the
Uconnect system
Úpage 112.
NOTE:
When enabled the system operates above 37 mph
(60 km/h) and below 112 mph (180 km/h).
The warnings are disabled with the use of the turn
signal.
The system will not apply torque to the steering wheel
whenever a safety system engages (Anti-Lock Brakes,
Traction Control System, Electronic Stability Control,
Forward Collision Warning, etc.).
PARKVIEW REAR BACK UP CAMERA
The ParkView Rear Back Up Camera allows you to see an
on-screen image of the rear surroundings of your vehicle
whenever the gear selector is put into REVERSE. The
image will be displayed on the Navigation/Multimedia
radio display screen along with a caution note to “Check
Entire Surroundings” across the top of the screen. After
five seconds this note will disappear. The ParkView Rear
Back Up Camera is located on the rear of the vehicle
above the rear license plate.
NOTE:
The ParkView Rear Back Up Camera has programmable
modes of operation that may be selected through the
Uconnect system
Úpage 112.
When the vehicle is shifted out of REVERSE with camera
delay turned off, the rear camera mode is exited and the
previous screen appears. When the vehicle is shifted out
of REVERSE with camera delay turned on, the camera
image will continue to be displayed for up to 10 seconds
unless the following conditions occur: The vehicle speed exceeds 8 mph (13 km/h), the vehicle
is shifted into PARK, the vehicle’s ignition is placed in the
OFF position, or the touchscreen X button is pressed.
When manually activated, a counter will be initiated after
the vehicle speed is above 8 mph (13 km/h). The rear
view camera image will turn off when this counter reaches
10 seconds. The counter will be reset when the vehicle
speed is 8 mph (13 km/h) or below. If the vehicle speed
remains below 8 mph (13 km/h), the rear view camera
image will continue to be displayed until the transmission
is shifted into PARK, the vehicle’s ignition is placed in the
OFF position, or the touchscreen X button is pressed.
When enabled, active guidelines are overlaid on the image
to illustrate the width of the vehicle and its projected
backup path based on the steering wheel position.
Different colored zones indicate the distance to the rear of
the vehicle. The following table shows the approximate
distances for each zone:
Zone
Distance To The Rear Of The
Vehicle
Red 0 - 1 ft (0 - 30 cm)
Yellow 1 ft - 6.5 ft (30 cm - 2 m)
Green 6.5 ft or greater (2 m or
greater)
23_LD_OM_EN_USC_t.book Page 100
Page 109 of 292
STARTING AND OPERATING107
Towing Requirements — Tires
Do not attempt to tow a trailer while using a compact
spare tire.
Do not drive more than 50 mph (80 km/h) when towing
while using a full size spare tire.
Proper tire inflation pressures are essential to the safe
and satisfactory operation of your vehicle.
Check the trailer tires for proper tire inflation pressures
before trailer usage.
Check for signs of tire wear or visible tire damage
before towing a trailer. For the proper inspection proce -
dure.
Replacing tires with a higher load carrying capacity will
not increase the vehicle's GVWR and GAWR limits.
For further information
Úpage 248.
Towing Requirements — Trailer Brakes
Do not interconnect the hydraulic brake system or
vacuum system of your vehicle with that of the trailer.
This could cause inadequate braking and possible
personal injury.
An electronically actuated trailer brake controller is
required when towing a trailer with electronically actu -
ated brakes. When towing a trailer equipped with a
hydraulic surge actuated brake system, an electronic
brake controller is not required.
Trailer brakes are recommended for trailers over
1,000 lb (453 kg) and required for trailers in excess of
2,000 lb (907 kg).
Towing Requirements — Trailer Lights And
Wiring
Whenever you pull a trailer, regardless of the trailer size,
stoplights and turn signals on the trailer are required for
motoring safety.
The Trailer Tow Package may include a four- and seven-pin
wiring harness. Use a factory approved trailer harness and
connector.
NOTE:Do not cut or splice wiring into the vehicle’s wiring
harness.
CAUTION!
Do not tow a trailer at all during the first 500 miles
(805 km) the new vehicle is driven. The engine, axle
or other parts could be damaged.
Then, during the first 500 miles (805 km) that a
trailer is towed, do not drive over 50 mph (80 km/h)
and do not make starts at full throttle. This helps the
engine and other parts of the vehicle wear in at the
heavier loads.
WARNING!
Do not connect trailer brakes to your vehicle's
hydraulic brake lines. It can overload your brake
system and cause it to fail. You might not have
brakes when you need them and could have an acci -
dent.
Towing any trailer will increase your stopping
distance. When towing, you should allow for addi -
tional space between your vehicle and the vehicle in
front of you. Failure to do so could result in an acci -
dent.
CAUTION!
If the trailer weighs more than 1,000 lb (453 kg)
loaded, it should have its own brakes and they should
be of adequate capacity. Failure to do this could lead to
accelerated brake lining wear, higher brake pedal
effort, and longer stopping distances.
4
23_LD_OM_EN_USC_t.book Page 107
Page 119 of 292
MULTIMEDIA117
Safety/Assistance
When the Safety/Assistance button is selected on the touchscreen, the system displays the options related to the vehicle’s safety settings. These options will differ depending on the
features equipped on the vehicle. The settings may display in list form or within subfolders on the screen. To access a subfolder, select the desired folder; the available options
related to that feature will then display on the screen.
NOTE:Depending on the vehicle’s options, feature settings may vary.
Setting Name Description
Forward Collision Warning SensitivityThis setting will change the distance at which the Forward Collision Warning (FCW) alert
sounds. The “Medium” setting will have the FCW system signal when an object is in view, and the possibility of a collision is detected. The “Near” setting will have the FCW system
signal when the object is closer to the vehicle. The “Far” setting will have the FCW system signal when an object is at a far distance from the vehicle.
Forward Collision Warning This setting will turn the Forward Collision Warning system on or off. The “Off” setting will
deactivate the FCW system. The “Warning Only” setting will provide only an audible chime when a collision is detected. The “Warning + Active Braking” setting will provide an audible chime and apply brake pressure when a collision is detected.
Forward Collision Warning Active Braking This setting will activate Forward Collision Warning Active Braking. The available options
are “On” and “Off”.
ParkSense This setting will change the type of ParkSense alert when a close object is detected and
can provide both an audible chime and a visual display.
Rear ParkSense Volume This setting adjusts the volume of the Rear ParkSense system. The available settings are
“Low”, “Medium”, and “High”.
Blind Spot Alert This setting will change the type of alert provided when an object is detected in a
vehicle’s blind spot. The “Off” setting will turn off Blind Spot Alert. The “Lights” setting will activate the Blind Spot Alert lights on the outside mirrors. The “Lights & Chime” setting will activate both the lights on the outside mirrors and an audible chime.
5
23_LD_OM_EN_USC_t.book Page 117
Page 141 of 292
MULTIMEDIA139
AUX MODE
Overview
Auxiliary Mode (AUX) is entered by inserting an AUX device
using a cable with a 3.5 mm audio jack into the AUX port,
or by pressing the AUX button on the left side of the
touchscreen or under the Source Select button
(if equipped).
To insert an Auxiliary device, gently insert the Auxiliary
device cable into the AUX port. If you insert an Auxiliary
device with the ignition and the radio on, the unit will
switch to AUX Mode and begin to play.
Controlling The Auxiliary Device
Auxiliary Mode (AUX) is entered by inserting an AUX device
using a cable with a 3.5 mm audio jack into the AUX port
or by pressing the AUX button on the left side of the
touchscreen, or under the Source Select button
(if equipped).
NOTE:The radio unit is acting as the amplifier for audio output
from the Auxiliary device. Therefore, if the volume control
on the Auxiliary device is set too low, there will be insuffi -
cient audio signal for the radio unit to play the music on
the device.
Seek Up /Seek Down
In USB Mode, press the Seek Up button on the
touchscreen for the next selection on the USB device.
Press and release the Seek Down button on the
touchscreen to return to the beginning of the current
selection, or to return to the beginning of the previous
selection if the USB device is within the first three seconds
of the current selection. In Bluetooth® Mode, press and release the Seek Up
button on the touchscreen for the next selection on the
Bluetooth® device. Press and release the Seek Down
button on the touchscreen to return to the beginning of
the current selection, or return to the beginning of the
previous selection if the Bluetooth® device is within the
first second of the current selection.
Browse
In USB Mode, press the Browse button on the touchscreen
to display the browse window. In USB Mode, the left side
of the browse window displays a list of ways you can
browse through the contents of the USB device. If
supported by the device, you can browse by Folder, Artist,
Playlist, Album, Song, etc. Press the desired button on the
touchscreen on the left side of the screen. The center of
the browse window shows items and their sub-functions,
which can be scrolled through by pressing the Up and
Down buttons to the right. The TUNE/SCROLL knob can
also be used to scroll.
Media Mode
In USB Mode, press the Media button on the touchscreen
to select the desired audio source: USB.
In Bluetooth® Mode, press the Media button on the
touchscreen to select the desired audio source:
Bluetooth®.
In AUX Mode, press the Media button on the touchscreen
to select the desired audio source: AUX.
Repeat
In USB Mode, press the Repeat button on the touchscreen
to toggle the repeat functionality. The Repeat button on
the touchscreen is highlighted when active. The Radio will
continue to play the current track, repeatedly, as long as
the repeat is active. Press the Repeat button again to
enter Repeat All. The radio will continue to play all the
current tracks, repeatedly, as long as the repeat function
is active. To cancel Repeat, press the Repeat button a
third time.
Shuffle
In USB Mode, press the Shuffle button on the touchscreen
to play the selections on the USB device in random order
to provide an interesting change of pace. Press the Shuffle
button on the touchscreen a second time to turn this
feature off.
Audio
Audio settings can be accessed by pressing the Audio
button Úpage 130.
Info
In USB Mode, press the Info button on the touchscreen to
display the current track information. Press the Info or X
button on the touchscreen a second time to cancel this
feature.
5
23_LD_OM_EN_USC_t.book Page 139
Page 143 of 292

MULTIMEDIA141
The Phone feature is driven through your Bluetooth®
“Hands-Free Profile” mobile phone. Uconnect features
Bluetooth® technology — the global standard that enables
different electronic devices to connect to each other
without wires or a docking station. Ensure you phone is
turned on with Bluetooth® active and has been paired to
the Uconnect system. Up to 10 mobile phones or audio
devices are allowed to be linked to the system. Only one
linked (or paired) mobile phone and one audio device can
be used with the system at a time.
Phone Button
The Phone button on your steering wheel is
used to get into the Phone Mode and make
calls, show recent, incoming or outgoing calls,
view phonebook, etc. When you push the
button you will hear a BEEP. The BEEP is your signal to give
a command.
Voice Command Button
The Voice Command button on your steering
wheel is only used for “barge in” and when you
are already in a call or want to make another
call. The button on your steering wheel is also used to access
the Voice Commands for the Uconnect Voice Command
features if your vehicle is equipped.
Phone Operation
OPERATION
Voice commands can be used to operate the Uconnect
Phone and to navigate its menu structure. Voice
commands are required after most Uconnect Phone
prompts. There are two general methods for how Voice
Command works:
1. Say compound commands like
“Call John Smith mobile”.
2. Say the individual commands and allow the system to guide you to complete the task.
You will be prompted for a specific command and then
guided through the available options.
Prior to giving a voice command, one must wait for the
beep, which follows the “Listen” prompt or another
prompt.
For certain operations, compound commands can be
used. For example, instead of saying “Call” and then
“John Smith” and then “mobile”, the following
compound command can be said:
“Call John Smith mobile.”
For each feature explanation in this section, only the
compound command form of the voice command is
given. You can also break the commands into parts and
say each part of the command when you are asked for
it. For example, you can use the compound command
form voice command “Search for John Smith,” or you
can break the compound command form into two voice
commands: “Search Contacts” and when asked, “John
Smith.” Please remember, the Uconnect Phone works
best when you talk in a normal conversational tone, as
if speaking to someone sitting a few feet/meters away
from you.
NATURAL SPEECH
Your Uconnect Phone Voice system uses a Natural
Language Voice Recognition (VR) engine.
Natural speech allows the user to speak commands in
phrases or complete sentences. The system filters out
certain non-word utterances and sounds such as “ah”
and “eh.” The system handles fill-in words such as
“I would like to”.
The system handles multiple inputs in the same phrase or
sentence such as “make a phone call” and “to Kelly
Smith”. For multiple inputs in the same phrase or
sentence, the system identifies the topic or context and
provides the associated follow-up prompt such as “Who
do you want to call?” in the case where a phone call was
requested but the specific name was not recognized.
The system utilizes continuous dialog. When the system
requires more information from the user, it will ask a
question to which the user can respond without pushing
the Voice Command button on the steering wheel.
WARNING!
ALWAYS drive safely with your hands on the steering
wheel. You have full responsibility and assume all risks
related to the use of the Uconnect features and
applications in this vehicle. Only use Uconnect when it
is safe to do so. Failure to do so may result in an
accident involving serious injury or death.
5
23_LD_OM_EN_USC_t.book Page 141
Page 173 of 292
SAFETY171
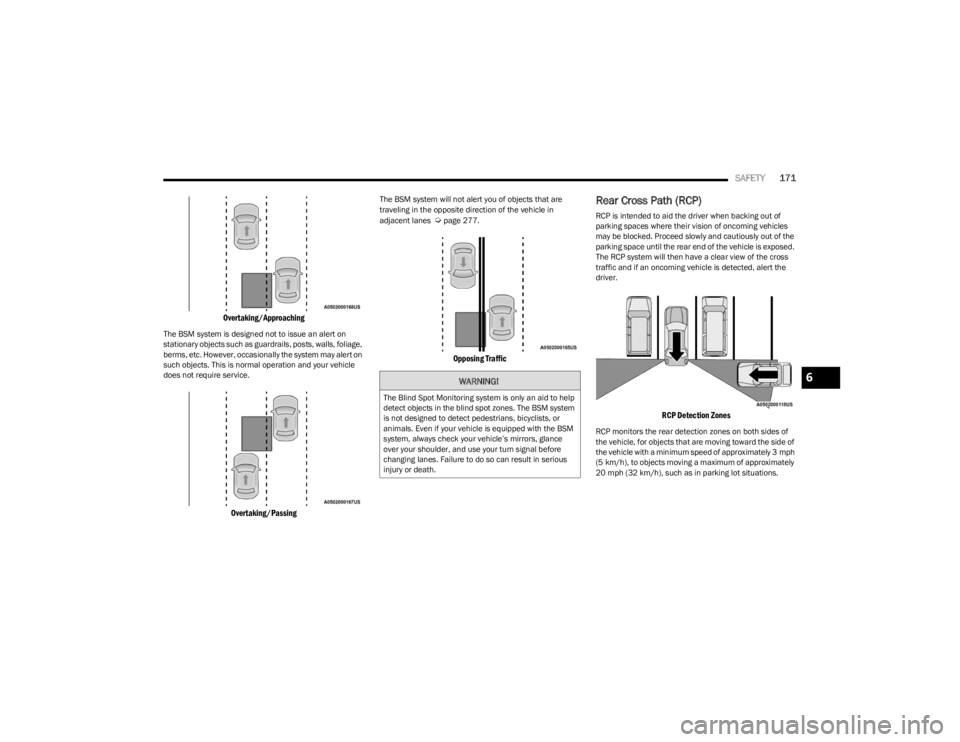
Overtaking/Approaching
The BSM system is designed not to issue an alert on
stationary objects such as guardrails, posts, walls, foliage,
berms, etc. However, occasionally the system may alert on
such objects. This is normal operation and your vehicle
does not require service.
Overtaking/Passing
The BSM system will not alert you of objects that are
traveling in the opposite direction of the vehicle in
adjacent lanes
Úpage 277.
Opposing Traffic
Rear Cross Path (RCP)
RCP is intended to aid the driver when backing out of
parking spaces where their vision of oncoming vehicles
may be blocked. Proceed slowly and cautiously out of the
parking space until the rear end of the vehicle is exposed.
The RCP system will then have a clear view of the cross
traffic and if an oncoming vehicle is detected, alert the
driver.
RCP Detection Zones
RCP monitors the rear detection zones on both sides of
the vehicle, for objects that are moving toward the side of
the vehicle with a minimum speed of approximately 3 mph
(5 km/h), to objects moving a maximum of approximately
20 mph (32 km/h), such as in parking lot situations.
WARNING!
The Blind Spot Monitoring system is only an aid to help
detect objects in the blind spot zones. The BSM system
is not designed to detect pedestrians, bicyclists, or
animals. Even if your vehicle is equipped with the BSM
system, always check your vehicle’s mirrors, glance
over your shoulder, and use your turn signal before
changing lanes. Failure to do so can result in serious
injury or death.
6
23_LD_OM_EN_USC_t.book Page 171