2023 DODGE CHARGER check engine light
[x] Cancel search: check engine lightPage 76 of 292

74GETTING TO KNOW YOUR INSTRUMENT PANEL
Turn Signal Indicator Lights
When the left or right turn signal is activated,
the turn signal indicator will flash
independently and the corresponding exterior
turn signal lamps will flash. Turn signals can be
activated when the multifunction lever is moved down
(left) or up (right).
NOTE:
A continuous chime will sound if the vehicle is driven
more than 1 mile (1.6 km) with either turn signal on.
Check for an inoperative outside light bulb if either indi -
cator flashes at a rapid rate.
WHITE INDICATOR LIGHTS
Adaptive Cruise Control (ACC) Ready
Indicator Light — If Equipped
This light will turn on when ACC has been
turned on, but is not set Úpage 87.
Cruise Control Ready Indicator Light
This indicator light will illuminate when the
cruise control is ready, but not set Úpage 85.
LaneSense Indicator Light — If Equipped
When the LaneSense system is on, but not
armed, the LaneSense indicator light
illuminates solid white. This occurs when only
left, right, or neither lane line has been
detected. If a single lane line is detected, the system is
ready to provide only visual warnings if an unintentional
lane departure occurs on the detected lane line
Úpage 98.
BLUE INDICATOR LIGHTS
High Beam Indicator Light
This indicator light will illuminate to indicate
that the high beam headlights are on. With the
low beams activated, push the multifunction
lever forward (toward the front of the vehicle) to
turn on the high beams. Pull the multifunction lever
rearward (toward the rear of the vehicle) to turn off the
high beams. If the high beams are off, pull the lever toward
you for a temporary high beam on, "flash to pass"
scenario.
ONBOARD DIAGNOSTIC SYSTEM — OBD II
Your vehicle is equipped with a sophisticated Onboard
Diagnostic system called OBD II. This system monitors the
performance of the emissions, engine, and transmission
control systems. When these systems are operating
properly, your vehicle will provide excellent performance
and fuel economy, as well as engine emissions well within
current government regulations.
If any of these systems require service, the OBD II system
will turn on the Malfunction Indicator Light (MIL). It will
also store diagnostic codes and other information to
assist your service technician in making repairs. Although
your vehicle will usually be drivable and not need towing,
see an authorized dealer for service as soon as possible.
CAUTION!
Prolonged driving with the MIL on could cause further
damage to the emission control system. It could also
affect fuel economy and driveability. The vehicle
must be serviced before any emissions tests can be
performed.
If the MIL is flashing while the vehicle is running,
severe catalytic converter damage and power loss
will soon occur. Immediate service is required.
23_LD_OM_EN_USC_t.book Page 74
Page 77 of 292

GETTING TO KNOW YOUR INSTRUMENT PANEL75
ONBOARD DIAGNOSTIC SYSTEM
(OBD II) C
YBERSECURITY
Your vehicle is required to have OBD II and a connection
port to allow access to information related to the
performance of your emissions controls. Authorized
service technicians may need to access this information to
assist with the diagnosis and service of your vehicle and
emissions system
Úpage 111.
EMISSIONS INSPECTION AND
MAINTENANCE PROGRAMS
In some localities, it may be a legal requirement to pass an
inspection of your vehicle's emissions control system.
Failure to pass could prevent vehicle registration.
For states that require an Inspection and
Maintenance (I/M), this check verifies the
Malfunction Indicator Light (MIL) is functioning
and is not on when the engine is running, and
that the OBD II system is ready for testing.
Normally, the OBD II system will be ready. The OBD II
system may not be ready if your vehicle was recently
serviced, recently had a dead battery or a battery
replacement. If the OBD II system should be determined
not ready for the I/M test, your vehicle may fail the test.
Your vehicle has a simple ignition actuated test, which you
can use prior to going to the test station. To check if your
vehicle's OBD II system is ready, you must do the following:
1. Cycle the ignition switch to the ON position, but do not crank or start the engine.
NOTE:If you crank or start the engine, you will have to start this
test over. 2. As soon as you cycle the ignition switch to the ON
position, you will see the Malfunction Indicator Light
(MIL) symbol come on as part of a normal bulb check.
3. Approximately 15 seconds later, one of two things will happen:
The MIL will flash for about 10 seconds and then
return to being fully illuminated until you turn OFF
the ignition or start the engine. This means that
your vehicle's OBD II system is not ready and you
should not proceed to the I/M station.
The MIL will not flash at all and will remain fully illu -
minated until you place the ignition in the off posi -
tion or start the engine. This means that your
vehicle's OBD II system is ready and you can
proceed to the I/M station.
If your OBD II system is not ready, you should see an
authorized dealer or repair facility. If your vehicle was
recently serviced or had a battery failure or replacement,
you may need to do nothing more than drive your vehicle
as you normally would in order for your OBD II system to
update. A recheck with the previously mentioned test
routine may then indicate that the system is now ready.
Regardless of whether your vehicle's OBD II system is
ready or not, if the MIL is illuminated during normal vehicle
operation you should have your vehicle serviced before
going to the I/M station. The I/M station can fail your
vehicle because the MIL is on with the engine running.
WARNING!
ONLY an authorized service technician should
connect equipment to the OBD II connection port in
order to read the VIN, diagnose, or service your
vehicle.
If unauthorized equipment is connected to the OBD II
connection port, such as a driver-behavior tracking
device, it may:
Be possible that vehicle systems, including
safety related systems, could be impaired or a
loss of vehicle control could occur that may
result in an accident involving serious injury or
death.
Access, or allow others to access, information
stored in your vehicle systems, including
personal information.
3
23_LD_OM_EN_USC_t.book Page 75
Page 81 of 292
STARTING AND OPERATING79
(Continued)
ENGINE BREAK-IN RECOMMENDATIONS —
3.6L & 5.7L
A long break-in period is not required for the drivetrain
(engine, transmission, clutch, and rear axle) in your new
vehicle.
Drive moderately during the first 300 miles (500 km).
After the initial 60 miles (100 km), speeds up to 50 or
55 mph (80 or 90 km/h) are desirable.
While cruising, brief full-throttle acceleration within the
limits of local traffic laws contributes to a good break-in.
However, wide-open throttle acceleration in low gear can
be detrimental and should be avoided.
The engine oil, transmission fluid, and axle lubricant
installed at the factory is high-quality and
energy-conserving. Oil, fluid, and lubricant changes should
be consistent with anticipated climate and conditions
under which vehicle operations will occur. For the
recommended viscosity and quality grades
Úpage 271.
NOTE:A new engine may consume some oil during its first few
thousand miles (kilometers) of operation. This should be
considered a normal part of the break-in and not inter -
preted as an indication of difficulty. Please check your oil
level with the engine oil indicator often during the break in
period. Add oil as required.
PARKING BRAKE
Before leaving the vehicle, make sure that the parking
brake is fully applied and place the gear selector in the
PARK position.
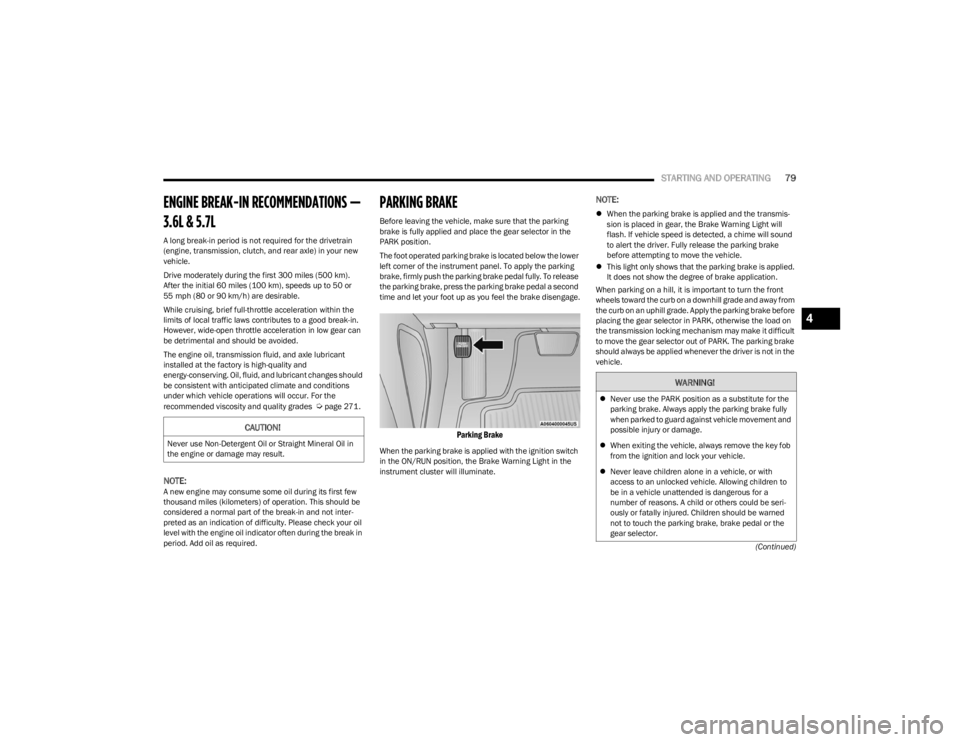
The foot operated parking brake is located below the lower
left corner of the instrument panel. To apply the parking
brake, firmly push the parking brake pedal fully. To release
the parking brake, press the parking brake pedal a second
time and let your foot up as you feel the brake disengage.
Parking Brake
When the parking brake is applied with the ignition switch
in the ON/RUN position, the Brake Warning Light in the
instrument cluster will illuminate.
NOTE:
When the parking brake is applied and the transmis -
sion is placed in gear, the Brake Warning Light will
flash. If vehicle speed is detected, a chime will sound
to alert the driver. Fully release the parking brake
before attempting to move the vehicle.
This light only shows that the parking brake is applied.
It does not show the degree of brake application.
When parking on a hill, it is important to turn the front
wheels toward the curb on a downhill grade and away from
the curb on an uphill grade. Apply the parking brake before
placing the gear selector in PARK, otherwise the load on
the transmission locking mechanism may make it difficult
to move the gear selector out of PARK. The parking brake
should always be applied whenever the driver is not in the
vehicle.
CAUTION!
Never use Non-Detergent Oil or Straight Mineral Oil in
the engine or damage may result.
WARNING!
Never use the PARK position as a substitute for the
parking brake. Always apply the parking brake fully
when parked to guard against vehicle movement and
possible injury or damage.
When exiting the vehicle, always remove the key fob
from the ignition and lock your vehicle.
Never leave children alone in a vehicle, or with
access to an unlocked vehicle. Allowing children to
be in a vehicle unattended is dangerous for a
number of reasons. A child or others could be seri -
ously or fatally injured. Children should be warned
not to touch the parking brake, brake pedal or the
gear selector.
4
23_LD_OM_EN_USC_t.book Page 79
Page 82 of 292
80STARTING AND OPERATING
(Continued)
AUTOMATIC TRANSMISSION
You must press and hold the brake pedal while shifting out
of PARK.
When exiting the vehicle, always make sure the
keyless ignition node is in the OFF position, remove
the key fob from the vehicle and lock the vehicle.
Do not leave the key fob in or near the vehicle or in a
location accessible to children, and do not leave the
ignition of a vehicle equipped with Keyless Enter ’n
Go™ in the ACC or ON/RUN position. A child could
operate power windows, other controls, or move the
vehicle.
Be sure the parking brake is fully disengaged before
driving; failure to do so can lead to brake failure and
a collision.
Always fully apply the parking brake when leaving
your vehicle, or it may roll and cause damage or
injury. Also be certain to leave the transmission in
PARK. Failure to do so may allow the vehicle to roll
and cause damage or injury.
CAUTION!
If the Brake Warning Light remains on with the parking
brake released, a brake system malfunction is
indicated. Have the brake system serviced by an
authorized dealer immediately.
WARNING!
WARNING!
Never use the PARK position as a substitute for the
parking brake. Always apply the parking brake fully
when exiting the vehicle to guard against vehicle
movement and possible injury or damage.
Your vehicle could move and injure you and others if
it is not in PARK. Check by trying to move the trans -
mission gear selector out of PARK with the brake
pedal released. Make sure the transmission is in
PARK before exiting the vehicle.
The transmission may not engage PARK if the vehicle
is moving. Always bring the vehicle to a complete
stop before shifting to PARK, and verify that the
transmission gear position indicator solidly indicates
PARK (P) without blinking. Ensure that the vehicle is
completely stopped, and the PARK position is prop -
erly indicated, before exiting the vehicle.
It is dangerous to shift out of PARK or NEUTRAL if the
engine speed is higher than idle speed. If your foot is
not firmly pressing the brake pedal, the vehicle could
accelerate quickly forward or in reverse. You could
lose control of the vehicle and hit someone or some -
thing. Only shift into gear when the engine is idling
normally and your foot is firmly pressing the brake
pedal.
Unintended movement of a vehicle could injure
those in or near the vehicle. As with all vehicles, you
should never exit a vehicle while the engine is
running. Before exiting a vehicle, always come to a
complete stop, then apply the parking brake, shift
the transmission into PARK, and turn the ignition
OFF. When the ignition is in the OFF position, the
transmission is locked in PARK, securing the vehicle
against unwanted movement.
When exiting the vehicle, always make sure the igni -
tion is in the OFF position, remove the key fob from
the vehicle, and lock the vehicle.
Never leave children alone in a vehicle, or with
access to an unlocked vehicle. Allowing children to
be in a vehicle unattended is dangerous for a
number of reasons. A child or others could be seri -
ously or fatally injured. Children should be warned
not to touch the parking brake, brake pedal or the
transmission gear selector.
Do not leave the key fob in or near the vehicle (or in
a location accessible to children), and do not leave
the ignition in the ACC or ON/RUN position. A child
could operate power windows, other controls, or
move the vehicle.
WARNING!
23_LD_OM_EN_USC_t.book Page 80
Page 109 of 292
STARTING AND OPERATING107
Towing Requirements — Tires
Do not attempt to tow a trailer while using a compact
spare tire.
Do not drive more than 50 mph (80 km/h) when towing
while using a full size spare tire.
Proper tire inflation pressures are essential to the safe
and satisfactory operation of your vehicle.
Check the trailer tires for proper tire inflation pressures
before trailer usage.
Check for signs of tire wear or visible tire damage
before towing a trailer. For the proper inspection proce -
dure.
Replacing tires with a higher load carrying capacity will
not increase the vehicle's GVWR and GAWR limits.
For further information
Úpage 248.
Towing Requirements — Trailer Brakes
Do not interconnect the hydraulic brake system or
vacuum system of your vehicle with that of the trailer.
This could cause inadequate braking and possible
personal injury.
An electronically actuated trailer brake controller is
required when towing a trailer with electronically actu -
ated brakes. When towing a trailer equipped with a
hydraulic surge actuated brake system, an electronic
brake controller is not required.
Trailer brakes are recommended for trailers over
1,000 lb (453 kg) and required for trailers in excess of
2,000 lb (907 kg).
Towing Requirements — Trailer Lights And
Wiring
Whenever you pull a trailer, regardless of the trailer size,
stoplights and turn signals on the trailer are required for
motoring safety.
The Trailer Tow Package may include a four- and seven-pin
wiring harness. Use a factory approved trailer harness and
connector.
NOTE:Do not cut or splice wiring into the vehicle’s wiring
harness.
CAUTION!
Do not tow a trailer at all during the first 500 miles
(805 km) the new vehicle is driven. The engine, axle
or other parts could be damaged.
Then, during the first 500 miles (805 km) that a
trailer is towed, do not drive over 50 mph (80 km/h)
and do not make starts at full throttle. This helps the
engine and other parts of the vehicle wear in at the
heavier loads.
WARNING!
Do not connect trailer brakes to your vehicle's
hydraulic brake lines. It can overload your brake
system and cause it to fail. You might not have
brakes when you need them and could have an acci -
dent.
Towing any trailer will increase your stopping
distance. When towing, you should allow for addi -
tional space between your vehicle and the vehicle in
front of you. Failure to do so could result in an acci -
dent.
CAUTION!
If the trailer weighs more than 1,000 lb (453 kg)
loaded, it should have its own brakes and they should
be of adequate capacity. Failure to do this could lead to
accelerated brake lining wear, higher brake pedal
effort, and longer stopping distances.
4
23_LD_OM_EN_USC_t.book Page 107
Page 112 of 292
110STARTING AND OPERATING
DRIVING THROUGH WATER
Driving through water more than a few inches/
centimeters deep will require extra caution to ensure
safety and prevent damage to your vehicle.
Flowing/Rising Water Shallow Standing Water
Although your vehicle is capable of driving through shallow
standing water, consider the following Warnings and
Cautions before doing so.
WARNING!
Do not drive on or across a road or path where water is
flowing and/or rising (as in storm run-off). Flowing water
can wear away the road or path's surface and cause
your vehicle to sink into deeper water. Furthermore,
flowing and/or rising water can carry your vehicle away
swiftly. Failure to follow this warning may result in
injuries that are serious or fatal to you, your
passengers, and others around you.
WARNING!
Driving through standing water limits your vehicle’s
traction capabilities. Do not exceed 5 mph (8 km/h)
when driving through standing water.
Driving through standing water limits your vehicle’s
braking capabilities, which increases stopping
distances. Therefore, after driving through standing
water, drive slowly and lightly press on the brake
pedal several times to dry the brakes.
Failure to follow these warnings may result in injuries
that are serious or fatal to you, your passengers, and
others around you.
CAUTION!
Always check the depth of the standing water before
driving through it. Never drive through standing
water that is deeper than the bottom of the tire rims
mounted on the vehicle.
Determine the condition of the road or the path that
is under water and if there are any obstacles in the
way before driving through the standing water.
Do not exceed 5 mph (8 km/h) when driving through
standing water. This will minimize wave effects.
Driving through standing water may cause damage
to your vehicle’s drivetrain components. Always
inspect your vehicle’s fluids (i.e., engine oil, transmis -
sion, axle, etc.) for signs of contamination (i.e., fluid
that is milky or foamy in appearance) after driving
through standing water. Do not continue to operate
the vehicle if any fluid appears contaminated, as this
may result in further damage. Such damage is not
covered by the New Vehicle Limited Warranty.
Getting water inside your vehicle’s engine can cause
it to lock up and stall out, and cause serious internal
damage to the engine. Such damage is not covered
by the New Vehicle Limited Warranty.
23_LD_OM_EN_USC_t.book Page 110
Page 186 of 292
184SAFETY
(Continued)
The ORC turns on the Air Bag Warning Light in the
instrument panel for approximately four to eight seconds
for a self-check when the ignition switch is first in the
ON/RUN position. After the self-check, the Air Bag Warning
Light will turn off. If the ORC detects a malfunction in any
part of the system, it turns on the Air Bag Warning Light,
either momentarily or continuously. A single chime will
sound to alert you if the light comes on again after initial
startup.
The ORC also includes diagnostics that will illuminate the
instrument panel Air Bag Warning Light if a malfunction is
detected that could affect the air bag system. The
diagnostics also record the nature of the malfunction.
While the air bag system is designed to be maintenance
free, if any of the following occurs, have an authorized
dealer service the air bag system immediately.
The Air Bag Warning Light does not come on during the
four to eight seconds when the ignition switch is first in
the ON/RUN position.
The Air Bag Warning Light remains on after the four to
eight-second interval.
The Air Bag Warning Light comes on intermittently or
remains on while driving.
NOTE:If the speedometer, tachometer, or any engine related
gauges are not working, the Occupant Restraint Controller
(ORC) may also be disabled. In this condition the air bags
may not be ready to inflate for your protection. Have an
authorized dealer service the air bag system immediately.
Redundant Air Bag Warning Light
If a fault with the Air Bag Warning Light is
detected, which could affect the Supplemental
Restraint System (SRS), the Redundant Air Bag
Warning Light will illuminate on the instrument
panel. The Redundant Air Bag Warning Light will stay on
until the fault is cleared. In addition, a single chime will
sound to alert you that the Redundant Air Bag Warning
Light has come on and a fault has been detected. If the
Redundant Air Bag Warning Light comes on intermittently
or remains on while driving have an authorized dealer
service the vehicle immediately
Úpage 68.
Front Air Bags
This vehicle has front air bags and lap/shoulder belts for
both the driver and front passenger. The front air bags are
a supplement to the seat belt restraint systems. The driver
front air bag is mounted in the center of the steering
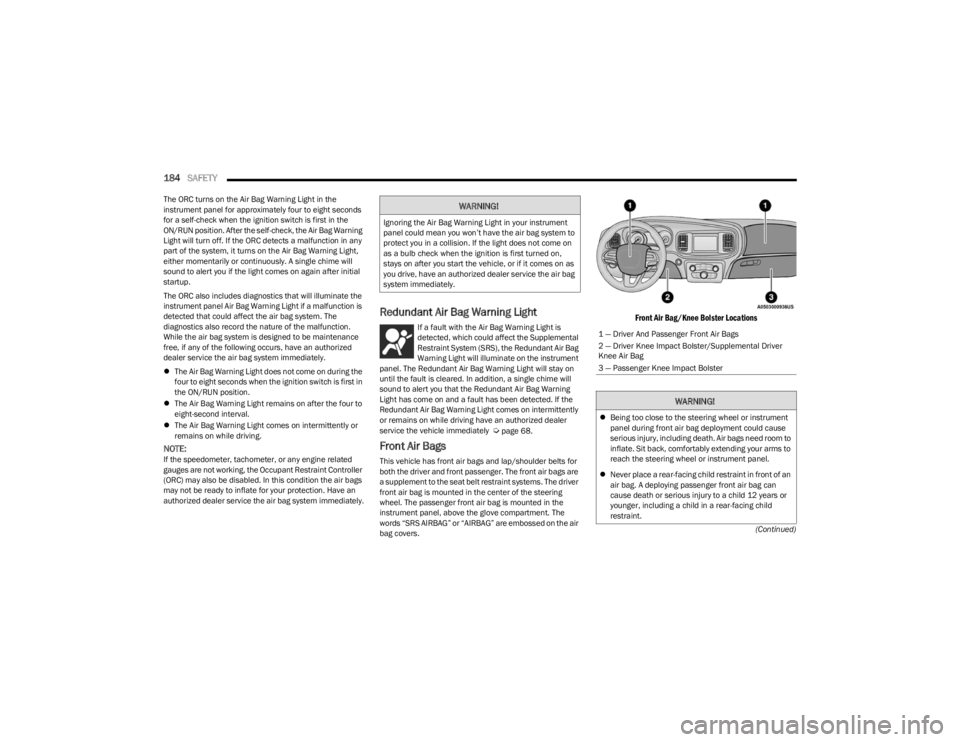
wheel. The passenger front air bag is mounted in the
instrument panel, above the glove compartment. The
words “SRS AIRBAG” or “AIRBAG” are embossed on the air
bag covers.
Front Air Bag/Knee Bolster Locations
WARNING!
Ignoring the Air Bag Warning Light in your instrument
panel could mean you won’t have the air bag system to
protect you in a collision. If the light does not come on
as a bulb check when the ignition is first turned on,
stays on after you start the vehicle, or if it comes on as
you drive, have an authorized dealer service the air bag
system immediately.
1 — Driver And Passenger Front Air Bags
2 — Driver Knee Impact Bolster/Supplemental Driver
Knee Air Bag
3 — Passenger Knee Impact Bolster
WARNING!
Being too close to the steering wheel or instrument
panel during front air bag deployment could cause
serious injury, including death. Air bags need room to
inflate. Sit back, comfortably extending your arms to
reach the steering wheel or instrument panel.
Never place a rear-facing child restraint in front of an
air bag. A deploying passenger front air bag can
cause death or serious injury to a child 12 years or
younger, including a child in a rear-facing child
restraint.
23_LD_OM_EN_USC_t.book Page 184
Page 191 of 292

SAFETY189
(Continued)
Your vehicle may also be designed to perform any of these
other functions in response to the Enhanced Accident
Response System:
Turn off the Fuel Filter Heater, Turn off the HVAC Blower
Motor, Close the HVAC Circulation Door
Cut off battery power to the:
Engine
Electric Motor (if equipped)
Electric power steering
Brake booster
Electric park brake
Automatic transmission gear selector
Horn
Front wiper
NOTE:After an accident, remember to cycle the ignition to the
STOP (OFF/LOCK) position and remove the key from the
ignition switch to avoid draining the battery. Carefully
check the vehicle for fuel leaks in the engine compartment
and on the ground near the engine compartment and fuel
tank before resetting the system and starting the engine.
If there are no fuel leaks or damage to the vehicle elec -
trical devices (e.g. headlights) after an accident, reset the
system by following the procedure described below. If you
have any doubt, contact an authorized dealer.
Enhanced Accident Response System
Reset Procedure
In order to reset the Enhanced Accident Response System
functions after an event, the ignition switch must be
changed from ignition START or ON/RUN to ignition OFF.
Carefully check the vehicle for fuel leaks in the engine
compartment and on the ground near the engine
compartment and fuel tank before resetting the system
and starting the engine.
After an accident, if the vehicle will not start after
performing the reset procedure, the vehicle must be
towed to an authorized dealer to be inspected and to have
the Enhanced Accident Response System reset.
Maintaining Your Air Bag System Event Data Recorder (EDR)
This vehicle is equipped with an event data recorder
(EDR). The main purpose of an EDR is to record, in certain
crash or near crash-like situations, such as an air bag
deployment or hitting a road obstacle, data that will assist
in understanding how a vehicle’s systems performed. The
EDR is designed to record data related to vehicle
dynamics and safety systems for a short period of time,
typically 30 seconds or less. The EDR in this vehicle is
designed to record such data as:
How various systems in your vehicle were operating;
Whether or not the driver and passenger safety belts
were buckled/fastened;
How far (if at all) the driver was depressing the acceler -
ator and/or brake pedal; and,
How fast the vehicle was traveling.WARNING!
Modifications to any part of the air bag system could
cause it to fail when you need it. You could be injured
if the air bag system is not there to protect you. Do
not modify the components or wiring, including
adding any kind of badges or stickers to the steering
wheel hub trim cover or the upper passenger side of
the instrument panel. Do not modify the front fascia/
bumper, vehicle body structure, or add aftermarket
side steps or running boards.
It is dangerous to try to repair any part of the air bag
system yourself. Be sure to tell anyone who works on
your vehicle that it has an air bag system.
Do not attempt to modify any part of your air bag
system. The air bag may inflate accidentally or may
not function properly if modifications are made. Take
your vehicle to an authorized dealer for any air bag
system service. If your seat, including your trim cover
and cushion, needs to be serviced in any way
(including removal or loosening/tightening of seat
attachment bolts), take the vehicle to an authorized
dealer. Only manufacturer approved seat accesso -
ries may be used. If it is necessary to modify the air
bag system for persons with disabilities, contact an
authorized dealer.
WARNING!
6
23_LD_OM_EN_USC_t.book Page 189