2023 DODGE CHARGER light
[x] Cancel search: lightPage 223 of 292

221
SERVICING AND MAINTENANCE
SCHEDULED SERVICING
3.6L AND 5.7L ENGINES
These vehicles are equipped with an automatic oil change
indicator system. The oil change indicator system will
remind you that it is time to take your vehicle in for
scheduled maintenance.
Based on engine operation conditions, the oil change
indicator message will illuminate. This means that service
is required for your vehicle. Operating conditions such as
frequent short-trips, trailer tow, and extremely hot or cold
ambient temperatures will influence when the “Change
Oil” or “Oil Change Required” message is displayed. Have
your vehicle serviced as soon as possible, within the next
500 miles (805 km).The “Oil Change Required” message will be displayed in
the instrument cluster and a single chime will sound,
indicating that an oil change is necessary.
An authorized dealer will reset the oil change indicator
message after completing the scheduled oil change.
If a scheduled oil change is performed by someone other
than an authorized dealer, the message can be reset by
referring to “Instrument Cluster Display”
Úpage 63.
NOTE:Under no circumstances should oil change intervals
exceed 10,000 miles (16,000 km), 12 months or
350 hours of engine run time, whichever comes first.
The 350 hours of engine run or idle time is generally only
a concern for fleet customers.
Once A Month Or Before A Long Trip:
Check engine oil level.
Check windshield washer fluid level.
Check tire pressure and look for unusual wear or
damage. Rotate tires at the first sign of irregular wear,
even if it occurs before your next scheduled service.
Check the fluid levels of the coolant reservoir, brake
master cylinder, and power steering (if equipped) and
fill as needed.
Check function of all interior and exterior lights.
8
23_LD_OM_EN_USC_t.book Page 221
Page 230 of 292
228SERVICING AND MAINTENANCE
MAINTENANCE-FREE BATTERY
Your vehicle is equipped with a maintenance-free battery.
Water will never have to be added, and periodic
maintenance is not required.
NOTE:The battery is stored under an access cover in the trunk.
Remote battery terminals are located in the engine
compartment for jump starting
Úpage 213.
PRESSURE WASHING
Cleaning the engine compartment with a high pressure
washer is not recommended.
VEHICLE MAINTENANCE
An authorized dealer has the qualified service personnel,
special tools, and equipment to perform all service
operations in an expert manner. Service Manuals are available which include detailed
service information for your vehicle. Refer to these Service
Manuals before attempting any procedure yourself.
NOTE:Intentional tampering with emissions control systems may
void your warranty and could result in civil penalties being
assessed against you.
ENGINE OIL
Engine Oil Selection — 3.6L/5.7L Engines
Use only the manufacturer's recommended fluids Úpage 271.
NOTE:Hemi engines at times can tick right after startup and then
quiet down after approximately 30 seconds. This is normal
and will not harm the engine. This characteristic can be
caused by short drive cycles. For example, if the vehicle is
started then shut off after driving a short distance. Upon
restarting, you may experience a ticking sound. Other
causes could be if the vehicle is unused for an extended
period of time, incorrect oil, extended oil changes or
extended idling. If the engine continues to tick or if the
Malfunction Indicator Light (MIL) comes on, see the
nearest authorized dealer.
WARNING!
Battery fluid is a corrosive acid solution and can burn
or even blind you. Do not allow battery fluid to
contact your eyes, skin, or clothing. Do not lean over
a battery when attaching clamps. If acid splashes in
eyes or on skin, flush the area immediately with large
amounts of water
Úpage 213.
Battery gas is flammable and explosive. Keep flame
or sparks away from the battery. Do not use a
booster battery or any other booster source with an
output greater than 12 Volts. Do not allow cable
clamps to touch each other.
Battery posts, terminals, and related accessories
contain lead and lead compounds. Wash hands after
handling.
The battery in this vehicle has a vent hose that
should not be disconnected and should only be
replaced with a battery of the same type (vented).
CAUTION!
It is essential when replacing the cables on the
battery that the positive cable is attached to the posi -
tive post and the negative cable is attached to the
negative post. Battery posts are marked positive (+)
and negative (-) and are identified on the battery
case. Cable clamps should be tight on the terminal
posts and free of corrosion.
If a “fast charger” is used while the battery is in the
vehicle, disconnect both vehicle battery cables
before connecting the charger to the battery. Do not
use a “fast charger” to provide starting voltage.
CAUTION!
Precautions have been taken to safeguard all parts and
connections however, the pressures generated by these
machines is such that complete protection against
water ingress cannot be guaranteed.
WARNING!
You can be badly injured working on or around a motor
vehicle. Only do service work for which you have the
knowledge and the proper equipment. If you have any
doubt about your ability to perform a service job, take
your vehicle to a competent mechanic.
23_LD_OM_EN_USC_t.book Page 228
Page 236 of 292
234SERVICING AND MAINTENANCE
(Continued)
To minimize the possibility of catalytic converter damage:
Do not shut off the engine or interrupt the ignition when
the transmission is in gear and the vehicle is in motion.
Do not try to start the engine by pushing or towing the
vehicle.
Do not idle the engine with any spark plug wires discon -
nected or removed, such as when diagnostic testing, or
for prolonged periods during very rough idle or malfunc -
tioning operating conditions.
NOTE:The vehicle exhaust system may be equipped with an Elec -
tronic Exhaust Valve (EEV) system, if the exhaust system is
replaced with aftermarket products a Malfunction Indi -
cator Light (MIL) will illuminate.
COOLING SYSTEM
Coolant Checks
Check engine coolant (antifreeze) protection every
12 months (before the onset of freezing weather, where
applicable). If the engine coolant is dirty, the system
should be drained, flushed, and refilled with fresh Organic
Additive Technology (OAT) coolant (conforming to
MS.90032) by an authorized dealer. Check the front of the
radiator for any accumulation of bugs, leaves, etc. If dirty,
clean by gently spraying water from a garden hose
vertically down the face of the condenser.
Check the coolant recovery bottle tubing for brittle rubber,
cracking, tears, cuts, and tightness of the connection at
the bottle and radiator. Inspect the entire system for
leaks. DO NOT REMOVE THE COOLANT PRESSURE CAP
WHEN THE COOLING SYSTEM IS HOT.
Cooling System — Drain, Flush And Refill
NOTE:Some vehicles require special tools to add coolant
properly. Failure to fill these systems properly could lead
to severe internal engine damage. If any coolant is needed
to be added to the system please contact an authorized
dealer. If the engine coolant (antifreeze) is dirty or contains visible
sediment, have an authorized dealer clean and flush with
Organic Additive Technology (OAT) coolant (conforming to
MS.90032).
For the proper maintenance intervals
Úpage 221.
Selection Of Coolant
For further information Úpage 271.
NOTE:
Mixing of engine coolant (antifreeze) other than speci-
fied Organic Additive Technology (OAT) engine coolant,
may result in engine damage and may decrease corro -
sion protection. OAT engine coolant is different and
should not be mixed with Hybrid Organic Additive Tech -
nology (HOAT) engine coolant or any “globally compat -
ible” coolant. If a non-OAT engine coolant is introduced
into the cooling system in an emergency, the cooling
system will need to be drained, flushed, and refilled
with fresh OAT coolant (conforming to MS.90032), by
an authorized dealer as soon as possible.
Do not use water alone or alcohol-based engine
coolant products. Do not use additional rust inhibitors
or anti-rust products, as they may not be compatible
with the radiator engine coolant and may plug the radi -
ator.
This vehicle has not been designed for use with
propylene glycol-based engine coolant. Use of
propylene glycol-based engine coolant is not recom -
mended.
WARNING!
You or others can be badly burned by hot engine
coolant (antifreeze) or steam from your radiator. If
you see or hear steam coming from under the hood,
do not open the hood until the radiator has had time
to cool. Never open a cooling system pressure cap
when the radiator or coolant bottle is hot.
Keep hands, tools, clothing, and jewelry away from
the radiator cooling fan when the hood is raised. The
fan starts automatically and may start at any time,
whether the engine is running or not.
When working near the radiator cooling fan, discon -
nect the fan motor lead or turn the ignition to the OFF
position. The fan is temperature controlled and can
start at any time the ignition is in the ON/RUN
position.
WARNING!
23_LD_OM_EN_USC_t.book Page 234
Page 238 of 292
236SERVICING AND MAINTENANCE
(Continued)
The radiator normally remains completely full, so there is
no need to remove the radiator/coolant pressure cap
unless checking for engine coolant freeze point or
replacing coolant. Advise your service attendant of this. As
long as the engine operating temperature is satisfactory,
the coolant bottle need only be checked once a month.
When additional engine coolant is needed to maintain the
proper level, only OAT coolant that meets the
requirements of manufacturer Material Standard
MS.90032 should be added to the coolant bottle.
Do not overfill.
Cooling System Notes
NOTE:When the vehicle is stopped after a few miles/kilometers
of operation, you may observe vapor coming from the front
of the engine compartment. This is normally a result of
moisture from rain, snow, or high humidity accumulating
on the radiator and being vaporized when the thermostat
opens, allowing hot engine coolant (antifreeze) to enter
the radiator.
If an examination of your engine compartment shows no
evidence of radiator or hose leaks, the vehicle may be
safely driven. The vapor will soon dissipate.
Do not overfill the coolant expansion bottle.
Check the coolant freeze point in the radiator and in
the coolant expansion bottle. If engine coolant needs
to be added, the contents of the coolant expansion
bottle must also be protected against freezing.
If frequent engine coolant additions are required, the
cooling system should be pressure tested for leaks.
Maintain engine coolant concentration at a minimum
of 50% OAT coolant (conforming to MS.90032) and
distilled water for proper corrosion protection of your
engine which contains aluminum components.
Make sure that the coolant expansion bottle overflow
hoses are not kinked or obstructed.
Keep the front of the radiator clean. If your vehicle is
equipped with air conditioning, keep the front of the
condenser clean.
Do not change the thermostat for Summer or Winter
operation. If replacement is ever necessary, install
ONLY the correct type thermostat. Other designs may
result in unsatisfactory engine cooling performance,
poor gas mileage, and increased emissions.
BRAKE SYSTEM
In order to ensure brake system performance, all brake
system components should be inspected periodically
Úpage 221.
Fluid Level Check — Brake Master Cylinder
Check the fluid level in the master cylinder immediately if
the Brake System Warning Light indicates system failure.
Check the fluid level in the master cylinder when
performing underhood services.
Clean the top of the master cylinder area before removing
the cap. Add fluid to bring the level up to the top of the
“FULL” mark on the side of the master cylinder reservoir.
Overfilling of fluid is not recommended because it may
cause leaking in the system.
Add enough fluid to bring the level up to the requirements
described on the brake fluid reservoir. With disc brakes,
fluid level can be expected to fall as the brake pads wear.
However, low fluid level may be caused by a leak and a
checkup may be needed.
Use only brake fluid that has been recommended by the
manufacturer, and has been kept in a tightly closed
container to avoid contamination from foreign matter or
moisture.
For further information
Úpage 271.
WARNING!
Riding the brakes can lead to brake failure and possibly
a collision. Driving with your foot resting or riding on the
brake pedal can result in abnormally high brake
temperatures, excessive lining wear, and possible brake
damage. You would not have your full braking capacity
in an emergency.WARNING!
Use only manufacturer's recommended brake fluid Úpage 271. Using the wrong type of brake fluid can
severely damage your brake system and/or impair its
performance. The proper type of brake fluid for your
vehicle is also identified on the original factory
installed hydraulic master cylinder reservoir.
23_LD_OM_EN_USC_t.book Page 236
Page 244 of 292
242SERVICING AND MAINTENANCE
Rear Interior Fuses
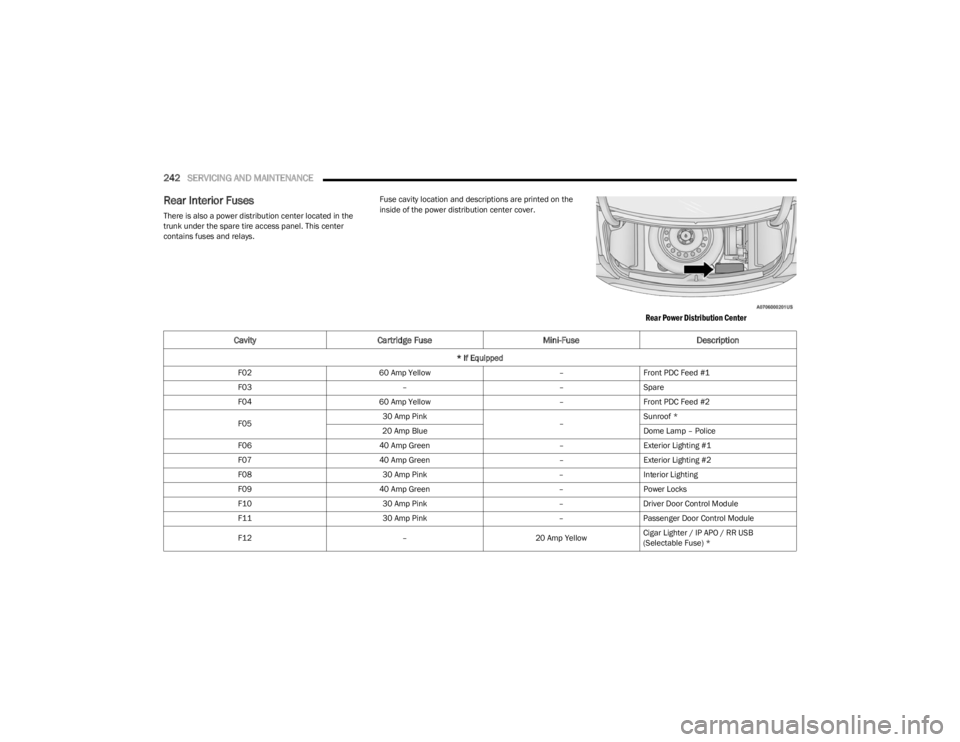
There is also a power distribution center located in the
trunk under the spare tire access panel. This center
contains fuses and relays. Fuse cavity location and descriptions are printed on the
inside of the power distribution center cover.
Rear Power Distribution Center
Cavity
Cartridge Fuse Mini-FuseDescription
* If Equipped
F02 60 Amp Yellow –Front PDC Feed #1
F03 ––Spare
F04 60 Amp Yellow –Front PDC Feed #2
F05 30 Amp Pink
–Sunroof *
20 Amp Blue Dome Lamp – Police
F06 40 Amp Green –Exterior Lighting #1
F07 40 Amp Green –Exterior Lighting #2
F08 30 Amp Pink –Interior Lighting
F09 40 Amp Green –Power Locks
F10 30 Amp Pink –Driver Door Control Module
F11 30 Amp Pink –Passenger Door Control Module
F12 –20 Amp YellowCigar Lighter / IP APO / RR USB
(Selectable Fuse) *
23_LD_OM_EN_USC_t.book Page 242
Page 246 of 292
244SERVICING AND MAINTENANCE
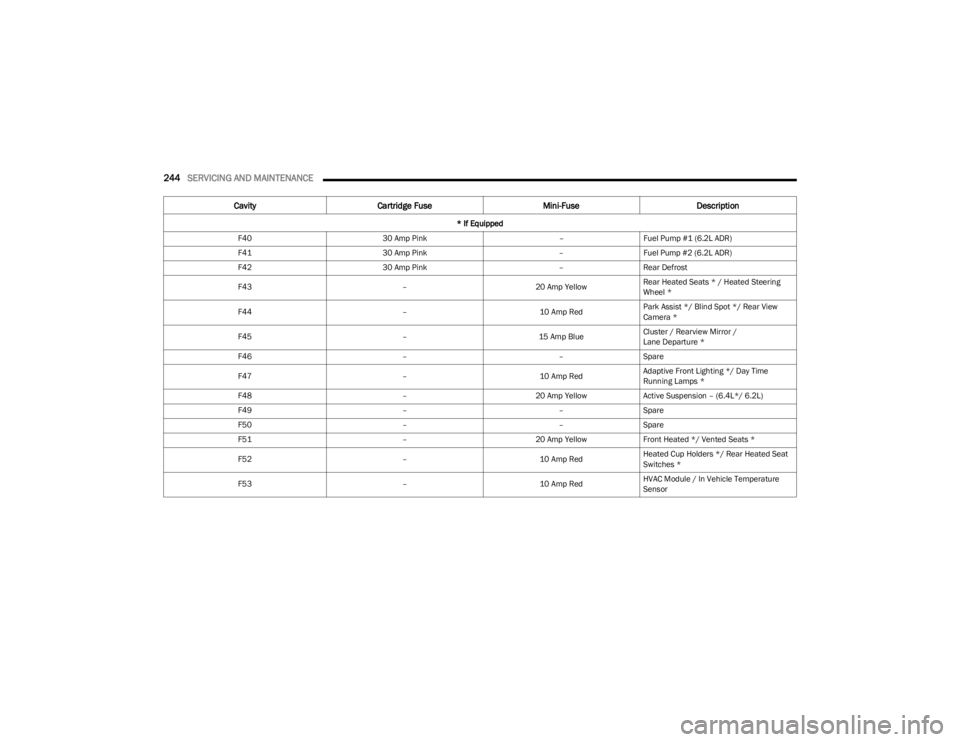
F40 30 Amp Pink –Fuel Pump #1 (6.2L ADR)
F41 30 Amp Pink –Fuel Pump #2 (6.2L ADR)
F42 30 Amp Pink –Rear Defrost
F43 –20 Amp YellowRear Heated Seats * / Heated Steering
Wheel *
F44 –10 Amp RedPark Assist */ Blind Spot */ Rear View
Camera *
F45 –15 Amp BlueCluster / Rearview Mirror /
Lane Departure *
F46 ––Spare
F47 –10 Amp RedAdaptive Front Lighting */ Day Time
Running Lamps *
F48 –20 Amp YellowActive Suspension – (6.4L*/ 6.2L)
F49 ––Spare
F50 ––Spare
F51 –20 Amp YellowFront Heated */ Vented Seats *
F52 –10 Amp RedHeated Cup Holders */ Rear Heated Seat
Switches *
F53 –10 Amp RedHVAC Module / In Vehicle Temperature
Sensor
Cavity
Cartridge Fuse Mini-FuseDescription
* If Equipped
23_LD_OM_EN_USC_t.book Page 244
Page 247 of 292
SERVICING AND MAINTENANCE245
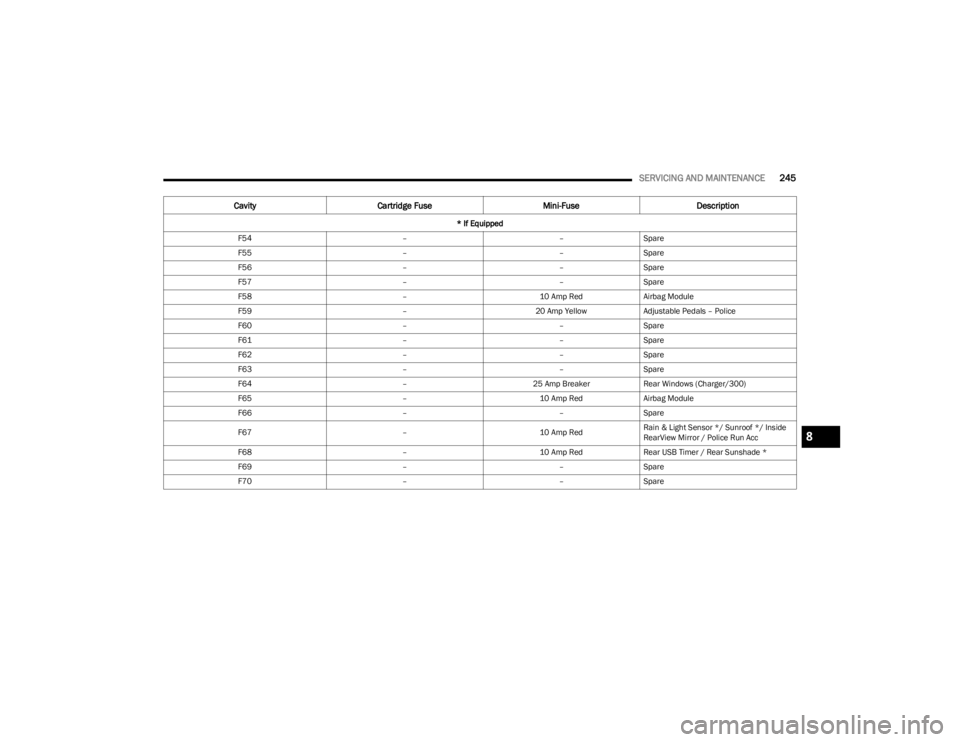
F54 ––Spare
F55 ––Spare
F56 ––Spare
F57 ––Spare
F58 –10 Amp RedAirbag Module
F59 –20 Amp YellowAdjustable Pedals – Police
F60 ––Spare
F61 ––Spare
F62 ––Spare
F63 ––Spare
F64 –25 Amp BreakerRear Windows (Charger/300)
F65 –10 Amp RedAirbag Module
F66 ––Spare
F67 –10 Amp RedRain & Light Sensor */ Sunroof */ Inside
RearView Mirror / Police Run Acc
F68 –10 Amp RedRear USB Timer / Rear Sunshade *
F69 ––Spare
F70 ––Spare
Cavity Cartridge Fuse Mini-FuseDescription
* If Equipped
8
23_LD_OM_EN_USC_t.book Page 245
Page 248 of 292
246SERVICING AND MAINTENANCE
BULB REPLACEMENT
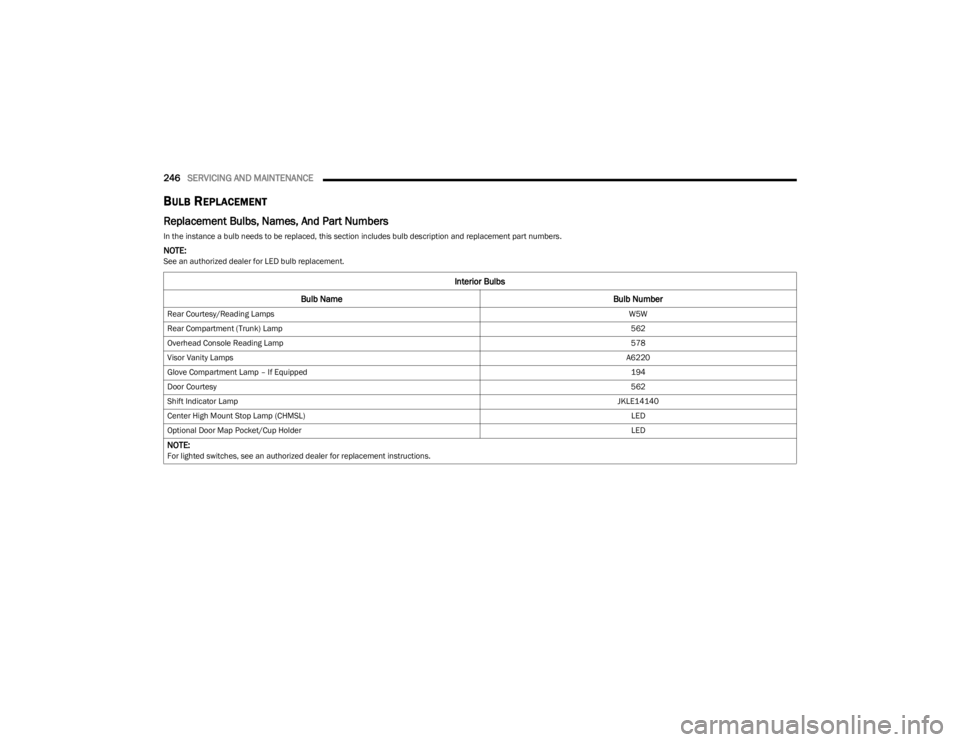
Replacement Bulbs, Names, And Part Numbers
In the instance a bulb needs to be replaced, this section includes bulb description and replacement part numbers.
NOTE:See an authorized dealer for LED bulb replacement.
Interior Bulbs
Bulb Name Bulb Number
Rear Courtesy/Reading Lamps W5W
Rear Compartment (Trunk) Lamp 562
Overhead Console Reading Lamp 578
Visor Vanity Lamps A6220
Glove Compartment Lamp – If Equipped 194
Door Courtesy 562
Shift Indicator Lamp JKLE14140
Center High Mount Stop Lamp (CHMSL) LED
Optional Door Map Pocket/Cup Holder LED
NOTE:For lighted switches, see an authorized dealer for replacement instructions.
23_LD_OM_EN_USC_t.book Page 246