2023 DODGE CHALLENGER lock
[x] Cancel search: lockPage 44 of 300

42GETTING TO KNOW YOUR VEHICLE
FOG LIGHTS — IF EQUIPPED
To activate the front fog lights, turn on the parking lights or
the low beam headlights, and push the fog light button on
the headlight switch.
Fog Light Switch
Fog Light Switch (Vehicles Sold In Canada Only)
The fog lights will operate only when the parking lights are
on or when the vehicle headlights are on low beam. An
indicator light located in the instrument cluster will
illuminate when the fog lights are on. The fog lights will
turn off when the switch is pushed a second time, when
the headlight switch is rotated to the off position, or the
high beam is selected.
TURN SIGNALS
Move the multifunction lever up or down to activate the
turn signals. The arrows on each side of the instrument
cluster flash to show proper operation.
NOTE:
If either light remains on and does not flash, or there is
a very fast flash rate, check for a defective outside light
bulb.
A “Turn Signal On” message will appear in the instru -
ment cluster display and a continuous chime will sound
if the vehicle is driven more than 1 mile (1.6 km) with
either turn signal on.
LANE CHANGE ASSIST — IF EQUIPPED
Lightly push the multifunction lever up or down, without
moving beyond the detent, and the turn signal will flash
three times then automatically turn off.
INTERIOR LIGHTS
The interior lights come on when a door is opened.
To protect the battery, the interior lights will turn off
automatically 10 minutes after the ignition is placed in the
OFF position. This will occur if the interior lights were
turned on manually, or are on because a door is open. The battery protection also includes the glove
compartment light and the trunk light (if equipped).
To restore interior light operation after automatic battery
protection is enabled (lights off), either place the ignition
in the ON/RUN position or cycle the light switch.
FRONT MAP/READING LIGHTS
These lights are mounted between the sun visors on the
overhead console. Each light is turned on by pushing the
lens. Push the lens a second time to turn off the light.
These lights also turn on when a door is opened, when the
unlock button on the remote keyless entry key fob is
pushed, or when the dimmer control is turned fully
upward, to the second detent.
Map/Reading Lights
AMBIENT LIGHT — IF EQUIPPED
The overhead console is equipped with an ambient light
feature. This light casts illumination for improved visibility
of the floor and center console area.
23_LA_OM_EN_USC_t.book Page 42
Page 45 of 300

GETTING TO KNOW YOUR VEHICLE43
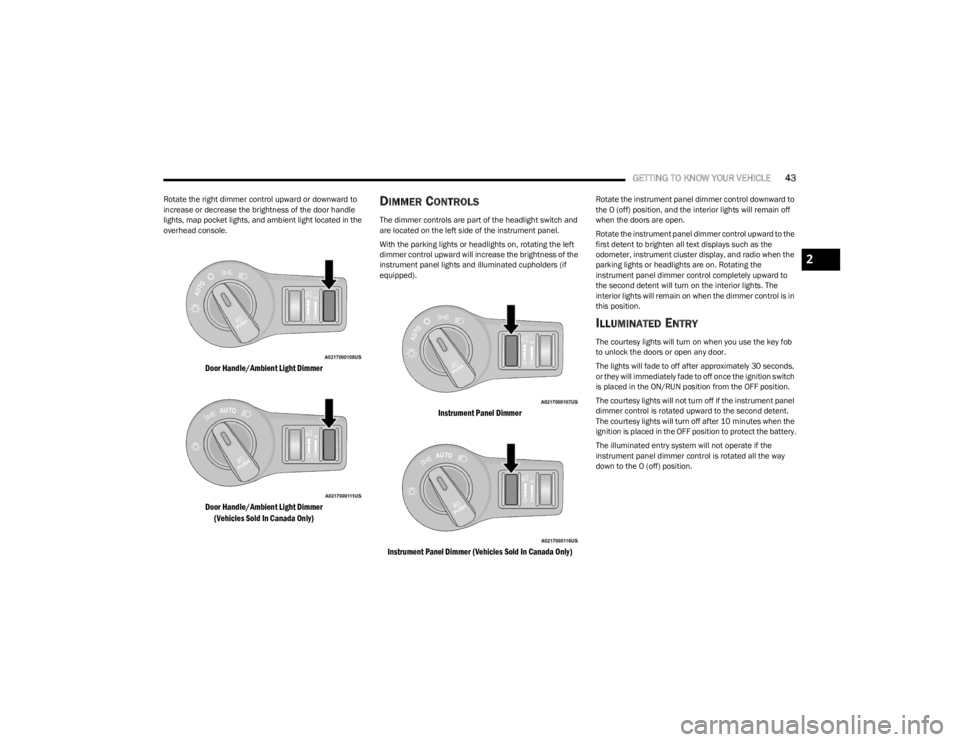
Rotate the right dimmer control upward or downward to
increase or decrease the brightness of the door handle
lights, map pocket lights, and ambient light located in the
overhead console.
Door Handle/Ambient Light Dimmer
Door Handle/Ambient Light Dimmer
(Vehicles Sold In Canada Only)
DIMMER CONTROLS
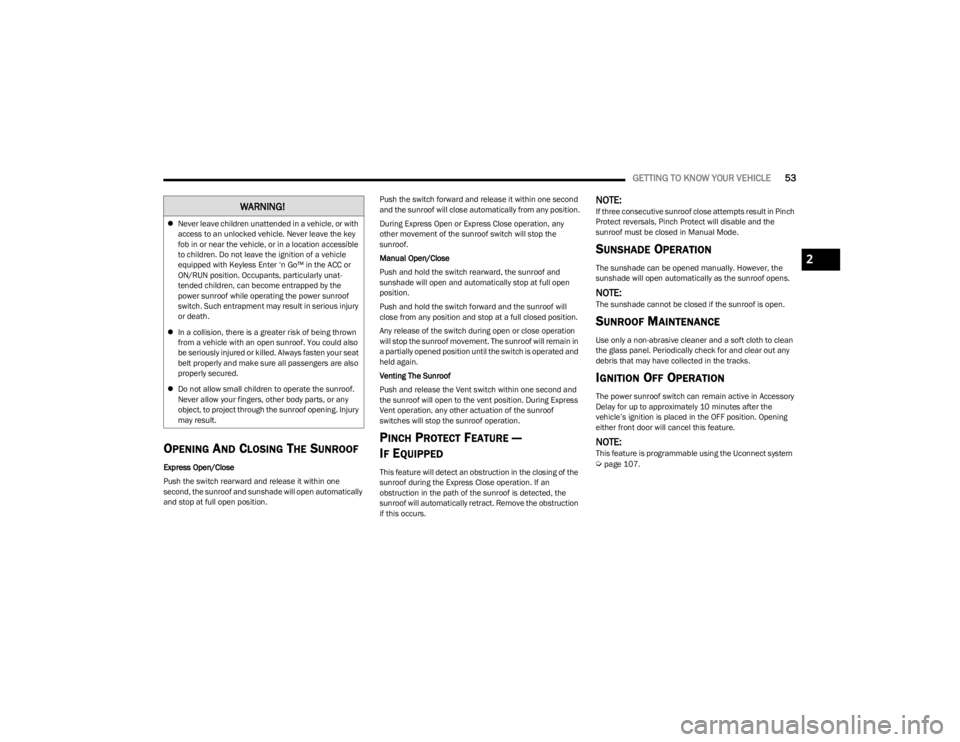
The dimmer controls are part of the headlight switch and
are located on the left side of the instrument panel.
With the parking lights or headlights on, rotating the left
dimmer control upward will increase the brightness of the
instrument panel lights and illuminated cupholders (if
equipped).
Instrument Panel Dimmer
Instrument Panel Dimmer (Vehicles Sold In Canada Only)
Rotate the instrument panel dimmer control downward to
the O (off) position, and the interior lights will remain off
when the doors are open.
Rotate the instrument panel dimmer control upward to the
first detent to brighten all text displays such as the
odometer, instrument cluster display, and radio when the
parking lights or headlights are on. Rotating the
instrument panel dimmer control completely upward to
the second detent will turn on the interior lights. The
interior lights will remain on when the dimmer control is in
this position.
ILLUMINATED ENTRY
The courtesy lights will turn on when you use the key fob
to unlock the doors or open any door.
The lights will fade to off after approximately 30 seconds,
or they will immediately fade to off once the ignition switch
is placed in the ON/RUN position from the OFF position.
The courtesy lights will not turn off if the instrument panel
dimmer control is rotated upward to the second detent.
The courtesy lights will turn off after 10 minutes when the
ignition is placed in the OFF position to protect the battery.
The illuminated entry system will not operate if the
instrument panel dimmer control is rotated all the way
down to the O (off) position.
2
23_LA_OM_EN_USC_t.book Page 43
Page 49 of 300

GETTING TO KNOW YOUR VEHICLE47
Driver And Passenger Up And Down
Buttons
These buttons provide the driver and passenger with
independent temperature control.
Push the red button on the faceplate or
touchscreen or press and slide the
temperature bar towards the red arrow button
on the touchscreen for warmer temperature
settings.
Push the blue button on the faceplate or
touchscreen or press and slide the
temperature bar towards the blue arrow on the
touchscreen for cooler temperature settings.
SYNC Button
Press the SYNC button on the touchscreen to
toggle the Sync feature on/off. The SYNC
indicator is illuminated when SYNC is on. SYNC
is used to synchronize the passenger
temperature setting with the driver temperature setting.
Changing the passenger temperature setting while in
SYNC will automatically exit this feature.
NOTE:The SYNC button is only available on the touchscreen.
Blower Control
Blower Control is used to regulate the amount
of air forced through the Climate Control
system. There are seven blower speeds
available. Adjusting the blower will cause automatic mode to switch
to manual operation. The speeds can be selected using
either the blower control knob on the faceplate or the
buttons on the touchscreen.
Faceplate
The blower speed increases as you turn the blower control
knob clockwise from the lowest blower setting. The blower
speed decreases as you turn the blower control knob
counterclockwise.
Touchscreen
Use the small blower icon to reduce the blower setting and
the large blower icon to increase the blower setting.
Blower can also be selected by pressing the blower bar
area between the icons.
Mode Control
Change the airflow distribution mode by
pressing one of the Mode buttons on the
touchscreen. The airflow distribution mode can
be adjusted so air comes from the instrument
panel outlets, floor outlets, defrost outlets and demist
outlets.
Panel Mode
Air comes from the outlets in the instrument
panel. Each of these outlets can be individually
adjusted to direct the flow of air. The air vanes
of the center outlets and outboard outlets can
be moved up and down or side to side to regulate airflow
direction. There is a shut-off wheel located below the air
vanes to shut off or adjust the amount of airflow from
these outlets.
Bi-Level Mode
Air comes from the instrument panel outlets
and floor outlets. A slight amount of air is
directed through the defrost and side window
demister outlets.
NOTE:Bi-Level mode is designed under comfort conditions to
provide cooler air out of the panel outlets and warmer air
from the floor outlets.
Floor Mode
Air comes from the floor outlets. A slight
amount of air is directed through the defrost
and side window demister outlets.
Mix Mode
Air is directed through the floor, defrost, and
side window demister outlets. This setting
works best in cold or snowy conditions that
require extra heat to the windshield. This
setting is good for maintaining comfort while reducing
moisture on the windshield.
Climate Control OFF Button
Press and release this button to turn the
Climate Control ON/OFF.
2
23_LA_OM_EN_USC_t.book Page 47
Page 55 of 300

GETTING TO KNOW YOUR VEHICLE53
OPENING AND CLOSING THE SUNROOF
Express Open/Close
Push the switch rearward and release it within one
second, the sunroof and sunshade will open automatically
and stop at full open position. Push the switch forward and release it within one second
and the sunroof will close automatically from any position.
During Express Open or Express Close operation, any
other movement of the sunroof switch will stop the
sunroof.
Manual Open/Close
Push and hold the switch rearward, the sunroof and
sunshade will open and automatically stop at full open
position.
Push and hold the switch forward and the sunroof will
close from any position and stop at a full closed position.
Any release of the switch during open or close operation
will stop the sunroof movement. The sunroof will remain in
a partially opened position until the switch is operated and
held again.
Venting The Sunroof
Push and release the Vent switch within one second and
the sunroof will open to the vent position. During Express
Vent operation, any other actuation of the sunroof
switches will stop the sunroof operation.
PINCH PROTECT FEATURE —
I
F EQUIPPED
This feature will detect an obstruction in the closing of the
sunroof during the Express Close operation. If an
obstruction in the path of the sunroof is detected, the
sunroof will automatically retract. Remove the obstruction
if this occurs.
NOTE:If three consecutive sunroof close attempts result in Pinch
Protect reversals, Pinch Protect will disable and the
sunroof must be closed in Manual Mode.
SUNSHADE OPERATION
The sunshade can be opened manually. However, the
sunshade will open automatically as the sunroof opens.
NOTE:The sunshade cannot be closed if the sunroof is open.
SUNROOF MAINTENANCE
Use only a non-abrasive cleaner and a soft cloth to clean
the glass panel. Periodically check for and clear out any
debris that may have collected in the tracks.
IGNITION OFF OPERATION
The power sunroof switch can remain active in Accessory
Delay for up to approximately 10 minutes after the
vehicle’s ignition is placed in the OFF position. Opening
either front door will cancel this feature.
NOTE:This feature is programmable using the Uconnect system Úpage 107.
WARNING!
Never leave children unattended in a vehicle, or with
access to an unlocked vehicle. Never leave the key
fob in or near the vehicle, or in a location accessible
to children. Do not leave the ignition of a vehicle
equipped with Keyless Enter ‘n Go™ in the ACC or
ON/RUN position. Occupants, particularly unat -
tended children, can become entrapped by the
power sunroof while operating the power sunroof
switch. Such entrapment may result in serious injury
or death.
In a collision, there is a greater risk of being thrown
from a vehicle with an open sunroof. You could also
be seriously injured or killed. Always fasten your seat
belt properly and make sure all passengers are also
properly secured.
Do not allow small children to operate the sunroof.
Never allow your fingers, other body parts, or any
object, to project through the sunroof opening. Injury
may result.
2
23_LA_OM_EN_USC_t.book Page 53
Page 56 of 300

54GETTING TO KNOW YOUR VEHICLE
HOOD
OPENING THE HOOD
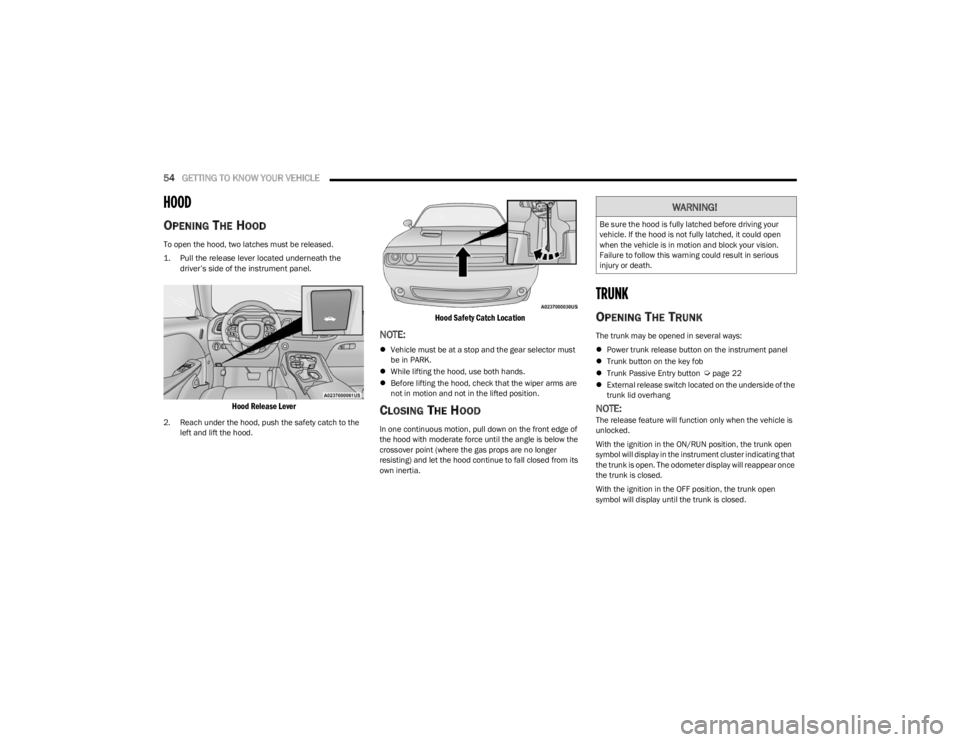
To open the hood, two latches must be released.
1. Pull the release lever located underneath the
driver’s side of the instrument panel.
Hood Release Lever
2. Reach under the hood, push the safety catch to the left and lift the hood.
Hood Safety Catch Location
NOTE:
Vehicle must be at a stop and the gear selector must
be in PARK.
While lifting the hood, use both hands.
Before lifting the hood, check that the wiper arms are
not in motion and not in the lifted position.
CLOSING THE HOOD
In one continuous motion, pull down on the front edge of
the hood with moderate force until the angle is below the
crossover point (where the gas props are no longer
resisting) and let the hood continue to fall closed from its
own inertia.
TRUNK
OPENING THE TRUNK
The trunk may be opened in several ways:
Power trunk release button on the instrument panel
Trunk button on the key fob
Trunk Passive Entry button
Úpage 22
External release switch located on the underside of the
trunk lid overhang
NOTE:The release feature will function only when the vehicle is
unlocked.
With the ignition in the ON/RUN position, the trunk open
symbol will display in the instrument cluster indicating that
the trunk is open. The odometer display will reappear once
the trunk is closed.
With the ignition in the OFF position, the trunk open
symbol will display until the trunk is closed.
WARNING!
Be sure the hood is fully latched before driving your
vehicle. If the hood is not fully latched, it could open
when the vehicle is in motion and block your vision.
Failure to follow this warning could result in serious
injury or death.
23_LA_OM_EN_USC_t.book Page 54
Page 57 of 300

GETTING TO KNOW YOUR VEHICLE55
Power Trunk Release Button
The trunk can be opened from inside the
vehicle using the power trunk release button
located on the instrument panel to the left of
the steering wheel.
NOTE:The automatic transmission must be in PARK before the
button will operate. For manual transmissions, the vehicle
must be in NEUTRAL.
Key Fob Trunk Release ButtonPush the power trunk button on the key fob
twice within five seconds to release the trunk.
Passive Entry Button
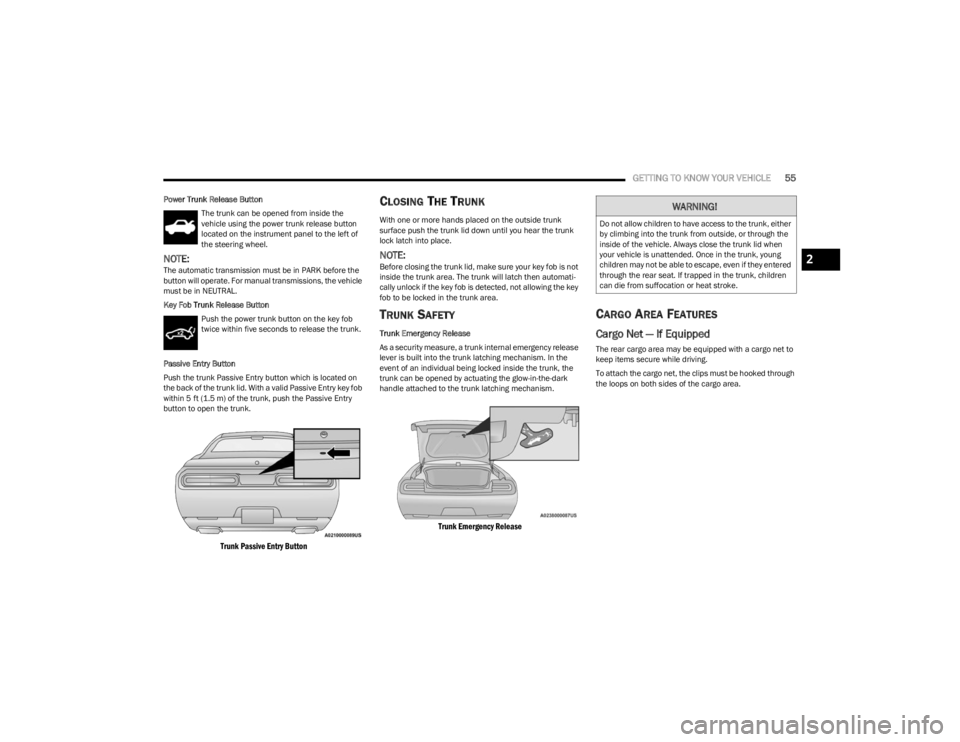
Push the trunk Passive Entry button which is located on
the back of the trunk lid. With a valid Passive Entry key fob
within 5 ft (1.5 m) of the trunk, push the Passive Entry button to open the trunk.
Trunk Passive Entry Button
CLOSING THE TRUNK
With one or more hands placed on the outside trunk
surface push the trunk lid down until you hear the trunk
lock latch into place.
NOTE:Before closing the trunk lid, make sure your key fob is not
inside the trunk area. The trunk will latch then automati -
cally unlock if the key fob is detected, not allowing the key
fob to be locked in the trunk area.
TRUNK SAFETY
Trunk Emergency Release
As a security measure, a trunk internal emergency release
lever is built into the trunk latching mechanism. In the
event of an individual being locked inside the trunk, the
trunk can be opened by actuating the glow-in-the-dark
handle attached to the trunk latching mechanism.
Trunk Emergency Release
CARGO AREA FEATURES
Cargo Net — If Equipped
The rear cargo area may be equipped with a cargo net to
keep items secure while driving.
To attach the cargo net, the clips must be hooked through
the loops on both sides of the cargo area.
WARNING!
Do not allow children to have access to the trunk, either
by climbing into the trunk from outside, or through the
inside of the vehicle. Always close the trunk lid when
your vehicle is unattended. Once in the trunk, young
children may not be able to escape, even if they entered
through the rear seat. If trapped in the trunk, children
can die from suffocation or heat stroke.
2
23_LA_OM_EN_USC_t.book Page 55
Page 66 of 300

64GETTING TO KNOW YOUR INSTRUMENT PANEL
Brake Warning Light
This warning light monitors various brake
functions, including brake fluid level and
parking brake application. If the brake light
turns on it may indicate that the parking brake
is applied, that the brake fluid level is low, or that there is
a problem with the Anti-Lock Brake System reservoir.
If the light remains on when the parking brake has been
disengaged, and the fluid level is at the full mark on the
master cylinder reservoir, it indicates a possible brake
hydraulic system malfunction or that a problem with the
Brake Booster has been detected by the Anti-Lock Brake
System (ABS) / Electronic Stability Control (ESC) system.
In this case, the light will remain on until the condition has
been corrected. If the problem is related to the brake
booster, the ABS pump will run when applying the brake,
and a brake pedal pulsation may be felt during each stop.
The dual brake system provides a reserve braking capacity
in the event of a failure to a portion of the hydraulic
system. A leak in either half of the dual brake system is
indicated by the Brake Warning Light, which will turn on
when the brake fluid level in the master cylinder has
dropped below a specified level.
The light will remain on until the cause is corrected.
NOTE:The light may flash momentarily during sharp cornering
maneuvers, which change fluid level conditions. The
vehicle should have service performed, and the brake
fluid level checked.
If brake failure is indicated, immediate repair is necessary. Vehicles equipped with the Anti-Lock Brake System (ABS)
are also equipped with Electronic Brake Force Distribution
(EBD). In the event of an EBD failure, the Brake Warning
Light will turn on along with the ABS Light. Immediate
repair to the ABS system is required.
Operation of the Brake Warning Light can be checked by
turning the ignition switch from the OFF position to the
ON/RUN position. The light should illuminate for
approximately two seconds. The light should then turn off
unless the parking brake is applied or a brake fault is
detected. If the light does not illuminate, have the light
inspected by an authorized dealer.
The light also will turn on when the parking brake is
applied with the ignition switch in the ON/RUN position.
NOTE:This light shows only that the parking brake is applied. It
does not show the degree of brake application.
Seat Belt Reminder Warning Light
This warning light indicates when the driver or
passenger seat belt is unbuckled. When the
ignition is first placed in the ON/RUN or ACC/
ON/RUN position and if the driver’s seat belt is
unbuckled, a chime will sound and the light will turn on.
When driving, if the driver or front passenger seat belt
remains unbuckled, the Seat Belt Reminder Light will flash
or remain on continuously and a chime will sound
Úpage 172.
Battery Charge Warning Light
This warning light will illuminate when the
battery is not charging properly. If it stays on
while the engine is running, there may be a
malfunction with the charging system. Contact
an authorized dealer as soon as possible.
This indicates a possible problem with the electrical
system or a related component.
Door Open Warning Light
This indicator will illuminate when a door is
ajar/open and not fully closed.
NOTE:If the vehicle is moving, there will also be a single chime.
WARNING!
Driving a vehicle with the red brake light on is
dangerous. Part of the brake system may have failed. It
will take longer to stop the vehicle. You could have a
collision. Have the vehicle checked immediately.
23_LA_OM_EN_USC_t.book Page 64
Page 68 of 300

66GETTING TO KNOW YOUR INSTRUMENT PANEL
Transmission Temperature Warning Light
This warning light will illuminate to warn of a
high transmission fluid temperature. This may
occur with strenuous usage such as trailer
towing. If this light turns on, stop the vehicle
and run the engine at idle or slightly faster, with the
transmission in PARK (P) or NEUTRAL (N), until the light
turns off. Once the light turns off, you may continue to
drive normally.
Vehicle Security Warning Light —
If Equipped
This light will flash at a fast rate for
approximately 15 seconds when the vehicle
security system is arming, and then will flash
slowly until the vehicle is disarmed.
YELLOW WARNING LIGHTS
Service Adaptive Cruise Control (ACC)
Warning Light — If Equipped
This light will turn on when a ACC is not
operating and needs service Úpage 85.
Anti-Lock Brake System (ABS) Warning
Light
This warning light monitors the ABS. The light
will turn on when the ignition is placed in the
ON/RUN or ACC/ON/RUN position and may
stay on for as long as four seconds.
If the ABS light remains on or turns on while driving, then
the Anti-Lock portion of the brake system is not
functioning and service is required as soon as possible.
However, the conventional brake system will continue to
operate normally, assuming the Brake Warning Light is not
also on.
If the ABS light does not turn on when the ignition is placed
in the ON/RUN or ACC/ON/RUN position, have the brake
system inspected by an authorized dealer.
Electronic Stability Control (ESC) Active
Warning Light — If Equipped
This warning light will indicate when the ESC
system is Active. The ESC Indicator Light in the
instrument cluster will come on when the
ignition is placed in the ON/RUN or ACC/ON/
RUN position, and when ESC is activated. It should go out
with the engine running. If the ESC Indicator Light comes on continuously with the
engine running, a malfunction has been detected in the
ESC system. If this warning light remains on after several
ignition cycles, and the vehicle has been driven several
miles (kilometers) at speeds greater than 30 mph
(48 km/h), see an authorized dealer as soon as possible
to have the problem diagnosed and corrected.
The ESC OFF Indicator Light and the ESC Indicator Light
come on momentarily each time the ignition is placed
in the ON/RUN or ACC/ON/RUN position.
The ESC system will make buzzing or clicking sounds
when it is active. This is normal; the sounds will stop
when ESC becomes inactive.
This light will come on when the vehicle is in an ESC
event.
Electronic Stability Control (ESC) OFF
Warning Light — If Equipped
This warning light indicates the ESC is off.
Each time the ignition is turned to ON/RUN or
ACC/ON/RUN, the ESC system will be on, even
if it was turned off previously.
Low Fuel Warning Light
When the fuel level reaches approximately 2
gal (7.5 L), this light will turn on and a chime will
sound. The light will remain on until fuel is
added.
Low Washer Fluid Warning Light
This warning light will illuminate when the
windshield washer fluid is low.
WARNING!
If you continue operating the vehicle when the
Transmission Temperature Warning Light is illuminated
you could cause the fluid to boil over, come in contact
with hot engine or exhaust components and cause a
fire.
CAUTION!
Continuous driving with the Transmission Temperature
Warning Light illuminated will eventually cause severe
transmission damage or transmission failure.
23_LA_OM_EN_USC_t.book Page 66