2023 DODGE CHALLENGER windshield wipers
[x] Cancel search: windshield wipersPage 4 of 300

2
INTRODUCTION
SYMBOLS KEY ....................................................................... 8
VEHICLE MODIFICATIONS/ALTERATIONS ......................... 8
SYMBOL GLOSSARY ............................................................. 9
GETTING TO KNOW YOUR VEHICLE
KEYS .....................................................................................12
Key Fob ........................................................................ 12
SENTRY KEY ........................................................................15
IGNITION SWITCH .............................................................15 Keyless Enter ‘n Go™ Ignition .................................... 15
REMOTE START — IF EQUIPPED ......................................17 How To Use Remote Start .......................................... 17
To Exit Remote Start Mode ........................................ 18
Remote Start Front Defrost Activation —
If Equipped .................................................................. 18
Remote Start Comfort Systems — If Equipped.......... 18
Remote Start Windshield Wiper De-Icer
Activation — If Equipped ............................................. 19
Remote Start Cancel Message — If Equipped........... 19
VEHICLE SECURITY SYSTEM — IF EQUIPPED ..................19 To Arm The System ..................................................... 19
To Disarm The System ................................................ 19
Rearming The System................................................. 20
Security System Manual Override.............................. 20
Tamper Alert ................................................................ 20
DELUXE VEHICLE SECURITY SYSTEM —
IF EQUIPPED ........................................................................20 To Arm The System ..................................................... 20
To Disarm The System ................................................ 20
Security System Manual Override.............................. 21 DOORS ................................................................................. 21
Manual Door Locks......................................................21
Power Door Locks .......................................................22
Keyless Enter ‘n Go™ —
Passive Entry................................................................ 22
Automatic Door Locks — If Equipped ......................... 24
Automatic Unlock Doors On Exit ................................. 24
STEERING WHEEL............................................................... 24 Manual Tilt/Telescoping Steering Column —
If Equipped ................................................................... 24
Power Tilt/Telescoping Steering Column —
If Equipped ................................................................... 25
Heated Steering Wheel — If Equipped........................ 25
UCONNECT VOICE RECOGNITION .................................... 26 Introducing Voice Recognition .................................... 26
Basic Voice Commands............................................... 26
Get Started ................................................................... 26
Additional Information................................................. 27
DRIVER MEMORY SETTINGS — IF EQUIPPED ................. 27 Programming The Memory Feature............................ 28
Linking And Unlinking The Key Fob To Memory......... 28
Memory Position Recall............................................... 28
SEATS ................................................................................... 28 Manual Adjustment
(Front Seats) — If Equipped......................................... 29
Manual Adjustment (Rear Seats) ............................... 30
Power Adjustment (Front Seats) — If Equipped ......... 30
Heated Seats — If Equipped ....................................... 31
Front Ventilated Seats — If Equipped ......................... 32
Vehicles Without Passenger Seating Installed .......... 32
Passenger Seat Easy Entry ......................................... 33
Head Restraints ........................................................... 34 MIRRORS ............................................................................ 35
Inside Rearview Mirror ................................................ 35
Illuminated Vanity Mirrors .......................................... 35
Outside Mirrors ............................................................ 35
Power Mirrors .............................................................. 36
Heated Mirrors — If Equipped ..................................... 36
UNIVERSAL GARAGE DOOR OPENER
(HOMELINK®) .................................................................... 36 Before You Begin Programming HomeLink® ............ 36
Erasing All The HomeLink® Channels ....................... 37
Identifying Whether You Have A Rolling Code
Or Non-Rolling Code Device........................................ 37
Programming HomeLink® To A Garage Door
Opener ......................................................................... 37
Programming HomeLink® To A Miscellaneous
Device .......................................................................... 38
Reprogramming A Single HomeLink® Button ........... 38
Canadian/Gate Operator Programming .................... 38
Security ........................................................................ 39
Troubleshooting Tips ................................................... 39
EXTERIOR LIGHTS .............................................................. 39 Headlight Switch.......................................................... 39
Multifunction Lever ..................................................... 40
Daytime Running Lights (DRLs) — If Equipped .......... 40
High/Low Beam Switch .............................................. 40
Automatic High Beam Headlamp Control —
If Equipped................................................................... 40
Flash-To-Pass............................................................... 41
Automatic Headlights ................................................. 41
Parking Lights ............................................................. 41
Automatic Headlights With Wipers............................. 41
23_LA_OM_EN_USC_t.book Page 2
Page 5 of 300

3
Headlight Time Delay ................................................. 41
Lights-On Reminder ................................................... 41
Fog Lights — If Equipped ............................................ 42
Turn Signals .............................................................. 42
Lane Change Assist — If Equipped............................. 42
INTERIOR LIGHTS ...............................................................42 Front Map/Reading Lights ........................................ 42
Ambient Light — If Equipped ...................................... 42
Dimmer Controls ........................................................ 43
Illuminated Entry ........................................................ 43
WINDSHIELD WIPERS AND WASHERS ........................... 44 Windshield Wiper Operation....................................... 44
Rain Sensing Wipers — If Equipped ........................... 45
CLIMATE CONTROLS ..........................................................45 Automatic Climate Control Descriptions
And Functions ............................................................. 45
Automatic Temperature Control (ATC) ...................... 48
Climate Voice Commands .......................................... 48
Operating Tips ............................................................ 48
INTERIOR STORAGE AND EQUIPMENT ............................49 Storage ........................................................................ 49
Illuminated Cupholders — If Equipped....................... 50
USB/AUX Control ......................................................... 50
Electrical Power Outlets.............................................. 50
WINDOWS ............................................................................52 Power Window Controls .............................................. 52
Wind Buffeting............................................................. 52
POWER SUNROOF — IF EQUIPPED ...................................52 Opening And Closing The Sunroof ............................. 53
Pinch Protect Feature — If Equipped ......................... 53
Sunshade Operation ................................................... 53
Sunroof Maintenance ................................................. 53
Ignition Off Operation.................................................. 53 HOOD.................................................................................... 54
Opening The Hood .......................................................54
Closing The Hood ......................................................... 54
TRUNK .................................................................................. 54 Opening The Trunk ......................................................54
Closing The Trunk ........................................................ 55
Trunk Safety ................................................................ 55
Cargo Area Features.................................................... 55
GETTING TO KNOW YOUR
INSTRUMENT PANEL
INSTRUMENT CLUSTER ..................................................... 56 Instrument Cluster Descriptions ................................. 57
INSTRUMENT CLUSTER DISPLAY ..................................... 57 Location And Controls ................................................. 58
Engine Oil Life Reset ................................................... 59
Performance Shift Indicator (PSI) — If Equipped ....... 59
Instrument Cluster Display Selectable
Menu Items .................................................................. 60
Battery Saver On/Battery Saver
Mode Message — Electrical Load Reduction
Actions — If Equipped .................................................. 62
WARNING LIGHTS AND MESSAGES ................................ 63 Red Warning Lights ..................................................... 63
Yellow Warning Lights ................................................. 66
Yellow Indicator Lights ................................................ 68
Green Indicator Lights ................................................. 68
White Indicator Lights.................................................. 69
Blue Indicator Lights.................................................... 69
ONBOARD DIAGNOSTIC SYSTEM — OBD II ..................... 69 Onboard Diagnostic System (OBD II)
Cybersecurity ...............................................................70
EMISSIONS INSPECTION AND MAINTENANCE
PROGRAMS ........................................................................ 70
STARTING AND OPERATING
STARTING THE ENGINE...................................................... 71 Manual Transmission — If Equipped .......................... 71
Automatic Transmission — If Equipped...................... 71
Normal Starting ........................................................... 71
AutoPark ...................................................................... 72
Extended Park Starting ............................................... 73
If Engine Fails To Start ............................................... 74
Cold Weather Operation
(Below –22°F Or −30°C) .......................................... 74
After Starting................................................................ 74
ENGINE BREAK-IN RECOMMENDATIONS —
3.6L & 5.7L ......................................................................... 74
PARKING BRAKE ................................................................ 74
MANUAL TRANSMISSION — IF EQUIPPED ...................... 76 6-Speed Manual Transmission................................... 76
Shifting ......................................................................... 76
Recommended Shift Speeds ...................................... 77
1–4 Skip Shift ............................................................. 77
Downshifting ................................................................ 77
AUTOMATIC TRANSMISSION —
IF EQUIPPED ...................................................................... 78 Ignition Park Interlock ................................................. 78
Brake Transmission Shift Interlock
(BTSI) System ............................................................. 79
8-Speed Automatic Transmission ............................. 79
SPORT MODE — WITHOUT PERFORMANCE
CONTROL ............................................................................. 83
FUEL SAVER TECHNOLOGY 5.7L — IF EQUIPPED .......... 83
ELECTRIC POWER STEERING ........................................... 83
CRUISE CONTROL SYSTEMS — IF EQUIPPED ................. 84 Cruise Control ............................................................. 84
Adaptive Cruise Control (ACC) .................................... 85
23_LA_OM_EN_USC_t.book Page 3
Page 43 of 300

GETTING TO KNOW YOUR VEHICLE41
If the windshield or Automatic High Beam Headlamp
Control mirror is replaced, the mirror must be re-aimed
to ensure proper performance. See a local authorized
dealer.
FLASH-TO-PASS
You can signal another vehicle with your headlights by
lightly pulling the multifunction lever toward you. This will
cause the high beam headlights to turn on, and remain on,
until the lever is released.
NOTE:If the multifunction lever is held in the flash-to pass
position for more than 20 seconds, the high beams will
shut off.
AUTOMATIC HEADLIGHTS
This system automatically turns the headlights on or off
according to ambient light levels. To turn the system on,
rotate the headlight switch counterclockwise to the AUTO
position.
When the system is on, the Headlight Delay feature is
also on. This means the headlights will stay on for up to
90 seconds after you place the ignition into the OFF
position. To turn the automatic headlights off, turn the
headlight switch out of the AUTO position.
NOTE:The engine must be running before the headlights will
come on in the automatic mode.
PARKING LIGHTS
To turn on the parking lights and instrument panel lights,
rotate the headlight switch clockwise. To turn off the
parking lights, rotate the headlight switch back to the O
(off) position.
NOTE:Vehicles sold in Canada are equipped with a headlight
switch with an AUTO and ON detent but without an OFF
detent. Headlights will be deactivated when the headlight
switch is placed in the parking lights position. However,
the Daytime Running Lights (DRLs) will be activated along
with the front and rear marker lights. The DRLs may be
deactivated when the parking brake is engaged.
AUTOMATIC HEADLIGHTS WITH WIPERS
If your vehicle is equipped with Automatic Headlights, it
also has this customer-programmable feature. When your
headlights are in the automatic mode and the engine is
running, they will automatically turn on when the wiper
system is on. This feature is programmable through the
Uconnect system
Úpage 107.
In addition, the headlights will turn off when the wipers are
turned off if they were turned on by this feature.
HEADLIGHT TIME DELAY
To assist when exiting the vehicle, the headlight delay
feature will leave the headlights on for up to 90 seconds.
This delay is initiated when the ignition is placed in the OFF
position while the headlight switch is on, and then the
headlight switch is cycled off within 45 seconds.
Headlight delay can be canceled by either turning the
headlight switch on then off, or by placing the ignition in
the ON position.
NOTE:
This feature can be programmed through the Uconnect
system Úpage 107.
If you turn the headlights off before the ignition, they
will turn off in the normal manner.
LIGHTS-ON REMINDER
If the headlights or parking lights are on after the ignition
is placed in the OFF position, the vehicle will chime when
the driver's door is opened.
2
23_LA_OM_EN_USC_t.book Page 41
Page 46 of 300
44GETTING TO KNOW YOUR VEHICLE
WINDSHIELD WIPERS AND WASHERS
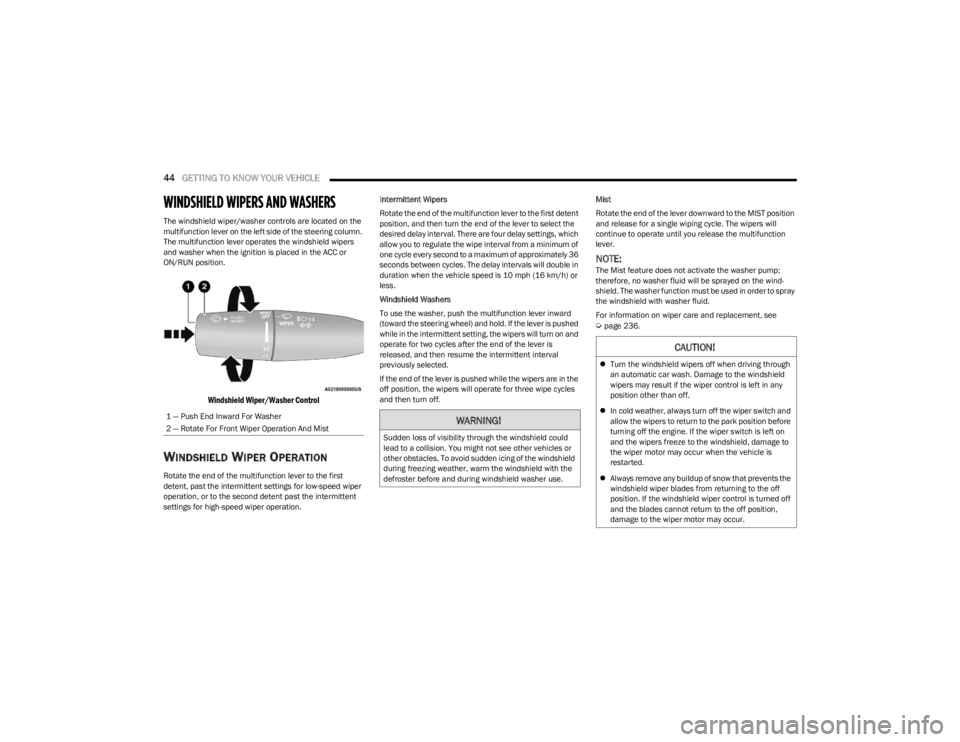
The windshield wiper/washer controls are located on the
multifunction lever on the left side of the steering column.
The multifunction lever operates the windshield wipers
and washer when the ignition is placed in the ACC or
ON/RUN position.
Windshield Wiper/Washer Control
WINDSHIELD WIPER OPERATION
Rotate the end of the multifunction lever to the first
detent, past the intermittent settings for low-speed wiper
operation, or to the second detent past the intermittent
settings for high-speed wiper operation. Intermittent Wipers
Rotate the end of the multifunction lever to the first detent
position, and then turn the end of the lever to select the
desired delay interval. There are four delay settings, which
allow you to regulate the wipe interval from a minimum of
one cycle every second to a maximum of approximately 36
seconds between cycles. The delay intervals will double in
duration when the vehicle speed is 10 mph (16 km/h) or
less.
Windshield Washers
To use the washer, push the multifunction lever inward
(toward the steering wheel) and hold. If the lever is pushed
while in the intermittent setting, the wipers will turn on and
operate for two cycles after the end of the lever is
released, and then resume the intermittent interval
previously selected.
If the end of the lever is pushed while the wipers are in the
off position, the wipers will operate for three wipe cycles
and then turn off.
Mist
Rotate the end of the lever downward to the MIST position
and release for a single wiping cycle. The wipers will
continue to operate until you release the multifunction
lever.
NOTE:The Mist feature does not activate the washer pump;
therefore, no washer fluid will be sprayed on the wind
-
shield. The washer function must be used in order to spray
the windshield with washer fluid.
For information on wiper care and replacement, see
Úpage 236.
1 — Push End Inward For Washer
2 — Rotate For Front Wiper Operation And Mist
WARNING!
Sudden loss of visibility through the windshield could
lead to a collision. You might not see other vehicles or
other obstacles. To avoid sudden icing of the windshield
during freezing weather, warm the windshield with the
defroster before and during windshield washer use.
CAUTION!
Turn the windshield wipers off when driving through
an automatic car wash. Damage to the windshield
wipers may result if the wiper control is left in any
position other than off.
In cold weather, always turn off the wiper switch and
allow the wipers to return to the park position before
turning off the engine. If the wiper switch is left on
and the wipers freeze to the windshield, damage to
the wiper motor may occur when the vehicle is
restarted.
Always remove any buildup of snow that prevents the
windshield wiper blades from returning to the off
position. If the windshield wiper control is turned off
and the blades cannot return to the off position,
damage to the wiper motor may occur.
23_LA_OM_EN_USC_t.book Page 44
Page 47 of 300
GETTING TO KNOW YOUR VEHICLE45
RAIN SENSING WIPERS — IF EQUIPPED
This feature senses rain or snowfall on the windshield and
automatically activates the wipers. Rotate the end of the
multifunction lever to one of four settings to activate this
feature.
The sensitivity of the system can be adjusted with the
multifunction lever. Wiper delay position 1 is the least
sensitive, and wiper delay position 4 is the most sensitive.
Wiper delay position three should be used for normal rain
conditions.
NOTE:
The Rain Sensing feature will not operate when the
wiper switch is in the low or high-speed position.
The Rain Sensing feature may not function properly
when ice, or dried salt water is present on the
windshield.
Use of products containing wax or silicone may reduce
Rain Sensing performance.
The Rain Sensing feature can be turned on and off
using the Uconnect system
Úpage 107.
The Rain Sensing system has protection features for the
wiper blades and arms, and will not operate under the
following conditions:
Low Ambient Temperature — When the ignition is first
placed in the ON position, the Rain Sensing system will
not operate until the wiper switch is moved, vehicle
speed is greater than 0 mph (0 km/h), or the outside
temperature is greater than 32°F (0°C).
Transmission In NEUTRAL Position — When the ignition
is ON, and the transmission is in the NEUTRAL position,
the Rain Sensing system will not operate until the wiper
switch is moved, vehicle speed is greater than 3 mph
(5 km/h), or the gear selector is moved out of the
NEUTRAL position.
Remote Start Mode Inhibit — On vehicles equipped with
the Remote Start system, Rain Sensing wipers are not
operational when the vehicle is in the Remote Start
mode.
CLIMATE CONTROLS
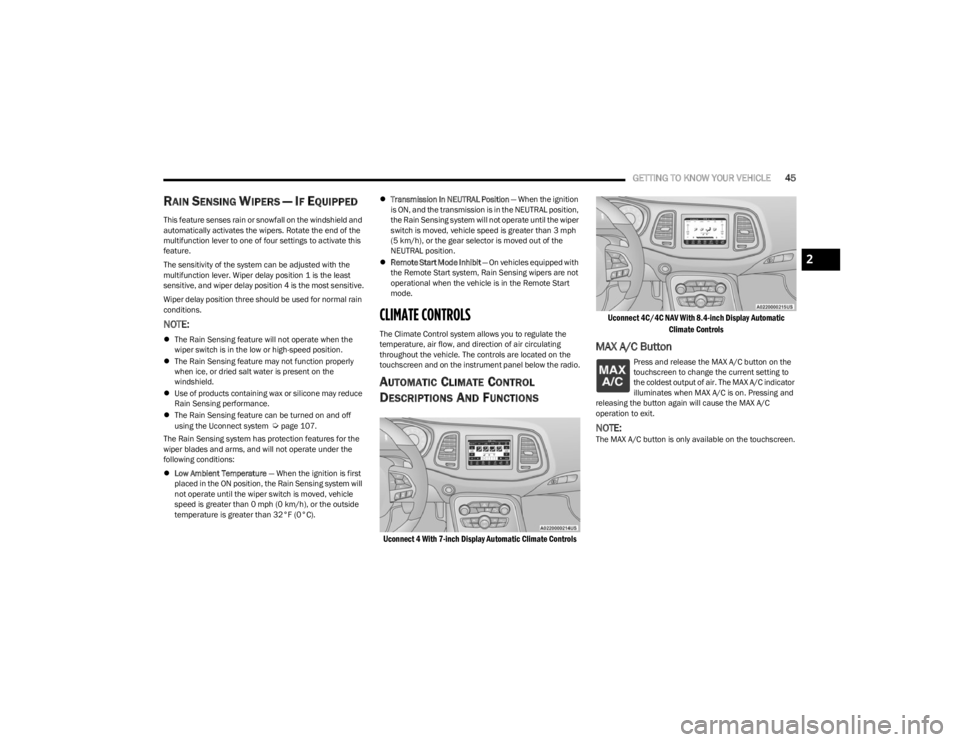
The Climate Control system allows you to regulate the
temperature, air flow, and direction of air circulating
throughout the vehicle. The controls are located on the
touchscreen and on the instrument panel below the radio.
AUTOMATIC CLIMATE CONTROL
D
ESCRIPTIONS AND FUNCTIONS
Uconnect 4 With 7-inch Display Automatic Climate Controls Uconnect 4C/4C NAV With 8.4-inch Display Automatic
Climate Controls
MAX A/C Button
Press and release the MAX A/C button on the
touchscreen to change the current setting to
the coldest output of air. The MAX A/C indicator
illuminates when MAX A/C is on. Pressing and
releasing the button again will cause the MAX A/C
operation to exit.
NOTE:The MAX A/C button is only available on the touchscreen.
2
23_LA_OM_EN_USC_t.book Page 45
Page 165 of 300
SAFETY163
The following conditions must be met in order for HSA to
activate:
The feature must be enabled.
The vehicle must be stopped.
The parking brake must be off.
The driver door must be closed.
The vehicle must be on a sufficient grade.
The gear selection must match vehicle uphill direction
(i.e., vehicle facing uphill is in forward gear; vehicle
backing uphill is in REVERSE gear).
HSA will work in REVERSE gear and all forward gears.
The system will not activate if the transmission is in
PARK or NEUTRAL. For vehicles equipped with a
manual transmission, if the clutch is pressed, HSA will
remain active.Disabling And Enabling HSA
This feature can be turned on or turned off. To change the
current setting, proceed as follows:
If disabling HSA using Uconnect Settings, see
Úpage 107.
Towing With HSA
HSA will also provide assistance to mitigate roll back while
towing a trailer.
Rain Brake Support (RBS)
RBS may improve braking performance in wet conditions.
It will periodically apply a small amount of brake pressure
to remove any water buildup on the front brake rotors. It
functions when the windshield wipers are in LO or HI
speed. When RBS is active, there is no notification to the
driver and no driver interaction is required.
Ready Alert Braking (RAB)
RAB may reduce the time required to reach full braking
during emergency braking situations. It anticipates when
an emergency braking situation may occur by monitoring
how fast the throttle is released by the driver. The
Electronic Brake Controller (EBC) will prepare the brake
system for a panic stop.
Traction Control System (TCS)
The TCS monitors the amount of wheel spin of each of the
driven wheels. If wheel spin is detected, the TCS may apply
brake pressure to the spinning wheel(s) and/or reduce
engine power to provide enhanced acceleration and
stability. A feature of the TCS, Brake Limited Differential
(BLD) functions similarly to a limited slip differential and
controls the wheel spin across a driven axle. If one wheel
on a driven axle is spinning faster than the other, the
system will apply the brake of the spinning wheel. This will
allow more engine power to be applied to the wheel that is
not spinning. BLD may remain enabled even if TCS and
ESC are in reduced modes.WARNING!
There may be situations where the Hill Start Assist
(HSA) will not activate and slight rolling may occur, such
as on minor hills or with a loaded vehicle, or while
pulling a trailer. HSA is not a substitute for active driving
involvement. It is always the driver’s responsibility to be
attentive to distance to other vehicles, people, and
objects, and most importantly brake operation to
ensure safe operation of the vehicle under all road
conditions. Your complete attention is always required
while driving to maintain safe control of your vehicle.
Failure to follow these warnings can result in a collision
or serious personal injury.
WARNING!
If you use a trailer brake controller with your trailer,
the trailer brakes may be activated and deactivated
with the brake switch. If so, there may not be enough
brake pressure to hold both the vehicle and the
trailer on a hill when the brake pedal is released. In
order to avoid rolling down an incline while resuming
acceleration, manually activate the trailer brake or
apply more vehicle brake pressure prior to releasing
the brake pedal.
HSA is not a parking brake. Always apply the parking
brake fully when exiting your vehicle. Also, be certain
to place the transmission in PARK.
Failure to follow these warnings can result in a colli -
sion or serious personal injury.
6
23_LA_OM_EN_USC_t.book Page 163
Page 236 of 300
234SERVICING AND MAINTENANCE
AIR CONDITIONER MAINTENANCE
For best possible performance, your air conditioner should
be checked and serviced by an authorized dealer at the
start of each warm season. This service should include
cleaning of the condenser fins and a performance test.
Drive belt tension should also be checked at this time.
Refrigerant Recovery And Recycling
R-134a — If Equipped
R-134a Air Conditioning Refrigerant is a hydrofluo -
rocarbon (HFC) that is an ozone-friendly substance. The
manufacturer recommends that air conditioning service
be performed by an authorized dealer or other service
facilities using recovery and recycling equipment.
NOTE:Use only manufacturer approved A/C system PAG
compressor oil and refrigerants.
Refrigerant Recovery And Recycling
R-1234yf — If Equipped
R–1234yf Air Conditioning Refrigerant is a hydrofluo -
roolefin (HFO) that is endorsed by the Environmental
Protection Agency and is an ozone-friendly substance with
a low global-warming potential. The manufacturer
recommends that air conditioning service be performed by
an authorized dealer using recovery and recycling
equipment.
NOTE:Use only manufacturer approved A/C system PAG
compressor oil, and refrigerants.
Cabin Air Filter
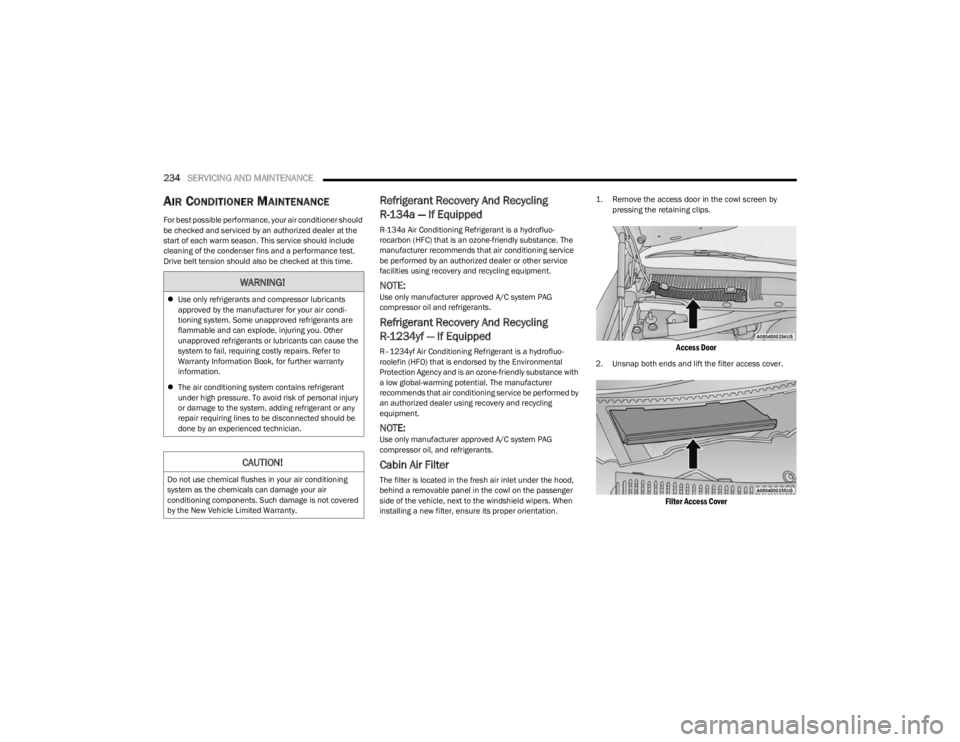
The filter is located in the fresh air inlet under the hood,
behind a removable panel in the cowl on the passenger
side of the vehicle, next to the windshield wipers. When
installing a new filter, ensure its proper orientation.
1. Remove the access door in the cowl screen by
pressing the retaining clips.
Access Door
2. Unsnap both ends and lift the filter access cover.
Filter Access Cover
WARNING!
Use only refrigerants and compressor lubricants
approved by the manufacturer for your air condi -
tioning system. Some unapproved refrigerants are
flammable and can explode, injuring you. Other
unapproved refrigerants or lubricants can cause the
system to fail, requiring costly repairs. Refer to
Warranty Information Book, for further warranty
information.
The air conditioning system contains refrigerant
under high pressure. To avoid risk of personal injury
or damage to the system, adding refrigerant or any
repair requiring lines to be disconnected should be
done by an experienced technician.
CAUTION!
Do not use chemical flushes in your air conditioning
system as the chemicals can damage your air
conditioning components. Such damage is not covered
by the New Vehicle Limited Warranty.
23_LA_OM_EN_USC_t.book Page 234
Page 238 of 300
236SERVICING AND MAINTENANCE
Particular attention should also be given to hood latching
components to ensure proper function. When performing
other underhood services, the hood latch, release
mechanism and safety catch should be cleaned and
lubricated.
The external lock cylinders should be lubricated twice a
year, preferably in the Autumn and Spring. Apply a small
amount of a high quality lubricant, such as Mopar® Lock
Cylinder Lubricant directly into the lock cylinder.
WINDSHIELD WIPER BLADES
Clean the rubber edges of the wiper blades and the
windshield periodically with a sponge or soft cloth and a
mild nonabrasive cleaner. This will remove accumulations
of salt or road film.
Operation of the wipers on dry glass for long periods may
cause deterioration of the wiper blades. Always use
washer fluid when using the wipers to remove salt or dirt
from a dry windshield.
Avoid using the wiper blades to remove frost or ice from
the windshield. Keep the blade rubber out of contact with
petroleum products such as engine oil, gasoline, etc.
NOTE:Life expectancy of wiper blades varies depending on
geographical area and frequency of use. Poor perfor -
mance of blades may be present with chattering, marks,
water lines or wet spots. If any of these conditions are
present, clean the wiper blades or replace as necessary.
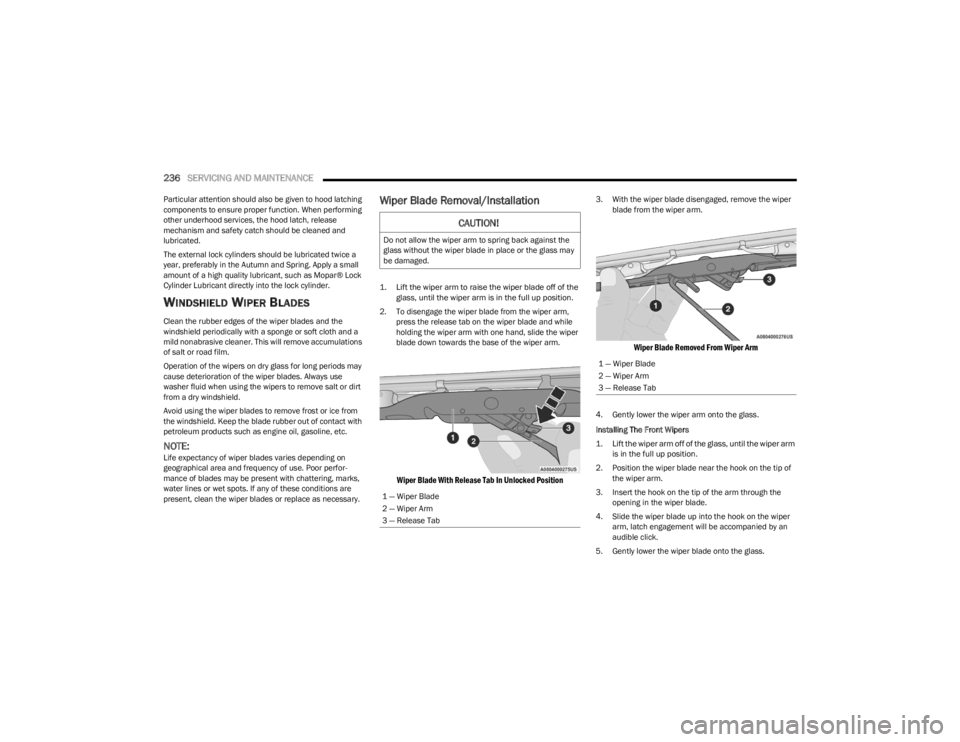
Wiper Blade Removal/Installation
1. Lift the wiper arm to raise the wiper blade off of the glass, until the wiper arm is in the full up position.
2. To disengage the wiper blade from the wiper arm, press the release tab on the wiper blade and while
holding the wiper arm with one hand, slide the wiper
blade down towards the base of the wiper arm.
Wiper Blade With Release Tab In Unlocked Position
3. With the wiper blade disengaged, remove the wiper blade from the wiper arm.
Wiper Blade Removed From Wiper Arm
4. Gently lower the wiper arm onto the glass.
Installing The Front Wipers
1. Lift the wiper arm off of the glass, until the wiper arm is in the full up position.
2. Position the wiper blade near the hook on the tip of the wiper arm.
3. Insert the hook on the tip of the arm through the opening in the wiper blade.
4. Slide the wiper blade up into the hook on the wiper arm, latch engagement will be accompanied by an
audible click.
5. Gently lower the wiper blade onto the glass.
CAUTION!
Do not allow the wiper arm to spring back against the
glass without the wiper blade in place or the glass may
be damaged.
1 — Wiper Blade
2 — Wiper Arm
3 — Release Tab
1 — Wiper Blade
2 — Wiper Arm
3 — Release Tab
23_LA_OM_EN_USC_t.book Page 236