2023 DODGE CHALLENGER oil pressure
[x] Cancel search: oil pressurePage 210 of 300

208IN CASE OF EMERGENCY
Sealing A Tire With Tire Service Kit
Whenever You Stop To Use Tire Service Kit:
1. Pull over to a safe location and turn on the vehicle’s
Hazard Warning Flashers.
2. Verify that the valve stem (on the wheel with the deflated tire) is in a position that is near to the
ground. This will allow the Tire Service Kit Hose to
reach the valve stem and keep the Tire Service Kit flat
on the ground. This will provide the best positioning of
the kit when injecting the sealant into the deflated
tire and running the air pump. Move the vehicle as
necessary to place the valve stem in this position
before proceeding.
3. Place the gear selector in PARK, then push and release the ENGINE START/STOP button to set the
ignition switch to the OFF position.
4. Apply the parking brake.
Setting Up To Use Tire Service Kit:
1. Uncoil the Sealant Hose and then remove the cap from the fitting at the end of the hose.
2. Place the Tire Service Kit flat on the ground next to the deflated tire. 3. Remove the cap from the valve stem and
then screw the fitting at the end of the Sealant
Hose onto the valve stem.
4. Uncoil the Power Plug and insert the plug
into the vehicle’s 12 Volt power outlet.
NOTE:Do not remove foreign objects (e.g., screws or nails) from
the tire.
Injecting Tire Service Kit Sealant Into The Deflated Tire:
5. Always start the vehicle before turning the
Tire Service Kit on.
6. Ensure the Mode Select Knob is to the
Sealant Mode position.
7. After pushing the Power Button, the sealant
(white fluid) will flow from the Sealant Bottle
through the Sealant Hose and into the tire.
NOTE:Sealant may leak out through the puncture in the tire. If the sealant (white fluid) does not flow within
0 – 10 seconds through the Sealant Hose:
1. Push the Power Button to turn the Tire Service Kit
off. Disconnect the Sealant Hose from the valve
stem. Make sure the valve stem is free of debris.
Reconnect the Sealant Hose to the valve stem.
Check that the Mode Select Knob is in the Sealant
Mode position and not Air Mode. Push the Power
Button to turn the Tire Service Kit on.
2. Connect the Power Plug to a different 12 Volt power outlet in your vehicle or another vehicle, if available.
Make sure the vehicle is running before turning the
Tire Service Kit on.
3. The Sealant Bottle may be empty due to previous use. Call for assistance.
If the sealant (white fluid) does flow through the Sealant
Hose: 4. Continue to operate the pump until sealant
is no longer flowing through hose (typically
takes 30 - 70 seconds). As the sealant flows
through the Sealant Hose, the Pressure Gauge
can read as high as 70 psi (4.8 bar). The Pressure Gauge
will decrease quickly from approximately 70 psi (4.8 bar)
to the actual tire pressure when the Sealant Bottle is
empty.
5. The pump will start to inject air into the tire
immediately after the Sealant Bottle is empty.
Continue to operate the pump and inflate the
tire to the cold tire inflation pressure found on
the tire and loading information label located in the
driver-side door opening. Check the tire pressure by
looking at the Pressure Gauge.
23_LA_OM_EN_USC_t.book Page 208
Page 211 of 300
IN CASE OF EMERGENCY209
If the tire does not inflate to at least 26 psi (1.8 bar) within
15 minutes:
The tire is too badly damaged. Do not attempt to drive
the vehicle further. Call for assistance.
If the tire inflates to the recommended pressure or is at
least 26 psi (1.8 bar) within 15 minutes:
NOTE:If the tire becomes overinflated, push the Deflation Button
to reduce the tire pressure to the recommended inflation
pressure before continuing.
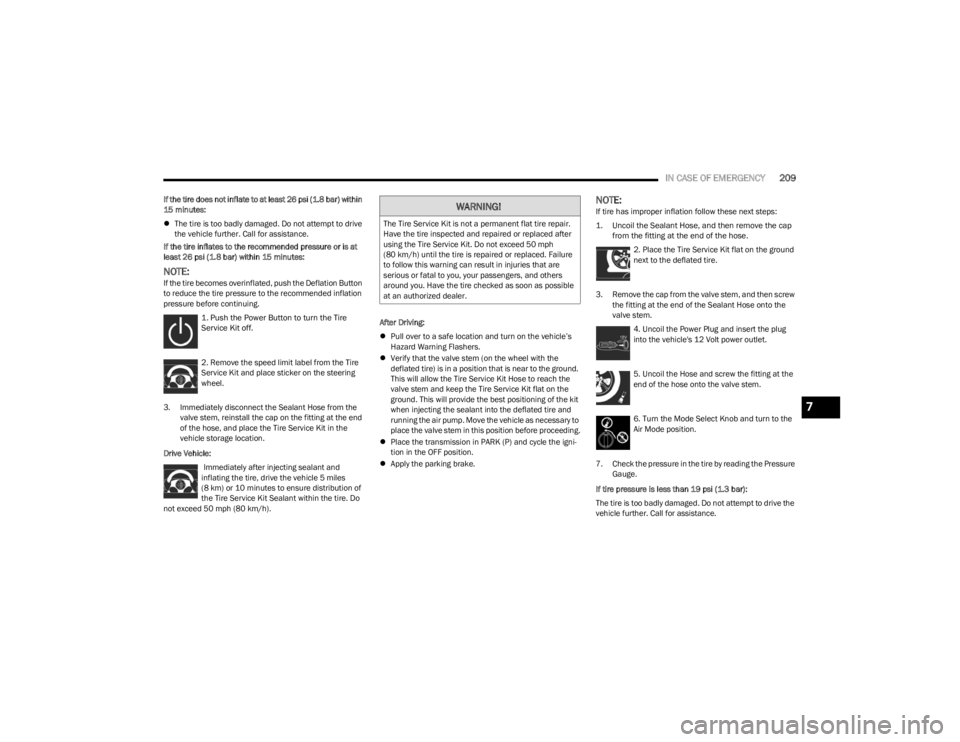
1. Push the Power Button to turn the Tire
Service Kit off.
2. Remove the speed limit label from the Tire
Service Kit and place sticker on the steering
wheel.
3. Immediately disconnect the Sealant Hose from the valve stem, reinstall the cap on the fitting at the end
of the hose, and place the Tire Service Kit in the
vehicle storage location.
Drive Vehicle: Immediately after injecting sealant and
inflating the tire, drive the vehicle 5 miles
(8 km) or 10 minutes to ensure distribution of
the Tire Service Kit Sealant within the tire. Do
not exceed 50 mph (80 km/h). After Driving:
Pull over to a safe location and turn on the vehicle’s
Hazard Warning Flashers.
Verify that the valve stem (on the wheel with the
deflated tire) is in a position that is near to the ground.
This will allow the Tire Service Kit Hose to reach the
valve stem and keep the Tire Service Kit flat on the
ground. This will provide the best positioning of the kit
when injecting the sealant into the deflated tire and
running the air pump. Move the vehicle as necessary to
place the valve stem in this position before proceeding.
Place the transmission in PARK (P) and cycle the igni -
tion in the OFF position.
Apply the parking brake.
NOTE:If tire has improper inflation follow these next steps:
1. Uncoil the Sealant Hose, and then remove the cap
from the fitting at the end of the hose.
2. Place the Tire Service Kit flat on the ground
next to the deflated tire.
3. Remove the cap from the valve stem, and then screw the fitting at the end of the Sealant Hose onto the
valve stem.
4. Uncoil the Power Plug and insert the plug
into the vehicle's 12 Volt power outlet.
5. Uncoil the Hose and screw the fitting at the
end of the hose onto the valve stem.
6. Turn the Mode Select Knob and turn to the
Air Mode position.
7. Check the pressure in the tire by reading the Pressure Gauge.
If tire pressure is less than 19 psi (1.3 bar):
The tire is too badly damaged. Do not attempt to drive the
vehicle further. Call for assistance.WARNING!
The Tire Service Kit is not a permanent flat tire repair.
Have the tire inspected and repaired or replaced after
using the Tire Service Kit. Do not exceed 50 mph
(80 km/h) until the tire is repaired or replaced. Failure
to follow this warning can result in injuries that are
serious or fatal to you, your passengers, and others
around you. Have the tire checked as soon as possible
at an authorized dealer.
7
23_LA_OM_EN_USC_t.book Page 209
Page 216 of 300
214IN CASE OF EMERGENCY
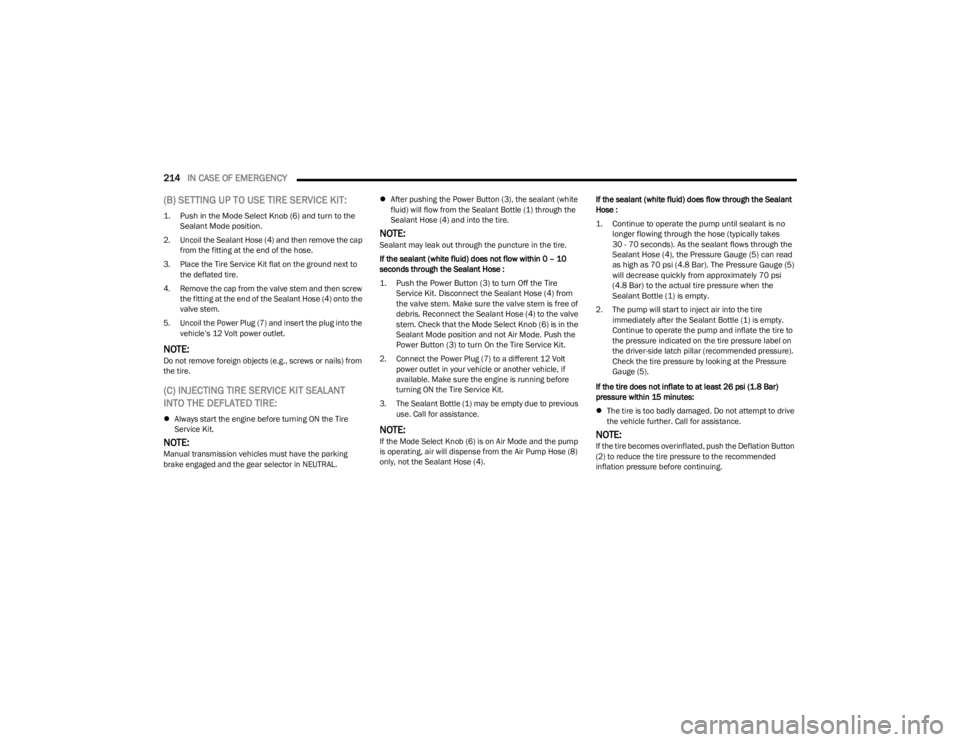
(B) SETTING UP TO USE TIRE SERVICE KIT:
1. Push in the Mode Select Knob (6) and turn to the
Sealant Mode position.
2. Uncoil the Sealant Hose (4) and then remove the cap from the fitting at the end of the hose.
3. Place the Tire Service Kit flat on the ground next to the deflated tire.
4. Remove the cap from the valve stem and then screw the fitting at the end of the Sealant Hose (4) onto the
valve stem.
5. Uncoil the Power Plug (7) and insert the plug into the vehicle’s 12 Volt power outlet.
NOTE:Do not remove foreign objects (e.g., screws or nails) from
the tire.
(C) INJECTING TIRE SERVICE KIT SEALANT
INTO THE DEFLATED TIRE:
Always start the engine before turning ON the Tire
Service Kit.
NOTE:Manual transmission vehicles must have the parking
brake engaged and the gear selector in NEUTRAL.
After pushing the Power Button (3), the sealant (white
fluid) will flow from the Sealant Bottle (1) through the
Sealant Hose (4) and into the tire.
NOTE:Sealant may leak out through the puncture in the tire.
If the sealant (white fluid) does not flow within 0 – 10
seconds through the Sealant Hose :
1. Push the Power Button (3) to turn Off the Tire
Service Kit. Disconnect the Sealant Hose (4) from
the valve stem. Make sure the valve stem is free of
debris. Reconnect the Sealant Hose (4) to the valve
stem. Check that the Mode Select Knob (6) is in the
Sealant Mode position and not Air Mode. Push the
Power Button (3) to turn On the Tire Service Kit.
2. Connect the Power Plug (7) to a different 12 Volt power outlet in your vehicle or another vehicle, if
available. Make sure the engine is running before
turning ON the Tire Service Kit.
3. The Sealant Bottle (1) may be empty due to previous use. Call for assistance.
NOTE:If the Mode Select Knob (6) is on Air Mode and the pump
is operating, air will dispense from the Air Pump Hose (8)
only, not the Sealant Hose (4). If the sealant (white fluid) does flow through the Sealant
Hose :
1. Continue to operate the pump until sealant is no
longer flowing through the hose (typically takes
30 - 70 seconds). As the sealant flows through the
Sealant Hose (4), the Pressure Gauge (5) can read
as high as 70 psi (4.8 Bar). The Pressure Gauge (5)
will decrease quickly from approximately 70 psi
(4.8 Bar) to the actual tire pressure when the
Sealant Bottle (1) is empty.
2. The pump will start to inject air into the tire immediately after the Sealant Bottle (1) is empty.
Continue to operate the pump and inflate the tire to
the pressure indicated on the tire pressure label on
the driver-side latch pillar (recommended pressure).
Check the tire pressure by looking at the Pressure
Gauge (5).
If the tire does not inflate to at least 26 psi (1.8 Bar)
pressure within 15 minutes:
The tire is too badly damaged. Do not attempt to drive
the vehicle further. Call for assistance.NOTE:If the tire becomes overinflated, push the Deflation Button
(2) to reduce the tire pressure to the recommended
inflation pressure before continuing.
23_LA_OM_EN_USC_t.book Page 214
Page 217 of 300
IN CASE OF EMERGENCY215
If the tire inflates to the recommended pressure or is at
least 26 psi (1.8 Bar) pressure within 15 minutes:
1. Push the Power Button (3) to turn off the Tire Service
Kit.
2. Remove the Speed Limit sticker from the top of the Sealant Bottle (1) and place the sticker on the
instrument panel.
3. Immediately disconnect the Sealant Hose (4) from the valve stem, reinstall the cap on the fitting at the
end of the hose, and place the Tire Service Kit in the
vehicle storage location.
(D) DRIVE VEHICLE:
Immediately after injecting sealant and inflating the tire,
drive the vehicle 5 miles (8 km) or 10 minutes to ensure
distribution of the Tire Service Kit Sealant within the tire.
Do not exceed 50 mph (80 km/h).
(E) AFTER DRIVING:
Pull over to a safe location before continuing Úpage 213.
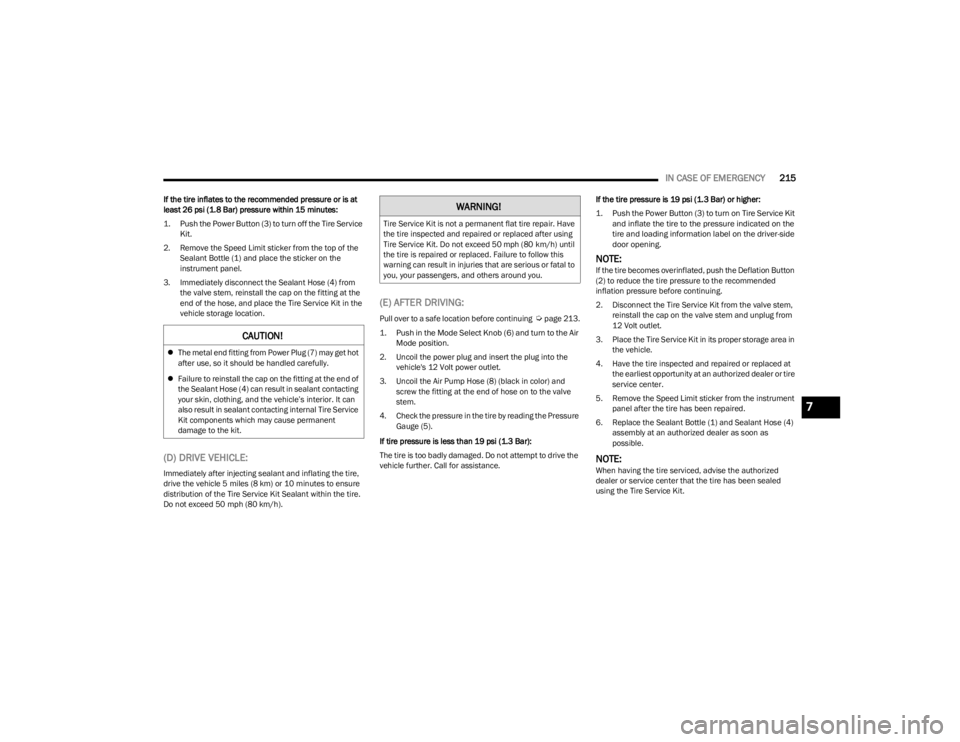
1. Push in the Mode Select Knob (6) and turn to the Air Mode position.
2. Uncoil the power plug and insert the plug into the vehicle's 12 Volt power outlet.
3. Uncoil the Air Pump Hose (8) (black in color) and screw the fitting at the end of hose on to the valve
stem.
4. Check the pressure in the tire by reading the Pressure Gauge (5).
If tire pressure is less than 19 psi (1.3 Bar):
The tire is too badly damaged. Do not attempt to drive the
vehicle further. Call for assistance. If the tire pressure is 19 psi (1.3 Bar) or higher:
1. Push the Power Button (3) to turn on Tire Service Kit
and inflate the tire to the pressure indicated on the
tire and loading information label on the driver-side
door opening.
NOTE:If the tire becomes overinflated, push the Deflation Button
(2) to reduce the tire pressure to the recommended
inflation pressure before continuing.
2. Disconnect the Tire Service Kit from the valve stem, reinstall the cap on the valve stem and unplug from
12 Volt outlet.
3. Place the Tire Service Kit in its proper storage area in the vehicle.
4. Have the tire inspected and repaired or replaced at the earliest opportunity at an authorized dealer or tire
service center.
5. Remove the Speed Limit sticker from the instrument panel after the tire has been repaired.
6. Replace the Sealant Bottle (1) and Sealant Hose (4) assembly at an authorized dealer as soon as
possible.
NOTE:When having the tire serviced, advise the authorized
dealer or service center that the tire has been sealed
using the Tire Service Kit.
CAUTION!
The metal end fitting from Power Plug (7) may get hot
after use, so it should be handled carefully.
Failure to reinstall the cap on the fitting at the end of
the Sealant Hose (4) can result in sealant contacting
your skin, clothing, and the vehicle’s interior. It can
also result in sealant contacting internal Tire Service
Kit components which may cause permanent
damage to the kit.
WARNING!
Tire Service Kit is not a permanent flat tire repair. Have
the tire inspected and repaired or replaced after using
Tire Service Kit. Do not exceed 50 mph (80 km/h) until
the tire is repaired or replaced. Failure to follow this
warning can result in injuries that are serious or fatal to
you, your passengers, and others around you.
7
23_LA_OM_EN_USC_t.book Page 215
Page 225 of 300

223
SERVICING AND MAINTENANCE
SCHEDULED SERVICING
3.6L AND 5.7L ENGINES
These engines are equipped with an automatic oil change
indicator system. The oil change indicator system will
remind you that it is time to take your vehicle in for
scheduled maintenance.Based on engine operation conditions, the oil change
indicator message will illuminate. This means that service
is required for the vehicle. Operating conditions such as
frequent short-trips, trailer tow, and extremely hot or cold
ambient temperatures will influence when the “Change
Oil” or “Oil Change Required” message is displayed. Have
your vehicle serviced as soon as possible, within the next
500 miles (805 km).
The “Oil Change Required” message will be displayed in
the instrument cluster and a single chime will sound,
indicating that an oil change is necessary.
An authorized dealer will reset the oil change indicator
message after completing the scheduled oil change.
NOTE:Under no circumstances should oil change intervals
exceed 10,000 miles (16,000 km), 12 months or
350 hours of engine run time, whichever comes first.
The 350 hours of engine run or idle time is generally only
a concern for fleet customers.Once A Month Or Before A Long Trip:
Check engine oil level.
Check windshield washer fluid level.
Check tire pressure and look for unusual wear or
damage. Rotate tires at the first sign of irregular wear,
even if it occurs before your next scheduled service.
Check the fluid levels of the coolant reservoir, brake
master cylinder, and power steering (if equipped) and
fill as needed.
Check function of all interior and exterior lights.
8
23_LA_OM_EN_USC_t.book Page 223
Page 230 of 300
228SERVICING AND MAINTENANCE
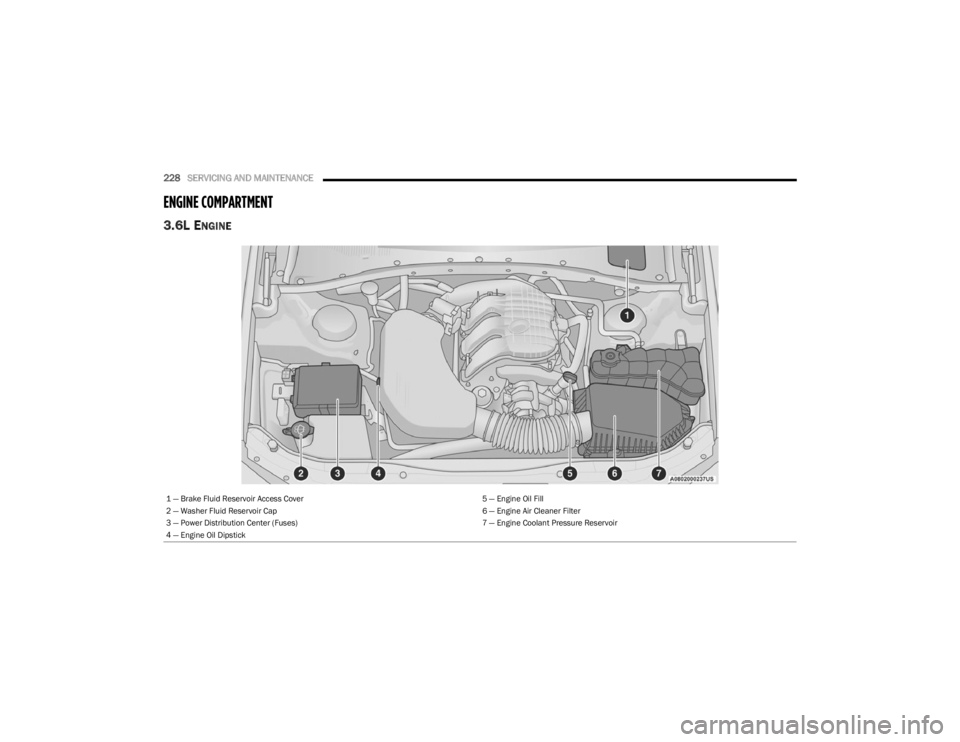
ENGINE COMPARTMENT
3.6L ENGINE
1 — Brake Fluid Reservoir Access Cover 5 — Engine Oil Fill
2 — Washer Fluid Reservoir Cap 6 — Engine Air Cleaner Filter
3 — Power Distribution Center (Fuses) 7 — Engine Coolant Pressure Reservoir
4 — Engine Oil Dipstick
23_LA_OM_EN_USC_t.book Page 228
Page 231 of 300
SERVICING AND MAINTENANCE229
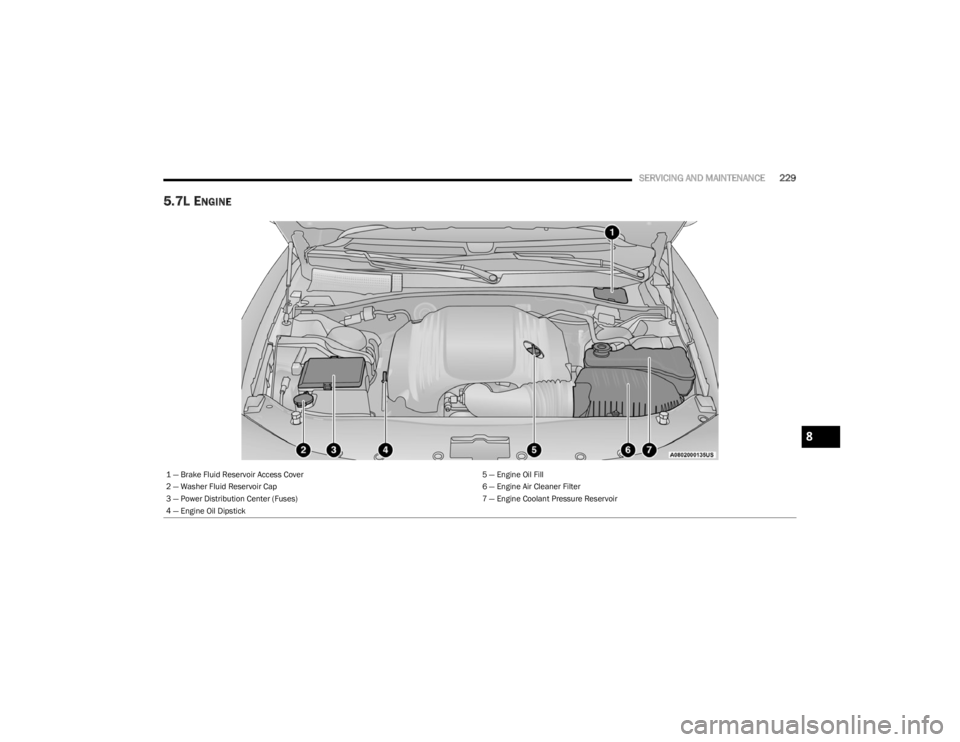
5.7L ENGINE
1 — Brake Fluid Reservoir Access Cover 5 — Engine Oil Fill
2 — Washer Fluid Reservoir Cap 6 — Engine Air Cleaner Filter
3 — Power Distribution Center (Fuses) 7 — Engine Coolant Pressure Reservoir
4 — Engine Oil Dipstick
8
23_LA_OM_EN_USC_t.book Page 229
Page 232 of 300
230SERVICING AND MAINTENANCE
CHECKING OIL LEVELTo ensure proper engine lubrication, the engine oil must
be maintained at the correct level. Check the oil level at
regular intervals, such as every fuel stop. The best time to
check the engine oil level is about ten minutes after a fully
warmed up engine is shut off.
Checking the oil while the vehicle is on level ground will
improve the accuracy of the oil level readings.
There are four possible dipstick types:
Crosshatched zone.
Crosshatched zone marked SAFE.
Crosshatched zone marked with MIN at the low end of
the range and MAX at the high end of the range.
Crosshatched zone marked with dimples at the MIN
and the MAX ends of the range.
NOTE:Always maintain the oil level within the crosshatch
markings on the dipstick.
Adding 1 qt (1 L) of oil when the reading is at the low end
of the dipstick range will raise the oil level to the high end
of the range marking.
ADDING WASHER FLUID
The windshield washer fluid reservoir is located in the
front of the engine compartment. Be sure to check the
fluid level at regular intervals. Fill the reservoir with
windshield washer solvent (not radiator antifreeze) and
operate the system for a few seconds to flush out the
residual water.
When refilling the washer fluid reservoir, apply some
washer fluid to a cloth or towel and wipe the wiper blades
clean. This will help blade performance.
To prevent freeze-up of your windshield washer system in
cold weather, select a solution or mixture that meets or
exceeds the temperature range of your climate. This rating
information can be found on most washer fluid containers.
The fluid reservoir will hold nearly 1 Gallon (4 Liters) of
washer fluid when the message “Low Washer Fluid”
appears in the instrument cluster.WARNING!
Never smoke while working in the engine compart -
ment: gas and flammable vapors may be present,
with the risk of fire.
Be very careful when working in the engine compart -
ment when the engine is hot: you may get burned. Do
not get too close to the radiator cooling fan: the elec -
tric fan may start; danger of injury. Scarves, ties and
other loose clothing might be pulled by moving parts.
CAUTION!
Be careful not to confuse the various types of fluids
while topping up: they are not compatible with each
other! Topping up with an unsuitable fluid could
severely damage your car.
The oil level must never exceed the MAX mark.
Always top up using engine oil of the same specifica -
tions as what is already in the engine.
If the engine oil is being topped up, wait for the
engine to cool down before loosening the filler cap,
particularly for vehicles with aluminum caps (if
equipped). WARNING: risk of burns!
Overfilling or underfilling the crankcase will cause
aeration or loss of oil pressure. This could damage
your engine.
CAUTION!
Overfilling or underfilling the crankcase will cause
aeration or loss of oil pressure. This could damage your
engine.
WARNING!
Commercially available windshield washer solvents are
flammable. They could ignite and burn you. Care must
be exercised when filling or working around the washer
solution.
23_LA_OM_EN_USC_t.book Page 230