Page 49 of 196

47
Lighting and visibility
4Before removing a windscreen wiper blade
► Operating the wiper control stalk within one
minute after switching off the ignition will place
the wiper blades in a vertical position.
►
Proceed with the desired operation or replace
the wiper blades.
After refitting a windscreen wiper blade
► To return the wiper blades to their initial
position, switch on the ignition and operate the
wiper control stalk.
Changing a wiper blade
Removing / Refitting at the front
► Carry out these wiper blade replacement
operations from the driver's side.
►
Starting with the wiper blade farthest from
you, hold each arm by the rigid section and raise
it as far as possible.
► Pull the screenwash delivery pipe to
disconnect it from the jet (located on the wiper
blade).
Take care not to hold the arms at the jet locations.
Do not touch the wiper blades. Risk of
irreparable deformation.
Do not release them while moving them. Risk
of damaging the windscreen!
►
Clean the windscreen using screenwash
fluid.
Do not apply "Rain X" type water-
repellent products.
►
Unclip the worn wiper blade closest to you
and remove it.
►
Install the new wiper blade and clip it to the
arm.
►
Repeat the procedure for the other wiper
blade.
►
Starting with the wiper blade closest to you,
once again hold each arm by the rigid section,
then guide it carefully onto the windscreen.
Removing/refitting at the rear
► Hold the arm by the rigid section and raise it
as far as possible.
►
Clean the rear screen using screenwash
fluid.
►
Unclip the worn wiper blade and remove it.
►
Install the new wiper blade and clip it to the
arm.
►
Once again hold the arm by the rigid section,
then guide it carefully onto the rear screen.
Page 50 of 196
, adapting their speed to the intensity")
48
Lighting and visibility
Automatic windscreen wipers
The windscreen wipers operate automatically
once rain is detected (sensor behind the rear
view mirror), adapting their speed to the intensity
of the rain without any action on the part of the
driver.
Switching on
Give a short downwards push to the
control.
A wiping cycle confirms that the instruction has
been accepted.
This warning lamp comes on in the instrument
panel and a message is displayed.
Switching off
Give the control stalk a brief push
downwards or place the control stalk in
another position (Int, 1 or 2).
This warning lamp goes off in the instrument
panel and a message is displayed.
The automatic rain sensitive windscreen wipers must be reactivated by pushing
the control stalk downwards, if the ignition has
been off for more than one minute.
Operating fault
If a fault occurs with the automatic rain sensitive
wipers, the wipers will operate in intermittent
mode.
Have it checked by a CITROËN dealer or a
qualified workshop.
Do not cover the rain sensor, linked with
the sunshine sensor and located at the
top centre of the windscreen, behind the rear
view mirror.
When using an automatic car wash, switch off
the automatic rain sensitive wipers.
In winter, it is advisable to wait until the
windscreen is completely clear of ice before
activating the automatic rain sensitive wipers.
Page 51 of 196

49
Safety
5General safety
recommendations
Do not remove the labels attached in
different places on your vehicle. They
include safety warnings as well as
identification information for the vehicle.
For all work on your vehicle, use a
qualified workshop that has the technical
information, skills and equipment required, all
of which a CITROËN dealer is able to
provide.
Depending on country regulations,
certain safety equipment may be
mandatory: high visibility safety vests,
warning triangles, breathalysers, spare bulbs,
spare fuses, fire extinguisher, first aid kit, mud
flaps at the rear of the vehicle, etc.
Installing electrical accessories:
– The fitting of electrical equipment or
accessories not approved by CITROËN may
cause excessive current consumption and
faults and failures with the electrical system
of your vehicle. Contact a CITROËN dealer
for information on the range of approved
accessories.
–
As a safety measure, access to the
diagnostic socket, used for the vehicle's
electronic systems, is reserved strictly for
CITROËN dealers or qualified workshops,
equipped with the special tools required (risk
of malfunctions of the vehicle's electronic
systems that could cause breakdowns or
serious accidents). The Manufacturer cannot
be held responsible if this advice is not
followed.
–
Any modification or adaptation not intended
or authorised by CITROËN or carried out
without meeting the technical requirements
defined by the Manufacturer will result in the
suspension of the commercial warranty
.
Installation of accessory radio
communication transmitters
Before installing a radio communication
transmitter with an external aerial, you must
without fail contact a CITROËN dealer for
the specification of transmitters which can
be fitted (frequency, maximum power, aerial
position, specific installation requirements),
in line with the Vehicle Electromagnetic
Compatibility Directive (2004/104/EC).
Declarations of conformity for radio
equipment
The relevant certificates are available on the
http://service.citroen.com/ACddb/ website.
Hazard warning lamps
► Pressing the red button causes all the
direction indicators to flash.
They can operate with the ignition off.
Automatic operation of hazard warning lamps
When braking in an emergency, depending on
the rate of deceleration, the hazard warning
lamps come on automatically. They switch off
automatically when you next accelerate.
It is also possible to switch them off by pressing
the button.
Page 52 of 196

50
Safety
Horn
► Press the central part of the steering wheel.
Emergency or assistance
call
* In accordance with the general conditions of use of the service, available from dealers an\
d subject to technological and technical limitations.
** In areas covered by ‘Localised Emergency Call’ and ‘Localised Assistance Call’.
The list of countries covered and telematic services provided is availab\
le from dealers or on the website for your country.
Localised Emergency Call
(PE112)
► In an emergency , press button 1 for more
than 2 seconds.
The lighting of the indicator lamp and a voice
message confirm that the call has been made to
the emergency services*.
‘Localised Emergency Call’ immediately locates
your vehicle and puts you in contact with the
appropriate emergency services**.
►
Pressing again immediately cancels the
request.
The indicator lamp flashes when the vehicle
data is sent, and then remains lit when
communication is established.
If an impact is detected by the airbag
control unit, an emergency call is made
automatically, independently of the
deployment of any airbags.
‘Localised Emergency Call’ is a service
that can be accessed free of charge.
System operation
– Upon switching on the ignition, if the indicator
lamp lights up red, then green, and then goes
out: the system is operating correctly
.
– If the indicator lamp is fixed red: system
malfunction
–
If the indicator lamp flashes red: replace the
emergency battery
.
In the latter two cases, emergency and
assistance call services may not work.
Contact a dealer or a qualified repairer as soon
as possible.
The system fault does not prevent the vehicle from being driven.
Data processing
All processing of personal information
by the "Localised Emergency Call" system
(PE112) complies with the framework for
protection of personal information established
by Regulation 2016/679 (GDPR) and
Directive 2002/58/EC of the European
Parliament and the Council, and in particular,
seeks to protect the vital interests of the
data subject, in accordance with Article
6.1,
paragraph
d) of Regulation 2016/679.
Personal information processing is strictly
limited to the management of the "Localised
Emergency Call" system used with the “112”
European single emergency call number.
The "Localised Emergency Call" system is
able to collect and process only the following
Page 53 of 196
, fuel type or power source, most
recent three locations and direction of travel,
and a")
51
Safety
5data relating to the vehicle: chassis number,
type (passenger vehicle or light commercial
vehicle), fuel type or power source, most
recent three locations and direction of travel,
and a timestamped log file recording the
automatic activation of the system.
The recipients of the processed data are the
emergency call handling centres designated
by the relevant national authorities in the
territory in which they are located, enabling
priority reception and handling of calls to the
“112” emergency number.
Data storage
Data contained in the system’s memory
is not accessible from outside the system until
a call is made. The system is not traceable
and is not continuously monitored in its
normal operating mode.
The data in the system's internal memory is
automatically and continuously erased. Only
the vehicle’s three most recent locations are
stored.
When an emergency call is triggered, the data
log is stored for no more than 13
hours.
* According to the geographic coverage of ‘Localised Emergency Call’, ‘Localised Assistance Call’ and the official national language chosen by the owner
of the vehicle.
The list of countries covered and telematic services provided is availab\
le from dealers or on the website for your country
.
Access to data
You have the right to access the data
and, if necessary, submit a request to
rectify, erase or restrict the processing of
any personal information not processed in
accordance with the provisions of Regulation
2016/679 (GDPR). Third parties to which data
has been communicated shall be notified of
any rectification, erasure or restriction carried
out in accordance with the aforementioned
Directive, unless doing so would be
impossible or require a disproportionate effort.
You also have the right to lodge a complaint
with the relevant data protection authority.
Localised Assistance Call
► If the vehicle breaks down, press button 2
for more than 2 seconds to request assistance
(confirmed by a voice message*).
►
Pressing again immediately cancels the
request.
Privacy mode allows you to manage the
level of sharing (data and/or position)
between your vehicle and the CITROËN
brand.
It can be configured in the Settings menu on
the touch screen.
By default, depending on equipment,
deactivate/reactivate geolocation by
simultaneously pressing the 2 buttons, then
press the "Localised Assistance Call" button
to confirm.
If you purchased your vehicle outside the
CITROËN dealer network, we invite you
to have a dealer check the configuration of
these services and, if desired, modify them to
suit your wishes. In a multilingual country,
configuration is possible in the official national
language of your choice.
For technical reasons, in particular to
improve the quality of telematic services
for customers, the Manufacturer reserves the
right to carry out updates to the vehicle's
on-board telematic system at any time.
If you benefit from the Citroën Connect
Box offer with the SOS and Assistance
Pack included, there are additional services
available to you in your personal space, via
the website for your country.
For information about the SOS and
Assistance Pack, please refer to the general
conditions for these services.
Page 54 of 196

52
Safety
Deactivation is confirmed by the
illumination of this indicator lamp in the
instrument panel and the display of a message.
The ASR system is reactivated automatically
every time the ignition is switched back on or
from 31 mph (50 km/h).
Reactivation is manual below 31 mph (50 km/h).
Malfunction
In the event of a system malfunction, this
warning lamp comes on, accompanied by
an onscreen message and audible signal.
Contact a CITROËN dealer or a qualified
workshop to have the systems checked.
ASR / DSC
These systems enhance safety during
normal driving, but should not encourage
the driver to take extra risks or drive at high
speed.
It is in conditions of reduced grip (rain, snow,
ice) that the risk of loss of grip increases. It
is therefore important for your safety to keep
these systems activated in all conditions, and
particularly in difficult conditions.
Correct operation of these systems depends
on compliance with the manufacturer's
recommendations relating to the wheels
(tyres and rims), braking and electronic
components, as well as the assembly and
repair procedures used by CITROËN dealers.
The use of snow tyres is recommended, to
ensure that these systems remain effective
Electronic stability control
(ESCF
The electronic stability control programme includes the following systemsW
Page 55 of 196

53
Safety
5Deactivation is confirmed by the
illumination of this indicator lamp in the
instrument panel and the display of a message.
The ASR system is reactivated automatically
every time the ignition is switched back on or
from 31 mph (50
km/h).
Reactivation is manual below 31 mph (50 km/h).
Malfunction
In the event of a system malfunction, this
warning lamp comes on, accompanied by
an onscreen message and audible signal.
Contact a CITROËN dealer or a qualified
workshop to have the systems checked.
ASR / DSC
These systems enhance safety during
normal driving, but should not encourage
the driver to take extra risks or drive at high
speed.
It is in conditions of reduced grip (rain, snow,
ice) that the risk of loss of grip increases. It
is therefore important for your safety to keep
these systems activated in all conditions, and
particularly in difficult conditions.
Correct operation of these systems depends
on compliance with the manufacturer's
recommendations relating to the wheels
(tyres and rims), braking and electronic
components, as well as the assembly and
repair procedures used by CITROËN dealers.
The use of snow tyres is recommended, to
ensure that these systems remain effective
in winter conditions. All four wheels must be
fitted with tyres approved for the vehicle.
Seat belts
Front seat belts
The front seat belts are fitted with a pyrotechnic
pretensioning and force limiting system.
This system improves safety in the front seats
in the event of a front or side impact. Depending
on the severity of the impact, the pretensioning
system instantly tightens the seat belts against
the body of the occupants.
The pretensioning seat belts are active when the
ignition is on.
The force limiter reduces the pressure of the
seat belt on the chest of the occupant, thus
improving their protection.
Locking
► Pull the strap then insert the tongue in the
buckle.
►
Check that the seat belt is fastened correctly
by pulling the strap.
Release
► Press the red button on the buckle.
► Guide the seat belt as it reels in.
Page 56 of 196

54
Safety
Rear seat belts
The rear seats are each fitted with a three-point
seat belt.
Fastening
► Pull the strap then insert the tongue in the
buckle.
►
Check that the seat belt is fastened correctly
by pulling the strap.
Unfastening
► Press the red button on the buckle.
► Guide the seat belt as it reels in.
Seat belt(s) not fastened /
unfastened warning lamp(s)
1. Front seat belts not fastened / unfastened
warning lamp, in the instrument panel.
2. Front left seat belt warning lamp.
3. Front right seat belt warning lamp.
4. Rear right seat belt warning lamp.
5. Rear centre seat belt warning lamp.
6. Rear left seat belt warning lamp.
From approximately 12 mph (20
km/h), the
warning lamp(s) flashes for two minutes
accompanied by an audible signal. Once these
two minutes have elapsed, the warning lamp(s)
remains on until the driver or the front passenger
fastens their seat belt.
Front seat belt warning lamp(s)
On switching on the ignition, warning lamp
1 comes on in the instrument panel and the
corresponding warning lamp ( 2 and 3) comes
on in red in the seat belt and front passenger’s
airbag warning lamp display if the driver's seat
belt or front passenger's seat belt is not fastened
or is unfastened.
Rear seat belt warning lamp(s)
The corresponding ( 4 to 6) warning lamp lights
up red in the seat belt and front passenger
airbag display screen when one or more rear
passengers unfastens their seat belts.
Advice
The driver must ensure that passengers use the seat belts correctly and that they
are all fastened before setting off.
Wherever seated in the vehicle, you must
always fasten the seat belt, even for short
journeys.
Do not interchange the seat belt buckles, as
they will not fulfil their role fully.
Before and after use, ensure that the seat belt
is reeled in correctly.
After folding or moving a seat or rear bench
seat, ensure that the seat belt is positioned
and reeled in correctly.
Installation
The lower part of the strap must be
positioned as low as possible on the pelvis.
The upper part must be positioned in the
hollow of the shoulder.
In order to be effective, a seat belt:
–
must be tightened as close to the body as
possible;
 1
1 2
2 3
3 4
4 5
5 6
6 7
7 8
8 9
9 10
10 11
11 12
12 13
13 14
14 15
15 16
16 17
17 18
18 19
19 20
20 21
21 22
22 23
23 24
24 25
25 26
26 27
27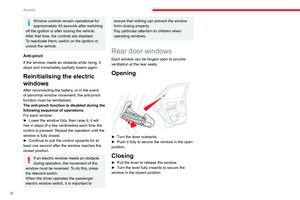 28
28 29
29 30
30 31
31 32
32 33
33 34
34 35
35 36
36 37
37 38
38 39
39 40
40 41
41 42
42 43
43 44
44 45
45 46
46 47
47 48
48 49
49 50
50 51
51 52
52 53
53 54
54 55
55 56
56 57
57 58
58 59
59 60
60 61
61 62
62 63
63 64
64 65
65 66
66 67
67 68
68 69
69 70
70 71
71 72
72 73
73 74
74 75
75 76
76 77
77 78
78 79
79 80
80 81
81 82
82 83
83 84
84 85
85 86
86 87
87 88
88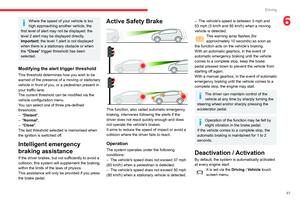 89
89 90
90 91
91 92
92 93
93 94
94 95
95 96
96 97
97 98
98 99
99 100
100 101
101 102
102 103
103 104
104 105
105 106
106 107
107 108
108 109
109 110
110 111
111 112
112 113
113 114
114 115
115 116
116 117
117 118
118 119
119 120
120 121
121 122
122 123
123 124
124 125
125 126
126 127
127 128
128 129
129 130
130 131
131 132
132 133
133 134
134 135
135 136
136 137
137 138
138 139
139 140
140 141
141 142
142 143
143 144
144 145
145 146
146 147
147 148
148 149
149 150
150 151
151 152
152 153
153 154
154 155
155 156
156 157
157 158
158 159
159 160
160 161
161 162
162 163
163 164
164 165
165 166
166 167
167 168
168 169
169 170
170 171
171 172
172 173
173 174
174 175
175 176
176 177
177 178
178 179
179 180
180 181
181 182
182 183
183 184
184 185
185 186
186 187
187 188
188 189
189 190
190 191
191 192
192 193
193 194
194 195
195