Page 25 of 196

23
Access
2► Immediately press the closed padlock button
for a few seconds.
►
Switch off the ignition and remove the key
from the switch.
The remote control is now fully operational
again.
With Keyless Entry and Starting
► Insert the mechanical key (incorporated into
the remote control) into the lock to open the
vehicle.
►
Place the electronic key against the back-up
reader under the parking brake lever and hold it
there until the ignition is switched on.
►
Switch on the ignition by pressing the
"
START/STOP" button.
►
W
ith a manual gearbox, place the gear lever
in neutral then fully depress the clutch pedal.
►
W
ith an automatic gearbox, while in mode
P, depress the brake pedal.
If the fault persists after reinitialisation, contact a
CITROËN dealer or a qualified workshop without
delay.
Doors
Opening
From outside
► After unlocking the vehicle or with the
Keyless Entry and Starting electronic key in the
recognition zone, pull the door handle.
From inside
► Pull the interior opening control of a door; this
unlocks the vehicle completely .
The interior opening control on a rear door does not work if the child lock is on.
For more information on the Child Lock, refer
to the corresponding section.
Closing
When a door is not closed correctly:
– with the engine running or the vehicle
moving (speed below 6 mph (10 km/h)) , a
message appears in the screen.
–
with the vehicle moving (speed above 6
mph (10 km/h))
, a message appears in the
screen, accompanied by an audible signal.
Boot
Opening
► With the vehicle unlocked or with the
Keyless Entry and Starting electronic key in the
recognition zone, press the centre
of the tailgate
opening control.
►
Lift the tailgate.
For more information on the Remote control
or
on the Keyless Entry and Starting, please refer
to the corresponding section.
If there is a fault or if it is difficult to move
the tailgate when opening or closing it,
have it checked as soon as possible by a
CITROËN dealer or a qualified workshop to
prevent the problem becoming worse, and
potentially causing the tailgate to drop and
thereby inflicting serious injuries.
Page 26 of 196
 is not
properly closed, the vehicle is not locked,
but the exterior perimeter monitoring will be
activated after 45 seconds.
Deactivation
► Press the remot")
24
Access
If an opening (door or boot) is not
properly closed, the vehicle is not locked,
but the exterior perimeter monitoring will be
activated after 45 seconds.
Deactivation
► Press the remote control unlocking
button.
or
► Unlock the vehicle with the Keyless Entry and
Starting system.
The monitoring system is deactivated: the
indicator lamp in the button goes off and the
direction indicators flash for about 2 seconds.
If the vehicle automatically locks itself
again (as happens if a door or the boot is
not opened within 30 seconds of unlocking),
the monitoring system is automatically
reactivated.
Triggering of the alarm
This is indicated by sounding of the siren
and flashing of the direction indicators for 30
seconds.
Depending on the country of sale, certain
monitoring functions remain active until the alarm
has been triggered eleven times consecutively.
When the vehicle is unlocked using the remote
control or the Keyless Entry and Starting system,
rapid flashing of the red indicator lamp in the
button informs you that the alarm was triggered
Closing
► Lower the tailgate using the interior grab
handle.
If the tailgate is not fully closed:
–
with the engine running or the vehicle
moving (speed below 6 mph (10 km/h)) , a
message appears in the screen.
–
with the vehicle moving (speed above 6
mph (10 km/h))
, a message appears in the
screen, accompanied by an audible signal.
Back-up release
To manually unlock the boot in the event of a
battery or central locking failure.
Unlocking
► Fold the rear seats to gain access to the lock
from inside the boot.
► Insert a small screwdriver into hole A of the
lock to unlock the boot.
►
Move the latch to the left.
Locking after closing
If the fault persists after closing again, the boot
will remain locked.
In the event of a fault with the central
locking system, it is essential to
disconnect the battery to lock the boot and so
ensure complete locking of the vehicle.
Alarm
(Depending on version)
System which protects and provides a deterrent
against theft and break-ins.
Exterior perimeter monitoring
The system checks for opening of the vehicle.
The alarm is triggered if anyone tries to open a
door, the boot or the bonnet, for example.
Self-protection function
The system checks for the putting out of service
of its components.
The alarm is triggered if the battery, the central
control or the siren wiring is put out of service or
damaged.
For all work on the alarm system, contact
a CITROËN dealer or a qualified
workshop.
Locking the vehicle with full
alarm system
Activation
► Switch off the ignition and exit the vehicle.
► Lock or deadlock the vehicle using the
remote control or with the “Keyless Entry and
Starting” system.
When the monitoring system is active, the red
indicator lamp in the button flashes once per
second and the direction indicators come on for
about 2 seconds.
The exterior perimeter monitoring is activated
after 5 seconds.
Page 27 of 196
 is not
properly closed, the vehicle is not locked,
but the exterior perimeter monitoring will be
activated after 45
seconds.
Deactivation
► Press the rem")
25
Access
2If an opening (door or boot) is not
properly closed, the vehicle is not locked,
but the exterior perimeter monitoring will be
activated after 45
seconds.
Deactivation
► Press the remote control unlocking
button.
or
►
Unlock the vehicle with the Keyless Entry and
Starting system.
The monitoring system is deactivated: the
indicator lamp in the button goes off and the
direction indicators flash for about 2 seconds.
If the vehicle automatically locks itself
again (as happens if a door or the boot is
not opened within 30 seconds of unlocking),
the monitoring system is automatically
reactivated.
Triggering of the alarm
This is indicated by sounding of the siren
and flashing of the direction indicators for 30
seconds.
Depending on the country of sale, certain
monitoring functions remain active until the alarm
has been triggered eleven times consecutively.
When the vehicle is unlocked using the remote
control or the Keyless Entry and Starting system,
rapid flashing of the red indicator lamp in the
button informs you that the alarm was triggered during your absence. When the ignition is
switched on, this flashing stops.
Failure of the remote control
To deactivate the monitoring functions:
►
Unlock the vehicle using the key in the
driver's door lock.
►
Open the door; the alarm is triggered.
►
Switch on the ignition; this stops the alarm.
The indicator lamp in the button goes off.
Locking the vehicle without
activating the alarm
► Lock or deadlock the vehicle using the key
(integral to the remote control) in the driver's
door lock.
Malfunction
When the ignition is switched on, fixed
illumination of the red indicator lamp in the
button indicates a malfunction of the system.
Have it checked by a CITROËN dealer or a
qualified workshop.
Electric windows
1. Left-hand front.
2. Right-hand front.
Manual operation
► To open/close the window, press/pull the
switch without passing the point of resistance;
the window stops as soon as the switch is
released.
Automatic operation
► To open/close the window, press/pull the
switch past its resistance point: the window
opens/closes completely when the switch is
released.
Operating the switch again stops the movement
of the window.
Page 28 of 196

26
Access
Window controls remain operational for
approximately 45 seconds after switching
off the ignition or after locking the vehicle.
After that time, the controls are disabled.
To reactivate them, switch on the ignition or
unlock the vehicle.
Anti-pinch
If the window meets an obstacle while rising, it
stops and immediately partially lowers again.
Reinitialising the electric
windows
After reconnecting the battery, or in the event
of abnormal window movement, the anti-pinch
function must be reinitialised.
The anti-pinch function is disabled during the
following sequence of operations.
For each window:
►
Lower the window fully
, then raise it; it will
rise in steps of a few centimetres each time the
control is pressed. Repeat the operation until the
window is fully closed.
►
Continue to pull the control upwards for at
least one second after the window reaches the
closed position.
If an electric window meets an obstacle
during operation, the movement of the
window must be reversed. To do this, press
the relevant switch.
When the driver operates the passenger
electric window switch, it is important to
ensure that nothing can prevent the window
from closing properly.
Pay particular attention to children when
operating windows.
Rear door windows
Each window can be hinged open to provide
ventilation at the rear seats.
Opening
► Turn the lever outwards.
► Push it fully to secure the window in the open
position.
Closing
► Pull the lever to release the window .
► T urn the lever fully inwards to secure the
window in the closed position.
Page 29 of 196

27
Ease of use and comfort
3Front seats
Correct driving position
For safety reasons, adjustments must
only be made when the vehicle is
stationary.
Before taking to the road and to make the most
of the ergonomic layout of the instruments and
controls, carry out these adjustments in the
following order:
–
head restraint height.
–
seat backrest angle.
–
seat cushion height.
–
longitudinal seat position.
–
steering wheel height and reach.
–
rear view mirror and door mirrors.
Once these adjustments have been
made, check that the instrument panel
can be viewed correctly from your driving
position.
Adjustments Forwards-backwards
► Raise the control bar and slide the seat
forwards or backwards.
►
Release the bar to lock the seat in position on
one of the notches.
Before moving the seat backwards,
ensure that there is nothing that might
prevent the full travel of the seat.
There is a risk of trapping or pinching
passengers if present in the rear seats or
jamming the seat if large objects are placed
on the floor behind the seat.
Backrest angle
► Turn the knob to adjust the backrest.
Height
► Pull the control upwards to raise the seat or
push it downwards to lower the seat, until the
position required is obtained.
Lumbar
(driver only)
Page 30 of 196

28
Ease of use and comfort
Steering wheel
adjustment
► When stationary, lower the control A to
release the steering wheel.
► Adjust the steering wheel height and reach to
suit your driving position.
► Raise the control A to lock the steering
wheel.
As a safety precaution, these operations should only be carried out while the
vehicle is stationary.
► Turn the knob manually to obtain the desired
level of lumbar support.
Head restraint height
adjustment
► To raise it, pull it upwards as far as possible
(notch).
►
T
o remove it, press the lug A and pull it
upwards.
►
T
o put it back in place, engage the head
restraint rods in the openings keeping them in
line with the seat backrest.
►
T
o lower it, press the lug A and push down on
the head restraint at the same time.
The head restraint has a frame with notches which prevents it from lowering;
this is a safety device in case of impact.
The adjustment is correct when the upper
edge of the head restraint is level with the
top of the head.
Never drive with the head restraints removed;
they must be fitted and correctly adjusted.
Heated seats
► With the engine running, use the adjustment
knob to switch on and select the level of heating
required:
0
: Off.
1
: Low.
2
: Medium.
3
: High.
The front seats can be heated individually.
Before leaving the vehicle, ensure that
the adjustment knob of the passenger
seat is at position
0, so that the heating does
not unnecessarily operate if no passenger is
present during the next journey.
Do not use the function when the seat
is not occupied.
Reduce the heating intensity as soon as
possible.
When the seat and passenger compartment
have reached a satisfactory temperature,
switch the function off; reducing electricity
consumption in turn decreases fuel
consumption.
Prolonged use of the heated seats is not
recommended for those with sensitive
skin.
There is a risk of burns for people whose
perception of heat is impaired (illness, taking
medication, etc.).
To keep the heated pad intact and to prevent
a short circuit:
–
do not place sharp or heavy objects on the
seat,
–
do not kneel or stand on the seat,
–
do not spill liquids onto the seat,
–
never use the heating function if the seat
is wet.
Page 31 of 196

29
Ease of use and comfort
3Steering wheel
adjustment
► When stationary, lower the control A to
release the steering wheel.
►
Adjust the steering wheel height and reach to
suit your driving position.
►
Raise the control A
to lock the steering
wheel.
As a safety precaution, these operations should only be carried out while the
vehicle is stationary.
Mirrors
Door mirrors
The objects observed are, in reality, closer than they appear.
Take this into account in order to correctly
judge the distance of vehicles approaching
from behind.
Electric adjustment
► Turn control A to the right or to the left to
select the corresponding mirror.
►
Move the control in any of the four directions
to adjust.
►
Return the control to the central position.
As a safety measure, the mirrors should be adjusted to reduce the blind spots.
Manual folding
You can manually fold the mirrors (parking
obstruction, narrow garage, etc.)
►
T
urn the mirror towards the vehicle.
Electric folding
If your vehicle is fitted with this function, the
mirrors can be folded electrically from the inside,
with the vehicle parked and the ignition on:
► Turn control A to opposite the mark.
From outside: lock the vehicle using the remote
control or the "Keyless Entry and Starting"
system.
The folding and unfolding of the door mirrors when locking or unlocking the
vehicle can be deactivated via the vehicle
configuration menu.
Demisting - Defrosting
Demisting-defrosting of the door mirrors
operates with the engine running, by
switching on the heated rear screen.
For more information on Demisting - defrosting
the rear screen , refer to the corresponding
section.
Page 32 of 196

30
Ease of use and comfort
Returning the backrest to
the normal position
► Straighten the seat backrest 2 and secure it.
► Unfasten and return the seat belts to the
sides of the backrest.
When repositioning the backrest, ensure
that the seat belts are not trapped and
the red indicator, located next to the controls
1, is no longer visible.
Rear head restraints
These have one position for use (up) and a
stowed position (down).
Interior rear view mirror
Equipped with an anti-dazzle system, which
darkens the mirror glass and reduces the
nuisance to the driver caused by the sun,
headlamps of other vehicles, etc.
Manual model
Adjustment
► Adjust the mirror so that the glass is in the
"day" position.
Day/night position
► Pull the lever to change to the "night" anti-
dazzle position.
►
Push the lever to change to the normal "day"
position.
Automatic "electrochrome" model
This system automatically and progressively
changes between day and night use by means
of a sensor measuring the light coming from the
rear of the vehicle.
In order to ensure optimum visibility
during your manoeuvres, the mirror
lightens automatically when reverse gear is
engaged.
Rear seats
Bench seat with fixed one-piece cushion and
split backrest (1/3 - 2/3) which can be folded
individually to adapt the load space in the boot.
Folding the backrest
► Move the front seats forward if necessary .
► Position the seat belts on the backrest and
fasten them.
►
Place the head restraints in the low position.
► Press the corresponding control 1 to release
the backrest 2.
►
Fold the seat back
2 on to the cushion.
When folding the seat, the centre seat
belt should not be fastened but laid out
flat along the backrest.
The rear seat cushion remains fixed. To increase the boot loading volume, tilt the
bench seat backrest.
 1
1 2
2 3
3 4
4 5
5 6
6 7
7 8
8 9
9 10
10 11
11 12
12 13
13 14
14 15
15 16
16 17
17 18
18 19
19 20
20 21
21 22
22 23
23 24
24 25
25 26
26 27
27 28
28 29
29 30
30 31
31 32
32 33
33 34
34 35
35 36
36 37
37 38
38 39
39 40
40 41
41 42
42 43
43 44
44 45
45 46
46 47
47 48
48 49
49 50
50 51
51 52
52 53
53 54
54 55
55 56
56 57
57 58
58 59
59 60
60 61
61 62
62 63
63 64
64 65
65 66
66 67
67 68
68 69
69 70
70 71
71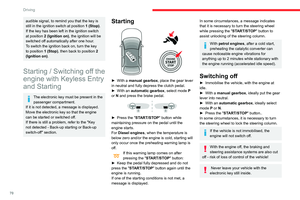 72
72 73
73 74
74 75
75 76
76 77
77 78
78 79
79 80
80 81
81 82
82 83
83 84
84 85
85 86
86 87
87 88
88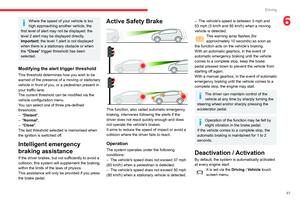 89
89 90
90 91
91 92
92 93
93 94
94 95
95 96
96 97
97 98
98 99
99 100
100 101
101 102
102 103
103 104
104 105
105 106
106 107
107 108
108 109
109 110
110 111
111 112
112 113
113 114
114 115
115 116
116 117
117 118
118 119
119 120
120 121
121 122
122 123
123 124
124 125
125 126
126 127
127 128
128 129
129 130
130 131
131 132
132 133
133 134
134 135
135 136
136 137
137 138
138 139
139 140
140 141
141 142
142 143
143 144
144 145
145 146
146 147
147 148
148 149
149 150
150 151
151 152
152 153
153 154
154 155
155 156
156 157
157 158
158 159
159 160
160 161
161 162
162 163
163 164
164 165
165 166
166 167
167 168
168 169
169 170
170 171
171 172
172 173
173 174
174 175
175 176
176 177
177 178
178 179
179 180
180 181
181 182
182 183
183 184
184 185
185 186
186 187
187 188
188 189
189 190
190 191
191 192
192 193
193 194
194 195
195