2023 CHEVROLET SILVERADO 2500 AUX
[x] Cancel search: AUXPage 273 of 441
Chevrolet Silverado 2500 HD/3500 HD Owner Manual (GMNA-Localizing-U.
S./Canada/Mexico-15546003) - 2022 - CRC - 5/5/21
272 Driving and Operating
Filling the Tank with a Portable Fuel
Container
If the vehicle runs out of fuel and must be
filled from a portable fuel container:
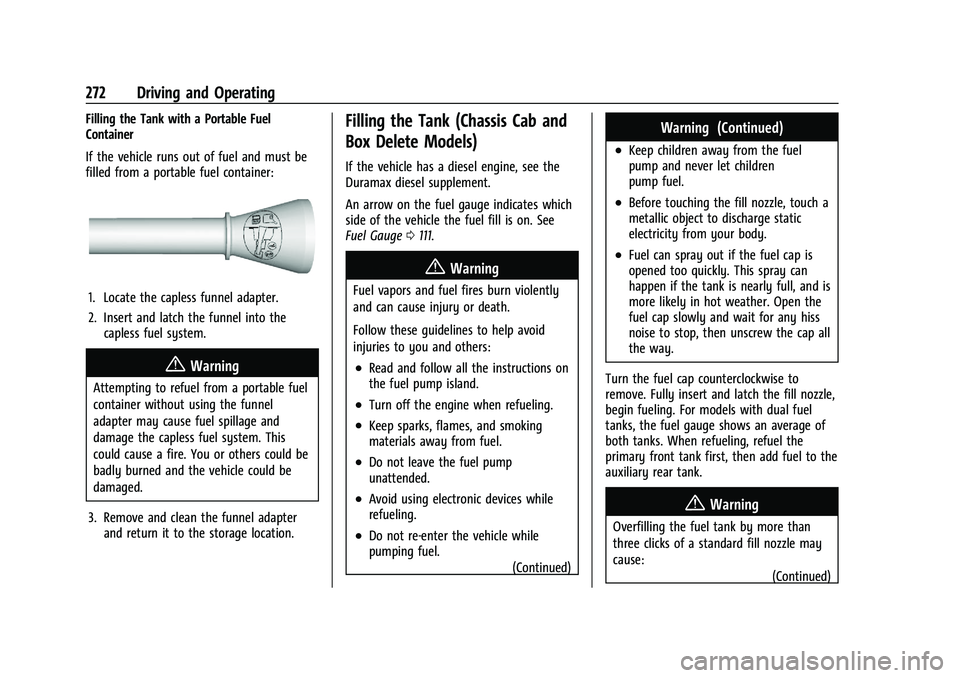
1. Locate the capless funnel adapter.
2. Insert and latch the funnel into thecapless fuel system.
{Warning
Attempting to refuel from a portable fuel
container without using the funnel
adapter may cause fuel spillage and
damage the capless fuel system. This
could cause a fire. You or others could be
badly burned and the vehicle could be
damaged.
3. Remove and clean the funnel adapter and return it to the storage location.
Filling the Tank (Chassis Cab and
Box Delete Models)
If the vehicle has a diesel engine, see the
Duramax diesel supplement.
An arrow on the fuel gauge indicates which
side of the vehicle the fuel fill is on. See
Fuel Gauge 0111.
{Warning
Fuel vapors and fuel fires burn violently
and can cause injury or death.
Follow these guidelines to help avoid
injuries to you and others:
.Read and follow all the instructions on
the fuel pump island.
.Turn off the engine when refueling.
.Keep sparks, flames, and smoking
materials away from fuel.
.Do not leave the fuel pump
unattended.
.Avoid using electronic devices while
refueling.
.Do not re-enter the vehicle while
pumping fuel.
(Continued)
Warning (Continued)
.Keep children away from the fuel
pump and never let children
pump fuel.
.Before touching the fill nozzle, touch a
metallic object to discharge static
electricity from your body.
.Fuel can spray out if the fuel cap is
opened too quickly. This spray can
happen if the tank is nearly full, and is
more likely in hot weather. Open the
fuel cap slowly and wait for any hiss
noise to stop, then unscrew the cap all
the way.
Turn the fuel cap counterclockwise to
remove. Fully insert and latch the fill nozzle,
begin fueling. For models with dual fuel
tanks, the fuel gauge shows an average of
both tanks. When refueling, refuel the
primary front tank first, then add fuel to the
auxiliary rear tank.
{Warning
Overfilling the fuel tank by more than
three clicks of a standard fill nozzle may
cause: (Continued)
Page 286 of 441
Chevrolet Silverado 2500 HD/3500 HD Owner Manual (GMNA-Localizing-U.
S./Canada/Mexico-15546003) - 2022 - CRC - 5/5/21
Driving and Operating 285
to the attaching points on the bumper;
otherwise, safety chains should be attached
to holes on the trailer hitch.
Cross the safety chains under the tongue of
the trailer to help prevent the tongue from
contacting the road if it becomes separated
from the hitch. Always leave enough slack in
the safety chains to allow the combination
to turn. Never allow safety chains to drag
on the ground.
Trailer Brakes
Loaded trailers over 900 kg (2,000 lb) must
be equipped with brake systems and with
brakes for each axle. Trailer braking
equipment conforming to Canadian
Standards Association (CSA) requirement
CAN3-D313, or its equivalent, is
recommended.
State or local regulations may require
trailers to have their own braking system if
the loaded weight of the trailer exceeds
certain minimums that can vary from state
to state. Read and follow the instructions for
the trailer brakes so they are installed,
adjusted, and maintained properly. Never
attempt to tap into your vehicle's hydraulicbrake system. If you do, both the vehicle
antilock brakes and the trailer brakes may
not function, which could result in a crash.
Auxiliary Battery
If equipped, the vehicle's auxiliary battery
can be used to supply electrical power to
additional equipment that may be added,
such as a slide-in camper.
Locate the auxiliary battery connector under
the hood on the driver side of the vehicle,
next to the engine compartment fuse block.
Follow the proper installation instructions
included with any electrical equipment that
is installed.
Caution
To prevent draining the auxiliary battery,
always turn off electrical equipment
when not in use and do not use any
equipment that may exceed the
maximum amperage rating of 30 amps.
Trailer Wiring Harness
Basic Trailer Wiring
If the vehicle is not equipped with a trailer
connector on the rear bumper, a 7-wire
trailering harness is tied to the vehiclesframe. The harness requires the installation
of a trailer connector, which is available
through your dealer.
Use only a round, seven-wire connector with
flat blade terminals meeting SAE J2863
specifications for proper electrical
connectivity.
The seven-wire harness contains the
following trailer circuits:
Stop/Turn
Signal Left Yellow/Blue
Stop/Turn Signal
Right Green/Violet
Tail/Parking Lamps Gray/Brown
Reverse Lamps White/Green
Battery Feed Red/Green
Ground White
Electric Trailer Brake Blue
Heavy-Duty Trailer Wiring Harness Package
If equipped, the trailer wiring harness, with
a 7-pin connector and a 4-pin connector, is
mounted on the vehicle's rear bumper.
Page 287 of 441
Chevrolet Silverado 2500 HD/3500 HD Owner Manual (GMNA-Localizing-U.
S./Canada/Mexico-15546003) - 2022 - CRC - 5/5/21
286 Driving and Operating
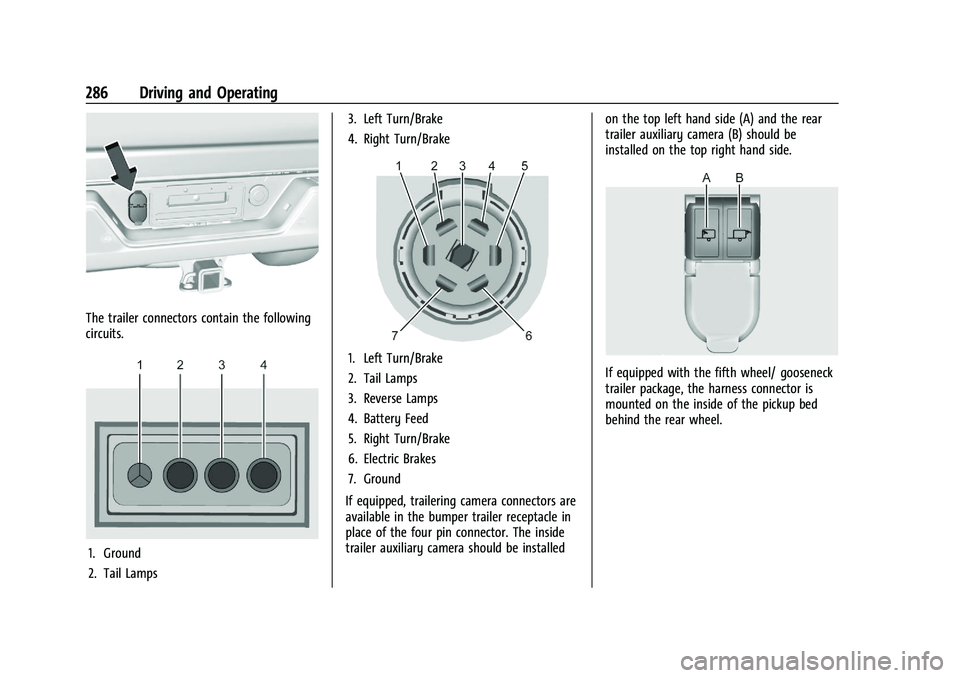
The trailer connectors contain the following
circuits.
1. Ground
2. Tail Lamps3. Left Turn/Brake
4. Right Turn/Brake
1. Left Turn/Brake
2. Tail Lamps
3. Reverse Lamps
4. Battery Feed
5. Right Turn/Brake
6. Electric Brakes
7. Ground
If equipped, trailering camera connectors are
available in the bumper trailer receptacle in
place of the four pin connector. The inside
trailer auxiliary camera should be installed on the top left hand side (A) and the rear
trailer auxiliary camera (B) should be
installed on the top right hand side.If equipped with the fifth wheel/ gooseneck
trailer package, the harness connector is
mounted on the inside of the pickup bed
behind the rear wheel.
Page 304 of 441
Chevrolet Silverado 2500 HD/3500 HD Owner Manual (GMNA-Localizing-U.
S./Canada/Mexico-15546003) - 2022 - CRC - 5/5/21
Driving and Operating 303
If Tow/Haul Mode is off and this setting is
on for a Trailer Profile, each time the
ignition is turned on a reminder will appear
to turn on Tow/Haul Mode when the Trailer
Profile is active.
If Tow/Haul Mode is on and this setting is
on for a Trailer Profile, the reminder will not
appear when the Trailer Profile is active.
Trailer Length Indicator
Touch Trailer Length Indicator to view the
Trailer Length Indicator settings page. If this
setting is ON a guideline is displayed in the
side mirror camera view to indicate the rear
of the attached trailer. If this setting is OFF
the guideline will not be displayed.
This setting will default to OFF if the trailer
length indicator feature is not set up. See
"Towing Assistance" for details on the setup.
Conversions and Add-Ons
Add-On Electrical Equipment
{Warning
The Data Link Connector (DLC) is used for
vehicle service and Emission Inspection/
Maintenance testing. SeeMalfunction
Indicator Lamp (Check Engine Light) 0116.
A device connected to the DLC —such as
an aftermarket fleet or driver-behavior
tracking device —may interfere with
vehicle systems. This could affect vehicle
operation and cause a crash. Such devices
may also access information stored in the
vehicle’s systems.
Caution
Some electrical equipment can damage
the vehicle or cause components to not
work and would not be covered by the
vehicle warranty. Always check with your
dealer before adding electrical equipment.
Add-on equipment can drain the vehicle's
12-volt battery, even if the vehicle is not
operating. The vehicle has an airbag system. Before
attempting to add anything electrical to the
vehicle, see
Servicing the Airbag-Equipped
Vehicle 071 and
Adding Equipment to the Airbag-Equipped
Vehicle 071.
For information on wiring auxiliary switches,
see www.gmupfitter.com or contact your
dealer.
Adding a Snow Plow or Similar
Equipment
Caution
Do not exceed 72 km/h (45 mph) with a
snow plow mounted to the vehicle. The
vehicle could overheat and be damaged.
Before installing a snow plow on the vehicle,
follow these guidelines:
Caution
If the vehicle does not have the snow
plow prep package, RPO VYU, adding a
plow can damage the vehicle, and the
repairs would not be covered by the
vehicle warranty. Unless the vehicle was
built to carry a snow plow, do not add
(Continued)
Page 312 of 441
Chevrolet Silverado 2500 HD/3500 HD Owner Manual (GMNA-Localizing-U.
S./Canada/Mexico-15546003) - 2022 - CRC - 5/5/21
Vehicle Care 311
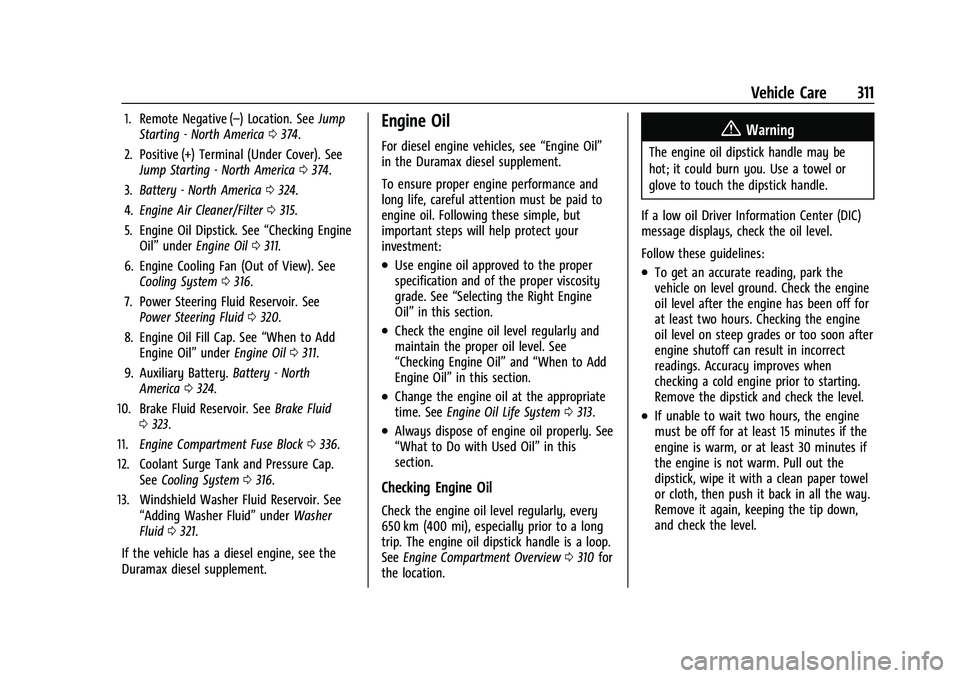
1. Remote Negative (–) Location. SeeJump
Starting - North America 0374.
2. Positive (+) Terminal (Under Cover). See Jump Starting - North America 0374.
3. Battery - North America 0324.
4. Engine Air Cleaner/Filter 0315.
5. Engine Oil Dipstick. See “Checking Engine
Oil” under Engine Oil 0311.
6. Engine Cooling Fan (Out of View). See Cooling System 0316.
7. Power Steering Fluid Reservoir. See Power Steering Fluid 0320.
8. Engine Oil Fill Cap. See “When to Add
Engine Oil” underEngine Oil 0311.
9. Auxiliary Battery. Battery - North
America 0324.
10. Brake Fluid Reservoir. See Brake Fluid
0 323.
11. Engine Compartment Fuse Block 0336.
12. Coolant Surge Tank and Pressure Cap. SeeCooling System 0316.
13. Windshield Washer Fluid Reservoir. See “Adding Washer Fluid” underWasher
Fluid 0321.
If the vehicle has a diesel engine, see the
Duramax diesel supplement.Engine Oil
For diesel engine vehicles, see “Engine Oil”
in the Duramax diesel supplement.
To ensure proper engine performance and
long life, careful attention must be paid to
engine oil. Following these simple, but
important steps will help protect your
investment:
.Use engine oil approved to the proper
specification and of the proper viscosity
grade. See “Selecting the Right Engine
Oil” in this section.
.Check the engine oil level regularly and
maintain the proper oil level. See
“Checking Engine Oil” and“When to Add
Engine Oil” in this section.
.Change the engine oil at the appropriate
time. SeeEngine Oil Life System 0313.
.Always dispose of engine oil properly. See
“What to Do with Used Oil” in this
section.
Checking Engine Oil
Check the engine oil level regularly, every
650 km (400 mi), especially prior to a long
trip. The engine oil dipstick handle is a loop.
See Engine Compartment Overview 0310 for
the location.
{Warning
The engine oil dipstick handle may be
hot; it could burn you. Use a towel or
glove to touch the dipstick handle.
If a low oil Driver Information Center (DIC)
message displays, check the oil level.
Follow these guidelines:
.To get an accurate reading, park the
vehicle on level ground. Check the engine
oil level after the engine has been off for
at least two hours. Checking the engine
oil level on steep grades or too soon after
engine shutoff can result in incorrect
readings. Accuracy improves when
checking a cold engine prior to starting.
Remove the dipstick and check the level.
.If unable to wait two hours, the engine
must be off for at least 15 minutes if the
engine is warm, or at least 30 minutes if
the engine is not warm. Pull out the
dipstick, wipe it with a clean paper towel
or cloth, then push it back in all the way.
Remove it again, keeping the tip down,
and check the level.
Page 339 of 441
Chevrolet Silverado 2500 HD/3500 HD Owner Manual (GMNA-Localizing-U.
S./Canada/Mexico-15546003) - 2022 - CRC - 5/5/21
338 Vehicle Care
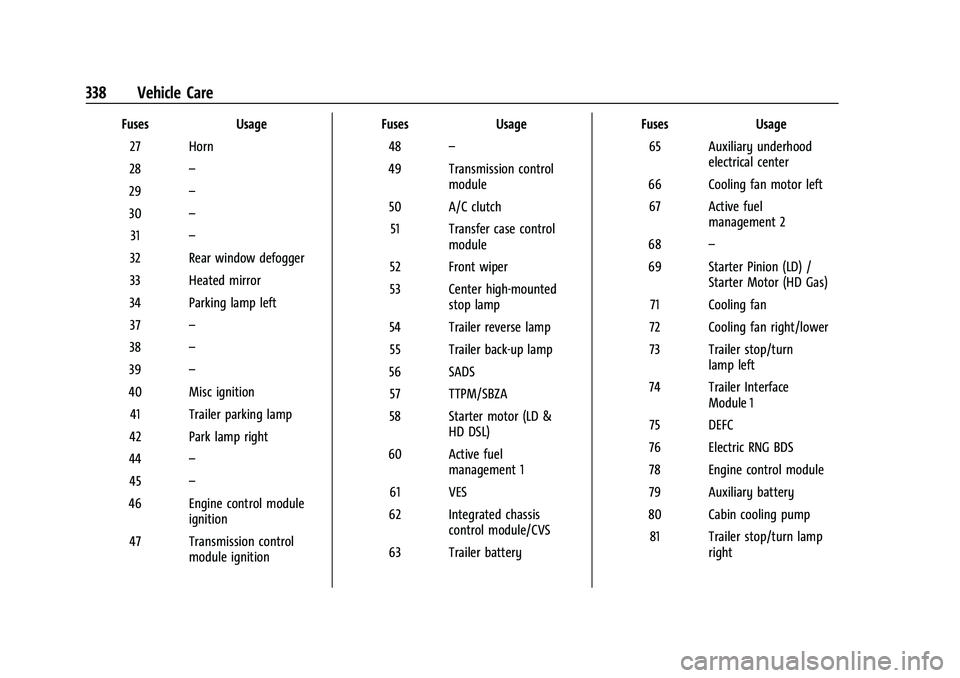
FusesUsage
27 Horn
28 –
29 –
30 –
31 –
32 Rear window defogger
33 Heated mirror
34 Parking lamp left 37 –
38 –
39 –
40 Misc ignition 41 Trailer parking lamp
42 Park lamp right
44 –
45 –
46 Engine control module ignition
47 Transmission control module ignition Fuses
Usage
48 –
49 Transmission control module
50 A/C clutch 51 Transfer case control module
52 Front wiper
53 Center high-mounted stop lamp
54 Trailer reverse lamp 55 Trailer back-up lamp
56 SADS 57 TTPM/SBZA
58 Starter motor (LD & HD DSL)
60 Active fuel management 1
61 VES
62 Integrated chassis control module/CVS
63 Trailer battery Fuses
Usage
65 Auxiliary underhood electrical center
66 Cooling fan motor left 67 Active fuel management 2
68 –
69 Starter Pinion (LD) / Starter Motor (HD Gas)
71 Cooling fan
72 Cooling fan right/lower
73 Trailer stop/turn lamp left
74 Trailer Interface Module 1
75 DEFC
76 Electric RNG BDS
78 Engine control module
79 Auxiliary battery
80 Cabin cooling pump 81 Trailer stop/turn lamp right
Page 344 of 441

Chevrolet Silverado 2500 HD/3500 HD Owner Manual (GMNA-Localizing-U.
S./Canada/Mexico-15546003) - 2022 - CRC - 5/5/21
Vehicle Care 343
FusesUsage
F22 Heated Steering Wheel
F23 MISC R/C
F24 Power Take Off/Reflective Light Auxiliary Display/
Instrument Panel Cluster/
Central Gateway Module/
Inside Rear View Mirror/
Overhead Console Module
Ignition
F25 Heating, Ventilation, and Air Conditioning Ignition/
Heating, Ventilation, and
Air Conditioning Auxiliary
F26 USB Ports/Special Equipment Option Retained
Accessory Power
F27 Accessory Power Outlet/ Retained Accessory Power
F28 Accessory Power Outlet/ Battery
F30 Sensing and Diagnostic Module/Parking Brake
F31 Body Control Module 4 Fuses
Usage
F32 Special Equipment Option/ Data Link Connection
F33 Body Control Module 8
F34 Cargo Lamp
F40 CGM –Central Gateway
Module
F41 Infotainment 1
F42 TCP –Telematics
Connectivity Platform
F43 –
F44 –
F45 Body Control Module 2
F46 Heating, Ventilation, and Air Conditioning/Battery 1
F47 Instrument Panel Cluster/ Battery
F48 Transmission Control Module
F49 Body Control Module 1 F50 –
F51 Battery 1
F52 Battery 2 Fuses
Usage
F53 –
F54 Sunroof F55 Driver Power Seat
F56 DC DC TRANS 1 F57 DC DC TRANS 2
F58 Infotainment 2
Circuit
Breakers Usage
1 Accessory Power Outlet 2
2 Accessory Power Outlet 1/ Cigarette Lighter
3 –
4 –
Relays Usage
K1 Run/Crank
K2 Retained Accessory Power/ Accessory 1
K4 –
K5 –
Page 430 of 441
Chevrolet Silverado 2500 HD/3500 HD Owner Manual (GMNA-Localizing-U.
S./Canada/Mexico-15546003) - 2022 - CRC - 5/5/21
Index 429
AudioBluetooth . . . . . . . . . . . . . . . . . . . . . . . . . . . . . . . 161
Automatic Dimming Mirrors . . . . . . . . . . . . . . . . . . . . . . . 37
Door Locks . . . . . . . . . . . . . . . . . . . . . . . . . . . . . . 22
Emergency Braking (AEB) . . . . . . . . . . . . . . 265
Headlamp System . . . . . . . . . . . . . . . . . . . . . . 141
Transmission . . . . . . . . . . . . . . . . . . . . . . . . . . . 235
Transmission Fluid . . . . . . . . . . . . . . . . . . . . . 314
Automatic Transmission Manual Mode . . . . . . . . . . . . . . . . . . . . . . . . . 238
Shift Lock Control Function Check . . . . . . 328
Auxiliary Roof Mounted Lamp . . . . . . . . . . . . . . . . . . . 144
Auxiliary Jack . . . . . . . . . . . . . . . . . . . . . . . . . . . . . 161
Avoiding Untrusted Media Devices . . . . . . . .158
Axle, Front . . . . . . . . . . . . . . . . . . . . . . . . . . . . . . . 326
Axle, Rear . . . . . . . . . . . . . . . . . . . . . . . . . . . . . . . . 326
B
Battery Exterior Lighting Battery Saver . . . . . . . . 147
Load Management . . . . . . . . . . . . . . . . . . . . . 147
Power Protection . . . . . . . . . . . . . . . . . . . . . . 147
Battery - North America . . . . . . . . . . . . 324, 374
Blade Replacement, Wiper . . . . . . . . . . . . . . . 328
Blind Spot Mirrors . . . . . . . . . . . . . . . . . . . . . . . . .37 Bluetooth
Overview . . . . . . . . . . . . . . . . . . . . . . . . . . 178, 179
Bluetooth Audio . . . . . . . . . . . . . . . . . . . . . . . . . . 161
Brake Parking, Electric . . . . . . . . . . . . . . . . . . . . . . . . 245
System Warning Light . . . . . . . . . . . . . . . . . . 117
Brake Pad Life System . . . . . . . . . . . . . . . . . . . 322
Brakes . . . . . . . . . . . . . . . . . . . . . . . . . . . . . . . . . . . 322
Antilock . . . . . . . . . . . . . . . . . . . . . . . . . . . . . . . . 244
Assist . . . . . . . . . . . . . . . . . . . . . . . . . . . . . . . . . . 246
Fluid . . . . . . . . . . . . . . . . . . . . . . . . . . . . . . . . . . . 323
Pad Life System . . . . . . . . . . . . . . . . . . . . . . . 322
Braking . . . . . . . . . . . . . . . . . . . . . . . . . . . . . . . . . . . 211 Automatic Emergency (AEB) . . . . . . . . . . . 265
Break-In, New Vehicle . . . . . . . . . . . . . . . . . . . . 226
Bulb Replacement Center High-Mounted Stoplamp(CHMSL) and Cargo Lamp . . . . . . . . . . . . 333
Halogen Bulbs . . . . . . . . . . . . . . . . . . . . . . . . . 331
Headlamp Aiming . . . . . . . . . . . . . . . . . . . . . . 330
Headlamps . . . . . . . . . . . . . . . . . . . . . . . . . . . . 330
Headlamps, Front Turn Signal, Sidemarker, and Parking Lamps . . . . . . 331
License Plate Lamps . . . . . . . . . . . . . . . . . . . 334
Taillamps, Turn Signal, Stoplamps, and Back-up Lamps . . . . . . . . . . . . . . . . . . 332
Buying New Tires . . . . . . . . . . . . . . . . . . . . . . . . 359
C
Calibration . . . . . . . . . . . . . . . . . . . . . . . . . . . . . . . 103
California Perchlorate MaterialsRequirements . . . . . . . . . . . . . . . . . . . . . . . . 307
California Proposition 65 Warning . . . . . . . . . . . . . . . . . . . . . . . 324, 374, Back Cover
Camera Rear Vision (RVC) . . . . . . . . . . . . . . . . . . . . . . 254
Truck Bed . . . . . . . . . . . . . . . . . . . . . . . . . . . . . . . 41
Canadian Vehicle Owners . . . . . . . . . . . . . . . . . . . 1
Capacities and Specifications . . . . . . . . . . . . . 406
Carbon Monoxide Engine Exhaust . . . . . . . . . . . . . . . . . . . . . . . . 235
Tailgate . . . . . . . . . . . . . . . . . . . . . . . . . . . . . . . . . 23
Winter Driving . . . . . . . . . . . . . . . . . . . . . . . . . 218
Cargo Tie-Downs . . . . . . . . . . . . . . . . . . . . . . . . . . . . . . 98
Caution, Danger, and Warning . . . . . . . . . . . . . .2
Center Console Storage . . . . . . . . . . . . . . . . . . . 97
Center High-Mounted Stoplamp (CHMSL) and Cargo Lamp . . . . . . . . . . . . . . 333
Center Seat . . . . . . . . . . . . . . . . . . . . . . . . . . . . . . . 48
Chains, Tire . . . . . . . . . . . . . . . . . . . . . . . . . . . . . . 362
Charging
Wireless . . . . . . . . . . . . . . . . . . . . . . . . . . . . . . . 104
Charging System Light . . . . . . . . . . . . . . . . . . . . 116