2023 CHEVROLET SILVERADO 2500 cooling
[x] Cancel search: coolingPage 148 of 441
Chevrolet Silverado 2500 HD/3500 HD Owner Manual (GMNA-Localizing-U.
S./Canada/Mexico-15546003) - 2022 - CRC - 5/5/21
Lighting 147
Battery Load Management
The vehicle has Electric Power Management
(EPM), which estimates the battery's
temperature and state of charge. It then
adjusts the voltage for best performance
and extended life of the battery.
When the battery's state of charge is low,
the voltage is raised slightly to quickly bring
the charge back up. When the state of
charge is high, the voltage is lowered
slightly to prevent overcharging. The
voltmeter gauge or the voltage display on
the Driver Information Center (DIC),
if equipped, may show the voltage moving
up or down. This is normal. If there is a
problem, an alert will be displayed.
The battery can be discharged at idle if the
electrical loads are very high. This is true for
all vehicles. This is because the generator
(alternator) may not be spinning fast
enough at idle to produce all the power that
is needed for very high electrical loads.
A high electrical load occurs when several of
the following are on, such as: headlamps,
high beams, fog lamps, rear window
defogger, climate control fan at high speed,heated seats, engine cooling fans, trailer
loads, and loads plugged into accessory
power outlets.
EPM works to prevent excessive discharge of
the battery. It does this by balancing the
generator's output and the vehicle's
electrical needs. It can increase engine idle
speed to generate more power, whenever
needed. It can temporarily reduce the power
demands of some accessories.
Normally, these actions occur in steps or
levels, without being noticeable. In rare
cases at the highest levels of corrective
action, this action may be noticeable to the
driver. If so, a DIC message might be
displayed and it is recommended that the
driver reduce the electrical loads as much as
possible.
Battery Power Protection
This feature helps prevent the battery from
being drained, if the interior courtesy lamps
or reading lamps are accidentally left on.
If any of these lamps are left on, they
automatically turn off after 10 minutes,
if the ignition is off. The lamps will not
come back on again until one of the
following occurs:
.The ignition is turned on.
.The doors are closed and then re-opened.
Exterior Lighting Battery Saver
The exterior lamps turn off about 10 minutes
after the ignition is turned off, if the parking
lamps or headlamps have been manually
left on. This protects against draining the
battery. To restart the 10-minute timer, turn
the exterior lamp control to the
Oposition
and then back to the
;or2position.
To keep the lamps on for more than
10 minutes, the ignition must be on or in
ACC/ACCESSORY.
Page 203 of 441
Chevrolet Silverado 2500 HD/3500 HD Owner Manual (GMNA-Localizing-U.
S./Canada/Mexico-15546003) - 2022 - CRC - 5/5/21
202 Climate Controls
Climate Controls
Climate Control Systems
Climate Control Systems . . . . . . . . . . . . . . 202
Dual Automatic Climate ControlSystem . . . . . . . . . . . . . . . . . . . . . . . . . . . . . . 204
Air Vents
Air Vents . . . . . . . . . . . . . . . . . . . . . . . . . . . . . . 207
Maintenance
Passenger Compartment Air Filter . . . . . 207
Service . . . . . . . . . . . . . . . . . . . . . . . . . . . . . . . . 208
Climate Control Systems
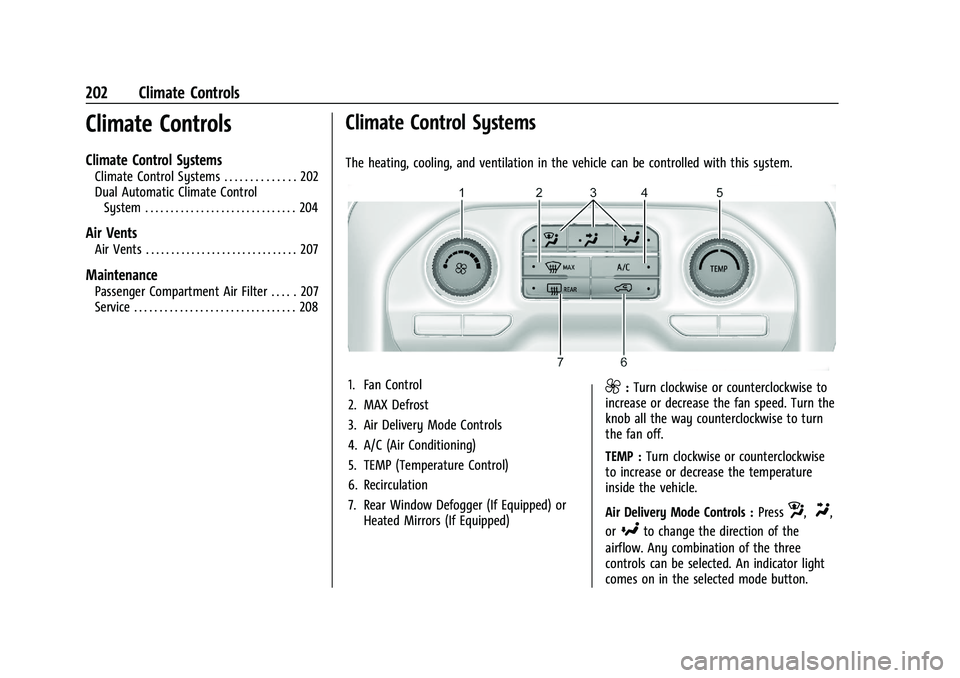
The heating, cooling, and ventilation in the vehicle can be controlled with this system.
1. Fan Control
2. MAX Defrost
3. Air Delivery Mode Controls
4. A/C (Air Conditioning)
5. TEMP (Temperature Control)
6. Recirculation
7. Rear Window Defogger (If Equipped) or Heated Mirrors (If Equipped)9:Turn clockwise or counterclockwise to
increase or decrease the fan speed. Turn the
knob all the way counterclockwise to turn
the fan off.
TEMP : Turn clockwise or counterclockwise
to increase or decrease the temperature
inside the vehicle.
Air Delivery Mode Controls : Press
z,Y,
or
[to change the direction of the
airflow. Any combination of the three
controls can be selected. An indicator light
comes on in the selected mode button.
Page 205 of 441
Chevrolet Silverado 2500 HD/3500 HD Owner Manual (GMNA-Localizing-U.
S./Canada/Mexico-15546003) - 2022 - CRC - 5/5/21
204 Climate Controls
Dual Automatic Climate Control System
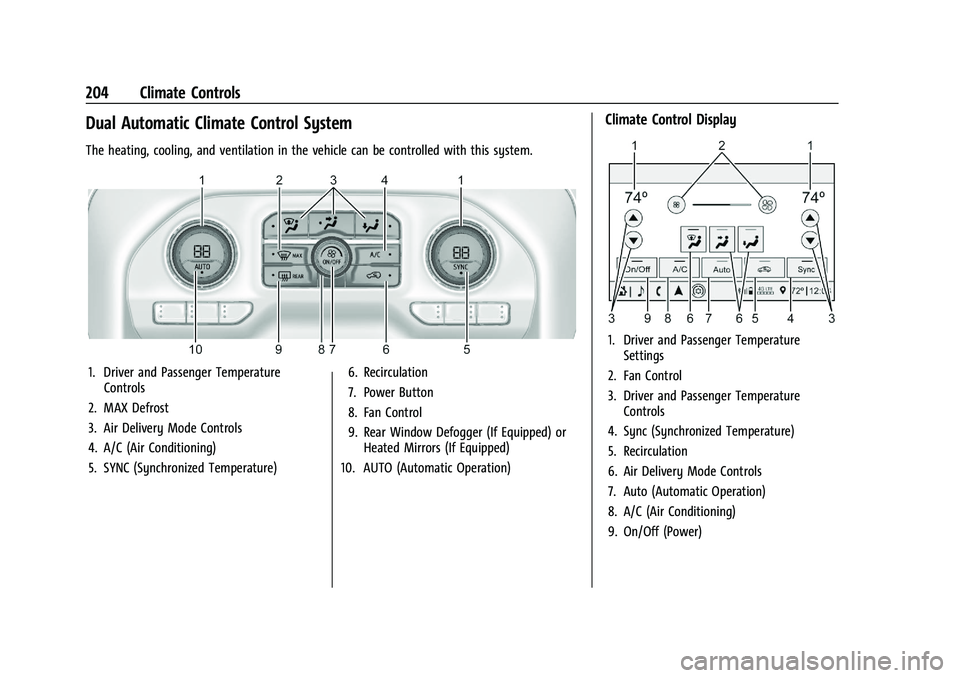
The heating, cooling, and ventilation in the vehicle can be controlled with this system.
1. Driver and Passenger TemperatureControls
2. MAX Defrost
3. Air Delivery Mode Controls
4. A/C (Air Conditioning)
5. SYNC (Synchronized Temperature) 6. Recirculation
7. Power Button
8. Fan Control
9. Rear Window Defogger (If Equipped) or
Heated Mirrors (If Equipped)
10. AUTO (Automatic Operation)
Climate Control Display
1. Driver and Passenger Temperature Settings
2. Fan Control
3. Driver and Passenger Temperature Controls
4. Sync (Synchronized Temperature)
5. Recirculation
6. Air Delivery Mode Controls
7. Auto (Automatic Operation)
8. A/C (Air Conditioning)
9. On/Off (Power)
Page 218 of 441
Chevrolet Silverado 2500 HD/3500 HD Owner Manual (GMNA-Localizing-U.
S./Canada/Mexico-15546003) - 2022 - CRC - 5/5/21
Driving and Operating 217
Warning (Continued)
the ice; you and your passengers could
drown. Drive your vehicle on safe
surfaces only.
Driving in Water
{Warning
Driving through rushing water can be
dangerous. Deep water can sweep your
vehicle downstream and you and your
passengers could drown. If it is only
shallow water, it can still wash away the
ground from under your tires. Traction
could be lost, and the vehicle could roll
over. Do not drive through rushing water.
Caution
Do not drive through standing water if it
is deep enough to cover the wheel hubs,
axles, or exhaust pipe. Deep water can
damage the axle and other vehicle parts.
If the standing water is not too deep, drive
through it slowly. At faster speeds, water
can get into the engine and cause it to stall.
Stalling can occur if the exhaust pipe is under water. Do not turn off the ignition
when driving through water. If the exhaust
pipe is under water, the engine will not
start. When going through water, the brakes
get wet and it may take longer to stop. See
“Driving on Wet Roads”
later in this section.
After Off-Road Driving
Remove any brush or debris that has
collected on the underbody or chassis,
or under the hood. These accumulations can
be a fire hazard. Re-install underbody air
deflector and air dam if removed.
After operation in mud or sand, have the
brake linings cleaned and checked. These
substances can cause glazing and uneven
braking. Check the body structure, driveline,
steering, suspension, wheels, tires, and
exhaust system for damage and check the
fuel lines and cooling system for any
leakage.
More frequent maintenance service is
required. See theMaintenance Schedule
0 392.
Driving on Wet Roads
Rain and wet roads can reduce vehicle
traction and affect your ability to stop and
accelerate. Always drive slower in these types of driving conditions and avoid driving
through large puddles and deep-standing or
flowing water.
{Warning
Wet brakes can cause crashes. They
might not work as well in a quick stop
and could cause pulling to one side. You
could lose control of the vehicle.
After driving through a large puddle of
water or a car/vehicle wash, lightly apply
the brake pedal until the brakes work
normally.
Flowing or rushing water creates strong
forces. Driving through flowing water
could cause the vehicle to be carried
away. If this happens, you and other
vehicle occupants could drown. Do not
ignore police warnings and be very
cautious about trying to drive through
flowing water.
Hydroplaning
Hydroplaning is dangerous. Water can build
up under the vehicle's tires so they actually
ride on the water. This can happen if the
Page 219 of 441
Chevrolet Silverado 2500 HD/3500 HD Owner Manual (GMNA-Localizing-U.
S./Canada/Mexico-15546003) - 2022 - CRC - 5/5/21
218 Driving and Operating
road is wet enough and you are going fast
enough. When the vehicle is hydroplaning, it
has little or no contact with the road.
There is no hard and fast rule about
hydroplaning. The best advice is to slow
down when the road is wet.
Other Rainy Weather Tips
Besides slowing down, other wet weather
driving tips include:
.Allow extra following distance.
.Pass with caution.
.Keep windshield wiping equipment in
good shape.
.Keep the windshield washer fluid reservoir
filled.
.Have good tires with proper tread depth.
SeeTires 0344.
.Turn off cruise control.
Hill and Mountain Roads
Driving on steep hills or through mountains
is different than driving on flat or rolling
terrain. Tips include:
.Keep the vehicle serviced and in good
shape.
.Check all fluid levels and brakes, tires,
cooling system, and transmission.
.Shift to a lower gear when going down
steep or long hills.
{Warning
Using the brakes to slow the vehicle on a
long downhill slope can cause brake
overheating, can reduce brake
performance, and could result in a loss of
braking. Shift the transmission to a lower
gear to let the engine assist the brakes
on a steep downhill slope.
{Warning
Coasting downhill in N (Neutral) or with
the ignition off is dangerous. This can
cause overheating of the brakes and loss
of steering assist. Always have the engine
running and the vehicle in gear.
.Drive at speeds that keep the vehicle in
its own lane. Do not swing wide or cross
the center line.
.Be alert on top of hills; something could
be in your lane (e.g., stalled car, crash).
.Pay attention to special road signs (e.g.,
falling rocks area, winding roads, long
grades, passing or no-passing zones) and
take appropriate action.
Winter Driving
Driving on Snow or Ice
Caution
To avoid damage to the wheels and
brake components, always clear snow and
ice from inside the wheels and
underneath the vehicle before driving.
Snow or ice between the tires and the road
creates less traction or grip, so drive
carefully. Wet ice can occur at about 0 °C
(32 °F) when freezing rain begins to fall.
Avoid driving on wet ice or in freezing rain
until roads can be treated.
For Slippery Road Driving:
.Accelerate gently. Accelerating too quickly
causes the wheels to spin and makes the
surface under the tires slick.
.Turn on Traction Control. See Traction
Control/Electronic Stability Control 0247.
.The Antilock Brake System (ABS) improves
vehicle stability during hard stops, but
the brakes should be applied sooner than
when on dry pavement. See Antilock
Brake System (ABS) 0244.
Page 241 of 441
Chevrolet Silverado 2500 HD/3500 HD Owner Manual (GMNA-Localizing-U.
S./Canada/Mexico-15546003) - 2022 - CRC - 5/5/21
240 Driving and Operating
10-Speed Automatic TransmissionGear before shifting from D (Drive) to L (Manual Mode) 10th 9th 8th 7th 6th 5th 4th 3rd 2nd 1st
Range after shifting from D (Drive) to L (Manual
Mode) –Tow/Haul not engaged L7 L7 L7 L6 L5 L4 L3 L3 L2 L1
Range after shifting from D (Drive) to L (Manual
Mode) –Tow/Haul engaged L7 L7 L6 L5 L4 L3 L3 L3 L2 L1
Tow/Haul Mode
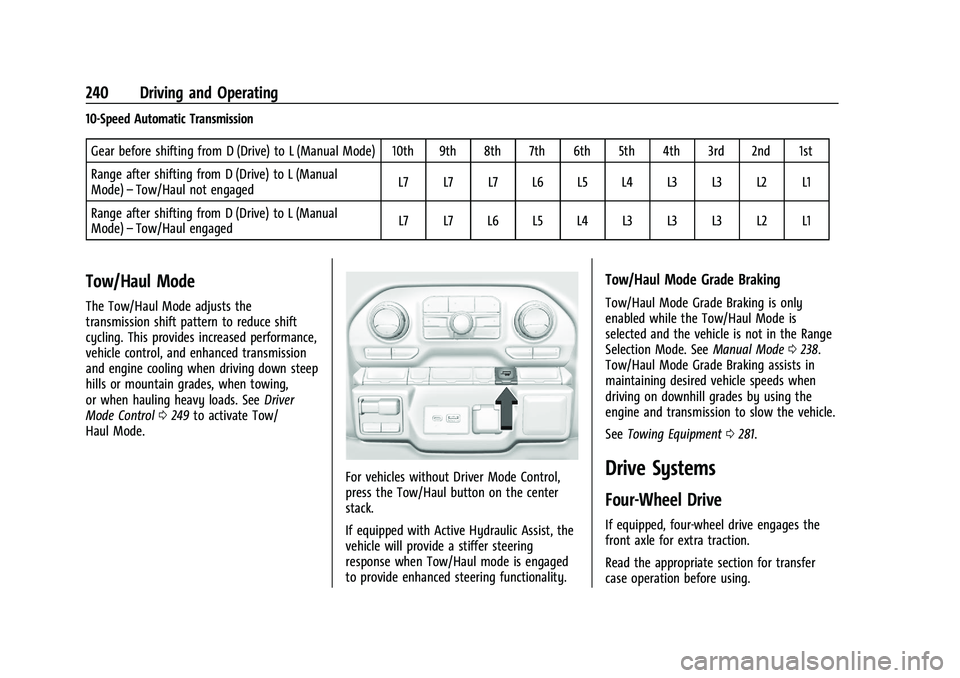
The Tow/Haul Mode adjusts the
transmission shift pattern to reduce shift
cycling. This provides increased performance,
vehicle control, and enhanced transmission
and engine cooling when driving down steep
hills or mountain grades, when towing,
or when hauling heavy loads. See
Driver
Mode Control 0249 to activate Tow/
Haul Mode.
For vehicles without Driver Mode Control,
press the Tow/Haul button on the center
stack.
If equipped with Active Hydraulic Assist, the
vehicle will provide a stiffer steering
response when Tow/Haul mode is engaged
to provide enhanced steering functionality.
Tow/Haul Mode Grade Braking
Tow/Haul Mode Grade Braking is only
enabled while the Tow/Haul Mode is
selected and the vehicle is not in the Range
Selection Mode. See Manual Mode0238.
Tow/Haul Mode Grade Braking assists in
maintaining desired vehicle speeds when
driving on downhill grades by using the
engine and transmission to slow the vehicle.
See Towing Equipment 0281.
Drive Systems
Four-Wheel Drive
If equipped, four-wheel drive engages the
front axle for extra traction.
Read the appropriate section for transfer
case operation before using.
Page 278 of 441
Chevrolet Silverado 2500 HD/3500 HD Owner Manual (GMNA-Localizing-U.
S./Canada/Mexico-15546003) - 2022 - CRC - 5/5/21
Driving and Operating 277
Warning (Continued)
.Do not move the vehicle if someone is
in the path of the trailer. Some parts
of the trailer might be underwater and
not visible to people who are assisting
in launching the boat.
Disconnect the wiring to the trailer before
backing the trailer into the water to prevent
damage to the electrical circuits on the
trailer. Reconnect the wiring to the trailer
after removing the trailer from the water.
If the trailer has electric brakes that can
function when the trailer is submerged, it
might help to leave the electrical trailer
connector attached to maintain trailer brake
functionality while on the boat ramp.
To back the trailer into the water: 1. If equipped, place the vehicle in four-wheel-drive high.
2. Slowly back down the boat ramp until the boat is floating, but no further than
necessary.
3. Press and hold the brake pedal, but do not shift into P (Park) yet.
4. Have someone place chocks under the front wheels of the vehicle. 5. Gradually release the brake pedal to
allow the chocks to absorb the load of
the trailer.
6. Reapply the brake pedal. Then apply the parking brake and shift into P (Park).
7. Release the brake pedal.
Pulling the Trailer from the Water
To pull the trailer out of the water: 1. Press and hold the brake pedal.
2. Start the engine and shift into gear.
3. Release the parking brake.
4. Let up on the brake pedal.
5. Drive slowly until the tires are clear of the chocks.
6. Stop and have someone pick up and store the chocks.
7. Slowly pull the trailer from the water.
8. Once the vehicle and trailer have been driven from the sloped part of the boat
ramp, the vehicle can be shifted from
four-wheel-drive high. Shift into the drive
mode that is appropriate for the road
conditions.
Caution
If the vehicle tires begin to spin and the
vehicle begins to slide toward the water,
remove your foot from the accelerator
pedal and apply the brake pedal. Seek
help to have the vehicle towed up
the ramp.
Maintenance when Trailer Towing
The vehicle needs service more often when
used to tow trailers. See Maintenance
Schedule 0392. It is especially important to
check the engine oil, axle lubricant, belts,
cooling system, and brake system before
and during each trip.
Check periodically to see that all nuts and
bolts on the trailer hitch are tight.
Engine Cooling When Trailer Towing
The cooling system may temporarily
overheat during severe operating conditions.
See Engine Overheating 0318.
Page 307 of 441
Chevrolet Silverado 2500 HD/3500 HD Owner Manual (GMNA-Localizing-U.
S./Canada/Mexico-15546003) - 2022 - CRC - 5/5/21
306 Vehicle Care
Vehicle Care
General Information
General Information . . . . . . . . . . . . . . . . . . . 307
California Perchlorate MaterialsRequirements . . . . . . . . . . . . . . . . . . . . . . . . 307
Accessories and Modifications . . . . . . . . . 307
Vehicle Checks
Doing Your Own Service Work . . . . . . . . 308
Hood . . . . . . . . . . . . . . . . . . . . . . . . . . . . . . . . . . 308
Engine Compartment Overview . . . . . . . . 310
Engine Oil . . . . . . . . . . . . . . . . . . . . . . . . . . . . . . 311
Engine Oil Life System . . . . . . . . . . . . . . . . . 313
Automatic Transmission Fluid . . . . . . . . . . 314
Engine Air Filter Life System . . . . . . . . . . . 314
Engine Air Cleaner/Filter . . . . . . . . . . . . . . . 315
Cooling System . . . . . . . . . . . . . . . . . . . . . . . . 316
Engine Overheating . . . . . . . . . . . . . . . . . . . . 318
Overheated Engine Protection Operating Mode . . . . . . . . . . . . . . . . . . . . . 320
Engine Fan . . . . . . . . . . . . . . . . . . . . . . . . . . . . 320
Power Steering Fluid . . . . . . . . . . . . . . . . . . 320
Washer Fluid . . . . . . . . . . . . . . . . . . . . . . . . . . 321
Brakes . . . . . . . . . . . . . . . . . . . . . . . . . . . . . . . . . 322
Brake Pad Life System . . . . . . . . . . . . . . . . . 322
Brake Fluid . . . . . . . . . . . . . . . . . . . . . . . . . . . . 323
Battery - North America . . . . . . . . . . . . . . . 324
Four-Wheel Drive . . . . . . . . . . . . . . . . . . . . . . 326
Front Axle . . . . . . . . . . . . . . . . . . . . . . . . . . . . . 326 Rear Axle . . . . . . . . . . . . . . . . . . . . . . . . . . . . . . 326
Noise Control System . . . . . . . . . . . . . . . . . 326
Starter Switch Check . . . . . . . . . . . . . . . . . . . 327
Automatic Transmission Shift Lock
Control Function Check . . . . . . . . . . . . . . 328
Ignition Transmission Lock Check . . . . . . 328
Park Brake and P (Park) Mechanism Check . . . . . . . . . . . . . . . . . . . . . . . . . . . . . . . . 328
Wiper Blade Replacement . . . . . . . . . . . . . 328
Glass Replacement . . . . . . . . . . . . . . . . . . . . 329
Windshield Replacement . . . . . . . . . . . . . . 329
Gas Strut(s) . . . . . . . . . . . . . . . . . . . . . . . . . . . 329
Headlamp Aiming
Front Headlamp Aiming . . . . . . . . . . . . . . . 330
Bulb Replacement
Bulb Replacement . . . . . . . . . . . . . . . . . . . . . 330
Halogen Bulbs . . . . . . . . . . . . . . . . . . . . . . . . . 331
LED Lighting . . . . . . . . . . . . . . . . . . . . . . . . . . . 331
Headlamps, Front Turn Signal, Sidemarker, and Parking Lamps . . . . . . 331
Taillamps, Turn Signal, Stoplamps, and Back-Up Lamps . . . . . . . . . . . . . . . . . . . . . . . 332
Center High-Mounted Stoplamp (CHMSL) and Cargo Lamp . . . . . . . . . . . . 333
License Plate Lamp . . . . . . . . . . . . . . . . . . . . 334
Electrical System
Electrical System Overload . . . . . . . . . . . . 334
Fuses and Circuit Breakers . . . . . . . . . . . . . 336 Engine Compartment Fuse Block . . . . . . 336
Instrument Panel Fuse Block (Left) . . . . 339
Instrument Panel Fuse Block (Right) . . . 341
Wheels and Tires
Tires . . . . . . . . . . . . . . . . . . . . . . . . . . . . . . . . . . 344
All-Season Tires . . . . . . . . . . . . . . . . . . . . . . . 344
Winter Tires . . . . . . . . . . . . . . . . . . . . . . . . . . . 345
All-Terrain Tires . . . . . . . . . . . . . . . . . . . . . . . . 345
Tire Sidewall Labeling . . . . . . . . . . . . . . . . . 345
Tire Designations . . . . . . . . . . . . . . . . . . . . . . 346
Tire Terminology and Definitions . . . . . . 347
Tire Pressure . . . . . . . . . . . . . . . . . . . . . . . . . . 349
Tire Pressure Monitor System . . . . . . . . . 350
Tire Pressure Monitor Operation . . . . . . . 351
Tire Inspection . . . . . . . . . . . . . . . . . . . . . . . . . 355
Tire Rotation . . . . . . . . . . . . . . . . . . . . . . . . . . 356
When It Is Time for New Tires . . . . . . . . 358
Buying New Tires . . . . . . . . . . . . . . . . . . . . . 359
Different Size Tires and Wheels . . . . . . . 360
Uniform Tire Quality Grading . . . . . . . . . 360
Wheel Alignment and Tire Balance . . . . 361
Wheel Replacement . . . . . . . . . . . . . . . . . . . 361
Tire Chains . . . . . . . . . . . . . . . . . . . . . . . . . . . . 362
If a Tire Goes Flat . . . . . . . . . . . . . . . . . . . . . 363
Tire Changing . . . . . . . . . . . . . . . . . . . . . . . . . 364
Full-Size Spare Tire . . . . . . . . . . . . . . . . . . . . 374
Jump Starting
Jump Starting - North America . . . . . . . . 374