2023 CHEVROLET SILVERADO 1500 instrument panel
[x] Cancel search: instrument panelPage 144 of 463
Chevrolet Silverado 1500 Owner Manual (GMNA-Localizing-U.S./Canada/
Mexico/Paraguay-16515119) - 2023 - CRC - 6/2/22
Lighting 143
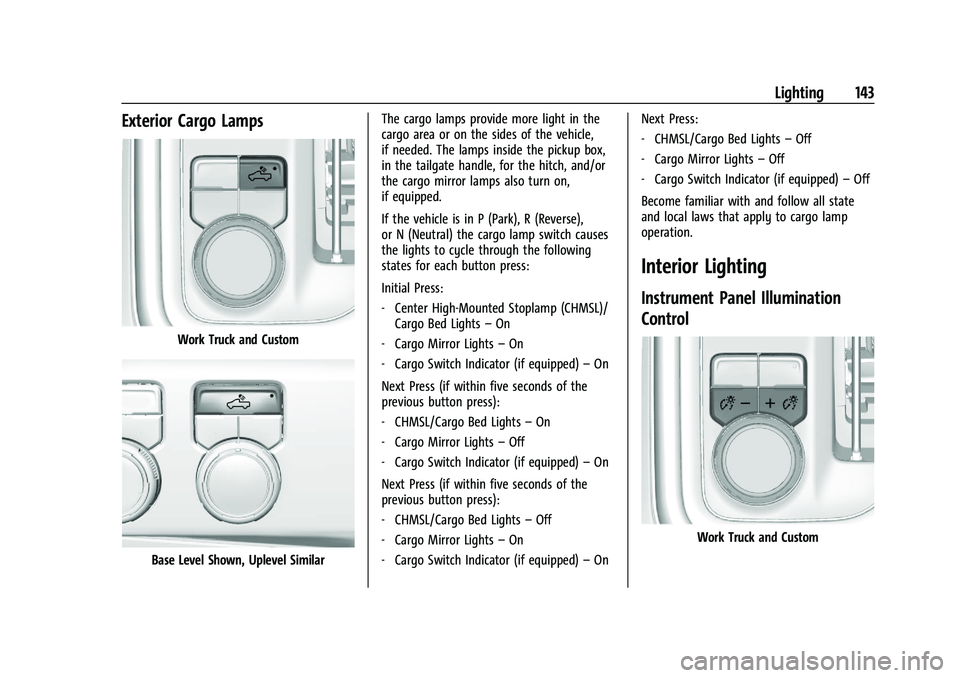
Exterior Cargo Lamps
Work Truck and Custom
Base Level Shown, Uplevel SimilarThe cargo lamps provide more light in the
cargo area or on the sides of the vehicle,
if needed. The lamps inside the pickup box,
in the tailgate handle, for the hitch, and/or
the cargo mirror lamps also turn on,
if equipped.
If the vehicle is in P (Park), R (Reverse),
or N (Neutral) the cargo lamp switch causes
the lights to cycle through the following
states for each button press:
Initial Press:
‐
Center High-Mounted Stoplamp (CHMSL)/
Cargo Bed Lights –On
‐ Cargo Mirror Lights –On
‐ Cargo Switch Indicator (if equipped) –On
Next Press (if within five seconds of the
previous button press):
‐ CHMSL/Cargo Bed Lights –On
‐ Cargo Mirror Lights –Off
‐ Cargo Switch Indicator (if equipped) –On
Next Press (if within five seconds of the
previous button press):
‐ CHMSL/Cargo Bed Lights –Off
‐ Cargo Mirror Lights –On
‐ Cargo Switch Indicator (if equipped) –On Next Press:
‐
CHMSL/Cargo Bed Lights –Off
‐ Cargo Mirror Lights –Off
‐ Cargo Switch Indicator (if equipped) –Off
Become familiar with and follow all state
and local laws that apply to cargo lamp
operation.
Interior Lighting
Instrument Panel Illumination
Control
Work Truck and Custom
Page 145 of 463
Chevrolet Silverado 1500 Owner Manual (GMNA-Localizing-U.S./Canada/
Mexico/Paraguay-16515119) - 2023 - CRC - 6/2/22
144 Lighting
Base Level Shown, Uplevel Similar
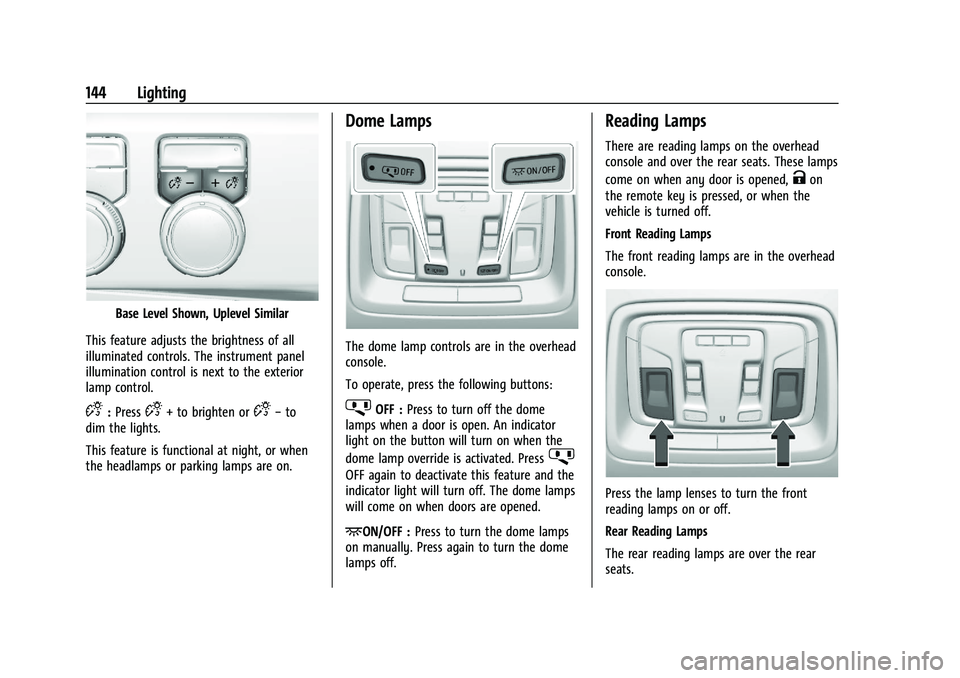
This feature adjusts the brightness of all
illuminated controls. The instrument panel
illumination control is next to the exterior
lamp control.
D: PressD+ to brighten orD− to
dim the lights.
This feature is functional at night, or when
the headlamps or parking lamps are on.
Dome Lamps
The dome lamp controls are in the overhead
console.
To operate, press the following buttons:
jOFF : Press to turn off the dome
lamps when a door is open. An indicator
light on the button will turn on when the
dome lamp override is activated. Press
j
OFF again to deactivate this feature and the
indicator light will turn off. The dome lamps
will come on when doors are opened.
+ON/OFF : Press to turn the dome lamps
on manually. Press again to turn the dome
lamps off.
Reading Lamps
There are reading lamps on the overhead
console and over the rear seats. These lamps
come on when any door is opened,
Kon
the remote key is pressed, or when the
vehicle is turned off.
Front Reading Lamps
The front reading lamps are in the overhead
console.
Press the lamp lenses to turn the front
reading lamps on or off.
Rear Reading Lamps
The rear reading lamps are over the rear
seats.
Page 191 of 463
Chevrolet Silverado 1500 Owner Manual (GMNA-Localizing-U.S./Canada/
Mexico/Paraguay-16515119) - 2023 - CRC - 6/2/22
190 Climate Controls
Remote Start Climate Control Operation :
If equipped with remote start, the climate
control system may run when the vehicle is
started remotely. If equipped with heated or
ventilated seats or a heated steering wheel,
these features may come on during a
remote start. SeeRemote Vehicle Start 018,
Heated and Ventilated Front Seats 049, and
Heated Steering Wheel 099.
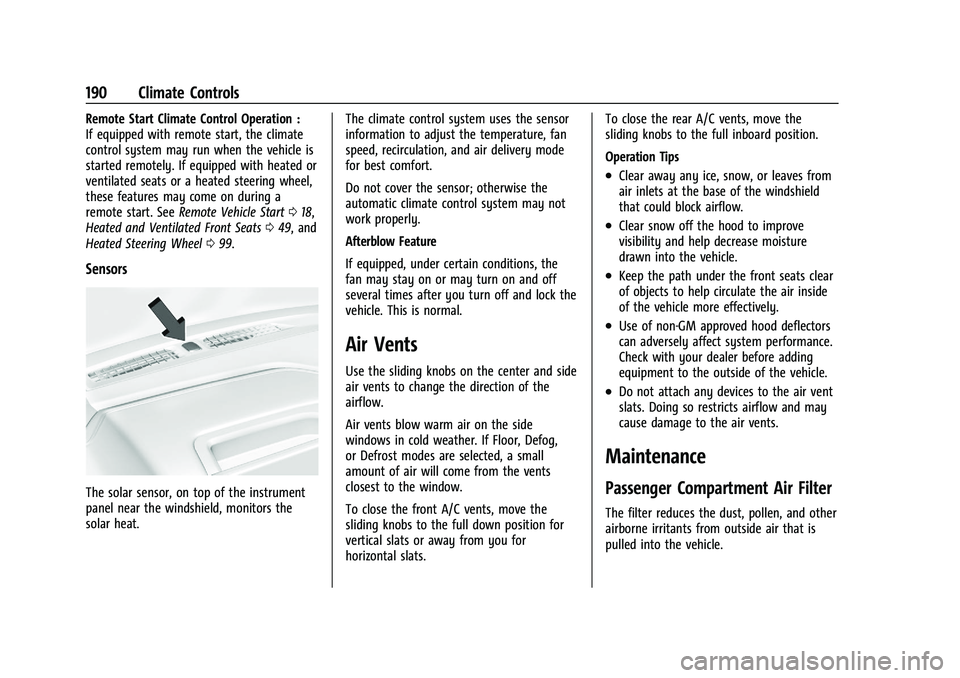
Sensors
The solar sensor, on top of the instrument
panel near the windshield, monitors the
solar heat. The climate control system uses the sensor
information to adjust the temperature, fan
speed, recirculation, and air delivery mode
for best comfort.
Do not cover the sensor; otherwise the
automatic climate control system may not
work properly.
Afterblow Feature
If equipped, under certain conditions, the
fan may stay on or may turn on and off
several times after you turn off and lock the
vehicle. This is normal.
Air Vents
Use the sliding knobs on the center and side
air vents to change the direction of the
airflow.
Air vents blow warm air on the side
windows in cold weather. If Floor, Defog,
or Defrost modes are selected, a small
amount of air will come from the vents
closest to the window.
To close the front A/C vents, move the
sliding knobs to the full down position for
vertical slats or away from you for
horizontal slats.To close the rear A/C vents, move the
sliding knobs to the full inboard position.
Operation Tips
.Clear away any ice, snow, or leaves from
air inlets at the base of the windshield
that could block airflow.
.Clear snow off the hood to improve
visibility and help decrease moisture
drawn into the vehicle.
.Keep the path under the front seats clear
of objects to help circulate the air inside
of the vehicle more effectively.
.Use of non-GM approved hood deflectors
can adversely affect system performance.
Check with your dealer before adding
equipment to the outside of the vehicle.
.Do not attach any devices to the air vent
slats. Doing so restricts airflow and may
cause damage to the air vents.
Maintenance
Passenger Compartment Air Filter
The filter reduces the dust, pollen, and other
airborne irritants from outside air that is
pulled into the vehicle.
Page 204 of 463
Chevrolet Silverado 1500 Owner Manual (GMNA-Localizing-U.S./Canada/
Mexico/Paraguay-16515119) - 2023 - CRC - 6/2/22
Driving and Operating 203
Cold Weather Mode
In very low temperatures, a cold weather
message may display on the Driver
Information Center (DIC). The engine speed,
transmission shift patterns, and cabin fan
speed may operate differently to enable the
vehicle to warm up quicker. You can
manually override the cabin fan speed in
cold weather mode.
Blizzard Conditions
Stop the vehicle in a safe place and signal
for help. Stay with the vehicle unless there
is help nearby. If possible, use Roadside
Assistance. SeeRoadside Assistance Program
0 433. To get help and keep everyone in the
vehicle safe:
.Turn on the hazard warning flashers.
.Tie a red cloth to an outside mirror.
{Warning
Snow can trap engine exhaust under the
vehicle. This may cause exhaust gases to
get inside. Engine exhaust contains
carbon monoxide (CO), which cannot be
seen or smelled. It can cause
unconsciousness and even death.
(Continued)
Warning (Continued)
If the vehicle is stuck in snow:
.Clear snow from the base of the
vehicle, especially any blocking the
exhaust pipe.
.Open a window about 5 cm (2 in) on
the vehicle side that is away from the
wind, to bring in fresh air.
.Fully open the air outlets on or under
the instrument panel.
.Adjust the climate control system to
circulate the air inside the vehicle and
set the fan speed to the highest
setting. See“Climate Control Systems.”
For more information about CO, see
Engine Exhaust 0220.
To save fuel, run the engine for short
periods to warm the vehicle and then shut
the engine off and partially close the
window. Moving about to keep warm also
helps.
If it takes time for help to arrive, when
running the engine, push the accelerator
pedal slightly so the engine runs faster than
the idle speed. This keeps the battery charged to restart the vehicle and to signal
for help with the headlamps. Do this as
little as possible, to save fuel.
If the Vehicle Is Stuck
Slowly and cautiously spin the wheels to
free the vehicle when stuck in sand, mud,
ice, or snow. See
“Rocking the Vehicle to Get
It Out” later in this section.
If equipped, the front and rear axles may be
locked to improve traction. See Locking Front
Axle 0244 and
Locking Rear Axle 0244.
The Traction Control/Electronic Stability
Control can often help to free a stuck
vehicle. See Traction Control/Electronic
Stability Control 0237. If TC/ESC cannot free
the vehicle, see “Rocking the Vehicle to Get
it Out” following.
{Warning
If the vehicle's tires spin at high speed,
they can explode, and you or others
could be injured. The vehicle can
overheat, causing an engine compartment
fire or other damage. Spin the wheels as
little as possible and avoid going above
56 km/h (35 mph).
Page 245 of 463
Chevrolet Silverado 1500 Owner Manual (GMNA-Localizing-U.S./Canada/
Mexico/Paraguay-16515119) - 2023 - CRC - 6/2/22
244 Driving and Operating
vehicles with the limited-slip differential,
driven under severe conditions, the rear axle
fluid should be changed. SeeMaintenance
Schedule 0417.
Locking Rear Axle
If equipped, the locking rear axle can give
the vehicle additional traction from the rear
wheels when traveling in off-road situations
such as mud, snow, steep hills, and uneven
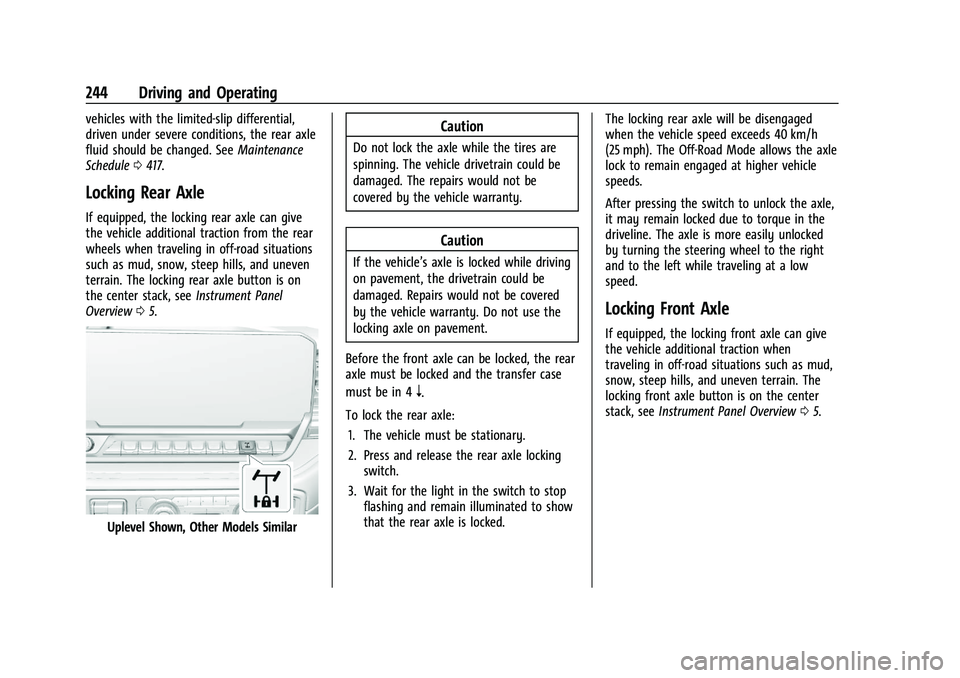
terrain. The locking rear axle button is on
the center stack, see Instrument Panel
Overview 05.
Uplevel Shown, Other Models Similar
Caution
Do not lock the axle while the tires are
spinning. The vehicle drivetrain could be
damaged. The repairs would not be
covered by the vehicle warranty.
Caution
If the vehicle’s axle is locked while driving
on pavement, the drivetrain could be
damaged. Repairs would not be covered
by the vehicle warranty. Do not use the
locking axle on pavement.
Before the front axle can be locked, the rear
axle must be locked and the transfer case
must be in 4
n.
To lock the rear axle: 1. The vehicle must be stationary.
2. Press and release the rear axle locking switch.
3. Wait for the light in the switch to stop flashing and remain illuminated to show
that the rear axle is locked. The locking rear axle will be disengaged
when the vehicle speed exceeds 40 km/h
(25 mph). The Off-Road Mode allows the axle
lock to remain engaged at higher vehicle
speeds.
After pressing the switch to unlock the axle,
it may remain locked due to torque in the
driveline. The axle is more easily unlocked
by turning the steering wheel to the right
and to the left while traveling at a low
speed.
Locking Front Axle
If equipped, the locking front axle can give
the vehicle additional traction when
traveling in off-road situations such as mud,
snow, steep hills, and uneven terrain. The
locking front axle button is on the center
stack, see
Instrument Panel Overview 05.
Page 301 of 463
Chevrolet Silverado 1500 Owner Manual (GMNA-Localizing-U.S./Canada/
Mexico/Paraguay-16515119) - 2023 - CRC - 6/2/22
300 Driving and Operating
{Warning
To prevent serious injury or death from
carbon monoxide (CO), when towing a
trailer:
.Do not drive with the liftgate, trunk/
hatch, or rear-most window open.
.Fully open the air outlets on or under
the instrument panel.
.Adjust the climate control system to a
setting that brings in only outside air.
See“Climate Control Systems” in the
Index.
For more information about carbon
monoxide, see Engine Exhaust 0220.
Towing a trailer requires experience. The
combination of the vehicle and trailer is
longer and not as responsive as the vehicle
itself. Get used to the handling and braking
of the combination by driving on a level
road surface before driving on public roads.
The trailer structure, the tires, and the
brakes must all be rated to carry the
intended cargo. Inadequate trailer
equipment can cause the combination to
operate in an unexpected or unsafe manner.
Before driving, inspect all trailer hitch parts and attachments, safety chains, electrical
connectors, lamps, tires, and mirrors. See
Towing Equipment
0307. If the trailer has
electric brakes, start the combination
moving and then manually apply the trailer
brake controller to check that the trailer
brakes work. During the trip, occasionally
check that the cargo and trailer are secure
and that the lamps and any trailer brakes
are working.Towing with a Stability Control System
When towing, the stability control system
might be heard. The system reacts to
vehicle movement caused by the trailer,
which mainly occurs during cornering. This is
normal when towing heavier trailers.
Following Distance
Stay at least twice as far behind the vehicle
ahead as you would when driving without a
trailer. This can help to avoid heavy braking
and sudden turns.
Passing
More passing distance is needed when
towing a trailer. The combination of the
vehicle and trailer will not accelerate as
quickly and is much longer than the vehicle
alone. It is necessary to go much farther beyond the passed vehicle before returning
to the lane. Pass on level roadways. Avoid
passing on hills if possible.
Backing Up
Hold the bottom of the steering wheel with
one hand. To move the trailer to the left,
move that hand to the left. To move the
trailer to the right, move that hand to the
right. Always back up slowly and, if possible,
have someone guide you.
Making Turns
Caution
Turn more slowly and make wider arcs
when towing a trailer to prevent damage
to your vehicle. Making very sharp turns
could cause the trailer to contact the
vehicle.
Make wider turns than normal when towing,
so the trailer will not go over soft shoulders,
over curbs, or strike road signs, trees,
or other objects. Always signal turns well in
advance. Do not steer or brake suddenly.
Page 314 of 463
Chevrolet Silverado 1500 Owner Manual (GMNA-Localizing-U.S./Canada/
Mexico/Paraguay-16515119) - 2023 - CRC - 6/2/22
Driving and Operating 313
.TRAILER DISCONNECTED CHECK
CONNECTION appears when a connected
trailer is disconnected. It appears
immediately when the vehicle is on,
or upon the next startup if the trailer was
disconnected while the vehicle was off.
Check the trailer connection as
appropriate.
.CHECK TRAILER XXX LAMP appears when
there is a detected lamp or wiring fault
on the trailer. Check the trailer wiring and
lamps.
Turn Signals When Towing a Trailer
When properly connected, the trailer turn
signals will illuminate to indicate the vehicle
is turning, changing lanes, or stopping.
When towing a trailer, the arrows on the
instrument cluster will illuminate even if the
trailer is not properly connected or the bulbs
are burned out.
Tow/Haul Mode
For instructions on how to enter Tow/Haul
Mode, seeDriver Mode Control 0240.
Tow/Haul assists when pulling a heavy
trailer or a large or heavy load. See Tow/
Haul Mode 0229. Tow/Haul Mode is designed to be most
effective when the vehicle and trailer
combined weight is at least 75% of the
vehicle's Gross Combined Weight Rating
(GCWR). See
“Trailer Weight” underTrailer
Towing 0302.
Tow/Haul Mode is most useful when towing
a heavy trailer or carrying a large or
heavy load:
.Through rolling terrain.
.In stop-and-go traffic.
.In busy parking lots.
Operating the vehicle in Tow/Haul Mode
when lightly loaded or not towing will not
cause damage; however, it is not
recommended and may result in unpleasant
engine and transmission driving
characteristics, heavy or light steering
efforts, and reduced fuel economy.
Integrated Trailer Brake Control System
The vehicle may have an Integrated Trailer
Brake Control (ITBC) system for use with
electric trailer brakes or most electric over
hydraulic trailer brake systems. These
instructions apply to both types of electric
trailer brakes.
This symbol is on the Trailer Brake Control
Panel on vehicles with an ITBC system. The
power output to the trailer brakes is
proportional to the amount of vehicle
braking. This available power output to the
trailer brakes can be adjusted to a wide
range of trailering situations.
The ITBC system is integrated with the
vehicle brake system, antilock brake control
system (ABS), and StabiliTrak/Electronic
Stability Control (ESC) system. In trailering
conditions that cause the ABS or StabiliTrak/
ESC systems to activate, power sent to the
trailer's brakes will be automatically
adjusted to minimize trailer wheel lock-up.
This does not imply that the trailer has
StabiliTrak/ESC.
If the vehicle brakes, ABS, or StabiliTrak/ESC
systems are not functioning properly, the
ITBC system may not function fully or at all.
Make sure all of these systems are fully
operational to allow the ITBC system to
function properly.
Page 315 of 463
Chevrolet Silverado 1500 Owner Manual (GMNA-Localizing-U.S./Canada/
Mexico/Paraguay-16515119) - 2023 - CRC - 6/2/22
314 Driving and Operating
The ITBC system is powered through the
vehicle electrical system. Turning the vehicle
off will also turn off the ITBC system. The
ITBC system is fully functional only when
the vehicle is on.
{Warning
Connecting a trailer that has an air brake
system may result in reduced or
complete loss of trailer braking, including
increased stopping distance or trailer
instability which could result in serious
injury, death, or property damage. Only
use the ITBC system with electric or
electric over hydraulic trailer brake
systems.
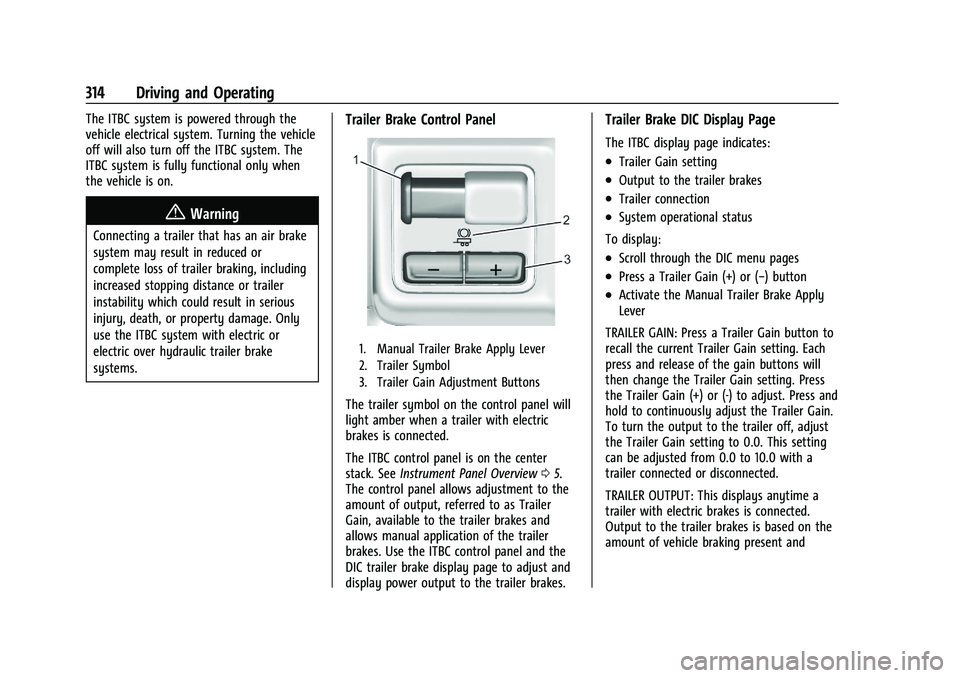
Trailer Brake Control Panel
1. Manual Trailer Brake Apply Lever
2. Trailer Symbol
3. Trailer Gain Adjustment Buttons
The trailer symbol on the control panel will
light amber when a trailer with electric
brakes is connected.
The ITBC control panel is on the center
stack. SeeInstrument Panel Overview 05.
The control panel allows adjustment to the
amount of output, referred to as Trailer
Gain, available to the trailer brakes and
allows manual application of the trailer
brakes. Use the ITBC control panel and the
DIC trailer brake display page to adjust and
display power output to the trailer brakes.
Trailer Brake DIC Display Page
The ITBC display page indicates:
.Trailer Gain setting
.Output to the trailer brakes
.Trailer connection
.System operational status
To display:
.Scroll through the DIC menu pages
.Press a Trailer Gain (+) or (−) button
.Activate the Manual Trailer Brake Apply
Lever
TRAILER GAIN: Press a Trailer Gain button to
recall the current Trailer Gain setting. Each
press and release of the gain buttons will
then change the Trailer Gain setting. Press
the Trailer Gain (+) or (-) to adjust. Press and
hold to continuously adjust the Trailer Gain.
To turn the output to the trailer off, adjust
the Trailer Gain setting to 0.0. This setting
can be adjusted from 0.0 to 10.0 with a
trailer connected or disconnected.
TRAILER OUTPUT: This displays anytime a
trailer with electric brakes is connected.
Output to the trailer brakes is based on the
amount of vehicle braking present and