2023 CHEVROLET MALIBU transmission
[x] Cancel search: transmissionPage 6 of 332
Chevrolet Malibu Owner Manual (GMNA-Localizing-U.S./Canada-
16273584) - 2023 - CRC - 9/28/22
Introduction 5
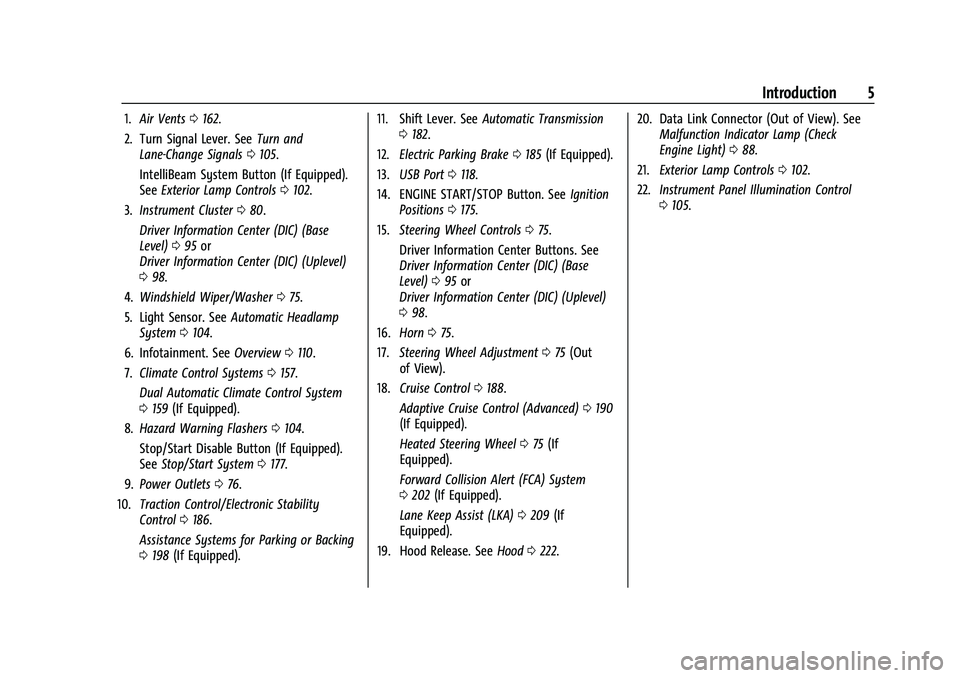
1.Air Vents 0162.
2. Turn Signal Lever. See Turn and
Lane-Change Signals 0105.
IntelliBeam System Button (If Equipped).
See Exterior Lamp Controls 0102.
3. Instrument Cluster 080.
Driver Information Center (DIC) (Base
Level) 095 or
Driver Information Center (DIC) (Uplevel)
0 98.
4. Windshield Wiper/Washer 075.
5. Light Sensor. See Automatic Headlamp
System 0104.
6. Infotainment. See Overview0110.
7. Climate Control Systems 0157.
Dual Automatic Climate Control System
0 159 (If Equipped).
8. Hazard Warning Flashers 0104.
Stop/Start Disable Button (If Equipped).
See Stop/Start System 0177.
9. Power Outlets 076.
10. Traction Control/Electronic Stability
Control 0186.
Assistance Systems for Parking or Backing
0 198 (If Equipped). 11. Shift Lever. See
Automatic Transmission
0 182.
12. Electric Parking Brake 0185 (If Equipped).
13. USB Port 0118.
14. ENGINE START/STOP Button. See Ignition
Positions 0175.
15. Steering Wheel Controls 075.
Driver Information Center Buttons. See
Driver Information Center (DIC) (Base
Level) 095 or
Driver Information Center (DIC) (Uplevel)
0 98.
16. Horn 075.
17. Steering Wheel Adjustment 075 (Out
of View).
18. Cruise Control 0188.
Adaptive Cruise Control (Advanced) 0190
(If Equipped).
Heated Steering Wheel 075 (If
Equipped).
Forward Collision Alert (FCA) System
0 202 (If Equipped).
Lane Keep Assist (LKA) 0209 (If
Equipped).
19. Hood Release. See Hood0222. 20. Data Link Connector (Out of View). See
Malfunction Indicator Lamp (Check
Engine Light) 088.
21. Exterior Lamp Controls 0102.
22. Instrument Panel Illumination Control
0105.
Page 18 of 332
Chevrolet Malibu Owner Manual (GMNA-Localizing-U.S./Canada-
16273584) - 2023 - CRC - 9/28/22
Keys, Doors, and Windows 17
Delayed locking can only be turned on when
the Open Door Anti-Lockout feature has
been turned off.
When
Qis pressed on the power door lock
switch with the door open, a chime will
sound three times indicating that delayed
locking is active.
The doors will then lock automatically
five seconds after all doors are closed. If a
door is reopened before five seconds have
elapsed, the five-second timer will reset once
all the doors are closed again.
Press
Qon the door lock switch again,
or press
Qon the RKE transmitter, to
override this feature and lock the doors
immediately.
Delayed locking can be programmed. To
view available settings for this feature,
touch the Settings icon on the infotainment
home page. Select “Vehicle”to display the
list of available options and select “Power
Door Locks”.
Automatic Door Locks
The doors will lock automatically when all
doors are closed, the ignition is on, and the
vehicle is shifted out of P (Park). If a vehicle door is unlocked, and then
opened and closed, the doors will lock either
when your foot is removed from the brake
or the vehicle speed becomes faster than
13 km/h (8 mph).
To unlock the doors:
.PressKon the power door lock switch.
.Shift the transmission into P (Park).
Automatic door locking cannot be disabled.
Automatic door unlocking can be
programmed. To view available settings for
this feature, touch the Settings icon on the
infotainment home page. Select “Vehicle”to
display the list of available options and
select “Power Door Locks”.
Lockout Protection
If the ignition is on or in accessory mode
and the power door lock switch is pressed
with the driver door open, all the doors will
lock and only the driver door will unlock.
If the vehicle is off and locking is requested
while a door is open, when all doors are
closed the vehicle will check for remote keys
inside. If an remote key is detected and the
number of remote keys inside has not
reduced, the driver door will unlock and the
horn will chirp three times. Lockout Protection can be manually
overridden with the driver door open by
pressing and holding
Qon the power door
lock switch.
Open Door Anti-Lockout
If Open Door Anti-Lockout has been turned
on and the vehicle is off, the driver door is
open, and locking is requested, all the doors
will lock and the driver door will remain
open. The Open Door Anti-Lockout feature
can be turned on or off. To view available
settings from the infotainment screen, touch
the Settings > Vehicle > Power Door Locks.
Safety Locks
The rear door safety locks prevent
passengers from opening the rear doors
from inside the vehicle.
Page 89 of 332
Chevrolet Malibu Owner Manual (GMNA-Localizing-U.S./Canada-
16273584) - 2023 - CRC - 9/28/22
88 Instruments and Controls
Malfunction Indicator Lamp
(Check Engine Light)
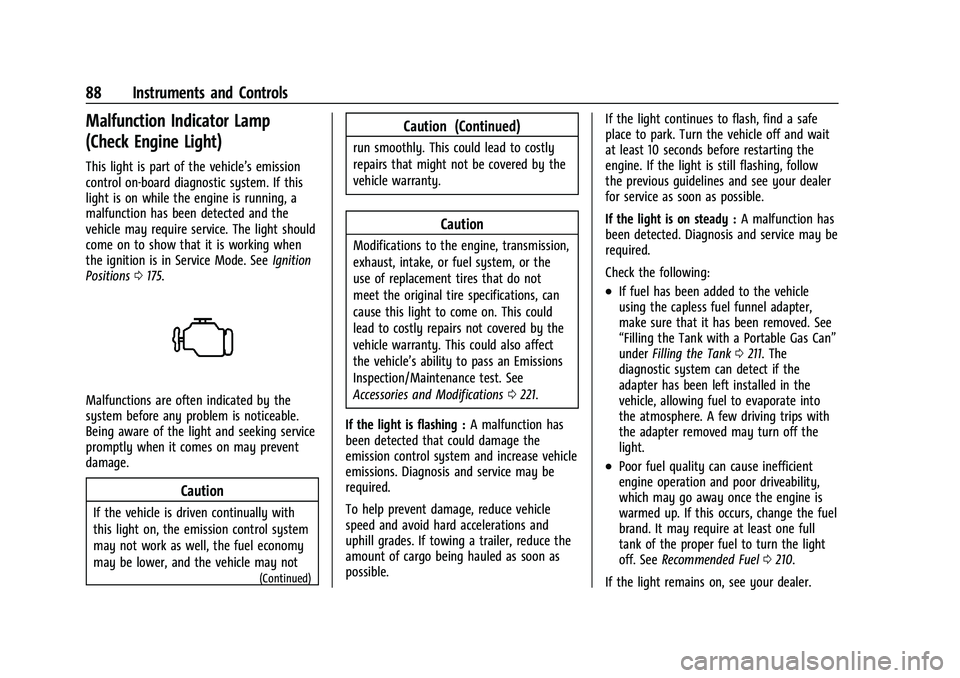
This light is part of the vehicle’s emission
control on-board diagnostic system. If this
light is on while the engine is running, a
malfunction has been detected and the
vehicle may require service. The light should
come on to show that it is working when
the ignition is in Service Mode. SeeIgnition
Positions 0175.
Malfunctions are often indicated by the
system before any problem is noticeable.
Being aware of the light and seeking service
promptly when it comes on may prevent
damage.
Caution
If the vehicle is driven continually with
this light on, the emission control system
may not work as well, the fuel economy
may be lower, and the vehicle may not
(Continued)
Caution (Continued)
run smoothly. This could lead to costly
repairs that might not be covered by the
vehicle warranty.
Caution
Modifications to the engine, transmission,
exhaust, intake, or fuel system, or the
use of replacement tires that do not
meet the original tire specifications, can
cause this light to come on. This could
lead to costly repairs not covered by the
vehicle warranty. This could also affect
the vehicle’s ability to pass an Emissions
Inspection/Maintenance test. See
Accessories and Modifications 0221.
If the light is flashing : A malfunction has
been detected that could damage the
emission control system and increase vehicle
emissions. Diagnosis and service may be
required.
To help prevent damage, reduce vehicle
speed and avoid hard accelerations and
uphill grades. If towing a trailer, reduce the
amount of cargo being hauled as soon as
possible. If the light continues to flash, find a safe
place to park. Turn the vehicle off and wait
at least 10 seconds before restarting the
engine. If the light is still flashing, follow
the previous guidelines and see your dealer
for service as soon as possible.
If the light is on steady :
A malfunction has
been detected. Diagnosis and service may be
required.
Check the following:
.If fuel has been added to the vehicle
using the capless fuel funnel adapter,
make sure that it has been removed. See
“Filling the Tank with a Portable Gas Can”
under Filling the Tank 0211. The
diagnostic system can detect if the
adapter has been left installed in the
vehicle, allowing fuel to evaporate into
the atmosphere. A few driving trips with
the adapter removed may turn off the
light.
.Poor fuel quality can cause inefficient
engine operation and poor driveability,
which may go away once the engine is
warmed up. If this occurs, change the fuel
brand. It may require at least one full
tank of the proper fuel to turn the light
off. See Recommended Fuel 0210.
If the light remains on, see your dealer.
Page 102 of 332
Chevrolet Malibu Owner Manual (GMNA-Localizing-U.S./Canada-
16273584) - 2023 - CRC - 9/28/22
Instruments and Controls 101
.Engine and Transmission
.Tire Pressure
.Battery
Engine Power Messages
ENGINE POWER IS REDUCED
This message displays when the vehicle's
propulsion power is reduced. A reduction in
propulsion power can affect the vehicle's
ability to accelerate. If this message is on,
but there is no observed reduction in
performance, proceed to your destination.
Under certain conditions the performance
may be reduced the next time the vehicle is
driven. The vehicle may be driven while this
message is on, but maximum acceleration
and speed may be reduced. Anytime this
message stays on, or displays repeatedly,
the vehicle should be taken to your dealer
for service as soon as possible.
Under certain operating conditions,
propulsion will be disabled. Try restarting
after the ignition has been off for
30 seconds.
Vehicle Speed Messages
SPEED LIMITED TO XXX KM/H (MPH)
This message shows that the vehicle speed
has been limited to the speed displayed. The
limited speed is a protection for various
propulsion and vehicle systems, such as
lubrication, thermal, brakes, suspension,
Teen Driver if equipped, or tires.
Page 148 of 332
Chevrolet Malibu Owner Manual (GMNA-Localizing-U.S./Canada-
16273584) - 2023 - CRC - 9/28/22
Infotainment System 147
The menu may contain the following:
Name
Touch to edit your user name that will be
displayed in the vehicle.
Vehicle Account Information
Touch to view the vehicle account
information and to change the account
password.
An“unverified user account” pop-up will
display until the account information
verification process has been completed on
the Internet. Check your registered e-mail
account for an activation e-mail to complete
the verification process.
Profile Picture
Touch to choose or change your profile
picture.
Profile Identifiers
Touch to have the vehicle recognize the
identifier you choose.
Touch Vehicle Key 1 and/or Vehicle Key 2.
If the remote key is lost or stolen, see your
dealer. Security
Touch to have your profile secured with
a PIN.
Touch No or Yes.
Vehicle Name
Touch to edit your vehicle name.
Vehicle Account
Touch to view the vehicle account
information and to change the account
password.
Delete Profile
Touch to remove the profile from the
vehicle.
Touch Remove or Cancel.
Teen Driver
If equipped, this allows multiple keys to be
registered for beginner drivers to encourage
safe driving habits. When the vehicle is
started with a Teen Driver key, it will
automatically activate certain safety
systems, allow setting of some features, and
limit the use of others. The Report Card will
record vehicle data about driving behavior
that can be viewed later. When the vehicleis started with a registered key, the Driver
Information Center (DIC) displays a message
that Teen Driver is active.
To access:
1. Touch Settings on the Home Page, then touch Vehicle, and then Teen Driver.
2. Create a Personal Identification Number (PIN) by choosing a four-digit PIN.
Re-enter the PIN to confirm. To change
the PIN, touch Change PIN.
The PIN is required to:
.Set up/Add or remove keys.
.Change Teen Driver settings.
.Change or clear the Teen Driver PIN.
.Access or delete Report Card data.
Set up/Add keys to activate Teen Driver and
assign restrictions to the key:
Any vehicle key can be registered, up to a
maximum of eight keys. Label the key to
tell it apart from the other keys.
For a pushbutton start system: 1. Start the vehicle.
2. For automatic transmissions, the vehicle must be in P (Park). For manual
transmissions, the vehicle must be
stopped with the parking brake set.
Page 149 of 332
Chevrolet Malibu Owner Manual (GMNA-Localizing-U.S./Canada-
16273584) - 2023 - CRC - 9/28/22
148 Infotainment System
3. From the Settings menu, touch Vehicleand then Teen Driver.
4. Enter the PIN.
5. Place the remote key you wish to register in the transmitter pocket. The
key does not need to be the one that
started the vehicle. See Remote Key
Operation 07for transmitter pocket
location.
6. From the Teen Driver menu, touch Setup Keys or Add/Remove Teen Driver Keys.
.If the remote key has not previously
been registered, the option to add
the key displays. Touch Add and a
confirmation message displays. Teen
Driver restrictions will be applied
whenever this remote key is used to
operate the vehicle.
.If the remote key has already been
registered, the option to remove the
key displays. If Remove is touched,
the remote key is no longer
registered. A confirmation message
displays, and Teen Driver restrictions
will not be applied if this remote key
is used to operate the vehicle.
In vehicles with a pushbutton start system,
if a Teen Driver and a non-Teen Driver key
are both present at start up, the vehicle will recognize the non-Teen Driver key to start
the vehicle. The Teen Driver settings will not
be active.
For a keyed ignition system:
1. Start the vehicle.
2. For automatic transmissions, the vehicle must be in P (Park). For manual
transmissions, the vehicle must be
stopped with the parking brake set.
3. From the Settings menu, touch Vehicle and then Teen Driver.
4. Enter the PIN.
5. Touch Setup Keys or Add/Remove Teen Driver Keys. The system displays
instructions for registering or
unregistering a key. A confirmation
message displays.
Manage Settings or Teen Driver Settings
Depending on the options of your vehicle,
the following menu items may be displayed:
Buckle to Drive : When turned ON, Buckle to
Drive prevents the driver from shifting out
of P (Park) for a period of time after the
brake pedal is pressed if the driver, or on
some vehicles the detected passenger, has
not buckled their seat belt. On some vehicles, Buckle to Drive is always ON when
Teen Driver is active and is not configurable.
See
Buckle To Drive 038.
Audio Volume Limit : Allows a maximum
audio volume to be set. Turn the audio
volume limit on or off. Use the arrows to
choose the maximum allowable level for the
audio volume. On some infotainment
systems, touch Set Audio Volume Limit to
choose the maximum allowable audio
volume level.
Set Audio Volume Limit : Use the arrows to
choose the maximum allowable level for the
audio volume.
Teen Driver Speed Limiter : Limits the
maximum speed of the vehicle. When the
speed limiter is turned on and the vehicle is
started with a Teen Driver key, the DIC
displays a message that the top speed is
limited.
On certain vehicles, when the Speed Limiter
is turned ON, the vehicle’s maximum
acceleration will be limited. The DIC will
display a message that the acceleration is
limited.
Teen Driver Speed Warning : Displays a
warning in the DIC when exceeding a
selectable speed. Turn the speed warning on
Page 166 of 332
Chevrolet Malibu Owner Manual (GMNA-Localizing-U.S./Canada-
16273584) - 2023 - CRC - 9/28/22
Driving and Operating 165
Driving and Operating
Driving Information
Driving for Better Fuel Economy . . . . . . 166
Distracted Driving . . . . . . . . . . . . . . . . . . . . . 166
Defensive Driving . . . . . . . . . . . . . . . . . . . . . . 166
Impaired Driving . . . . . . . . . . . . . . . . . . . . . . . 167
Control of a Vehicle . . . . . . . . . . . . . . . . . . . 167
Braking . . . . . . . . . . . . . . . . . . . . . . . . . . . . . . . . 167
Steering . . . . . . . . . . . . . . . . . . . . . . . . . . . . . . . 167
Off-Road Recovery . . . . . . . . . . . . . . . . . . . . . 168
Loss of Control . . . . . . . . . . . . . . . . . . . . . . . . 169
Driving on Wet Roads . . . . . . . . . . . . . . . . . 169
Hill and Mountain Roads . . . . . . . . . . . . . . 170
Winter Driving . . . . . . . . . . . . . . . . . . . . . . . . . 170
If the Vehicle Is Stuck . . . . . . . . . . . . . . . . . . 171
Vehicle Load Limits . . . . . . . . . . . . . . . . . . . . 172
Starting and Operating
New Vehicle Break-In . . . . . . . . . . . . . . . . . . 175
Ignition Positions . . . . . . . . . . . . . . . . . . . . . . 175
Starting the Engine . . . . . . . . . . . . . . . . . . . . 177
Stop/Start System . . . . . . . . . . . . . . . . . . . . . 177
Engine Heater . . . . . . . . . . . . . . . . . . . . . . . . . 178
Retained Accessory Power (RAP) . . . . . . . 179
Shifting Into Park . . . . . . . . . . . . . . . . . . . . . . 179
Shifting out of Park . . . . . . . . . . . . . . . . . . . 180
Parking over Things That Burn . . . . . . . . . 181
Extended Parking . . . . . . . . . . . . . . . . . . . . . . 181
Engine Exhaust
Engine Exhaust . . . . . . . . . . . . . . . . . . . . . . . . 181
Running the Vehicle While Parked . . . . . 181
Automatic Transmission
Automatic Transmission . . . . . . . . . . . . . . . 182
Manual Mode . . . . . . . . . . . . . . . . . . . . . . . . . 183
Brakes
Electric Brake Boost . . . . . . . . . . . . . . . . . . . 184
Antilock Brake System (ABS) . . . . . . . . . . . 184
Electric Parking Brake . . . . . . . . . . . . . . . . . . 185
Brake Assist . . . . . . . . . . . . . . . . . . . . . . . . . . . 186
Hill Start Assist (HSA) . . . . . . . . . . . . . . . . . 186
Ride Control Systems
Traction Control/Electronic StabilityControl . . . . . . . . . . . . . . . . . . . . . . . . . . . . . . 186
Cruise Control
Cruise Control . . . . . . . . . . . . . . . . . . . . . . . . . 188
Adaptive Cruise Control (Advanced) . . . 190
Driver Assistance Systems
Driver Assistance Systems . . . . . . . . . . . . . 197
Assistance Systems for Parking orBacking . . . . . . . . . . . . . . . . . . . . . . . . . . . . . . 198
Rear Vision Camera (RVC) . . . . . . . . . . . . . 198
Park Assist . . . . . . . . . . . . . . . . . . . . . . . . . . . . 199
Automatic Parking Assist (APA) . . . . . . . 200
Rear Cross Traffic Alert (RCTA) System . . . . . . . . . . . . . . . . . . . . . . . . . . . . . . 202 Assistance Systems for Driving . . . . . . . . 202
Forward Collision Alert (FCA)
System . . . . . . . . . . . . . . . . . . . . . . . . . . . . . . 202
Automatic Emergency Braking (AEB) . . . . . . . . . . . . . . . . . . . . . . . . 204
Front Pedestrian Braking (FPB) System . . . . . . . . . . . . . . . . . . . . . . . . . . . . . . 205
Side Blind Zone Alert (SBZA) . . . . . . . . . . 207
Lane Change Alert (LCA) . . . . . . . . . . . . . . . 207
Lane Keep Assist (LKA) . . . . . . . . . . . . . . . . 209
Fuel
Top Tier Fuel . . . . . . . . . . . . . . . . . . . . . . . . . . 210
Recommended Fuel . . . . . . . . . . . . . . . . . . . . 210
Prohibited Fuels . . . . . . . . . . . . . . . . . . . . . . . . 211
Fuels in Foreign Countries . . . . . . . . . . . . . . 211
Fuel Additives . . . . . . . . . . . . . . . . . . . . . . . . . . 211
Filling the Tank . . . . . . . . . . . . . . . . . . . . . . . . 211
Filling a Portable Fuel Container . . . . . . . 213
Trailer Towing
General Towing Information . . . . . . . . . . . 213
Driving Characteristics and Towing Tips . . . . . . . . . . . . . . . . . . . . . . . . . . 213
Trailer Towing . . . . . . . . . . . . . . . . . . . . . . . . . 216
Towing Equipment . . . . . . . . . . . . . . . . . . . . . 217
Conversions and Add-Ons
Add-On Electrical Equipment . . . . . . . . . . . 219
Page 171 of 332
Chevrolet Malibu Owner Manual (GMNA-Localizing-U.S./Canada-
16273584) - 2023 - CRC - 9/28/22
170 Driving and Operating
Other Rainy Weather Tips
Besides slowing down, other wet weather
driving tips include:
.Allow extra following distance.
.Pass with caution.
.Keep windshield wiping equipment in
good shape.
.Keep the windshield washer fluid reservoir
filled.
.Have good tires with proper tread depth.
SeeTires 0251.
.Turn off cruise control.
Hill and Mountain Roads
Driving on steep hills or through mountains
is different than driving on flat or rolling
terrain. Tips include:
.Keep the vehicle serviced and in good
shape.
.Check all fluid levels and brakes, tires, and
cooling system.
.Shift to a lower gear when going down
steep or long hills.
{Warning
Using the brakes to slow the vehicle on a
long downhill slope can cause brake
overheating, can reduce brake
performance, and could result in a loss of
braking. Shift the transmission to a lower
gear to let the engine assist the brakes
on a steep downhill slope.
{Warning
Coasting downhill in N (Neutral) or with
the ignition off is dangerous. This can
cause overheating of the brakes and loss
of steering assist. Always have the engine
running and the vehicle in gear.
.Drive at speeds that keep the vehicle in
its own lane. Do not swing wide or cross
the center line.
.Be alert on top of hills; something could
be in your lane (e.g., stalled car, crash).
.Pay attention to special road signs (e.g.,
falling rocks area, winding roads, long
grades, passing or no-passing zones) and
take appropriate action.
Winter Driving
Driving on Snow or Ice
Caution
To avoid damage to the wheels and
brake components, always clear snow and
ice from inside the wheels and
underneath the vehicle before driving.
Snow or ice between the tires and the road
creates less traction or grip, so drive
carefully. Wet ice can occur at about 0 °C
(32 °F) when freezing rain begins to fall.
Avoid driving on wet ice or in freezing rain
until roads can be treated.
For Slippery Road Driving:
.Accelerate gently. Accelerating too quickly
causes the wheels to spin and makes the
surface under the tires slick.
.Turn on Traction Control. See Traction
Control/Electronic Stability Control 0186.
.The Antilock Brake System (ABS) improves
vehicle stability during hard stops, but
the brakes should be applied sooner than
when on dry pavement. See Antilock
Brake System (ABS) 0184.