2023 CHEVROLET MALIBU lock
[x] Cancel search: lockPage 26 of 332
Chevrolet Malibu Owner Manual (GMNA-Localizing-U.S./Canada-
16273584) - 2023 - CRC - 9/28/22
Keys, Doors, and Windows 25
Sun Visors
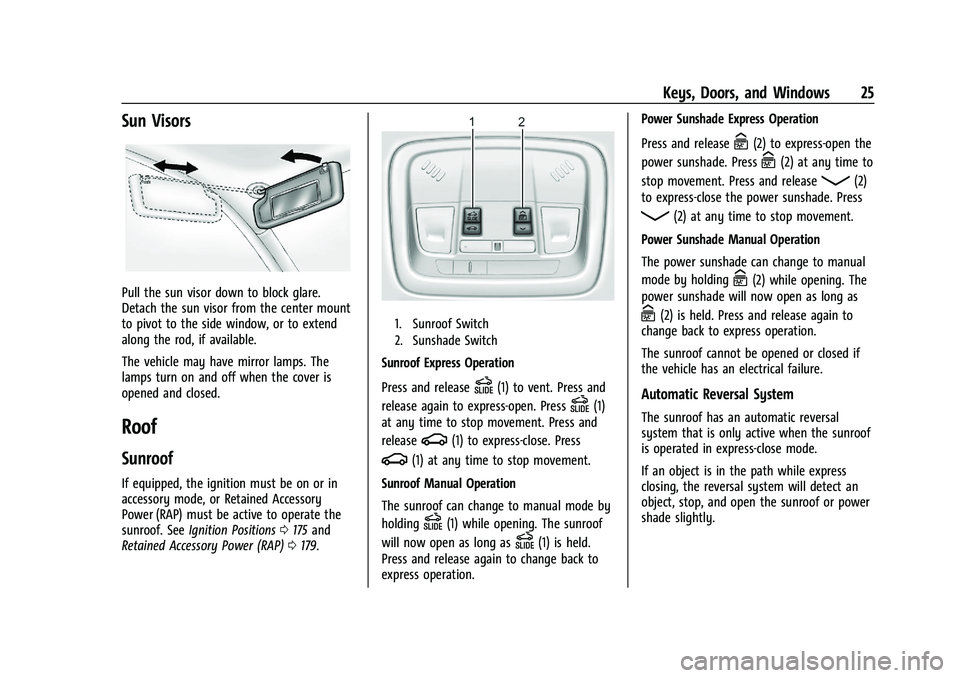
Pull the sun visor down to block glare.
Detach the sun visor from the center mount
to pivot to the side window, or to extend
along the rod, if available.
The vehicle may have mirror lamps. The
lamps turn on and off when the cover is
opened and closed.
Roof
Sunroof
If equipped, the ignition must be on or in
accessory mode, or Retained Accessory
Power (RAP) must be active to operate the
sunroof. SeeIgnition Positions 0175 and
Retained Accessory Power (RAP) 0179.
1. Sunroof Switch
2. Sunshade Switch
Sunroof Express Operation
Press and release
D(1) to vent. Press and
release again to express-open. Press
D(1)
at any time to stop movement. Press and
release
g(1) to express-close. Press
g(1) at any time to stop movement.
Sunroof Manual Operation
The sunroof can change to manual mode by
holding
D(1) while opening. The sunroof
will now open as long as
D(1) is held.
Press and release again to change back to
express operation. Power Sunshade Express Operation
Press and release
C(2) to express-open the
power sunshade. Press
C(2) at any time to
stop movement. Press and release
Q(2)
to express-close the power sunshade. Press
Q(2) at any time to stop movement.
Power Sunshade Manual Operation
The power sunshade can change to manual
mode by holding
C(2) while opening. The
power sunshade will now open as long as
C(2) is held. Press and release again to
change back to express operation.
The sunroof cannot be opened or closed if
the vehicle has an electrical failure.
Automatic Reversal System
The sunroof has an automatic reversal
system that is only active when the sunroof
is operated in express-close mode.
If an object is in the path while express
closing, the reversal system will detect an
object, stop, and open the sunroof or power
shade slightly.
Page 29 of 332
Chevrolet Malibu Owner Manual (GMNA-Localizing-U.S./Canada-
16273584) - 2023 - CRC - 9/28/22
28 Seats and Restraints
Front Seat
The vehicle's front seats have adjustable
head restraints in the outboard seating
positions.
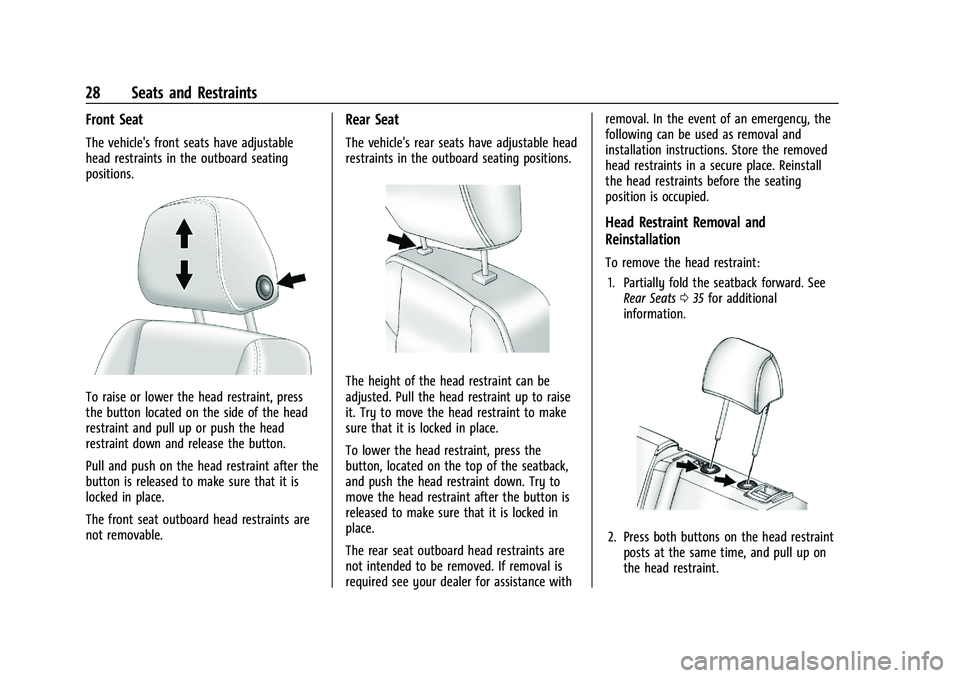
To raise or lower the head restraint, press
the button located on the side of the head
restraint and pull up or push the head
restraint down and release the button.
Pull and push on the head restraint after the
button is released to make sure that it is
locked in place.
The front seat outboard head restraints are
not removable.
Rear Seat
The vehicle's rear seats have adjustable head
restraints in the outboard seating positions.
The height of the head restraint can be
adjusted. Pull the head restraint up to raise
it. Try to move the head restraint to make
sure that it is locked in place.
To lower the head restraint, press the
button, located on the top of the seatback,
and push the head restraint down. Try to
move the head restraint after the button is
released to make sure that it is locked in
place.
The rear seat outboard head restraints are
not intended to be removed. If removal is
required see your dealer for assistance withremoval. In the event of an emergency, the
following can be used as removal and
installation instructions. Store the removed
head restraints in a secure place. Reinstall
the head restraints before the seating
position is occupied.
Head Restraint Removal and
Reinstallation
To remove the head restraint:
1. Partially fold the seatback forward. See Rear Seats 035 for additional
information.
2. Press both buttons on the head restraint posts at the same time, and pull up on
the head restraint.
Page 30 of 332
Chevrolet Malibu Owner Manual (GMNA-Localizing-U.S./Canada-
16273584) - 2023 - CRC - 9/28/22
Seats and Restraints 29
3. Store the head restraint in a secureplace.
{Warning
With head restraints that are not
installed and adjusted properly, there is a
greater chance that occupants will suffer
a neck/spinal injury in a crash. Do not
drive until the head restraints for all
occupants are installed and adjusted
properly.
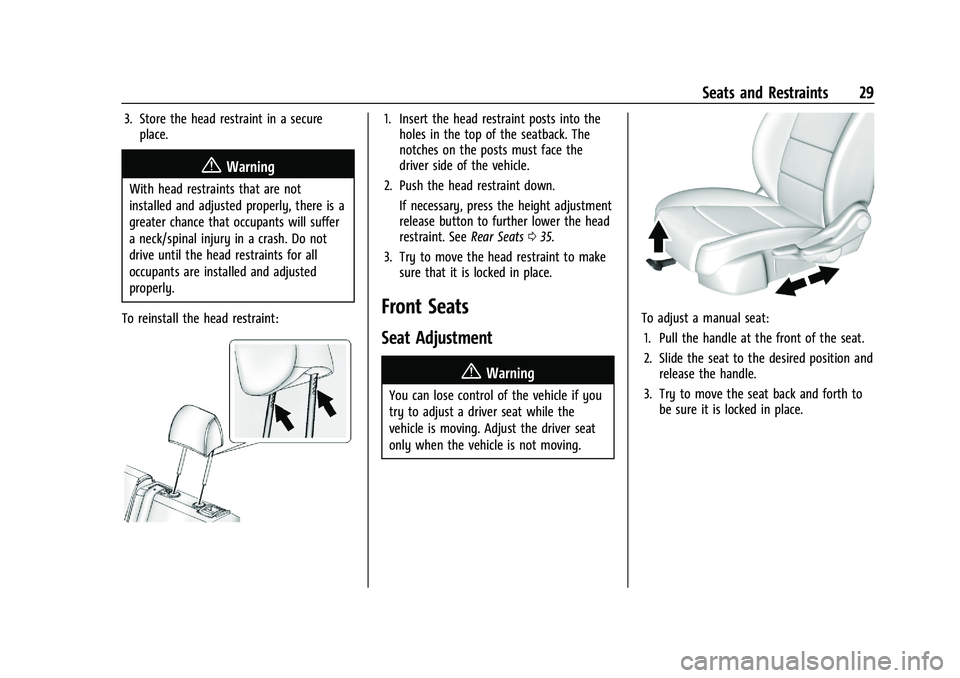
To reinstall the head restraint:
1. Insert the head restraint posts into the holes in the top of the seatback. The
notches on the posts must face the
driver side of the vehicle.
2. Push the head restraint down.
If necessary, press the height adjustment
release button to further lower the head
restraint. See Rear Seats035.
3. Try to move the head restraint to make sure that it is locked in place.
Front Seats
Seat Adjustment
{Warning
You can lose control of the vehicle if you
try to adjust a driver seat while the
vehicle is moving. Adjust the driver seat
only when the vehicle is not moving.
To adjust a manual seat:
1. Pull the handle at the front of the seat.
2. Slide the seat to the desired position and release the handle.
3. Try to move the seat back and forth to be sure it is locked in place.
Page 32 of 332
Chevrolet Malibu Owner Manual (GMNA-Localizing-U.S./Canada-
16273584) - 2023 - CRC - 9/28/22
Seats and Restraints 31
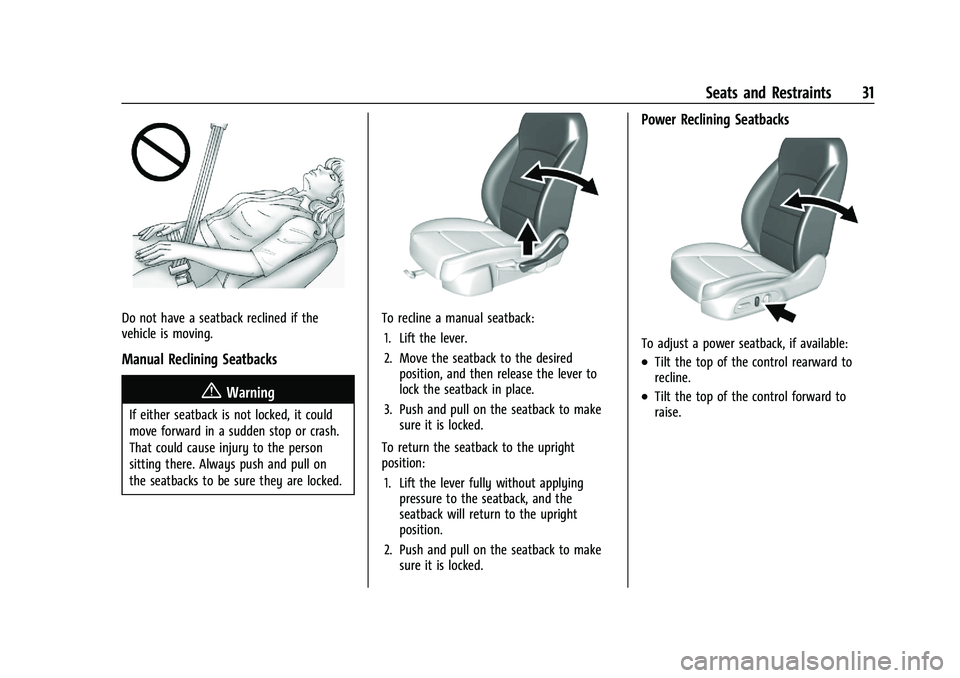
Do not have a seatback reclined if the
vehicle is moving.
Manual Reclining Seatbacks
{Warning
If either seatback is not locked, it could
move forward in a sudden stop or crash.
That could cause injury to the person
sitting there. Always push and pull on
the seatbacks to be sure they are locked.
To recline a manual seatback:1. Lift the lever.
2. Move the seatback to the desired position, and then release the lever to
lock the seatback in place.
3. Push and pull on the seatback to make sure it is locked.
To return the seatback to the upright
position: 1. Lift the lever fully without applying pressure to the seatback, and the
seatback will return to the upright
position.
2. Push and pull on the seatback to make sure it is locked.
Power Reclining Seatbacks
To adjust a power seatback, if available:
.Tilt the top of the control rearward to
recline.
.Tilt the top of the control forward to
raise.
Page 35 of 332
Chevrolet Malibu Owner Manual (GMNA-Localizing-U.S./Canada-
16273584) - 2023 - CRC - 9/28/22
34 Seats and Restraints
If the saved memory seat position does not
automatically recall, verify the recall is
enabled. See“Enabling Automatic Recalls”
previously in this section.
If the memory seat recalls to the wrong
position, the driver’s remote key number 1
or 2 may not match the memory button
number positions they were saved to. Try
the other remote key or try saving the
positions to the other 1 or 2 memory
button. See “Saving Seating Positions”
previously in this section.
Automatic Seat Entry Memory recalls are
only available for driver’s remote key
numbers 1 and 2. Remote keys 3–8 will not
provide Seat Entry Memory recalls.
Auto Seat Exit Memory Recall
Seat Exit Memory will begin movement to
the seating position of the
B
button when:
.The vehicle is turned off and the driver
door is open or opened within a
short time.
.A seating position has been previously
been saved to the
Bmemory button.
See “Saving Seating Positions” previously
in this section.
.Seat Exit Memory is enabled. See
“Enabling Automatic Recalls” previously in
this section.
.The shift lever is in P (Park).
Seat Exit Memory recall will continue if the
vehicle is shifted out of P (Park) prior to
reaching the saved memory position.
Seat Exit Memory is not linked to the
driver’s remote key. The seating position
saved to
Bis used for all drivers.
Cancel Memory Seating Recalls
.During any memory recall:
Press a power seat control
Press SET memory button
.During Manual memory recall:
Release 1, 2, or
Bmemory button
.During Auto Seat Entry Memory Recall:
Turn vehicle off
Press SET, 1, 2, or
Bmemory buttons
.During Auto Seat Exit Memory Recall:
Press SET, 1, 2, or
Bmemory buttons Obstructions
If something has blocked the seat while
recalling a memory position, the recall may
stop. Remove the obstruction and try the
recall again. If the memory position still
does not recall, see your dealer.
Heated and Ventilated Front
Seats
{Warning
If temperature change or pain to the skin
cannot be felt, the seat heater may cause
burns. To reduce the risk of burns, use
care when using the seat heater,
especially for long periods of time. Do
not place anything on the seat that
insulates against heat, such as a blanket,
cushion, cover, or similar item. This may
cause the seat heater to overheat. An
overheated seat heater may cause a burn
or may damage the seat.
Page 36 of 332
Chevrolet Malibu Owner Manual (GMNA-Localizing-U.S./Canada-
16273584) - 2023 - CRC - 9/28/22
Seats and Restraints 35
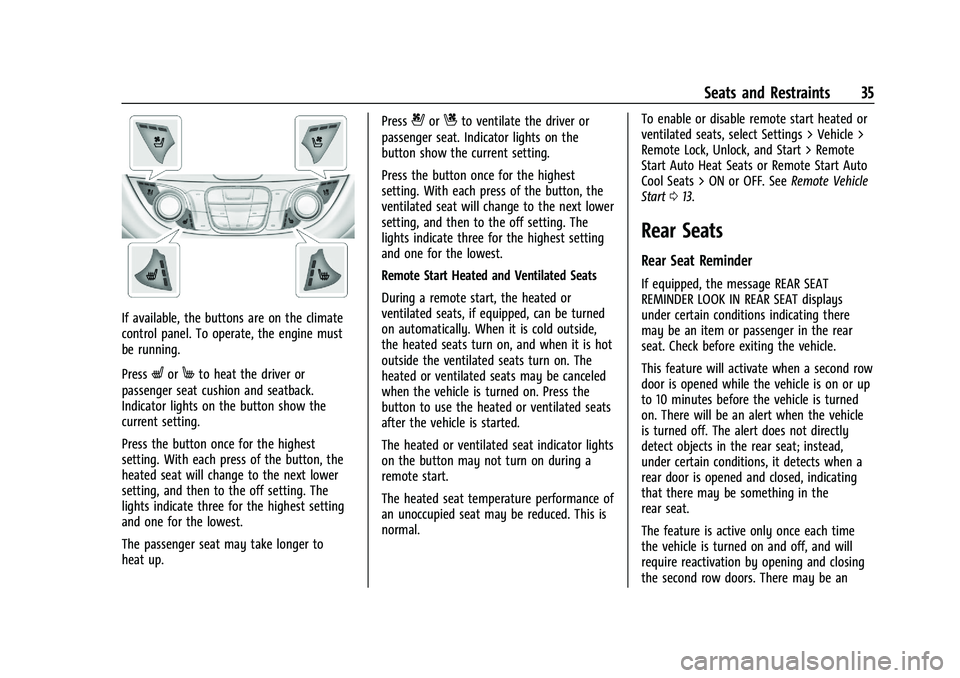
If available, the buttons are on the climate
control panel. To operate, the engine must
be running.
Press
LorMto heat the driver or
passenger seat cushion and seatback.
Indicator lights on the button show the
current setting.
Press the button once for the highest
setting. With each press of the button, the
heated seat will change to the next lower
setting, and then to the off setting. The
lights indicate three for the highest setting
and one for the lowest.
The passenger seat may take longer to
heat up. Press
{orCto ventilate the driver or
passenger seat. Indicator lights on the
button show the current setting.
Press the button once for the highest
setting. With each press of the button, the
ventilated seat will change to the next lower
setting, and then to the off setting. The
lights indicate three for the highest setting
and one for the lowest.
Remote Start Heated and Ventilated Seats
During a remote start, the heated or
ventilated seats, if equipped, can be turned
on automatically. When it is cold outside,
the heated seats turn on, and when it is hot
outside the ventilated seats turn on. The
heated or ventilated seats may be canceled
when the vehicle is turned on. Press the
button to use the heated or ventilated seats
after the vehicle is started.
The heated or ventilated seat indicator lights
on the button may not turn on during a
remote start.
The heated seat temperature performance of
an unoccupied seat may be reduced. This is
normal. To enable or disable remote start heated or
ventilated seats, select Settings > Vehicle >
Remote Lock, Unlock, and Start > Remote
Start Auto Heat Seats or Remote Start Auto
Cool Seats > ON or OFF. See
Remote Vehicle
Start 013.
Rear Seats
Rear Seat Reminder
If equipped, the message REAR SEAT
REMINDER LOOK IN REAR SEAT displays
under certain conditions indicating there
may be an item or passenger in the rear
seat. Check before exiting the vehicle.
This feature will activate when a second row
door is opened while the vehicle is on or up
to 10 minutes before the vehicle is turned
on. There will be an alert when the vehicle
is turned off. The alert does not directly
detect objects in the rear seat; instead,
under certain conditions, it detects when a
rear door is opened and closed, indicating
that there may be something in the
rear seat.
The feature is active only once each time
the vehicle is turned on and off, and will
require reactivation by opening and closing
the second row doors. There may be an
Page 38 of 332
Chevrolet Malibu Owner Manual (GMNA-Localizing-U.S./Canada-
16273584) - 2023 - CRC - 9/28/22
Seats and Restraints 37
Repeat the steps for the other seatback,
if desired.
Raising the Seatback
{Warning
If either seatback is not locked, it could
move forward in a sudden stop or crash.
That could cause injury to the person
sitting there. Always push and pull on
the seatbacks to be sure they are locked.
{Warning
A seat belt that is improperly routed, not
properly attached, or twisted will not
provide the protection needed in a crash.
The person wearing the belt could be
seriously injured. After raising the rear
seatback, always check to be sure that
the seat belts are properly routed and
attached, and are not twisted.
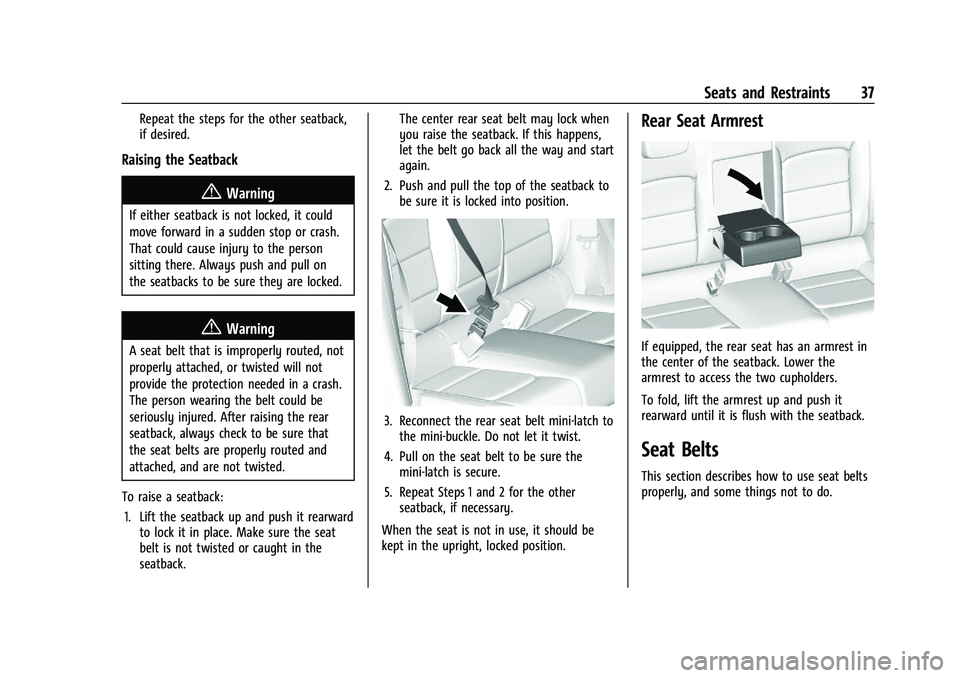
To raise a seatback: 1. Lift the seatback up and push it rearward to lock it in place. Make sure the seat
belt is not twisted or caught in the
seatback. The center rear seat belt may lock when
you raise the seatback. If this happens,
let the belt go back all the way and start
again.
2. Push and pull the top of the seatback to be sure it is locked into position.
3. Reconnect the rear seat belt mini-latch tothe mini-buckle. Do not let it twist.
4. Pull on the seat belt to be sure the mini-latch is secure.
5. Repeat Steps 1 and 2 for the other seatback, if necessary.
When the seat is not in use, it should be
kept in the upright, locked position.
Rear Seat Armrest
If equipped, the rear seat has an armrest in
the center of the seatback. Lower the
armrest to access the two cupholders.
To fold, lift the armrest up and push it
rearward until it is flush with the seatback.
Seat Belts
This section describes how to use seat belts
properly, and some things not to do.
Page 41 of 332
Chevrolet Malibu Owner Manual (GMNA-Localizing-U.S./Canada-
16273584) - 2023 - CRC - 9/28/22
40 Seats and Restraints
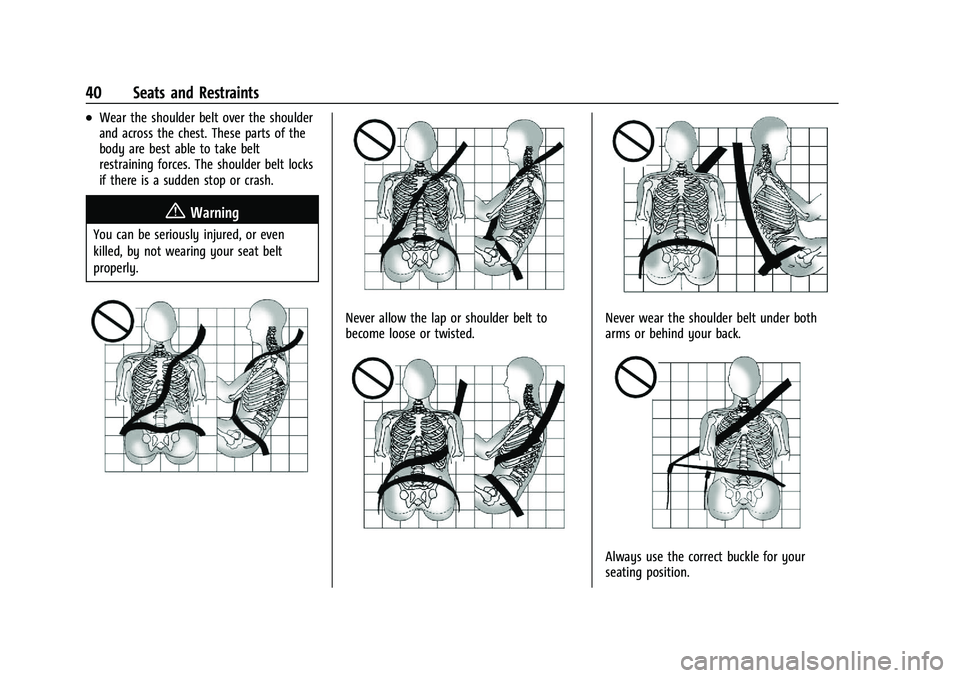
.Wear the shoulder belt over the shoulder
and across the chest. These parts of the
body are best able to take belt
restraining forces. The shoulder belt locks
if there is a sudden stop or crash.
{Warning
You can be seriously injured, or even
killed, by not wearing your seat belt
properly.
Never allow the lap or shoulder belt to
become loose or twisted.Never wear the shoulder belt under both
arms or behind your back.
Always use the correct buckle for your
seating position.