2023 CHEVROLET MALIBU spare wheel
[x] Cancel search: spare wheelPage 265 of 332
Chevrolet Malibu Owner Manual (GMNA-Localizing-U.S./Canada-
16273584) - 2023 - CRC - 9/28/22
264 Vehicle Care
Reset the Tire Pressure Monitor System.
SeeTire Pressure Monitor Operation
0 260.
Check that all wheel nuts are properly
tightened. See “Wheel Nut Torque”
under Capacities and Specifications
0 298, and “Removing the Flat Tire and
Installing the Spare Tire” underTire
Changing 0270.
{Warning
Rust or dirt on a wheel, or on the
parts to which it is fastened, can
cause wheel nuts to become loose
over time. The wheel could come off
and cause a crash. When changing a
wheel, remove any rust or dirt from
places where the wheel attaches to
the vehicle. In an emergency, a cloth
or paper towel can be used; however,
use a scraper or wire brush later to
remove all rust or dirt. Lightly coat the inner diameter of the
wheel hub opening with wheel bearing
grease after a wheel change or tire
rotation to prevent corrosion or rust
buildup.
{Warning
Do not apply grease to the wheel
mounting surface, wheel conical
seats, or the wheel nuts or bolts.
Grease applied to these areas could
cause a wheel to become loose or
come off, resulting in a crash.
When It Is Time for New Tires
Factors, such as maintenance, temperatures,
driving speeds, vehicle loading, and road
conditions affect the wear rate of the tires.
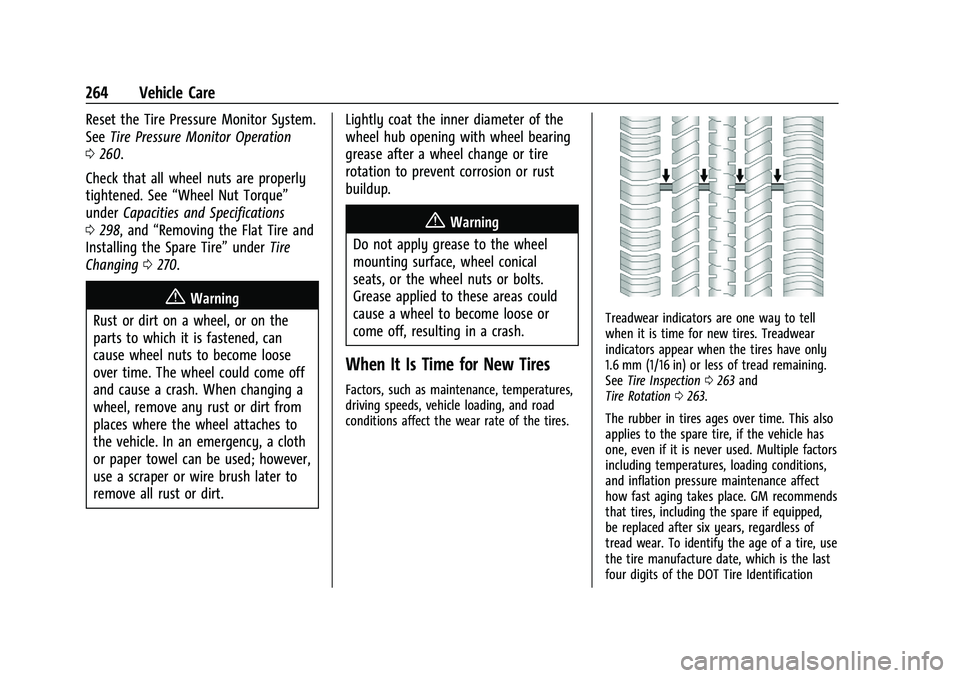
Treadwear indicators are one way to tell
when it is time for new tires. Treadwear
indicators appear when the tires have only
1.6 mm (1/16 in) or less of tread remaining.
See Tire Inspection 0263 and
Tire Rotation 0263.
The rubber in tires ages over time. This also
applies to the spare tire, if the vehicle has
one, even if it is never used. Multiple factors
including temperatures, loading conditions,
and inflation pressure maintenance affect
how fast aging takes place. GM recommends
that tires, including the spare if equipped,
be replaced after six years, regardless of
tread wear. To identify the age of a tire, use
the tire manufacture date, which is the last
four digits of the DOT Tire Identification
Page 267 of 332
Chevrolet Malibu Owner Manual (GMNA-Localizing-U.S./Canada-
16273584) - 2023 - CRC - 9/28/22
266 Vehicle Care
{Warning
Mixing tires of different sizes (other
than those originally installed on the
vehicle), brands, tread patterns,
or types may cause loss of vehicle
control, resulting in a crash or other
vehicle damage. Use the correct size,
brand, and type of tire on all wheels.
{Warning
Using bias-ply tires on the vehicle
may cause the wheel rim flanges to
develop cracks after many miles of
driving. A tire and/or wheel could fail
suddenly and cause a crash. Use only
radial-ply tires with the wheels on
the vehicle.
Winter tires with the same speed rating
as the original equipment tires may not
be available for H, V, W, Y and ZR
speed rated tires. Never exceed the
winter tires’ maximum speed capability
when using winter tires with a lower
speed rating. If the vehicle tires must be replaced
with a tire that does not have a TPC
Spec number, make sure they are the
same size, load range, speed rating, and
construction (radial) as the original
tires.
The Tire and Loading Information label
indicates the original equipment tires
on the vehicle. See
Vehicle Load Limits
0 172.Different Size Tires and Wheels
If wheels or tires are installed that are a
different size than the original equipment
wheels and tires, vehicle performance,
including its braking, ride and handling
characteristics, stability, and resistance to
rollover may be affected. If the vehicle has
electronic systems such as antilock brakes,
rollover airbags, traction control, electronic
stability control, or All-Wheel Drive, the
performance of these systems can also be
affected.
{Warning
If different sized wheels are used, there
may not be an acceptable level of
performance and safety if tires not
recommended for those wheels are
selected. This increases the chance of a
crash and serious injury. Only use GM
specific wheel and tire systems developed
for the vehicle, and have them properly
installed by a GM certified technician.
See Buying New Tires 0265 and
Accessories and Modifications 0221.
Uniform Tire Quality Grading
The following information relates to the
system developed by the United States
National Highway Traffic Safety
Administration (NHTSA), which grades
tires by treadwear, traction, and
temperature performance. This applies
only to vehicles sold in the United
States. The grades are molded on the
sidewalls of most passenger car tires.
The Uniform Tire Quality Grading
(UTQG) system does not apply to deep
tread, winter tires, compact spare tires,
Page 271 of 332
Chevrolet Malibu Owner Manual (GMNA-Localizing-U.S./Canada-
16273584) - 2023 - CRC - 9/28/22
270 Vehicle Care
If a tire goes flat, avoid further tire and
wheel damage by driving slowly to a level
place, well off the road, if possible. Turn on
the hazard warning flashers. SeeHazard
Warning Flashers 0104.
If your vehicle is loaded at or near
maximum cargo capacity, it may be difficult
to fit the jack under the vehicle due to the
environment (shoulder slope, road debris,
etc.). Removal of some weight may improve
the ability to fit the jack under the vehicle
at the correct jacking location.
{Warning
Changing a tire can be dangerous. The
vehicle can slip off the jack and roll over
or fall causing injury or death. Find a
level place to change the tire. To help
prevent the vehicle from moving:
1. Set the parking brake firmly.
2. Put the vehicle in P (Park).
3. Turn the vehicle off and do not restart the vehicle while it is raised.
4. Do not allow passengers to remain in the vehicle.
(Continued)
Warning (Continued)
5. Place wheel blocks, if equipped, onboth sides of the tire at the opposite
corner of the tire being changed.
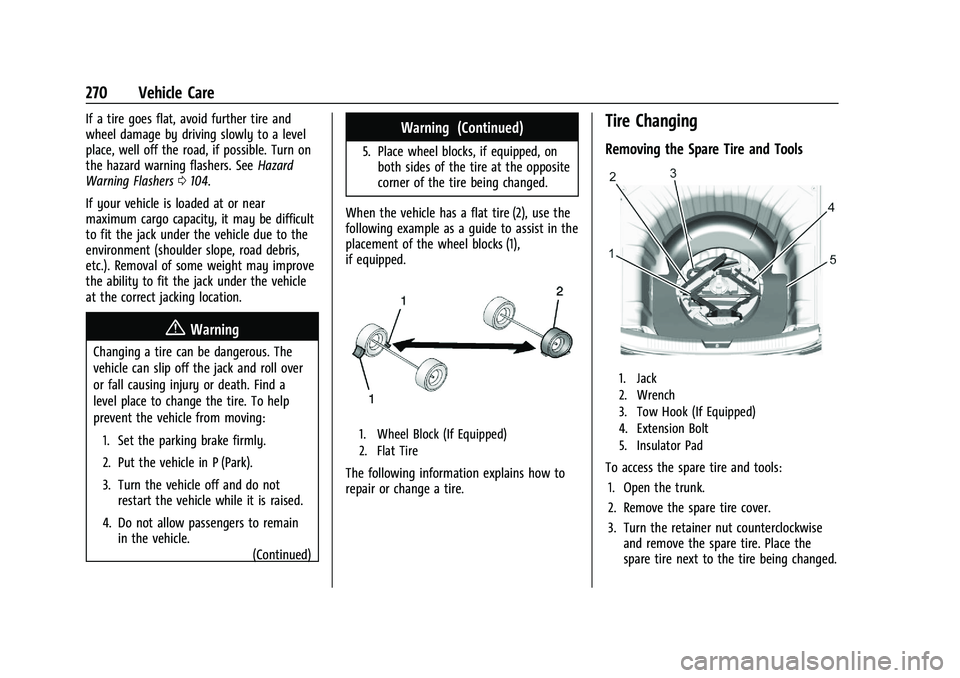
When the vehicle has a flat tire (2), use the
following example as a guide to assist in the
placement of the wheel blocks (1),
if equipped.
1. Wheel Block (If Equipped)
2. Flat Tire
The following information explains how to
repair or change a tire.
Tire Changing
Removing the Spare Tire and Tools
1. Jack
2. Wrench
3. Tow Hook (If Equipped)
4. Extension Bolt
5. Insulator Pad
To access the spare tire and tools: 1. Open the trunk.
2. Remove the spare tire cover.
3. Turn the retainer nut counterclockwise and remove the spare tire. Place the
spare tire next to the tire being changed.
Page 272 of 332
Chevrolet Malibu Owner Manual (GMNA-Localizing-U.S./Canada-
16273584) - 2023 - CRC - 9/28/22
Vehicle Care 271
4. The jack and tools are stored below thespare tire. Remove them from their
container and place them near the tire
being changed.
Removing the Flat Tire and Installing the
Spare Tire
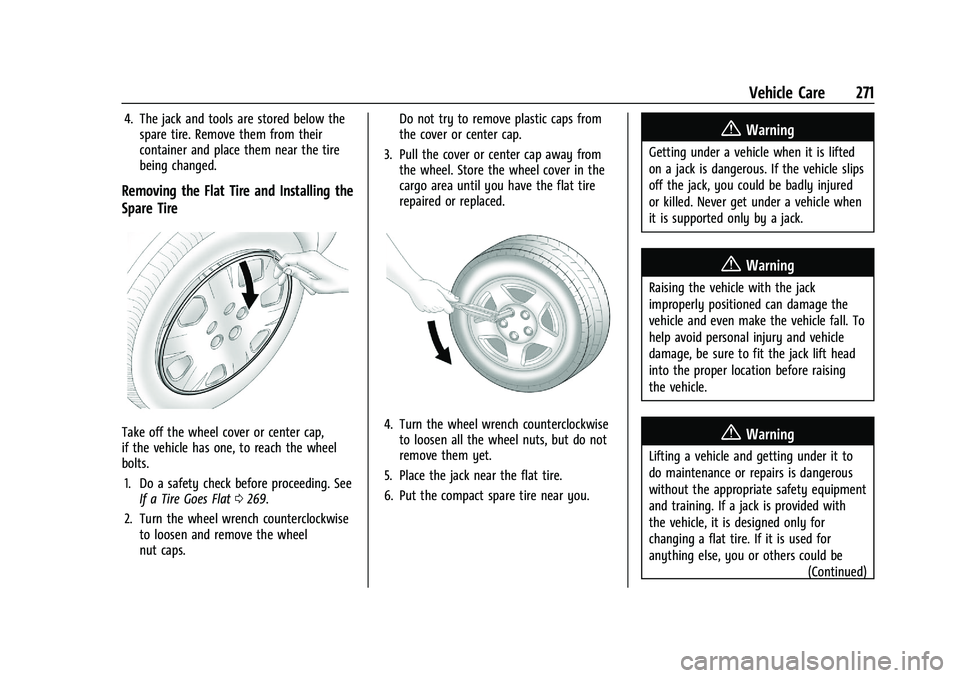
Take off the wheel cover or center cap,
if the vehicle has one, to reach the wheel
bolts.
1. Do a safety check before proceeding. See If a Tire Goes Flat 0269.
2. Turn the wheel wrench counterclockwise to loosen and remove the wheel
nut caps. Do not try to remove plastic caps from
the cover or center cap.
3. Pull the cover or center cap away from the wheel. Store the wheel cover in the
cargo area until you have the flat tire
repaired or replaced.4. Turn the wheel wrench counterclockwiseto loosen all the wheel nuts, but do not
remove them yet.
5. Place the jack near the flat tire.
6. Put the compact spare tire near you.
{Warning
Getting under a vehicle when it is lifted
on a jack is dangerous. If the vehicle slips
off the jack, you could be badly injured
or killed. Never get under a vehicle when
it is supported only by a jack.
{Warning
Raising the vehicle with the jack
improperly positioned can damage the
vehicle and even make the vehicle fall. To
help avoid personal injury and vehicle
damage, be sure to fit the jack lift head
into the proper location before raising
the vehicle.
{Warning
Lifting a vehicle and getting under it to
do maintenance or repairs is dangerous
without the appropriate safety equipment
and training. If a jack is provided with
the vehicle, it is designed only for
changing a flat tire. If it is used for
anything else, you or others could be (Continued)
Page 274 of 332
Chevrolet Malibu Owner Manual (GMNA-Localizing-U.S./Canada-
16273584) - 2023 - CRC - 9/28/22
Vehicle Care 273
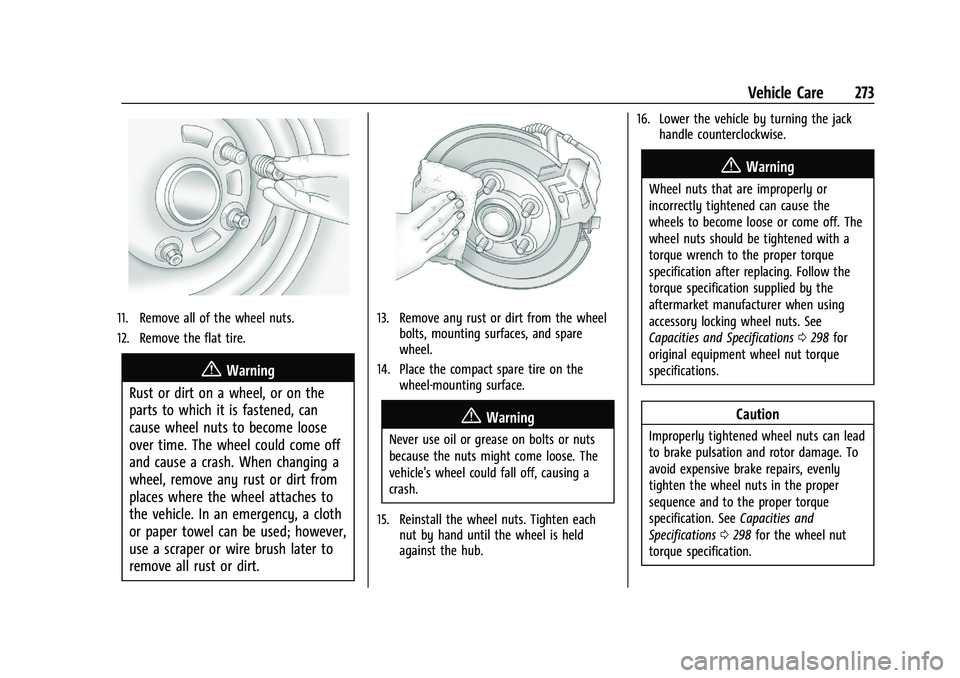
11. Remove all of the wheel nuts.
12. Remove the flat tire.
{Warning
Rust or dirt on a wheel, or on the
parts to which it is fastened, can
cause wheel nuts to become loose
over time. The wheel could come off
and cause a crash. When changing a
wheel, remove any rust or dirt from
places where the wheel attaches to
the vehicle. In an emergency, a cloth
or paper towel can be used; however,
use a scraper or wire brush later to
remove all rust or dirt.
13. Remove any rust or dirt from the wheel bolts, mounting surfaces, and spare
wheel.
14. Place the compact spare tire on the wheel-mounting surface.
{Warning
Never use oil or grease on bolts or nuts
because the nuts might come loose. The
vehicle's wheel could fall off, causing a
crash.
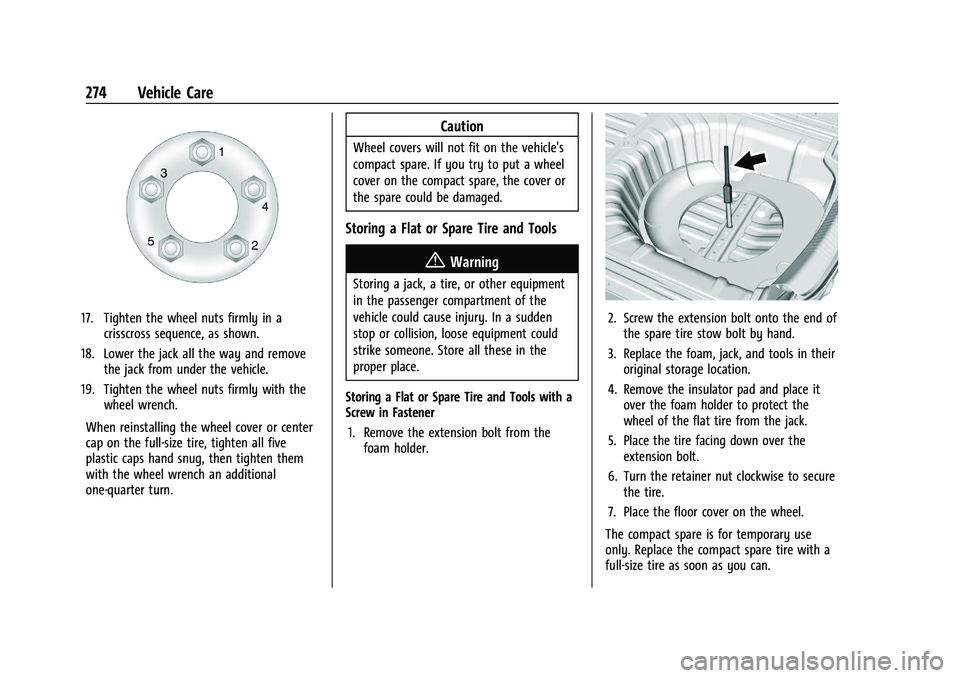
15. Reinstall the wheel nuts. Tighten each nut by hand until the wheel is held
against the hub. 16. Lower the vehicle by turning the jack
handle counterclockwise.
{Warning
Wheel nuts that are improperly or
incorrectly tightened can cause the
wheels to become loose or come off. The
wheel nuts should be tightened with a
torque wrench to the proper torque
specification after replacing. Follow the
torque specification supplied by the
aftermarket manufacturer when using
accessory locking wheel nuts. See
Capacities and Specifications 0298 for
original equipment wheel nut torque
specifications.
Caution
Improperly tightened wheel nuts can lead
to brake pulsation and rotor damage. To
avoid expensive brake repairs, evenly
tighten the wheel nuts in the proper
sequence and to the proper torque
specification. See Capacities and
Specifications 0298 for the wheel nut
torque specification.
Page 275 of 332
Chevrolet Malibu Owner Manual (GMNA-Localizing-U.S./Canada-
16273584) - 2023 - CRC - 9/28/22
274 Vehicle Care
17. Tighten the wheel nuts firmly in acrisscross sequence, as shown.
18. Lower the jack all the way and remove the jack from under the vehicle.
19. Tighten the wheel nuts firmly with the wheel wrench.
When reinstalling the wheel cover or center
cap on the full-size tire, tighten all five
plastic caps hand snug, then tighten them
with the wheel wrench an additional
one-quarter turn.
Caution
Wheel covers will not fit on the vehicle's
compact spare. If you try to put a wheel
cover on the compact spare, the cover or
the spare could be damaged.
Storing a Flat or Spare Tire and Tools
{Warning
Storing a jack, a tire, or other equipment
in the passenger compartment of the
vehicle could cause injury. In a sudden
stop or collision, loose equipment could
strike someone. Store all these in the
proper place.
Storing a Flat or Spare Tire and Tools with a
Screw in Fastener 1. Remove the extension bolt from the foam holder.
2. Screw the extension bolt onto the end ofthe spare tire stow bolt by hand.
3. Replace the foam, jack, and tools in their original storage location.
4. Remove the insulator pad and place it over the foam holder to protect the
wheel of the flat tire from the jack.
5. Place the tire facing down over the extension bolt.
6. Turn the retainer nut clockwise to secure the tire.
7. Place the floor cover on the wheel.
The compact spare is for temporary use
only. Replace the compact spare tire with a
full-size tire as soon as you can.
Page 276 of 332
Chevrolet Malibu Owner Manual (GMNA-Localizing-U.S./Canada-
16273584) - 2023 - CRC - 9/28/22
Vehicle Care 275
Compact Spare Tire
{Warning
Driving with more than one compact
spare tire at a time could result in loss of
braking and handling. This could lead to a
crash and you or others could be injured.
Use only one compact spare tire at
a time.
If this vehicle has a compact spare tire, it
was fully inflated when new; however, it
can lose air over time. Check the inflation
pressure regularly. It should be 420 kPa
(60 psi).
Stop as soon as possible and check that the
spare tire is correctly inflated after being
installed on the vehicle. The compact spare
tire is designed for temporary use only. The
vehicle will perform differently with the
spare tire installed and it is recommended
that the vehicle speed be limited to 80 km/h
(50 mph). To conserve the tread of the spare
tire, have the standard tire repaired or
replaced as soon as convenient and return
the spare tire to the storage area. When using a compact spare tire, the AWD
(if equipped), ABS, and Traction Control
systems may engage until the spare tire is
recognized by the vehicle, especially on
slippery roads. Adjust driving to reduce
possible wheel slip.
Caution
When the compact spare is installed, do
not take the vehicle through an
automatic car wash with guide rails. The
compact spare can get caught on the rails
which can damage the tire, wheel, and
other parts of the vehicle.
Do not use the compact spare on other
vehicles.
Do not mix the compact spare tire or wheel
with other wheels or tires. They will not fit.
Keep the spare tire and its wheel together.
Caution
Tire chains will not fit the compact spare.
Using them can damage the vehicle and
the chains. Do not use tire chains on the
compact spare.
Jump Starting
Jump Starting - North America
For more information about the vehicle
12-volt battery, see Battery - North America
0 235.
If the battery has run down, you may want
to use another vehicle and some jumper
cables to start your vehicle. Be sure to use
the following steps to do it safely.
{Warning
WARNING: Battery posts, terminals and
related accessories can expose you to
chemicals including lead and lead
compounds, which are known to the
State of California to cause cancer and
birth defects or other reproductive harm.
Wash hands after handling. For more
information go to
www.P65Warnings.ca.gov.
See California Proposition 65 Warning 01.
Page 323 of 332
Chevrolet Malibu Owner Manual (GMNA-Localizing-U.S./Canada-
16273584) - 2023 - CRC - 9/28/22
322 Index
Child Restraints (cont'd)Securing . . . . . . . . . . . . . . . . . . . . . . . . . . . . 67, 69
Systems . . . . . . . . . . . . . . . . . . . . . . . . . . . . . . . . 58
Child Safety Locks . . . . . . . . . . . . . . . . . . . . . . . . . 17
Circuit Breakers . . . . . . . . . . . . . . . . . . . . . . . . . . 244
Cleaning Exterior Care . . . . . . . . . . . . . . . . . . . . . . . . . . . 280
Interior Care . . . . . . . . . . . . . . . . . . . . . . . . . . . 284
Climate Control Systems . . . . . . . . . . . . . . . . . . 157 Air Conditioning . . . . . . . . . . . . . . . . . . . . . . . . 157
Dual Automatic . . . . . . . . . . . . . . . . . . . . . . . . 159
Heating . . . . . . . . . . . . . . . . . . . . . . . . . . . . . . . . . 157
Clock . . . . . . . . . . . . . . . . . . . . . . . . . . . . . . . . . . . . . 76
Cluster, Instrument . . . . . . . . . . . . . . . . . . . . . . . 80
Collision Damage Repair . . . . . . . . . . . . . . . . . 306
Compact Spare Tire . . . . . . . . . . . . . . . . . . . . . . 275
Compartments Storage . . . . . . . . . . . . . . . . . . . . . . . . . . . . . . . . . 72
Connected Services Connections . . . . . . . . . . . . . . . . . . . . . . . . . . . . 317
Diagnostics . . . . . . . . . . . . . . . . . . . . . . . . . . . . 319
Navigation . . . . . . . . . . . . . . . . . . . . . . . . . . . . . . 317
Connections Connected Services . . . . . . . . . . . . . . . . . . . . . 317
Control Traction and Electronic Stability . . . . . . . 186
Control of a Vehicle . . . . . . . . . . . . . . . . . . . . . 167 Controls
Steering Wheel . . . . . . . . . . . . . . . . . . . . . . . . . 111
Convenience Net . . . . . . . . . . . . . . . . . . . . . . . . . . .73
Convex Mirrors . . . . . . . . . . . . . . . . . . . . . . . . . . . . 21
Coolant Engine Temperature Gauge . . . . . . . . . . . . . 84
Engine Temperature Warning Light . . . . . 92
Cooling . . . . . . . . . . . . . . . . . . . . . . . . . . . . . . 157, 159
Cooling System . . . . . . . . . . . . . . . . . . . . . . . . . . 229
Courtesy Lamps . . . . . . . . . . . . . . . . . . . . . . . . . . 105
Courtesy Transportation Program . . . . . . . . 305
Coverage Explanations . . . . . . . . . . . . . . . . . . . . 133
Cruise Control . . . . . . . . . . . . . . . . . . . . . . . . . . . 188 Adaptive . . . . . . . . . . . . . . . . . . . . . . . . . . . . . . . 190
Light . . . . . . . . . . . . . . . . . . . . . . . . . . . . . . . . . . . . 95
Cupholders . . . . . . . . . . . . . . . . . . . . . . . . . . . . . . . .72
Customer Assistance
Offices . . . . . . . . . . . . . . . . . . . . . . . . . . . . . . . . . 302
Text Telephone (TTY) Users . . . . . . . . . . . . 302
Customer Information Publications Ordering Information . . . . . 308
Customer Satisfaction Procedure . . . . . . . . . 300
Cybersecurity . . . . . . . . . . . . . . . . . . . . . . . . . . . . 310
D
Damage Repair, Collision . . . . . . . . . . . . . . . . . 306
Danger, Warning, and Caution . . . . . . . . . . . . . .2
Dashboard . . . . . . . . . . . . . . . . . . . . . . . . . . . . . . . . . 4 Data Collection
Infotainment System . . . . . . . . . . . . . . . . . . . 311
OnStar . . . . . . . . . . . . . . . . . . . . . . . . . . . . . . . . . . 311
Data Recorders, Event . . . . . . . . . . . . . . . . . . . 310
Database Coverage Explanations . . . . . . . . . . 133
Daytime Running Lamps (DRL) . . . . . . . . . . . 104
Defensive Driving . . . . . . . . . . . . . . . . . . . . . . . . 166
Delayed Locking . . . . . . . . . . . . . . . . . . . . . . . . . . .16
Destination . . . . . . . . . . . . . . . . . . . . . . . . . . . . . . 126
Diagnostics Connected Services . . . . . . . . . . . . . . . . . . . . 319
Disabled Vehicle Transporting . . . . . . . . . . . . . . . . . . . . . . . . . . . 278
Distracted Driving . . . . . . . . . . . . . . . . . . . . . . . . 166
Dome Lamps . . . . . . . . . . . . . . . . . . . . . . . . . . . . . 105
Door Ajar Light . . . . . . . . . . . . . . . . . . . . . . . . . . . . . . . 95
Delayed Locking . . . . . . . . . . . . . . . . . . . . . . . . 16
Locks . . . . . . . . . . . . . . . . . . . . . . . . . . . . . . . . . . . 14
Power Locks . . . . . . . . . . . . . . . . . . . . . . . . . . . . 16
Drive Belt Routing, Engine . . . . . . . . . . . . . . . 299
Driver
Assistance Systems . . . . . . . . . . . . . . . . . . . . 197
Information Center (DIC) . . . . . . . . . . . . 95, 98
Teen . . . . . . . . . . . . . . . . . . . . . . . . . . . . . . . . . . . 147
Driving Assistance Systems . . . . . . . . . . . . . . . . . . . . 202
Better Fuel Economy . . . . . . . . . . . . . . . . . . . 166