2023 CHEVROLET CORVETTE ignition start
[x] Cancel search: ignition startPage 155 of 351
Chevrolet Corvette Owner Manual (GMNA-Localizing-U.S./Canada/Mexico-
16287457) - 2023 - CRC - 3/10/22
154 Infotainment System
Set up/Add keys to activate Teen Driver and
assign restrictions to the key:
Any vehicle key can be registered, up to a
maximum of eight keys. Label the key to
tell it apart from the other keys.
For a pushbutton start system:1. Start the vehicle.
2. For automatic transmissions, the vehicle must be in P (Park). For manual
transmissions, the vehicle must be
stopped with the parking brake set.
3. From the Settings menu, touch Vehicle and then Teen Driver.
4. Enter the PIN.
5. Place the remote key you wish to register in the transmitter pocket. The
key does not need to be the one that
started the vehicle. See Remote Key
Operation 07for transmitter pocket
location.
6. From the Teen Driver menu, touch Setup Keys or Add/Remove Teen Driver Keys.
.If the remote key has not previously
been registered, the option to add
the key displays. Touch Add and a
confirmation message displays. Teen Driver restrictions will be applied
whenever this remote key is used to
operate the vehicle.
.If the remote key has already been
registered, the option to remove the
key displays. If Remove is touched,
the remote key is no longer
registered. A confirmation message
displays, and Teen Driver restrictions
will not be applied if this remote key
is used to operate the vehicle.
In vehicles with a pushbutton start system,
if a Teen Driver and a non-Teen Driver key
are both present at start up, the vehicle will
recognize the non-Teen Driver key to start
the vehicle. The Teen Driver settings will not
be active.
For a keyed ignition system: 1. Start the vehicle.
2. For automatic transmissions, the vehicle must be in P (Park). For manual
transmissions, the vehicle must be
stopped with the parking brake set.
3. From the Settings menu, touch Vehicle and then Teen Driver.
4. Enter the PIN. 5. Touch Setup Keys or Add/Remove Teen
Driver Keys. The system displays
instructions for registering or
unregistering a key. A confirmation
message displays.
Manage Settings or Teen Driver Settings
Depending on the options of your vehicle,
the following menu items may be displayed:
Buckle to Drive : When turned ON, Buckle to
Drive prevents the driver from shifting out
of P (Park) for a period of time after the
brake pedal is pressed if the driver, or on
some vehicles the detected passenger, has
not buckled their seat belt. On some
vehicles, Buckle to Drive is always ON when
Teen Driver is active and is not configurable.
See Buckle To Drive 045.
Audio Volume Limit : Allows a maximum
audio volume to be set. Turn the audio
volume limit on or off. Use the arrows to
choose the maximum allowable level for the
audio volume. On some infotainment
systems, touch Set Audio Volume Limit to
choose the maximum allowable audio
volume level.
Set Audio Volume Limit : Use the arrows to
choose the maximum allowable level for the
audio volume.
Page 169 of 351
Chevrolet Corvette Owner Manual (GMNA-Localizing-U.S./Canada/Mexico-
16287457) - 2023 - CRC - 3/10/22
168 Driving and Operating
Driving and Operating
Driving Information
Driving for Better Fuel Economy . . . . . . 169
Distracted Driving . . . . . . . . . . . . . . . . . . . . . 169
Defensive Driving . . . . . . . . . . . . . . . . . . . . . . 170
Impaired Driving . . . . . . . . . . . . . . . . . . . . . . . 170
Control of a Vehicle . . . . . . . . . . . . . . . . . . . 170
Braking . . . . . . . . . . . . . . . . . . . . . . . . . . . . . . . . 170
Steering . . . . . . . . . . . . . . . . . . . . . . . . . . . . . . . 170
Off-Road Recovery . . . . . . . . . . . . . . . . . . . . . . 171
Loss of Control . . . . . . . . . . . . . . . . . . . . . . . . . 172
Track Events and CompetitiveDriving . . . . . . . . . . . . . . . . . . . . . . . . . . . . . . . 172
Driving on Wet Roads . . . . . . . . . . . . . . . . . 183
Hill and Mountain Roads . . . . . . . . . . . . . . 184
Winter Driving . . . . . . . . . . . . . . . . . . . . . . . . 184
If the Vehicle Is Stuck . . . . . . . . . . . . . . . . . 185
Vehicle Load Limits . . . . . . . . . . . . . . . . . . . . 186
Starting and Operating
New Vehicle Break-In . . . . . . . . . . . . . . . . . . 189
Front Air Dam (and Splitter) . . . . . . . . . . . 189
Composite Materials . . . . . . . . . . . . . . . . . . . 189
Ignition Positions . . . . . . . . . . . . . . . . . . . . . . 190
Starting the Engine . . . . . . . . . . . . . . . . . . . . 191
Retained Accessory Power (RAP) . . . . . . . 192
Shifting Into Park . . . . . . . . . . . . . . . . . . . . . . 193
Shifting out of Park . . . . . . . . . . . . . . . . . . . 193
Parking over Things That Burn . . . . . . . . 194 Active Fuel Management . . . . . . . . . . . . . . 194
Extended Parking . . . . . . . . . . . . . . . . . . . . . . 194
Engine Exhaust
Engine Exhaust . . . . . . . . . . . . . . . . . . . . . . . . 194
Running the Vehicle While Parked . . . . . 195
Dual Clutch Transmission
Dual Clutch Transmission . . . . . . . . . . . . . . 195
Manual Mode . . . . . . . . . . . . . . . . . . . . . . . . . 198
Brakes
Electric Brake Boost . . . . . . . . . . . . . . . . . . . 203
Antilock Brake System (ABS) . . . . . . . . . . 204
Electric Parking Brake . . . . . . . . . . . . . . . . . 204
Brake Assist . . . . . . . . . . . . . . . . . . . . . . . . . . . 205
Hill Start Assist (HSA) . . . . . . . . . . . . . . . . . 205
Ride Control Systems
Traction Control/Electronic Stability
Control . . . . . . . . . . . . . . . . . . . . . . . . . . . . . . 206
Hill Rollback Control . . . . . . . . . . . . . . . . . . . 208
Driver Mode Control . . . . . . . . . . . . . . . . . . 208
Front Lift System . . . . . . . . . . . . . . . . . . . . . . 214
Competitive Driving Mode . . . . . . . . . . . . . 215
Limited-Slip Differential (Stingray Models Without Z51 Performance
Package) . . . . . . . . . . . . . . . . . . . . . . . . . . . . . 218
Limited-Slip Differential (Stingray With Z51 Performance Package and
Z06 model) . . . . . . . . . . . . . . . . . . . . . . . . . . 219
Cruise Control
Cruise Control . . . . . . . . . . . . . . . . . . . . . . . . . 219
Driver Assistance Systems
Driver Assistance Systems . . . . . . . . . . . . . 221
Assistance Systems for Parking orBacking . . . . . . . . . . . . . . . . . . . . . . . . . . . . . . 223
Rear Vision Camera (RVC) . . . . . . . . . . . . . . 223
Curb View Camera . . . . . . . . . . . . . . . . . . . . 224
Park Assist . . . . . . . . . . . . . . . . . . . . . . . . . . . . . 225
Rear Cross Traffic Alert (RCTA) System . . . . . . . . . . . . . . . . . . . . . . . . . . . . . . 225
Side Blind Zone Alert (SBZA) . . . . . . . . . . . 225
Fuel
Top Tier Fuel . . . . . . . . . . . . . . . . . . . . . . . . . . 227
Recommended Fuel . . . . . . . . . . . . . . . . . . . . 227
Prohibited Fuels . . . . . . . . . . . . . . . . . . . . . . . 227
Fuels in Foreign Countries . . . . . . . . . . . . . 228
Fuel Additives . . . . . . . . . . . . . . . . . . . . . . . . . 228
Filling the Tank . . . . . . . . . . . . . . . . . . . . . . . . 228
Filling a Portable Fuel Container . . . . . . . 229
Trailer Towing
General Towing Information . . . . . . . . . . . 230
Conversions and Add-Ons
Add-On Electrical Equipment . . . . . . . . . . 230
Page 191 of 351
Chevrolet Corvette Owner Manual (GMNA-Localizing-U.S./Canada/Mexico-
16287457) - 2023 - CRC - 3/10/22
190 Driving and Operating
{Warning
Exposed edges of parts containing carbon
fiber and other composite materials can
be sharp. Contact with these parts could
result in injury. Use caution to avoid
contacting these parts, including when
washing the vehicle. If the parts are
damaged, replace the parts promptly
with replacements from your dealer.
{Warning
Rocker extensions may break under
pressure, resulting in property damage or
injury. Do not stand on the rocker
extension or use it as a step.
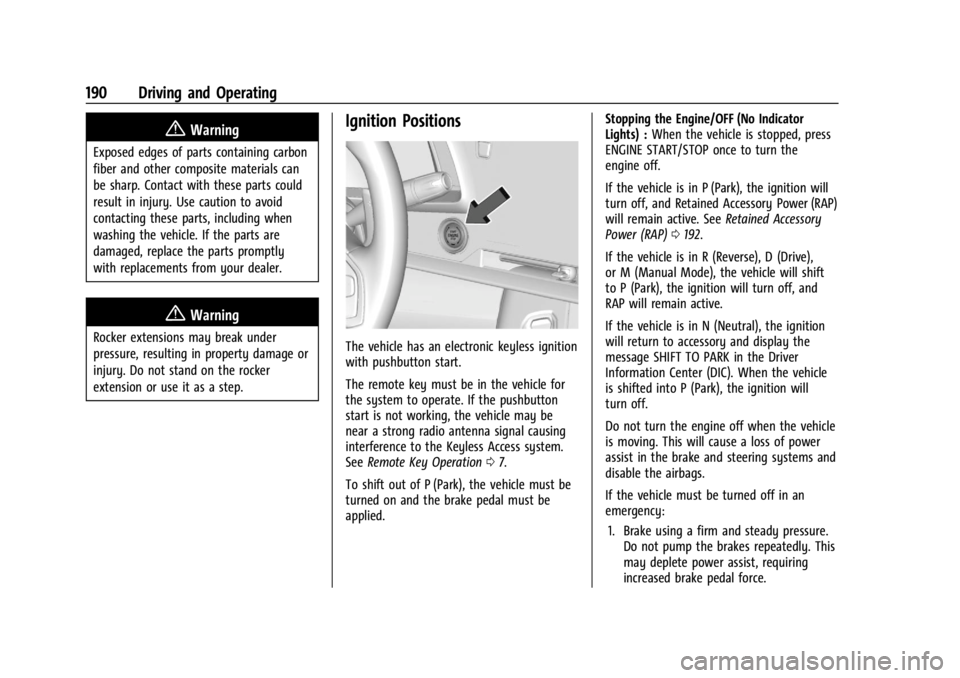
Ignition Positions
The vehicle has an electronic keyless ignition
with pushbutton start.
The remote key must be in the vehicle for
the system to operate. If the pushbutton
start is not working, the vehicle may be
near a strong radio antenna signal causing
interference to the Keyless Access system.
SeeRemote Key Operation 07.
To shift out of P (Park), the vehicle must be
turned on and the brake pedal must be
applied. Stopping the Engine/OFF (No Indicator
Lights) :
When the vehicle is stopped, press
ENGINE START/STOP once to turn the
engine off.
If the vehicle is in P (Park), the ignition will
turn off, and Retained Accessory Power (RAP)
will remain active. See Retained Accessory
Power (RAP) 0192.
If the vehicle is in R (Reverse), D (Drive),
or M (Manual Mode), the vehicle will shift
to P (Park), the ignition will turn off, and
RAP will remain active.
If the vehicle is in N (Neutral), the ignition
will return to accessory and display the
message SHIFT TO PARK in the Driver
Information Center (DIC). When the vehicle
is shifted into P (Park), the ignition will
turn off.
Do not turn the engine off when the vehicle
is moving. This will cause a loss of power
assist in the brake and steering systems and
disable the airbags.
If the vehicle must be turned off in an
emergency: 1. Brake using a firm and steady pressure. Do not pump the brakes repeatedly. This
may deplete power assist, requiring
increased brake pedal force.
Page 192 of 351
Chevrolet Corvette Owner Manual (GMNA-Localizing-U.S./Canada/Mexico-
16287457) - 2023 - CRC - 3/10/22
Driving and Operating 191
2. Shift into N (Neutral). This can be donewhile the vehicle is moving. After
shifting into N (Neutral), firmly apply the
brakes and steer the vehicle to a safe
location.
3. Come to a complete stop. Shift into P (Park).
4. Set the parking brake. See Electric
Parking Brake 0204. Press ENGINE
START/STOP to turn the vehicle off.
{Warning
Turning off the vehicle while moving may
cause loss of power assist in the brake
and steering systems and disable the
airbags. While driving, only shut the
vehicle off in an emergency.
If the vehicle cannot be pulled over and
must be turned off while driving, press and
hold ENGINE START/STOP for more than
two seconds, or press twice within
five seconds.
Accessory (Amber Indicator Light) : This
mode allows the use of some electrical
accessories when the engine is off. With the ignition off, pressing the button
one time without the brake pedal applied
will place the ignition system in accessory.
The ignition will switch from accessory to
OFF after five minutes to prevent battery
rundown.
ON/RUN/START (Green Indicator Light) :
This
mode is for driving and starting. With the
ignition off and the brake pedal applied,
pressing the button once will place the
ignition in ON/RUN/START. Once engine
cranking begins, release the button. Engine
cranking will continue until the engine
starts. See Starting the Engine 0191. The
ignition will then remain in ON/RUN.
Service Mode
This power mode is available for service and
diagnostics, and to verify the proper
operation of the malfunction indicator lamp
as may be required for emission inspection
purposes. With the vehicle off and the brake
pedal not applied, pressing and holding
ENGINE START/STOP for more than
five seconds will place the vehicle in Service
Mode. The instruments and audio systems
will operate as they do in ON/RUN, but the
vehicle will not be able to be driven. The engine will not start in Service Mode. Press
ENGINE START/STOP again to turn the
vehicle off.
Starting the Engine
Caution
If you add electrical parts or accessories,
you could change the way the engine
operates. Any resulting damage would
not be covered by the vehicle warranty.
See
Add-On Electrical Equipment 0230.
Caution
Do not try to shift to P (Park) if the
vehicle is moving. If you do, you could
damage the transmission. Shift to P (Park)
only when the vehicle is stopped.
Place the transmission in P (Park) or
N (Neutral). To restart the vehicle when it is
already moving, use N (Neutral) only.
Starting the Vehicle
The remote key must be inside the vehicle
for the ignition to work.
Page 206 of 351
Chevrolet Corvette Owner Manual (GMNA-Localizing-U.S./Canada/Mexico-
16287457) - 2023 - CRC - 3/10/22
Driving and Operating 205
have the vehicle serviced. Do not drive the
vehicle if the red parking brake status light
is flashing. See your dealer.
If the amber service parking brake warning
light is on, press the EPB switch. Continue to
hold the switch until the red parking brake
status light remains on. If the amber service
parking brake warning light is on, see your
dealer.
If the EPB is applied while the vehicle is
moving, the vehicle will decelerate as long
as the switch is pressed. If the switch is
pressed until the vehicle comes to a stop,
the EPB will remain applied.
The vehicle may automatically apply the EPB
in some situations when the vehicle is not
moving. This is normal, and is done to
periodically check the correct operation of
the EPB system, or at the request of other
safety functions that utilize the EPB.
If the EPB fails to apply, block the rear
wheels to prevent vehicle movement.
EPB Release
To release the EPB:1. Turn the ignition on or to accessory mode. 2. Apply and hold the brake pedal.
3. Press the EPB switch momentarily.
The EPB is released when the red parking
brake status light is off.
If the amber service parking brake warning
light is on, release the EPB by pressing and
holding the EPB switch. Continue to hold the
switch until the red parking brake status
light is off. If either light stays on after
release is attempted, see your dealer.
Caution
Driving with the parking brake on can
overheat the brake system and cause
premature wear or damage to brake
system parts. Make sure that the parking
brake is fully released and the brake
warning light is off before driving.
Automatic EPB Release
The EPB will automatically release if the
vehicle is running, placed into gear, and an
attempt is made to drive away. Avoid rapid
acceleration when the EPB is applied, to
preserve parking brake lining life.
Brake Assist
Brake Assist detects rapid brake pedal
applications due to emergency braking
situations and provides additional braking to
activate the Antilock Brake System (ABS) if
the brake pedal is not pushed hard enough
to activate ABS normally. Minor noise, brake
pedal pulsation, and/or pedal movement
during this time may occur. Continue to
apply the brake pedal as the driving
situation dictates. Brake Assist disengages
when the brake pedal is released.
Hill Start Assist (HSA)
{Warning
Do not rely on the HSA feature. HSA does
not replace the need to pay attention
and drive safely. You may not hear or
feel alerts or warnings provided by this
system. Failure to use proper care when
driving may result in injury, death,
or vehicle damage. See Defensive Driving
0 170.
When the vehicle is stopped on a grade, Hill
Start Assist (HSA) prevents the vehicle from
rolling in an unintended direction during the
transition from brake pedal release to
Page 260 of 351

Chevrolet Corvette Owner Manual (GMNA-Localizing-U.S./Canada/Mexico-
16287457) - 2023 - CRC - 3/10/22
Vehicle Care 259
Caution
Performing the brake burnish procedure
on a base brake system can result in
brake damage.
Perform this procedure only on dry
pavement, in a safe manner, and in
compliance with all local and state
ordinances/laws regarding motor vehicle
operation.
Caution
The new vehicle break-in period should be
completed before performing the brake
burnishing procedure or damage may
occur to the powertrain/engine. See New
Vehicle Break-In 0189.
Caution
Brake fade can occur during this burnish
procedure and can cause brake pedal
travel and force to increase. This could
extend stopping distance until the brakes
are fully burnished.
Completing the following procedure as
instructed will not damage the brakes. The
brake pads may smoke and produce an odor. The braking force and pedal travel
may increase. After the procedure, the brake
pads may appear white at the rotor contact.
1. Using the Friction Bubble gauge, apply the brakes 10 times starting at 100 km/h
(60 mph) to 50 km/h (30 mph) while
decelerating at 0.4g. This is a medium
brake application. Drive for at lest 0.5 km
(0.3 mi) between applying the brakes.
2. If further cleanup of the brake discs is needed, repeat this procedure with 0.7g
applications.
As with all high performance brake systems,
some amount of brake squeal is normal.
Brake Pad Life System (If
Equipped)
When to Change Brake Pads
If equipped, this system estimates the
remaining life of the front and rear brake
pads. Brake Pad Life is displayed in the
Driver Information Center (DIC), along with
a percentage for each axle. The system must
be reset every time the brake pads are
changed. When the system has determined that the
brake pads need to be replaced, a message
displays, which may include mileage
remaining.
Brake pads should always be replaced as
complete axle sets.
How to Reset the Brake Pad Life System
The system will automatically detect when
significantly worn brake pads are replaced.
When the ignition is turned on after new
pads and wear sensors are installed, a
message will display. Follow the prompts to
reset the system.
The brake pad life system can also be
manually reset:
1. Display Brake Pad Life on the DIC. See Driver Information Center (DIC) 092.
2. Select the Brake Pad Life menu.
3. Select front or rear pads as appropriate.
4. Select YES on the confirmation message. Repeat for the pads on the other axle if
they were also replaced.
Page 271 of 351

Chevrolet Corvette Owner Manual (GMNA-Localizing-U.S./Canada/Mexico-
16287457) - 2023 - CRC - 3/10/22
270 Vehicle Care
FusesUsage
10 Engine Control Module/ Air Conditioning
11 –
12 Lithium Ion Battery Module
13 Active Fuel Management
14 Seat Fan 15 –
16 Exterior Lighting Module
17 Instrument Panel Cluster/Shifter Interface
Board/Transmission
Control Module/
Electronic Brake Control
Module
18 Engine Control Module
19 –
20 Sensing and Diagnostic Module/Inside Rear
View Mirror
21 Exhaust Valve Solenoid Fuses
Usage
22 Fuel Pump/Fuel Tank Zone Module
23 Tonneau Left
24 Tonneau Right 25 Convertible Top Right
26 Convertible Top Left 27 Electronic Suspension Control
28 –
29 CGM
30 O2 Sensor 31 O2 Sensor/Engine Oil/ Canister Purge/Active
Fuel Management
32 Ignition Even
33 Ignition Odd
34 Engine Control Module 1 35 Engine Control Module/ Mass Air Flow Sensor/
O2 Sensor/Air
Conditioning
36 – Fuses
Usage
37 Canister Vent
38 Latch Control Module
39 Right Window Switch/ Door Lock
40 Left Window Switch/ Door Lock
41 –
42 Engine Control Module 2
43 –
44 Air Conditioning Clutch 45 –
46 –
47 –
48 –
49 Auxiliary Cooling Fan Right
50 –
51 –
52 –
53 Starter Solenoid
Page 293 of 351

Chevrolet Corvette Owner Manual (GMNA-Localizing-U.S./Canada/Mexico-
16287457) - 2023 - CRC - 3/10/22
292 Vehicle Care
Caution
If any accessories are left on or plugged
in during the jump starting procedure,
they could be damaged. The repairs
would not be covered by the vehicle
warranty. Whenever possible, turn off or
unplug all accessories on either vehicle
when jump starting.
3. Turn off the ignition on both vehicles. Unplug unnecessary accessories plugged
into the accessory power outlet. Turn off
the radio and all lamps that are not
needed. This will avoid sparks and help
save both batteries. And it could save
the radio!
4. Open the hood. See Hood017.
5. Release the four clips for the left and
right outer covers.
6. Release the five clips and remove theouter cover to access the battery. 7. Locate the battery positive (+) and
negative (−) terminals.
8. Check that the jumper cables do not have loose or missing insulation. If they
do, you could get a shock. The vehicles
could be damaged too.
9. Open the discharged battery positive (+) terminal trim cover and connect one end
of the positive (+) cable.
10. Do not let the other end of the positive (+) cable to touch metal.
Connect it to the good battery
positive (+) terminal.
11. Connect one end of the negative (−) cable to the good battery negative (−)
terminal.
Do not let the other end touch anything
until the next step.
12. Connect the other end of the negative (−) cable to the discharged battery
negative (−) terminal.
13. Start the vehicle with the good battery and run the engine for a while.
14. Try to start the vehicle that had the discharged battery. If it will not start
after a few tries, it probably needs
service.