2023 ALFA ROMEO STELVIO brake light
[x] Cancel search: brake lightPage 204 of 268
SERVICING AND MAINTENANCE
202
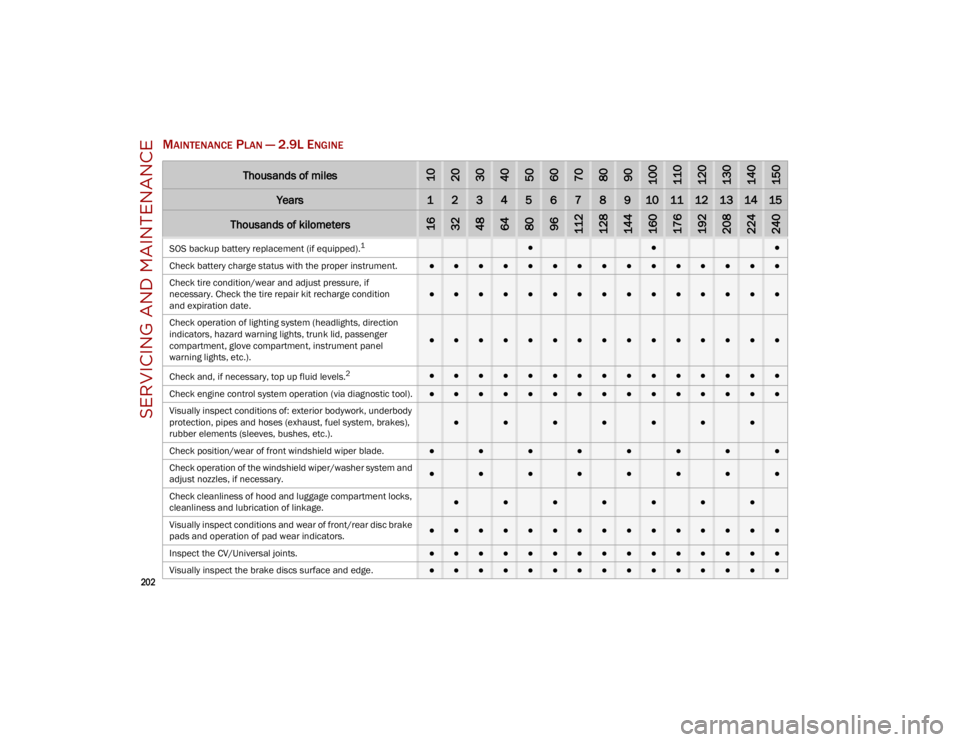
MAINTENANCE PLAN — 2.9L ENGINE
Thousands of miles102030405060708090100110120130140150
Years123456789101112131415
Thousands of kilometers163248648096112128144160176192208224240
SOS backup battery replacement (if equipped).1●●●
Check battery charge status with the proper instrument.
●●●●●●●●●●●●●●●
Check tire condition/wear and adjust pressure, if
necessary. Check the tire repair kit recharge condition
and expiration date.
●●●●●●●●●●●●●●●
Check operation of lighting system (headlights, direction
indicators, hazard warning lights, trunk lid, passenger
compartment, glove compartment, instrument panel
warning lights, etc.).
●●●●●●●●●●●●●●●
Check and, if necessary, top up fluid levels.
2●●●●●●●●●●●●●●●
Check engine control system operation (via diagnostic tool).
●●●●●●●●●●●●●●●
Visually inspect conditions of: exterior bodywork, underbody
protection, pipes and hoses (exhaust, fuel system, brakes),
rubber elements (sleeves, bushes, etc.).
●●●●●●●
Check position/wear of front windshield wiper blade.●●●●●●●●
Check operation of the windshield wiper/washer system and
adjust nozzles, if necessary.
●●●●●●●●
Check cleanliness of hood and luggage compartment locks,
cleanliness and lubrication of linkage.
●●●●●●●
Visually inspect conditions and wear of front/rear disc brake
pads and operation of pad wear indicators.●●●●●●●●●●●●●●●
Inspect the CV/Universal joints.
●●●●●●●●●●●●●●●
Visually inspect the brake discs surface and edge.
●●●●●●●●●●●●●●●
23_GU_OM_EN_USC_t.book Page 202
Page 205 of 268
203
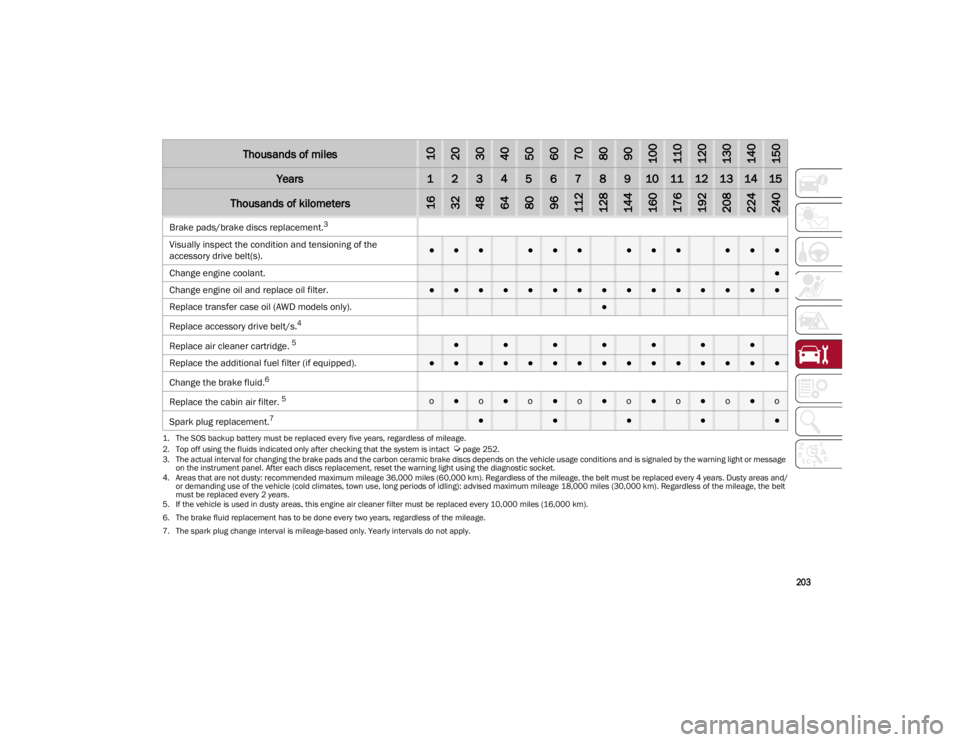
Brake pads/brake discs replacement.
3
Vis
ually inspect the condition and tensioning of the
accessory drive belt(s).
●●●●●●●●●●●●
Change engine coolant.
●
Change engine oil and replace oil filter.
●●●●●●●●●●●●●●●
Replace transfer case oil (AWD models only).
●
Replace accessory drive belt/s.4
Rep
lace air cleaner cartridge.
5●●●●●●●
Replace the additional fuel filter (if equipped).●●●●●●●●●●●●●●●
Change the brake fluid.
6
Rep
lace the cabin air filter.
5o●o●o●o●o●o●o●o
Spark plug replacement.
7●●●●●
1. The SOS backup battery must be replaced every five years, regardless of mileage.
2. Top off using the fluids indicated only after checking that the system is intact
Ú
page 252.
3. The actual interval for changing the brake pads and the carbon ceramic brake discs depends on the vehicle usage conditions and is signaled by the warning light or message on the instrument panel. After each discs replacement, reset the warning light using the diagnostic socket.
4. Areas that are not dusty: recommended maximum mileage 36,000 miles (60,000 km). Regardless of the mileage, the belt must be replaced every 4 years. Dusty areas and/ or demanding use of the vehicle (cold climates, town use, long periods of idling): advised maximum mileage 18,000 miles (30,000 km). Regardless of the mileage, the belt must be replaced every 2 years.
5. If the vehicle is used in dusty areas, this engine air cleaner filter must be replaced every 10,000 miles (16,000 km).
6. The brake fluid replacement has to be done every two years, regardless of the mileage.
7. The spark plug change interval is mileage-based only. Yearly intervals do not apply.
Thousands of miles102030405060708090100110120130140150
Years123456789101112131415
Thousands of kilometers163248648096112128144160176192208224240
23_GU_OM_EN_USC_t.book Page 203
Page 206 of 268
SERVICING AND MAINTENANCE
204
ENGINE COMPARTMENT
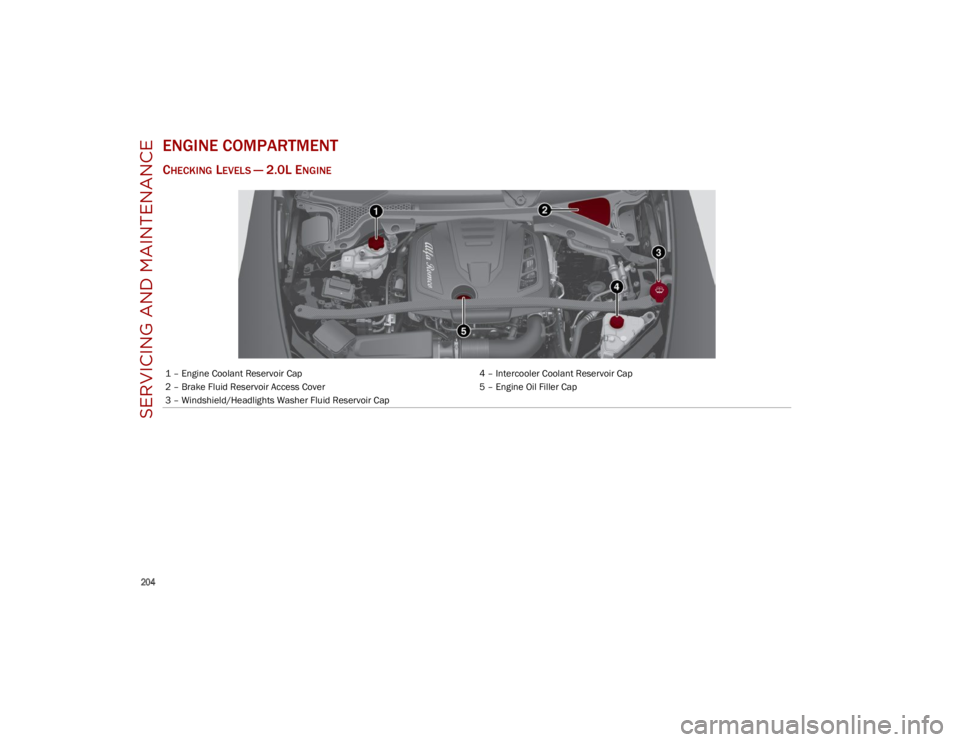
CHECKING LEVELS — 2.0L ENGINE
1 – Engine Coolant Reservoir Cap4 – Intercooler Coolant Reservoir Cap
2 – Brake Fluid Reservoir Access Cover 5 – Engine Oil Filler Cap
3 – Windshield/Headlights Washer Fluid Reservoir Cap
23_GU_OM_EN_USC_t.book Page 204
Page 207 of 268
205
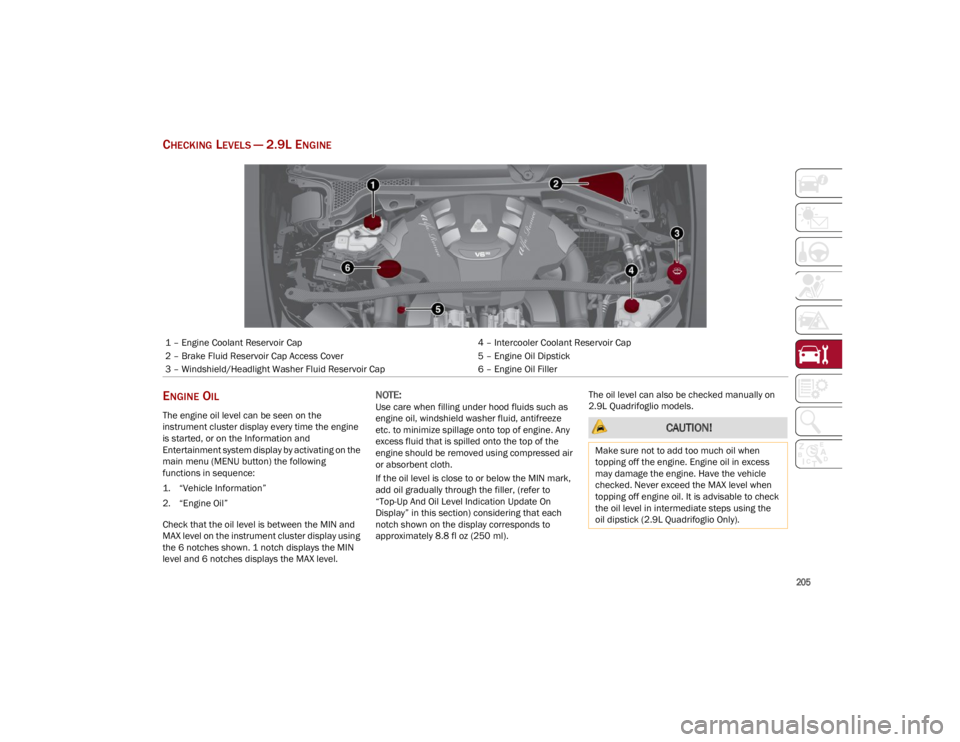
CHECKING LEVELS — 2.9L ENGINE
ENGINE OIL
The engine oil level can be seen on the
instrument cluster display every time the engine
is started, or on the Information and
Entertainment system display by activating on the
main menu (MENU button) the following
functions in sequence:
1. “Vehicle Information”
2. “Engine Oil”
Check that the oil level is between the MIN and
MAX level on the instrument cluster display using
the 6 notches shown. 1 notch displays the MIN
level and 6 notches displays the MAX level.
NOTE:
Use care when filling under hood fluids such as
engine oil, windshield washer fluid, antifreeze
etc. to minimize spillage onto top of engine. Any
excess fluid that is spilled onto the top of the
engine should be removed using compressed air
or absorbent cloth.
If the oil level is close to or below the MIN mark,
add oil gradually through the filler, (refer to
“Top-Up And Oil Level Indication Update On
Display” in this section) considering that each
notch shown on the display corresponds to
approximately 8.8 fl oz (250 ml).The oil level can also be checked manually on
2.9L Quadrifoglio models.
1 – Engine Coolant Reservoir Cap
4 – Intercooler Coolant Reservoir Cap
2 – Brake Fluid Reservoir Cap Access Cover 5 – Engine Oil Dipstick
3 – Windshield/Headlight Washer Fluid Reservoir Cap 6 – Engine Oil Filler
CAUTION!
Make sure not to add too much oil when
topping off the engine. Engine oil in excess
may damage the engine. Have the vehicle
checked. Never exceed the MAX level when
topping off engine oil. It is advisable to check
the oil level in intermediate steps using the
oil dipstick (2.9L Quadrifoglio Only).
23_GU_OM_EN_USC_t.book Page 205
Page 209 of 268

207
NOTE:
Use care when filling under hood fluids such as
engine oil, windshield washer fluid, antifreeze
etc. to minimize spillage onto top of engine.
Any excess fluid that is spilled onto the top of
the engine should be removed using compressed
air or absorbent cloth.
NOTE:
The headlight washers are activated every
10 activations of the windshield washer.
NOTE:
The headlight washing system will not work if the
liquid level is low (situation indicated by the
symbol on the instrument cluster display
Ú
page 70). The windshield washer will keep
working.
On vehicles equipped with headlight washers,
there is a reference notch on the dipstick:
ONLY the windshield/rear window washer oper -
ates with the level below this reference.
BRAKE FLUID
Check that the fluid is at the maximum level. If the
fluid level in the tank is low, contact an authorized
dealer to have the system checked.
AUTOMATIC TRANSMISSION ACTIVATION
S
YSTEM OIL
The transmission control oil level should only be
checked at an authorized dealer.
USEFUL ADVICE FOR EXTENDING THE LIFE
O
F YOUR BATTERY
To avoid draining your battery and make it last
longer, observe the following instructions:
When you park the vehicle, ensure that the
doors and liftgate are closed properly to
prevent any lights from remaining on inside the
passenger's compartment.
Do not keep accessories (e.g. radio, hazard
warning lights, etc.) switched on for a long time
when the engine is not running.
Before performing any operation on the
electrical system, disconnect the negative
battery cable.
If you wish to install electrical accessories after
purchasing the vehicle that require permanent
electrical supply (e.g. alarm, etc.), or accessories
which influence the electrical supply
requirements, contact an authorized dealer,
who’s qualified staff will evaluate the overall
electrical consumption.
NOTE:
After the battery is disconnected, the steering
must be initialized. The Power Steering
Warning Light on the instrument cluster display
switches on to indicate this. To carry out this
procedure, simply turn the steering wheel all the
way from one end to the other, and then turn it
back to the central position.
BATTERY
The battery does not require the electrolyte to be
topped up with distilled water. A periodic check
carried out at an authorized dealer, however, is
necessary to check efficiency.
CAUTION!
If the charge level remains under 50% for a
long time, the battery may be damaged by
sulfation, reducing its capacity and efficiency
during the vehicle start. The battery is also
more prone to the risk of freezing (at
temperatures as high as 14°F (-10°C).
WARNING!
Battery acid is a corrosive solution and can
burn or even blind you. Do not allow battery
acid to contact your eyes, skin, or clothing.
Do not lean over a battery when attaching
clamps. If acid splashes in eyes or on skin,
flush the area immediately with large
amounts of water
Ú
page 192.
Battery gas is flammable and explosive.
Keep flame or sparks away from the battery.
Do not use a booster battery or any other
booster source with an output greater than
12 Volts. Do not allow cable clamps to touch
each other.
Battery posts, terminals, and related
accessories contain lead and lead
compounds. Wash hands after handling.
23_GU_OM_EN_USC_t.book Page 207
Page 240 of 268
SERVICING AND MAINTENANCE
238
DEPARTMENT OF
TRANSPORTATION
UNIFORM TIRE QUALITY
GRADES
The following tire grading categories
were established by the National
Highway Traffic Safety Administration.
The specific grade rating assigned by
the tire's manufacturer in each
category is shown on the sidewall of
the tires on your vehicle.
All passenger vehicle tires must conform
to Federal safety requirements in
addition to these grades.
TREADWEAR
The Treadwear grade is a comparative
rating, based on the wear rate of the
tire when tested under controlled
conditions on a specified government
test course. For example, a tire graded
150 would wear one and one-half times
as well on the government course as a
tire graded 100. The relative
performance of tires depends upon the
actual conditions of their use, however,
and may depart significantly from the
norm due to variations in driving habits,
service practices, and differences in
road characteristics and climate.
TRACTION GRADES
The Traction grades, from highest to
lowest, are AA, A, B, and C. These
grades represent the tire's ability to
stop on wet pavement, as measured
under controlled conditions on
specified government test surfaces of
asphalt and concrete. A tire marked C
may have poor traction performance.
TEMPERATURE GRADES
The temperature grades are A (the
highest), B, and C, representing the
tire's resistance to the generation of
heat and its ability to dissipate heat,
when tested under controlled
conditions on a specified indoor
laboratory test wheel. Sustained high
temperature can cause the material of
the tire to degenerate and reduce tire
life, and excessive temperature can
lead to sudden tire failure. The grade C
corresponds to a level of performance,
which all passenger vehicle tires must
meet under the Federal Motor Vehicle Safety Standard No. 109. Grades B and
A represent higher levels of
performance on the laboratory test
wheel, than the minimum required
by law.
STORING THE VEHICLE
If the vehicle is left inactive for longer than a
month, the following precautions should be
observed:
Park the vehicle in an area that is covered and
dry, and well-ventilated if possible. Slightly
open the windows.
Check that the Electric Park Brake (EPB) is
not activated.
Carry out the “Liftgate Emergency Opening”
procedure
Ú
page 62.
Disconnect the negative battery terminal and
check the battery charge. Repeat this check
once every three months during storage.
If the battery is not disconnected from the
electrical system, check its state of charge
every 30 days.
Clean and protect the painted parts using
protective wax.
WARNING!
The traction grade assigned to this tire is
based on straight-ahead braking traction
tests, and does not include acceleration,
cornering, hydroplaning, or peak traction
characteristics.
WARNING!
The temperature grade for this tire is
established for a tire that is properly inflated
and not overloaded. Excessive speed,
under-inflation, or excessive loading, either
separately or in combination, can cause heat
buildup and possible tire failure.
23_GU_OM_EN_USC_t.book Page 238
Page 242 of 268
SERVICING AND MAINTENANCE
240
Dry the less visible parts (e.g. door frames, hood,
headlight frames, etc.) with special care, as water
may stagnate more easily in these areas. Do not
wash the vehicle after it has been left in the sun
or with the hood hot: this may alter the shine of
the paintwork.
NOTE:
Avoid parking under trees; the resin dropped by
trees makes the paintwork go opaque and
increases the possibility of corrosion.
Exterior plastic parts must be cleaned in the
same way as the rest of the vehicle.
If washing the vehicle in a service that moves the
vehicle, for vehicles with automatic
transmissions, proceed with the following
directions:
Ensure that the vehicle is on a flat surface.
Disable the automatic engagement of the
parking brake
Ú
page 89.
With the vehicle stationary, the gear in
NEUTRAL (N) and the brake pedal pressed,
push the START button.
NOTE:
The vehicle will remain in NEUTRAL (N) for
15 minutes before PARK (P) will be engaged
automatically.Windows
Use specific detergents and clean cloths to
prevent scratching or altering the transparency.
Front Headlights
Use a soft cloth soaked in water and detergent for
washing vehicles.
NOTE:
Never use aromatic substances (e.g. gasoline)
or ketones (e.g. acetone) for cleaning the
plastic lenses of the headlights.
When cleaning with a pressure washer, keep
the pressure washer at least eight inches
(20 cm) away from the headlights.
Engine Compartment
At the end of every Winter, wash the engine
compartment thoroughly, taking care not to aim
the jet of water directly at the electronic control
units or at the windshield wiper motors. Have this
operation performed at a specialized workshop
Ú
page 208.
NOTE:
The washing should take place with the engine
cold and the ignition device in the STOP position.
After the washing operation, make sure that the
various protections (e.g. rubber caps and guards)
have not been removed or damaged.
INTERIORS
Periodically check the cleanliness of the interior,
beneath the mats, which could cause oxidation of
the sheet metal.
SEATS AND FABRIC PARTS
Remove dust with a soft brush or a vacuum
cleaner. It is advised to use a moist brush on
velvet upholstery. Rub the seats with a sponge
moistened with a solution of water and neutral
detergent.
Cleaning heat press images on seats —
if equipped:
Due to the color, opacity and wear-resistant
protection with which the heat press images on
some seats are made, they may be subject to
temporary scratching if they are touched by finger
nails, keys, or other hard objects. In such cases,
the visible signs do not impair the profiled
images, and can easily be removed by wiping the
affected area with a microfiber cloth moistened
with water (not dry) to restore the seat to its
original condition. The microfiber cloth must not
have been previously soaked in other substances
or detergents.
CAUTION!
Wipe the rear window inside gently with a
cloth following the direction of the filaments to
avoid damaging the heating device.
23_GU_OM_EN_USC_t.book Page 240
Page 262 of 268

260
INDEX
A
Accessories Purchased By The Owner.......... 4
Active Blind Spot Assist .............................146
Active Safety Systems ................................ 140
Active Speed Limiter ..................................101
Active Torque Vectoring (ATV) System ......140
Adaptive Cruise Control (ACC)
(Cruise Control) .................................102, 105Off ........................................................... 106
On............................................................106
Additives, Fuel ............................................ 250
Adjust Forward.............................................. 31, 34
Rearward ........................................... 31, 34
Air Bag......................................................... 163 Air Bag Operation ...................................165Air Bag Warning Light ............................162
Driver Knee Air Bag................................ 165Enhanced Accident Response .....168, 198
Event Data Recorder (EDR) ...................198
Front Air Bag...........................................163
If Deployment Occurs ............................167
Knee Impact Bolsters ............................165
Maintaining Your Air Bag System.......... 170
Maintenance ..........................................170
Redundant Air Bag Warning Light.........163
Side Air Bags ..........................................165
Transporting Pets...................................180
Air Bag Light ......................................162, 180
Air Pressure Tires ........................................................230
Alfa Active Suspension (AAS)....................... 99
Alfa DNA System .......................................... 97
Antifreeze (Engine Coolant) ....................... 251
Anti-Lock Braking (ABS) System ................ 140 Anti-Lock Warning Light ...............................76
Automatic Climate Controls .........................50
Automatic Dimming Mirror...........................38
Automatic Door Locks ..................................28
Automatic Headlights ...................................44
Automatic Temperature Control (ATC) ........50
Automatic Transmission ..............................91
Auxiliary Driving Systems .......................... 144
Auxiliary Power Outlet ..................................57
B
Battery ..................................................79, 207 Charging System Light .............................79
Keyless Key Fob Replacement ................20
Battery Recharging .................................... 208
Belts, Seat .................................................. 180
Blind Spot Monitoring ............................... 144
Bodywork (Cleaning And Maintenance) ... 239
B-Pillar Location......................................... 227
Brake System Warning Light .................................... 75, 76
Brakes ........................................................ 244 Brake Fluid Level................................... 207
Brightness, Interior Lights............................47
Bulbs, Light ................................................ 182
C
Camera, Rear ............................................. 128
Capacities, Fluid ........................................ 251
Carbon Monoxide Warning ....................... 182
Cargo Compartment .....................................66
Certification Label ..................................... 132
Chart, Tire Sizing........................................ 225
Check Engine Light
(Malfunction Indicator Light) .......................85 Checking Levels ................................ 204, 205
Checking Your Vehicle For Safety ............. 180
Checks, Safety ........................................... 180
Child Restraint ........................................... 170
Child Restraints
Booster Seats ........................................ 173
Child Seat Installation ........................... 178
How To Stow An unused ALR Seat Belt ..................................... 176
Infant And Child Restraints ................... 172
LATCH Positions ..................................... 174
Lower Anchors And Tethers For Children ....................................... 174
Older Children And Child Restraints ..... 172
Seating Positions ................................... 173
Clean Air Gasoline ..................................... 249
Cleaning Wheels.................................................... 235
Climate Control ......................................49, 55 Automatic ................................................. 50
Compact Spare Tire ................................... 234
Contract, Service........................................ 257
Cooling System Cooling Capacity .................................... 251
Selection Of Coolant (Antifreeze) ......... 251
Cruise Control (Speed Control) ........ 102, 105
Customer Assistance ................................. 255
D
Daytime Running Lights .............................. 43
Defroster, Windshield ................................ 180
Dimensions ................................................ 246
Disabled Vehicle Towing............................ 196
Door Ajar.................................................79, 80
Door Ajar Light .......................................79, 80
23_GU_OM_EN_USC_t.book Page 260