2023 ALFA ROMEO STELVIO warning
[x] Cancel search: warningPage 47 of 268

45
PARKING LIGHTS
To turn on the parking lights and instrument
panel lights, rotate the headlight switch clockwise
to the position. All of the parking lights will turn
on for eight minutes, and opening the door
activates an audible warning.
To leave only the lights on one side (right/left)
illuminated, move the multifunction lever
(located on the left side of the steering wheel) to
the side that you want to remain on. With the
parking lights on, the indicator light on the
instrument panel will illuminate.
To turn off the parking lights, rotate the headlight
switch back to the O (off) position.
HEADLIGHT OFF DELAY
To assist when exiting the vehicle, the “Headlight
Off Delay” feature will leave the headlights on for
up to 90 seconds. This delay is initiated when the
ignition is placed in the OFF position while the
headlight switch is on, and then the headlight
switch is cycled off. Headlight delay can be
canceled by either turning on the headlights or
side lights, or by placing the ignition in the ON
position.
The function can be activated from the radio
system by selecting the following functions in
sequence on the main menu:
1. Settings
2. Lights
3. Headlight Off Delay
REAR FOG LIGHTS
The rear fog light switch is located within the
headlight switch.
Push the button, located in the center of the
headlight switch, to turn the rear fog lights on/off.
The rear fog lights turn on only when the
headlights or parking lights are also turned on.
The lights can be turned off by pushing the
button again or by turning the headlight switch to
the O (off) position.
When the engine is stopped with the rear fog
lights on, they will be off the next time the engine
is started.
ADAPTIVE HEADLIGHT SYSTEM —
I
F EQUIPPED
This is a system combined with Xenon headlights
(Bi-Xenon 35 W headlamp, if equipped) which
directs the headlights horizontally, and contin -
uously and automatically adapts them to the
driving conditions around bends or when
cornering.
The system directs the headlights to light up the
road in the best way, taking into account the
speed of the vehicle and the bend or corner
angle, as well as the speed at which the steering
wheel is turned.
The adaptive lights are automatically activated
when the vehicle is started.
TURN SIGNALS
Move the multifunction lever up or down to
activate the turn signals. The arrows on each side
of the instrument cluster flash to show proper
operation.
The or turn signal will blink on the
instrument panel.
LANE CHANGE ASSIST
Lightly push the lever up or down once, without
moving beyond the detent, and the turn signal will
flash five times then automatically turn off.
To turn off the flashing before the end of the
cycle, move the lever in the opposite direction
until the first click (about half way).
INTERIOR LIGHTS
Courtesy lights are turned on when the front
doors are opened or when the dimmer control is
rotated to its farthest upward position. The glove
compartment light turns on automatically when
the glove compartment is opened and turn off
when it is closed. The door courtesy lights
illuminate when one of the front doors is opened,
and turn off when it is closed. The liftgate
courtesy lights turn on automatically when the
liftgate is opened and turn off when it is closed.
All of these lights turn on and off regardless of the
ignition status.
23_GU_OM_EN_USC_t.book Page 45
Page 50 of 268

GETTING TO KNOW YOUR VEHICLE
48
WINDSHIELD WIPER OPERATION
Rotating the switch to the Low Continuous Wiper
Speed position (2) activates the first (low) level
continuous speed of the windshield wipers in
manual mode.
Rotating the switch to the High Continuous Wiper
Speed position (1) activates the second (high)
level continuous speed of the windshield wipers
in manual mode.Windshield Wiper Stalk Rain Sensors
Rotating the switch to the Low Sensitivity Rain
Sensing position (4), activates the first, less
sensitive level of the Rain Sensing function.
Rotating the switch to the High Sensitivity Rain
Sensing position (3), activates the second, more
sensitive level of the Rain Sensing function
Ú
page 48.
Windshield Washer
To use the washer, pull the windshield wiper lever
toward the steering wheel and hold.
Both the windshield washer jet and the
windshield wiper will be activated. The wipers and
washers will continue to operate until you let go
of the lever.
The windshield wiper stops working three strokes
after the stalk is released, followed by a final
stroke six seconds later to complete the cycle.
Mist
Push the lever upward to the MIST position and
release for a single wiping cycle.
NOTE:
The Mist feature does not activate the washer
pump; therefore, no washer fluid will be sprayed
on the windshield. The wash function must be
used in order to spray the windshield with washer
fluid.
For information on wiper care and replacement,
see
Ú
page 210.
RAIN SENSING WIPERS
This feature senses rain or snowfall on the
windshield and automatically activates the
wipers. The Rain Sensor is located behind the
interior rearview mirror.
Rain Sensor
Rotate the end of the multifunction lever to one of
four settings to activate this feature.
1 — High Continuous Wiper Speed
2 — Low Continuous Wiper Speed
3 — High Sensitivity Rain Sensing
4 — Low Sensitivity Rain Sensing
5 — Windshield Wiper Off
WARNING!
Sudden loss of visibility through the
windshield could lead to a collision. You might
not see other vehicles or other obstacles. To
avoid sudden icing of the windshield during
freezing weather, warm the windshield with
the defroster before and during windshield
washer use.
23_GU_OM_EN_USC_t.book Page 48
Page 58 of 268

GETTING TO KNOW YOUR VEHICLE
56
INTERIOR STORAGE AND
EQUIPMENT
GLOVE COMPARTMENT
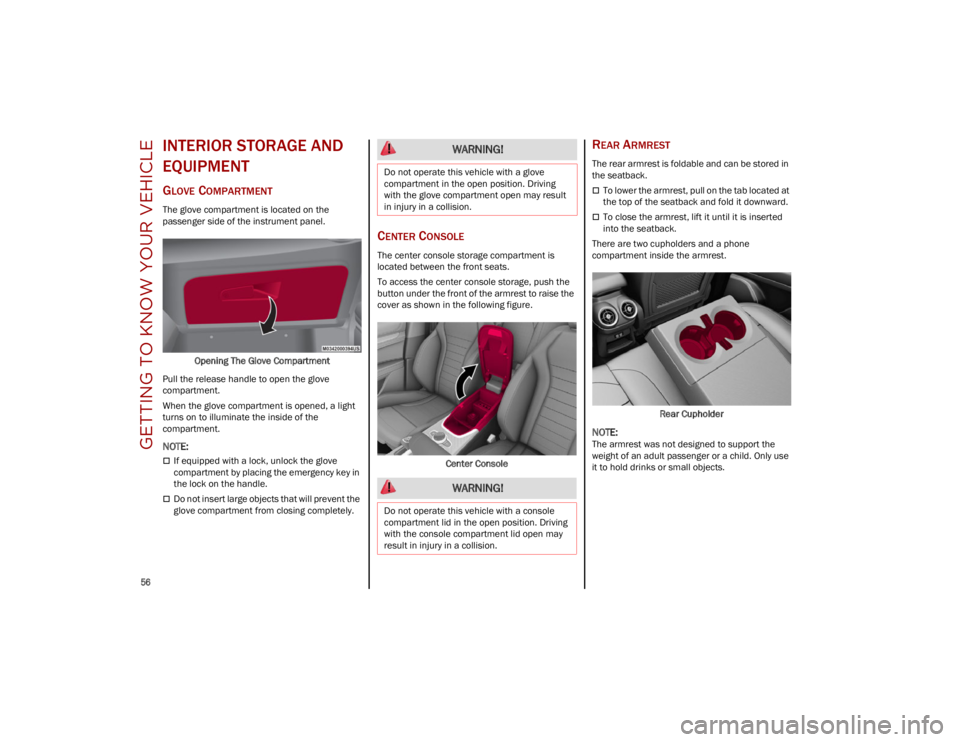
The glove compartment is located on the
passenger side of the instrument panel.Opening The Glove Compartment
Pull the release handle to open the glove
compartment.
When the glove compartment is opened, a light
turns on to illuminate the inside of the
compartment.
NOTE:
If equipped with a lock, unlock the glove
compartment by placing the emergency key in
the lock on the handle.
Do not insert large objects that will prevent the
glove compartment from closing completely.
CENTER CONSOLE
The center console storage compartment is
located between the front seats.
To access the center console storage, push the
button under the front of the armrest to raise the
cover as shown in the following figure.
Center Console
REAR ARMREST
The rear armrest is foldable and can be stored in
the seatback.
To lower the armrest, pull on the tab located at
the top of the seatback and fold it downward.
To close the armrest, lift it until it is inserted
into the seatback.
There are two cupholders and a phone
compartment inside the armrest.
Rear Cupholder
NOTE:
The armrest was not designed to support the
weight of an adult passenger or a child. Only use
it to hold drinks or small objects.
WARNING!
Do not operate this vehicle with a glove
compartment in the open position. Driving
with the glove compartment open may result
in injury in a collision.
WARNING!
Do not operate this vehicle with a console
compartment lid in the open position. Driving
with the console compartment lid open may
result in injury in a collision.
23_GU_OM_EN_USC_t.book Page 56
Page 61 of 268

59
POWER WINDOWS
POWER WINDOW CONTROLS
The power window switches work with the ignition
in the ACC or ON/RUN position and for three
minutes after the ignition has been placed in the
OFF position. When one of the front doors is
opened, this operation is disabled.
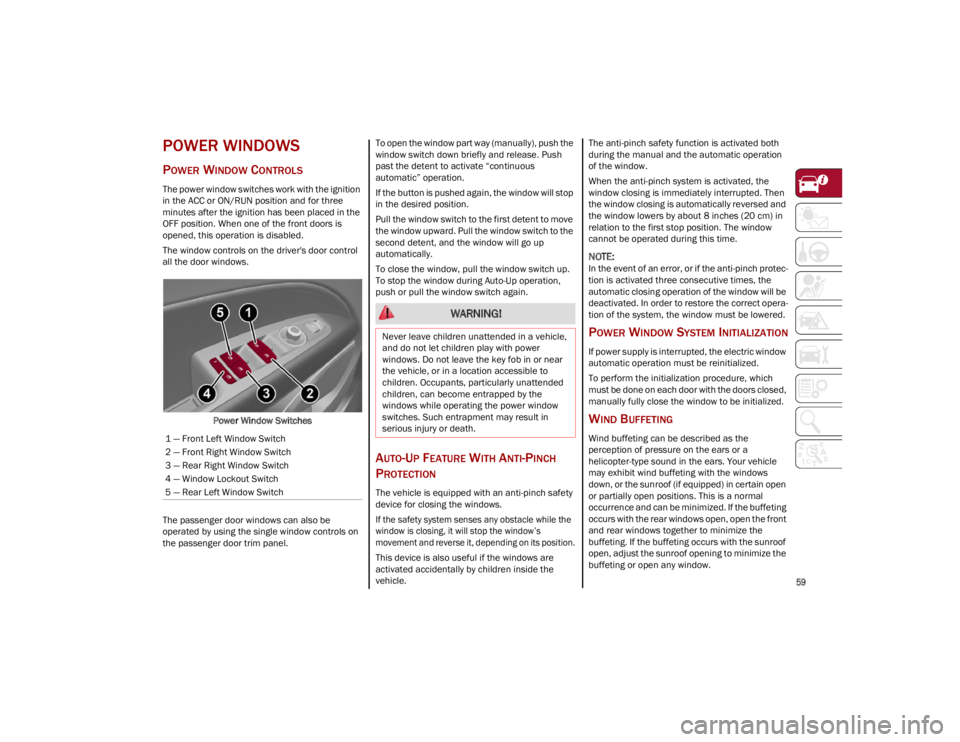
The window controls on the driver's door control
all the door windows.Power Window Switches
The passenger door windows can also be
operated by using the single window controls on
the passenger door trim panel. To open the window part way (manually), push the
window switch down briefly and release. Push
past the detent to activate “continuous
automatic” operation.
If the button is pushed again, the window will stop
in the desired position.
Pull the window switch to the first detent to move
the window upward. Pull the window switch to the
second detent, and the window will go up
automatically.
To close the window, pull the window switch up.
To stop the window during Auto-Up operation,
push or pull the window switch again.
AUTO-UP FEATURE WITH ANTI-PINCH
P
ROTECTION
The vehicle is equipped with an anti-pinch safety
device for closing the windows.
If the safety system senses any obstacle while the
window is closing, it will stop the window’s
movement and reverse it, depending on its position.
This device is also useful if the windows are
activated accidentally by children inside the
vehicle. The anti-pinch safety function is activated both
during the manual and the automatic operation
of the window.
When the anti-pinch system is activated, the
window closing is immediately interrupted. Then
the window closing is automatically reversed and
the window lowers by about 8 inches (20 cm) in
relation to the first stop position. The window
cannot be operated during this time.
NOTE:
In the event of an error, or if the anti-pinch protec
-
tion is activated three consecutive times, the
automatic closing operation of the window will be
deactivated. In order to restore the correct opera -
tion of the system, the window must be lowered.
POWER WINDOW SYSTEM INITIALIZATION
If power supply is interrupted, the electric window
automatic operation must be reinitialized.
To perform the initialization procedure, which
must be done on each door with the doors closed,
manually fully close the window to be initialized.
WIND BUFFETING
Wind buffeting can be described as the
perception of pressure on the ears or a
helicopter-type sound in the ears. Your vehicle
may exhibit wind buffeting with the windows
down, or the sunroof (if equipped) in certain open
or partially open positions. This is a normal
occurrence and can be minimized. If the buffeting
occurs with the rear windows open, open the front
and rear windows together to minimize the
buffeting. If the buffeting occurs with the sunroof
open, adjust the sunroof opening to minimize the
buffeting or open any window.
1 — Front Left Window Switch
2 — Front Right Window Switch
3 — Rear Right Window Switch
4 — Window Lockout Switch
5 — Rear Left Window Switch
WARNING!
Never leave children unattended in a vehicle,
and do not let children play with power
windows. Do not leave the key fob in or near
the vehicle, or in a location accessible to
children. Occupants, particularly unattended
children, can become entrapped by the
windows while operating the power window
switches. Such entrapment may result in
serious injury or death.
23_GU_OM_EN_USC_t.book Page 59
Page 62 of 268

GETTING TO KNOW YOUR VEHICLE
60
(Continued)
POWER SUNROOF —
IF EQUIPPED
POWER SUNROOF
The power sunroof consists of a single glass
panel and is fitted with a power sunshade the full
length of the panel.
Operation of the sunroof is only possible with the
ignition in the ACC or ON/RUN position
Ú
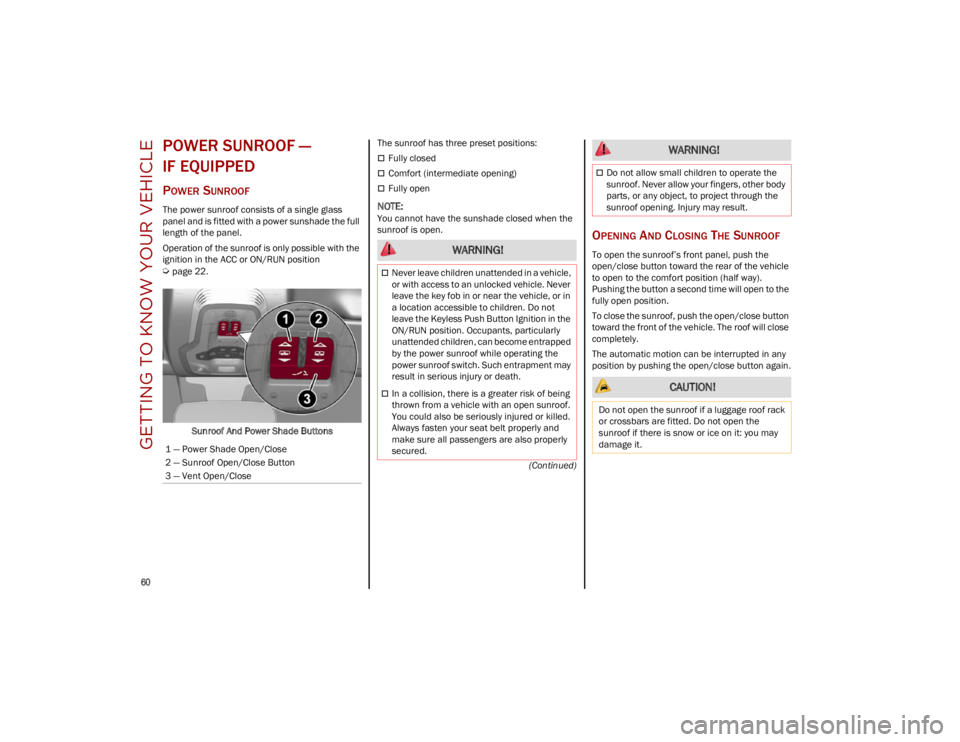
page 22.Sunroof And Power Shade Buttons The sunroof has three preset positions:
Fully closed
Comfort (intermediate opening)
Fully open
NOTE:
You cannot have the sunshade closed when the
sunroof is open.
OPENING AND CLOSING THE SUNROOF
To open the sunroof’s front panel, push the
open/close button toward the rear of the vehicle
to open to the comfort position (half way).
Pushing the button a second time will open to the
fully open position.
To close the sunroof, push the open/close button
toward the front of the vehicle. The roof will close
completely.
The automatic motion can be interrupted in any
position by pushing the open/close button again.
1 — Power Shade Open/Close
2 — Sunroof Open/Close Button
3 — Vent Open/Close WARNING!
Never leave children unattended in a vehicle,
or with access to an unlocked vehicle. Never
leave the key fob in or near the vehicle, or in
a location accessible to children. Do not
leave the Keyless Push Button Ignition in the
ON/RUN position. Occupants, particularly
unattended children, can become entrapped
by the power sunroof while operating the
power sunroof switch. Such entrapment may
result in serious injury or death.
In a collision, there is a greater risk of being
thrown from a vehicle with an open sunroof.
You could also be seriously injured or killed.
Always fasten your seat belt properly and
make sure all passengers are also properly
secured.
Do not allow small children to operate the
sunroof. Never allow your fingers, other body
parts, or any object, to project through the
sunroof opening. Injury may result.
CAUTION!
Do not open the sunroof if a luggage roof rack
or crossbars are fitted. Do not open the
sunroof if there is snow or ice on it: you may
damage it.
WARNING!
23_GU_OM_EN_USC_t.book Page 60
Page 64 of 268

GETTING TO KNOW YOUR VEHICLE
62
HOOD
OPENING THE HOOD
To open the hood, two latches must be released.
1. Pull the release lever located underneath the driver’s side of the instrument panel.
Hood Release Lever
2. Lift the hood slightly. Move the underhood latch from right to left to release the hood.
Hood Latch Location 3. Raise the hood completely. The operation is
assisted by the addition of two gas props
which hold it in the open position.
NOTE:
Use both hands to lift the hood. Before lifting,
check that the windshield wiper arms are not
raised from the windshield or in operation.
CLOSING THE HOOD
To close, lower the hood to approximately
16 inches (40 cm) from the engine compartment
then let it drop. Make sure that the hood is
completely closed and fully latched.
NOTE:
Since the hood is equipped with a double locking
system, one for each side, you must check that it
is closed on each side.
POWER LIFTGATE
Unlocking of the liftgate is electrically operated
and is deactivated when the vehicle is in motion.
If anything obstructs the power liftgate while it is
closing or opening, the liftgate will automatically
reverse to the closed or open position, provided it
meets sufficient resistance.
OPENING
The liftgate may be released in several ways:
Pressing the liftgate release button on the
key fob twice within five seconds
Pushing the external liftgate release switch
(when the liftgate is unlocked)
Lifting the interior liftgate release button on
the driver’s door panel trim
WARNING!
Before opening the hood, apply the Electric
Park Brake (EPB) and place the gear selector
in PARK. Otherwise the vehicle may roll and
cause damage, serious injury, or death.
CAUTION!
Do not tamper with the gas props.
WARNING!
Be sure the hood is fully latched before driving
your vehicle. If the hood is not fully latched, it
could open when the vehicle is in motion and
block your vision. Failure to follow this warning
could result in serious injury or death.
23_GU_OM_EN_USC_t.book Page 62
Page 67 of 268

65
If it is closed, the Hands-Free Liftgate unlocks and
opens completely, and with another movement of
the foot, it stops. A further movement of the foot
reverses the direction and closes the liftgate
completely, if you do not stop it again.
If it is open, with a movement of the foot, the
Hands-Free Liftgate closes completely, and with
another movement of the foot, it stops. If the
liftgate is stopped, another movement of the foot
will reverse the direction and open it completely.
NOTE:
To conserve the battery charge, avoid performing
this operation repeatedly with the engine off.
You can activate/deactivate the Hands-Free
Liftgate on the radio system by pushing the MENU
button to select the Main menu, and selecting the
following items:
1. Settings
2. Doors And Locks
3. Automatic Liftgate Opening
RE-INITIALIZATION PROCEDURE
Automatic operation of the liftgate must be
re-initialized in case of faulty liftgate operation.
It may also be necessary to re-initialize the liftgate
after the vehicle’s battery has been disconnected
and then reconnected.
Proceed as follows:
1. Close all the doors and the liftgate.
2. Press the lock button on the key fob.
3. Press the unlock button on the key fob.
WARNING!
Driving with the liftgate open can allow
poisonous exhaust gases into your vehicle.
You and your passengers could be injured by
these fumes. Keep the liftgate closed when
you are operating the vehicle.
If you are required to drive with the liftgate
open, make sure that all windows are closed,
and the climate control blower switch is set
at high speed. Do not use the recirculation
mode.
During power operation, personal injury or
cargo damage may occur. Ensure the liftgate
travel path is clear. Make sure the liftgate is
closed and latched before driving away.
CAUTION!
The Hands-Free Liftgate can be turned off
manually in the radio system to avoid
unintentional activation. For further
information refer to the Information and
Entertainment System Owner’s Manual
Supplement.
23_GU_OM_EN_USC_t.book Page 65
Page 68 of 268

GETTING TO KNOW YOUR VEHICLE
66
(Continued)
CARGO AREA FEATURES
Retractable Cargo Area Cover
The Retractable Cargo Area Cover can be rolled
up and removed.
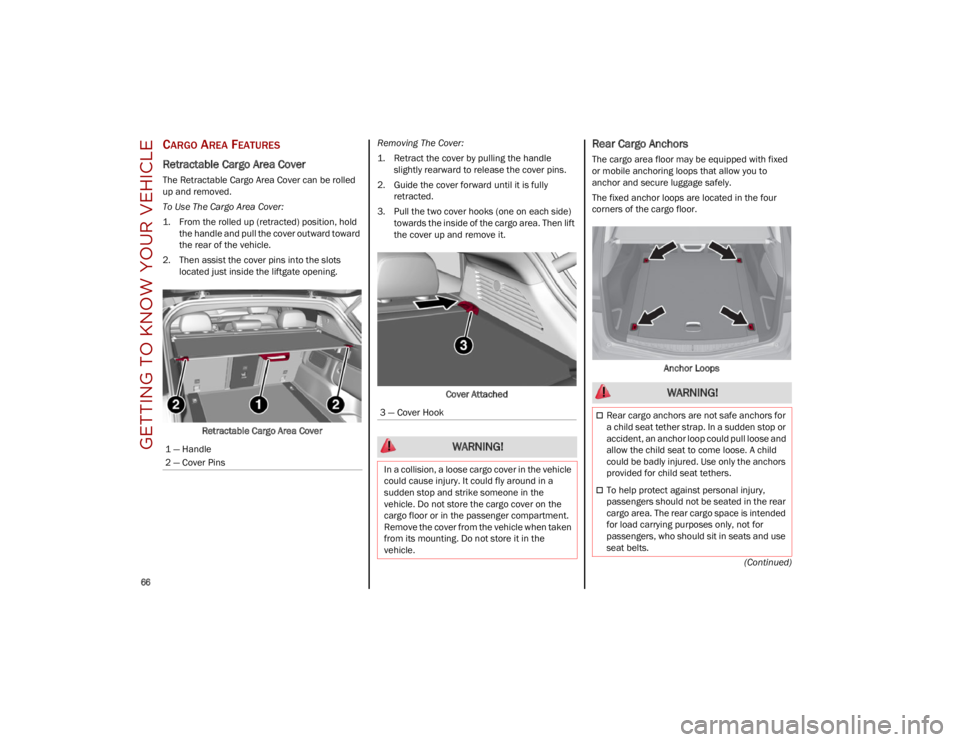
To Use The Cargo Area Cover:
1. From the rolled up (retracted) position, holdthe handle and pull the cover outward toward
the rear of the vehicle.
2. Then assist the cover pins into the slots located just inside the liftgate opening.
Retractable Cargo Area Cover Removing The Cover:
1. Retract the cover by pulling the handle
slightly rearward to release the cover pins.
2. Guide the cover forward until it is fully retracted.
3. Pull the two cover hooks (one on each side) towards the inside of the cargo area. Then lift
the cover up and remove it.
Cover Attached
Rear Cargo Anchors
The cargo area floor may be equipped with fixed
or mobile anchoring loops that allow you to
anchor and secure luggage safely.
The fixed anchor loops are located in the four
corners of the cargo floor. Anchor Loops
1 — Handle
2 — Cover Pins
3 — Cover Hook
WARNING!
In a collision, a loose cargo cover in the vehicle
could cause injury. It could fly around in a
sudden stop and strike someone in the
vehicle. Do not store the cargo cover on the
cargo floor or in the passenger compartment.
Remove the cover from the vehicle when taken
from its mounting. Do not store it in the
vehicle.
WARNING!
Rear cargo anchors are not safe anchors for
a child seat tether strap. In a sudden stop or
accident, an anchor loop could pull loose and
allow the child seat to come loose. A child
could be badly injured. Use only the anchors
provided for child seat tethers.
To help protect against personal injury,
passengers should not be seated in the rear
cargo area. The rear cargo space is intended
for load carrying purposes only, not for
passengers, who should sit in seats and use
seat belts.
23_GU_OM_EN_USC_t.book Page 66