2023 ALFA ROMEO STELVIO maintenance
[x] Cancel search: maintenancePage 188 of 268

IN CASE OF EMERGENCY
186
JACKING AND TIRE
CHANGING
GENERAL INSTRUCTIONS
This vehicle can be equipped with a Tire Service
Kit
Ú
page 189.
As an alternative to the Tire Service Kit, the
vehicle may be purchased with a compact spare
tire
Ú
page 186.
JACK INFORMATION AND USAGE
P
RECAUTIONS
Jack Information
The jack weighs 4.4 lb (2 kg).
The jack requires no adjustment.
The jack cannot be repaired, and in the event
of a fault it must be replaced by another
factory replacement.
No tool other than its extension lever may be
fitted on the jack.
Jack Maintenance
Prevent any dirt from depositing on the "worm
screw".
Keep the "worm screw" lubricated.
Never modify the jack.
Conditions Of Non-Use Of The Jack
Temperatures below −40°F (−40°C).
On sandy or muddy ground.
On uneven ground.
On steep slopes in extreme weather
conditions.
In direct contact with the engine or for repairs
under the vehicle.
On boats.
CHANGING PROCEDURE
1. Park the vehicle on a firm, level surface. Avoid ice or slippery areas.
2. Turn on the Hazard Warning Flashers.
3. Apply the Electric Park Brake.
4. Place the gear selector into PARK (P).
5. Place the ignition in the OFF mode.
6. Block both the front and rear of the wheel diagonally opposite of the jacking position.
For example, if changing the left rear tire,
block the right front wheel.
Wheel Blocking Example
WARNING!
Do not attempt to change a tire on the side of
the vehicle close to moving traffic. Pull far
enough off the road to avoid the danger of
being hit when operating the jack or
changing the wheel.
Being under a jacked-up vehicle is
dangerous. The vehicle could slip off the jack
and fall on you. You could be crushed. Never
put any part of your body under a vehicle that
is on a jack. If you need to get under a raised
vehicle, take it to a service center where it
can be raised on a lift.
Never start or run the engine while the
vehicle is on a jack.
The jack is designed to be used as a tool for
changing tires only. The jack should not be
used to lift the vehicle for service purposes.
The vehicle should be jacked on a firm level
surface only. Avoid ice or slippery areas.
WARNING!
Do not attempt to change a tire on the side of
the vehicle close to moving traffic. Pull far
enough off the road to avoid being hit when
operating the jack or changing the wheel.
23_GU_OM_EN_USC_t.book Page 186
Page 202 of 268
SERVICING AND MAINTENANCE
200
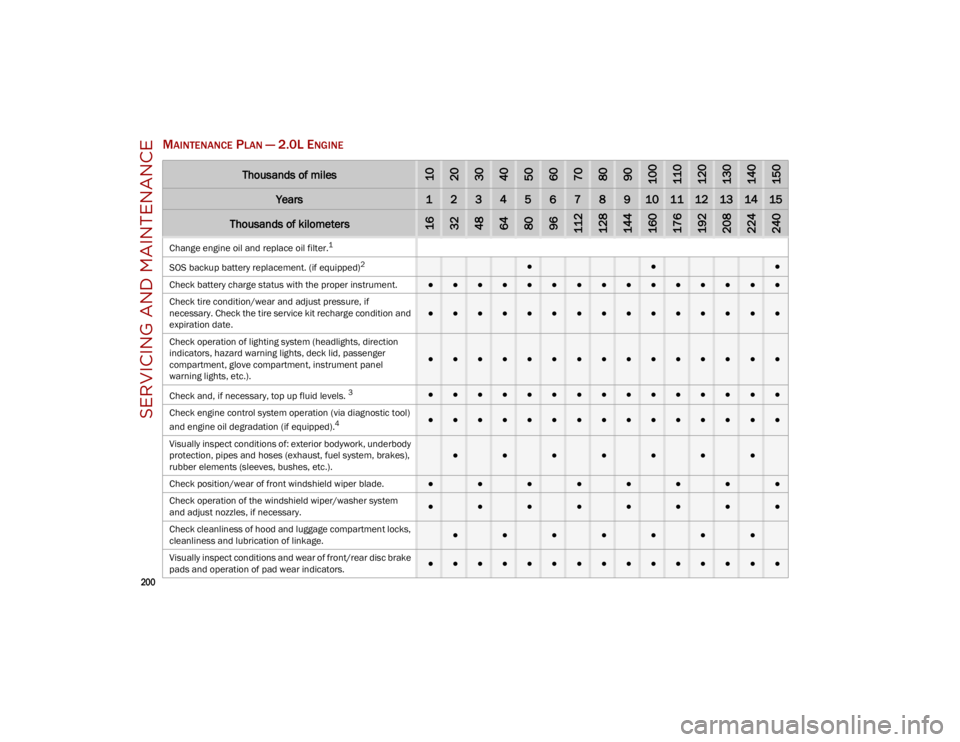
MAINTENANCE PLAN — 2.0L ENGINE
Thousands of miles102030405060708090100110120130140150
Years123456789101112131415
Thousands of kilometers163248648096112128144160176192208224240
Change engine oil and replace oil filter.1
SOS
backup battery replacement. (if equipped)
2 ●●●
Check battery charge status with the proper instrument.
●●●●●●●●●●●●●●●
Check tire condition/wear and adjust pressure, if
necessary. Check the tire service kit recharge condition and
expiration date.
●●●●●●●●●●●●●●●
Check operation of lighting system (headlights, direction
indicators, hazard warning lights, deck lid, passenger
compartment, glove compartment, instrument panel
warning lights, etc.).
●●●●●●●●●●●●●●●
Check and, if necessary, top up fluid levels.
3●●●●●●●●●●●●●●●
Check engine control system operation (via diagnostic tool)
and engine oil degradation (if equipped).
4●●●●●●●●●●●●●●●
Visually inspect conditions of: exterior bodywork, underbody
protection, pipes and hoses (exhaust, fuel system, brakes),
rubber elements (sleeves, bushes, etc.).
●●●●●●●
Check position/wear of front windshield wiper blade.●●●●●●●●
Check operation of the windshield wiper/washer system
and adjust nozzles, if necessary.
●●●●●●●●
Check cleanliness of hood and luggage compartment locks,
cleanliness and lubrication of linkage.
●●●●●●●
Visually inspect conditions and wear of front/rear disc brake
pads and operation of pad wear indicators.●●●●●●●●●●●●●●●
23_GU_OM_EN_USC_t.book Page 200
Page 204 of 268
SERVICING AND MAINTENANCE
202
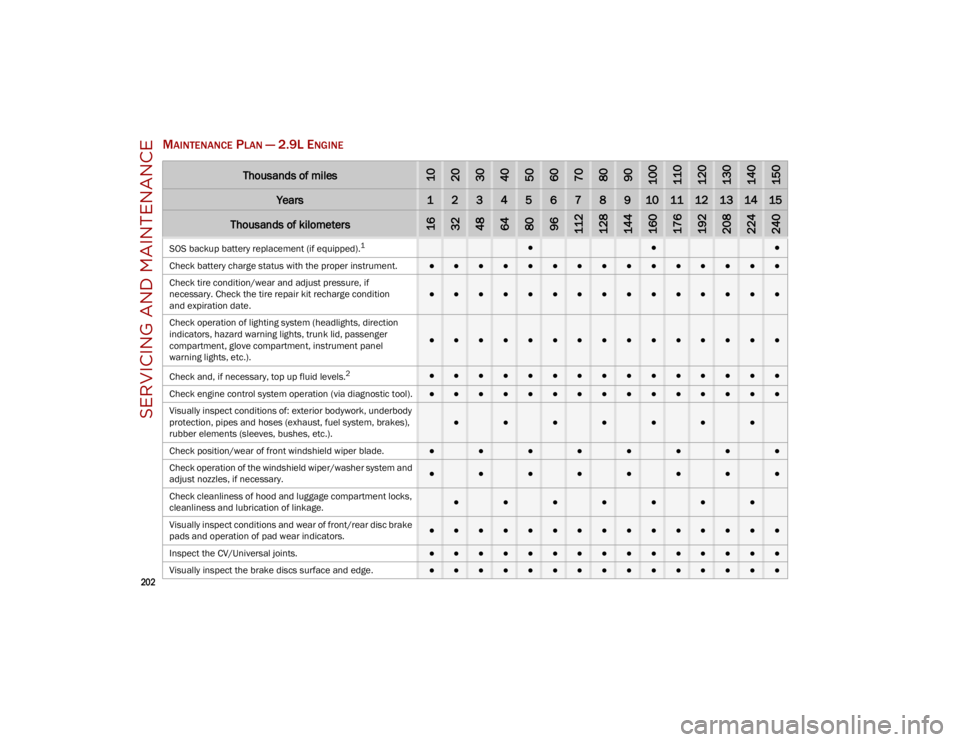
MAINTENANCE PLAN — 2.9L ENGINE
Thousands of miles102030405060708090100110120130140150
Years123456789101112131415
Thousands of kilometers163248648096112128144160176192208224240
SOS backup battery replacement (if equipped).1●●●
Check battery charge status with the proper instrument.
●●●●●●●●●●●●●●●
Check tire condition/wear and adjust pressure, if
necessary. Check the tire repair kit recharge condition
and expiration date.
●●●●●●●●●●●●●●●
Check operation of lighting system (headlights, direction
indicators, hazard warning lights, trunk lid, passenger
compartment, glove compartment, instrument panel
warning lights, etc.).
●●●●●●●●●●●●●●●
Check and, if necessary, top up fluid levels.
2●●●●●●●●●●●●●●●
Check engine control system operation (via diagnostic tool).
●●●●●●●●●●●●●●●
Visually inspect conditions of: exterior bodywork, underbody
protection, pipes and hoses (exhaust, fuel system, brakes),
rubber elements (sleeves, bushes, etc.).
●●●●●●●
Check position/wear of front windshield wiper blade.●●●●●●●●
Check operation of the windshield wiper/washer system and
adjust nozzles, if necessary.
●●●●●●●●
Check cleanliness of hood and luggage compartment locks,
cleanliness and lubrication of linkage.
●●●●●●●
Visually inspect conditions and wear of front/rear disc brake
pads and operation of pad wear indicators.●●●●●●●●●●●●●●●
Inspect the CV/Universal joints.
●●●●●●●●●●●●●●●
Visually inspect the brake discs surface and edge.
●●●●●●●●●●●●●●●
23_GU_OM_EN_USC_t.book Page 202
Page 206 of 268
SERVICING AND MAINTENANCE
204
ENGINE COMPARTMENT
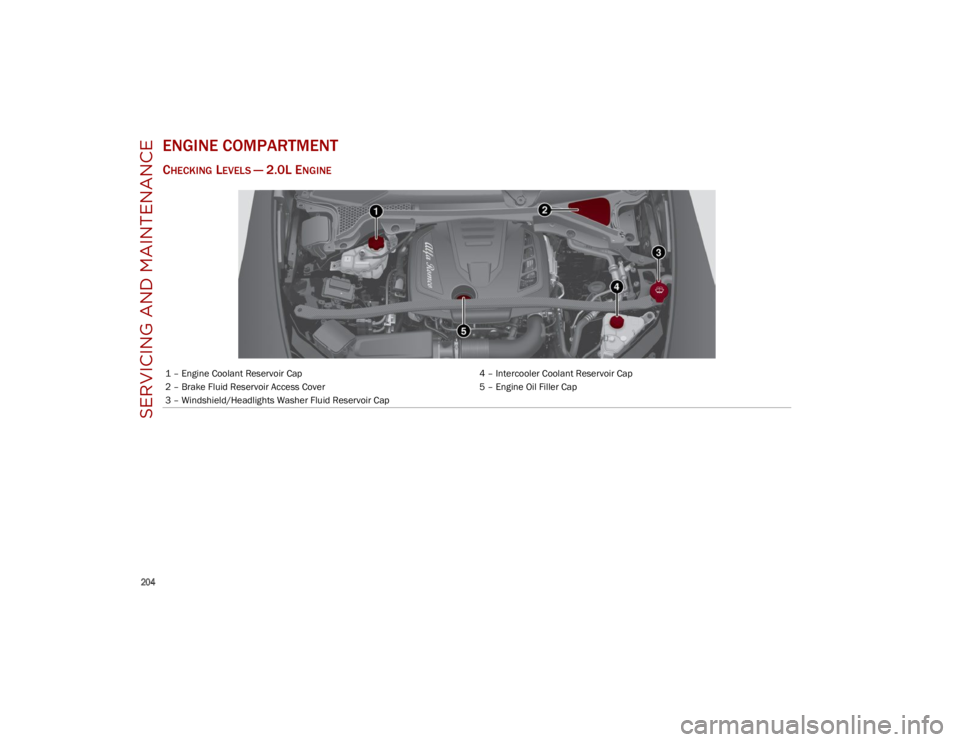
CHECKING LEVELS — 2.0L ENGINE
1 – Engine Coolant Reservoir Cap4 – Intercooler Coolant Reservoir Cap
2 – Brake Fluid Reservoir Access Cover 5 – Engine Oil Filler Cap
3 – Windshield/Headlights Washer Fluid Reservoir Cap
23_GU_OM_EN_USC_t.book Page 204
Page 208 of 268
SERVICING AND MAINTENANCE
206
NOTE:
Always reinstall the oil cap and tighten to proper
torque whenever it is removed to add oil to
engine. Never run the engine with cap removed
as this could cause oil to leak from engine.
Manual Oil Level Checking Procedure —
2.9L Quadrifoglio
Check that the oil level is between the MIN and
MAX marks on dipstick, clean it with a lint-free
cloth and reinsert it. Extract the dipstick again
and check that the level is between the MIN and
MAX marks.
Top-Up And Oil Level Indication Update On
Display — 2.9L Quadrifoglio
If an engine oil top-off is needed, in order to
ensure the correct indication of the oil level on
the display, proceed with the following process:
Leave the car on flat ground with the engine
running for approximately five minutes
(temperature higher than 198°F (90°C) and
shut the engine off.
Wait for five minutes, turn the ignition to the
ACC mode without starting the engine and wait
for a few seconds.
NOTE:
If the level indication is not updated after the
previously described procedure, repeat the
engine adjustment, shut the engine off and wait
another five minutes before starting it again. If
the indication is not updated after the second
start, contact an authorized dealer.
Top-Up And Oil Level Indication Update On
Display — 2.0L
If an engine oil top-off is needed, in order to
ensure the correct indication of the oil level on
the display, proceed with the following process:
Leave the car on flat ground with the engine
running for approximately five minutes
(temperature higher than 176°F (80°C) and
shut the engine off.
Start the engine again and idle it for about
two minutes.
NOTE:
If you have added the specified amount of oil and
the indicator is not reading “Full”, please contact
an authorized dealer.
ENGINE COOLANT FLUID
If the level is too low, unscrew the cap of the
reservoir and add the fluid described
Ú
page 252.
WASHER FLUID FOR WINDSHIELD/
H
EADLIGHTS
The windshield and headlight (if equipped)
washer fluid reservoir is equipped with a
telescopic filler neck.
If the level is too low, remove reservoir cap and lift
the filler neck. Then, add the fluid described
Ú
page 252. After filling the reservoir, lower the
filler neck and install the reservoir cap until you
hear it click.
CAUTION!
The oil level is not refreshed immediately on
the display after topping off. Consequently,
wait for the oil level to be refreshed on the
display and follow the procedure below.
WARNING!
If the engine oil is being topped up, wait for the
engine to cool down before loosening the filler
cap, particularly for vehicles with aluminum
cap (if equipped). WARNING: risk of burns!
CAUTION!
The oil level must never exceed the MAX mark.
If the MAX mark is exceeded (last notch on
the right turns red) after the fill-up, go to an
authorized dealer as soon as possible to have
the oil in excess removed.
Do not add oil with specifications different
from those of the oil already in the engine.
Used engine oil and oil filters contain
substances which are harmful to the
environment. To change the oil and filters, we
advise you to contact an authorized dealer.
23_GU_OM_EN_USC_t.book Page 206
Page 210 of 268

SERVICING AND MAINTENANCE
208
PRESSURE WASHING
Cleaning the engine compartment with a high
pressure washer is not recommended.
BATTERY RECHARGING
IMPORTANT NOTES
NOTE:
Before using the charging device, always make
sure that it is appropriate for the installed
battery, with constant voltage (below 14.8 Volts)
and low amperage (maximum 15 Amps).
Recharge the battery in a well ventilated
environment.
Before using any devices to charge or to
maintain the charge of the battery, carefully follow the instructions provided with the device
in order to properly and safely connect it to the
vehicle battery.
You can recharge the battery without discon -
necting the wires of the vehicle's electrical system.
To reach the battery, remove the load floor
inside the liftgate.
Load Floor
Locate the battery access panel under the load
floor.
Battery Access Panel
Remove the protective cover and connect the
positive cable terminal of the charger (usually
red) to the positive terminal (+) of the battery.
Connect the negative terminal of the charger
(usually black) to nut next to the negative
terminal (-) of the battery.
Battery
The vehicle is equipped with an Intelligent Battery
Sensor (IBS), which is able to measure the charge
and discharge voltage, calculate the charge level
and the general condition of the battery. The
sensor is placed next to the negative terminal (-)
of the battery.
For a correct charge/discharge procedure, the
charge voltage must go through the IBS sensor.
1. Turn the charger on and follow the instruc -
tions in the user's manual to completely
recharge the battery.
2. When the battery is charged, turn the charger off before disconnecting it from the battery.
CAUTION!
Precautions have been taken to safeguard all
parts and connections however, the pressures
generated by these machines is such that
complete protection against water ingress
cannot be guaranteed.
WARNING!
Never charge or recharge a frozen battery: it
may explode because of the nitrogen
trapped inside the ice crystals.
At all times while charging or recharging the
battery, make sure that any sparks or open
flames are kept sufficiently far away from the
battery.
1 — Protective Cover
2 — Negative Post (Nut)
23_GU_OM_EN_USC_t.book Page 208
Page 211 of 268
209
3. Disconnect the black cable terminal of the battery charger and then the red cable
terminal.
4. Refit the protective cover of the positive terminal of the battery and the access cover
to the battery compartment.
NOTE:
If a "quick-type" battery charger is used with the
battery fitted on the vehicle, before connecting it
disconnect both cables of the battery itself. Do
not use a "quick-type" battery charger to provide
the starting voltage.
VEHICLE MAINTENANCE
The following pages contain instructions on the
required maintenance from the technical
personnel who designed the vehicle.
In addition to these specific maintenance
instructions specified for routine scheduled
servicing, there are other components which may
require periodic maintenance or replacement
over the vehicle’s life cycle.
ENGINE OIL
Engine Oil Level Check
To ensure correct engine lubrication, the oil must
always be kept at the prescribed level
Ú
page 204.
Check the oil level at regular intervals, for
example every 1,864 miles (3,000 km).
It must be checked about five minutes after
stopping the engine.
Full operating temperature must be reached. The
vehicle must also be parked on as level a surface
as possible. The engine oil level can be checked using the
Information and Entertainment system. To
access the function, activate the main menu
(MENU button) and select the following options in
sequence:
1. “Vehicle Information”
2. “Engine Oil”
Ensure that the oil level is within the interval on
the dipstick between the minimum and maximum
limits (Quadrifoglio only).
Changing The Engine Oil
For the correct servicing intervals
Ú
page 200.
Choice Of Engine Oil Type
To ensure optimal performance and maximum
protection in all operating conditions, it is advised
to use certified engine oils
Ú
page 252.
Additives For Engine Oil
It is strongly recommended not to use additives
(other than leak detection dyes) with the engine
oil.
The engine oil is a product designed especially for
the vehicle, and its performance may be deteri -
orated through the use of further additives.
Disposal Of Used Engine Oil And Filters
For the disposal of the engine oil and filters,
contact the appropriate body to determine local
regulations.
NOTE:
Incorrectly disposed used engine oil may seri -
ously harm the environment.
ENGINE OIL FILTER
Replacing the Engine Oil Filter
The engine oil filter must be replaced each time
the engine oil is changed. It is advised to replace
it with a genuine spare part, specifically designed
for this vehicle.
ENGINE AIR CLEANER FILTER
Replacing the Engine Air Cleaner Filter
For the correct servicing intervals
Ú
page 200. It
is advised to replace the engine air cleaner filter
with a genuine spare part, specifically designed
for this vehicle.
AIR CONDITIONING SYSTEM
M
AINTENANCE
To ensure the best possible performance, the air
conditioning system must be checked and
undergo maintenance at an authorized dealer at
the beginning of the summer.
CAUTION!
Do not use chemicals to clean the air
conditioning system, since the internal
components may be damaged. This kind of
damage is not covered by warranty.
23_GU_OM_EN_USC_t.book Page 209
Page 212 of 268
SERVICING AND MAINTENANCE
210
Replace The Cabin Air Filter
For the correct servicing intervals
Ú
page 200.
For cleaner replacement, contact an authorized
dealer.
LUBRICATING MOVING PARTS OF THE
B
ODYWORK
Ensure that the locks and bodywork junction
points, including components such as the seat
guides, door hinges (and rollers), liftgate and
hood are periodically lubricated with
lithium-based grease to ensure correct,
silent operation and to protect them from
rust and wear.
Thoroughly clean the components, eliminating
every trace of dirt and dust. After lubricating,
eliminate excess oil and grease. Also pay
particular attention to the hood closing devices,
to ensure correct operation. Operations of the
hood are to be carried out with the engine cold.
Remember to check, clean and lubricate the
locking, release and safety devices. Lubricate the external lock barrels twice a year.
Apply a small amount of high-quality lubricant
directly into the lock barrel.
If necessary, contact an authorized dealer as
soon as possible.
WINDSHIELD WIPER
Periodically clean the windshield, rear window
and rubber profile of the windshield wiper blades,
using a sponge or a soft cloth and a non-abrasive
detergent. This eliminates the salt or impurities
accumulated when driving.
Prolonged operation of the windshield window
wipers with dry glass may cause the deterioration
of the blades, in addition to abrasion of the
surface of the glass. To eliminate the impurities
on the dry glass, always operate the windshield
washers.
In the event of very low outdoor temperatures,
below 0°F (-17.8°C), ensure that the movement
of the rubber part in contact with the glass is not
obstructed. Use a suitable deicing product to
release it if required.
Avoid using the windshield wipers to remove frost
or ice.
Also avoid contact of the rubber profile of the
blades with petroleum derivatives such as engine
oil, gas, etc.
NOTE:
The life of the windshield wiper blades varies
according to the usage frequency. It is advised to
replace the blades approximately once a year.
When the blades are worn, noise, marks on the
glass or streaks of water may be noticed. In the
presence of these conditions, clean the wind
-
shield wiper blades or, if necessary, replace
them.
Raising The Windshield Wiper Blades (“Service
Position” Function)
The “service position” function allows the driver
to replace the windshield wiper blades easily. It is
also recommended to activate this function when
it is snowing and to make it easier to remove any
dirt deposits in the area where the blades are
normally positioned, while washing.
NOTE:
If the windshield wipers are raised while not in
the “service position,” it is possible to damage
the hood.
WARNING!
Use only refrigerants and compressor
lubricants approved by the manufacturer for
your air conditioning system. Some
unapproved refrigerants are flammable and
can explode, injuring you. Other unapproved
refrigerants or lubricants can cause the
system to fail, requiring costly repairs. Refer to
Warranty Information Book, located in your
owner’s information kit, for further warranty
information.
WARNING!
Driving with worn windshield wiper blades is a
serious hazard, because visibility is reduced in
bad weather conditions.
23_GU_OM_EN_USC_t.book Page 210