2023 ALFA ROMEO STELVIO seats
[x] Cancel search: seatsPage 38 of 268

GETTING TO KNOW YOUR VEHICLE
36
Rear Heated Seats — If Equipped
If equipped with rear heated seats, the
controls can be found on the rear of the
center console and will function the
same as the front heated seat controls.Rear Heated Seat Buttons
NOTE:
To preserve the battery charge, this function
cannot be activated when the engine is off.
HEAD RESTRAINTS
Head restraints are designed to reduce the risk of
injury by restricting head movement in the event
of a rear impact. Head restraints should be
adjusted so that the top of the head restraint is
located above the top of your ear.
Front Head Restraints
NOTE:
For Quadrifoglio vehicles equipped with Sparco
Racing Seats, the head restraints are not adjust -
able or removable. The front head restraints may be
height-adjustable.
To raise the head restraint, pull up on the head
restraint until it clicks into place.
To lower the head restraint, push in the
adjustment button and lower the head restraint
to the desired height while holding the button.
Then, release the adjustment button.
Front Head Restraint
NOTE:
To allow for maximum visibility for the driver,
if a seat is not occupied by a passenger, the
head restraint can be lowered to the fully
lowered position.
WARNING!
A loose head restraint thrown forward in a
collision or hard stop could cause serious
injury or death to occupants of the vehicle.
Always securely stow removed head
restraints in a location outside the occupant
compartment.
ALL the head restraints MUST be reinstalled
in the vehicle to properly protect the
occupants. Follow the reinstallation
instructions prior to operating the vehicle or
occupying a seat.
WARNING!
All occupants, including the driver, should
not operate a vehicle or sit in a vehicle’s seat
until the head restraints are placed in their
proper positions in order to minimize the risk
of neck injury in the event of a crash.
Head restraints should never be adjusted
while the vehicle is in motion. Driving a
vehicle with the head restraints improperly
adjusted or removed could cause serious
injury or death in the event of a collision.
1 — Release Button
2 — Adjustment Button
23_GU_OM_EN_USC_t.book Page 36
Page 58 of 268

GETTING TO KNOW YOUR VEHICLE
56
INTERIOR STORAGE AND
EQUIPMENT
GLOVE COMPARTMENT
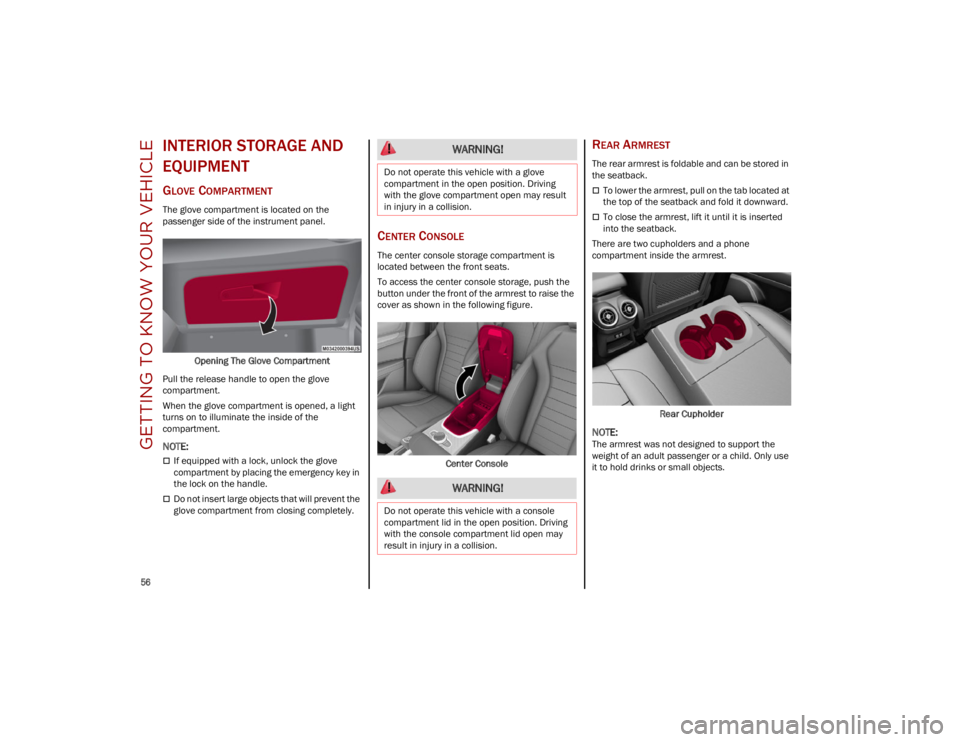
The glove compartment is located on the
passenger side of the instrument panel.Opening The Glove Compartment
Pull the release handle to open the glove
compartment.
When the glove compartment is opened, a light
turns on to illuminate the inside of the
compartment.
NOTE:
If equipped with a lock, unlock the glove
compartment by placing the emergency key in
the lock on the handle.
Do not insert large objects that will prevent the
glove compartment from closing completely.
CENTER CONSOLE
The center console storage compartment is
located between the front seats.
To access the center console storage, push the
button under the front of the armrest to raise the
cover as shown in the following figure.
Center Console
REAR ARMREST
The rear armrest is foldable and can be stored in
the seatback.
To lower the armrest, pull on the tab located at
the top of the seatback and fold it downward.
To close the armrest, lift it until it is inserted
into the seatback.
There are two cupholders and a phone
compartment inside the armrest.
Rear Cupholder
NOTE:
The armrest was not designed to support the
weight of an adult passenger or a child. Only use
it to hold drinks or small objects.
WARNING!
Do not operate this vehicle with a glove
compartment in the open position. Driving
with the glove compartment open may result
in injury in a collision.
WARNING!
Do not operate this vehicle with a console
compartment lid in the open position. Driving
with the console compartment lid open may
result in injury in a collision.
23_GU_OM_EN_USC_t.book Page 56
Page 68 of 268

GETTING TO KNOW YOUR VEHICLE
66
(Continued)
CARGO AREA FEATURES
Retractable Cargo Area Cover
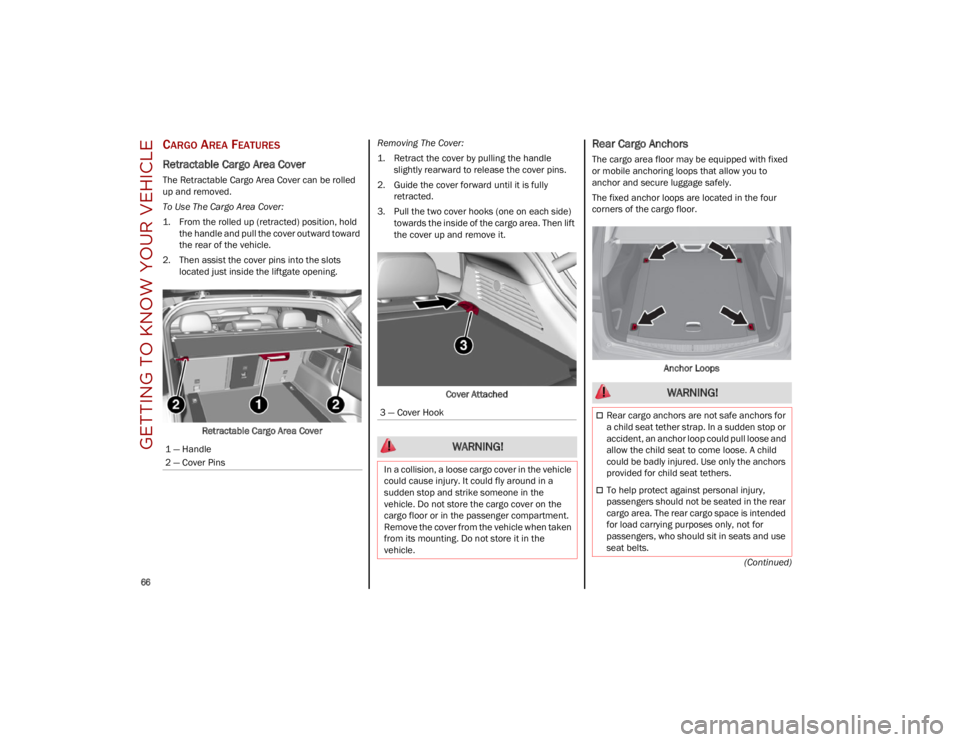
The Retractable Cargo Area Cover can be rolled
up and removed.
To Use The Cargo Area Cover:
1. From the rolled up (retracted) position, holdthe handle and pull the cover outward toward
the rear of the vehicle.
2. Then assist the cover pins into the slots located just inside the liftgate opening.
Retractable Cargo Area Cover Removing The Cover:
1. Retract the cover by pulling the handle
slightly rearward to release the cover pins.
2. Guide the cover forward until it is fully retracted.
3. Pull the two cover hooks (one on each side) towards the inside of the cargo area. Then lift
the cover up and remove it.
Cover Attached
Rear Cargo Anchors
The cargo area floor may be equipped with fixed
or mobile anchoring loops that allow you to
anchor and secure luggage safely.
The fixed anchor loops are located in the four
corners of the cargo floor. Anchor Loops
1 — Handle
2 — Cover Pins
3 — Cover Hook
WARNING!
In a collision, a loose cargo cover in the vehicle
could cause injury. It could fly around in a
sudden stop and strike someone in the
vehicle. Do not store the cargo cover on the
cargo floor or in the passenger compartment.
Remove the cover from the vehicle when taken
from its mounting. Do not store it in the
vehicle.
WARNING!
Rear cargo anchors are not safe anchors for
a child seat tether strap. In a sudden stop or
accident, an anchor loop could pull loose and
allow the child seat to come loose. A child
could be badly injured. Use only the anchors
provided for child seat tethers.
To help protect against personal injury,
passengers should not be seated in the rear
cargo area. The rear cargo space is intended
for load carrying purposes only, not for
passengers, who should sit in seats and use
seat belts.
23_GU_OM_EN_USC_t.book Page 66
Page 88 of 268

86
STARTING AND OPERATING
STARTING THE ENGINE
Before starting the engine, be sure to adjust the
seat, the interior rearview mirror, door mirrors,
and fasten the seat belt correctly.
Never press the accelerator pedal before starting
the engine.
If necessary, messages indicating the starting
procedure will be shown in the display.
STARTING PROCEDURE
Proceed as follows:
1. Apply the Electric Park Brake (EPB) and place the gear selector in PARK (P) or NEUTRAL (N).
2. Fully press the brake pedal without touching the accelerator.
3. Briefly push the ignition button.
4. If the engine doesn't start within a few seconds, you need to repeat the procedure.
If the problem persists, contact an authorized
dealer.
REMOTE STARTING SYSTEM
This system uses the key fob to start the engine
conveniently from outside the vehicle while still
maintaining security. The system has a range of
at least 300 feet (91 meters).
The remote starting system also activates the
climate control, the heated seats (if equipped),
and the heated steering wheel (if equipped),
depending on temperatures outside and inside of
the vehicle.
NOTE:
Obstructions between the vehicle and key fob
may reduce this range.
How To Use Remote Start
All of the following conditions must be met before
the engine will remote start:
Gear selector in PARK (P).
Doors closed.
Hood closed.
Liftgate closed.
Hazard switch off.
Brake switch inactive (brake pedal not
pressed).
Battery at an acceptable charge level.
WARNING!
When leaving the vehicle, always remove the
key fob from the vehicle and lock your
vehicle.
Never leave children alone in a vehicle, or
with access to an unlocked vehicle.
Allowing children to be in a vehicle
unattended is dangerous for a number of
reasons. A child or others could be seriously
or fatally injured. Children should be warned
not to touch the parking brake, brake pedal
or the transmission gear selector.
Do not leave the key fob in or near the
vehicle, or in a location accessible to
children. A child could operate power
windows, other controls, or move the vehicle.
Do not leave children or animals inside
parked vehicles in hot weather. Interior heat
buildup may cause serious injury or death.
WARNING!
Never pour fuel or other flammable liquid
into the throttle body air inlet opening in an
attempt to start the vehicle. This could result
in flash fire causing serious personal injury.
Do not attempt to push or tow your vehicle to
get it started. Vehicles equipped with an
automatic transmission cannot be started
this way. Unburned fuel could enter the
catalytic converter and once the engine has
started, ignite and damage the converter and
vehicle.
If the vehicle has a discharged battery,
booster cables may be used to obtain a start
from a booster battery or the battery in
another vehicle. This type of start can be
dangerous if done improperly
Ú
page 192.
CAUTION!
To prevent damage to the starter, do not
continuously crank the engine for more than
25 seconds at a time. Wait 60 seconds before
trying again.
23_GU_OM_EN_USC_t.book Page 86
Page 154 of 268

SAFETY
152
Engagement/Disengagement
The system may be disengaged (and engaged
again) in the “Driver Assistance” menu of the
Information and Entertainment system.
The system can be deactivated even with the
ignition device in the ON position.
NOTE:
The system status can be changed with car at a
standstill only.
Select from three operating modes:
Warning And Braking: the system (if active), in
addition to the visual and audible warnings,
provides limited braking, automatic braking
and additional assistance in the braking stage,
where the driver does not brake sufficiently in
the event of a potential frontal impact.
Only Warning : the system (if active), does not
provide limited braking, but guarantees
automatic braking or additional assistance in
the braking stage, where the driver does not
brake at all or not sufficiently in the event of a
potential frontal impact.
Disabled : the system does not provide visual
and audible warnings, limited braking,
automatic braking or additional assistance in
the braking stage. The system will therefore
provide no indication of a possible collision.
Activation/Deactivation
The Forward Collision Warning system is
activated whenever the engine is started
regardless of what is shown on the radio system.
Following a deactivation, the system will not warn
the driver about the possible collision with a
preceding vehicle, regardless of the setting
selected in the radio system.
NOTE:
Each time the engine is started, the system is
activated regardless of what setting was selected
when the engine was turned off.
This function is not active at a speed lower than
4 mph (7 km/h) or higher than 124 mph
(200 km/h).
The system is active:
Each time the engine is started
When feature is selected within the radio
system
When the ignition is in the ON position
When the vehicle speed is between 2 mph
(4 km/h) and 124 mph (200 km/h)
When the front seat belts are fastened
The Alfa DNA selector is not in RACE position
(if equipped)
NOTE:
If the seat belts of the front seats are not correctly
fastened, the system will not intervene on the
braking system (only audible and visual signals
will be provided).
Changing The System Sensitivity
The sensitivity of the system can be changed
through the Information and Entertainment
system menu, choosing from one of the following
three options: "Near", "Medium" or "Far".
Refer to the description in the Information and
Entertainment system Supplement for how to
change the settings.
The default setting is "Medium". With this setting,
the system warns the driver of a possible collision
with the vehicle in front when that vehicle is at a
standard distance, between that of the other two
settings. With the system sensitivity set to "Far", the
system will warn the driver of a possible collision
with the vehicle in front when that vehicle is at a
greater distance, thus providing the possibility of
acting on the brakes more lightly and gradually.
This setting provides the driver with the maximum
possible reaction time to prevent a potential
collision.
NOTE:
The “Far” setting may result in a greater number
of FCW possible collision warnings experienced.
With the option set to "Near", the system will alert
the driver of a possible collision with the vehicle
in front when that vehicle is close. This setting
offers the driver a lower reaction time compared
to the "Medium" and "Far" settings, in the event of
a potential collision, but permits more dynamic
driving of the vehicle.
NOTE:
The “Near” setting may result in a lesser number
of FCW possible collision warnings experienced.
The system sensitivity setting is kept in the
memory when the engine is turned off.
System Limited Operation Warning
If a dedicated message is displayed, a condition
limiting the system operation may have occurred.
The possible reasons of this limitation are
something is blocking the camera view or a fault.
If an obstruction is signaled, clean the area of the
radar on the front fascia/bumper, and the
camera area on the windshield.
If a fault in the system is occurring, it will still be
possible to drive the vehicle normally, but
automatic braking will not be available in the
event of an impending collision.
23_GU_OM_EN_USC_t.book Page 152
Page 159 of 268

157
Driving on a significantly underinflated tire will
cause the tire to overheat, and can lead to tire
failure. Underinflation also reduces fuel
efficiency and tire tread life, and may affect the
vehicle’s handling and stopping ability.
The TPMS is not a substitute for proper tire
maintenance, and it is the driver’s responsi-
bility to maintain correct tire pressure using an
accurate tire pressure gauge, even if underin -
flation has not reached the level to trigger
illumination of the TPMS Warning Light.
Seasonal temperature changes will affect tire
pressure, and the TPMS will monitor the actual
tire pressure in the tire
Ú
page 259.
OCCUPANT RESTRAINT
SYSTEMS
Some of the most important safety features in
your vehicle are the restraint systems:
OCCUPANT RESTRAINT SYSTEMS
F
EATURES
Seat Belt Systems
Supplemental Restraint Systems (SRS)
Air Bags
Child Restraints
Some of the safety features described in this
section may be standard equipment on some
models, or may be optional equipment on others.
If you are not sure, ask an authorized dealer.
IMPORTANT SAFETY PRECAUTIONS
Please pay close attention to the information in
this section. It tells you how to use your restraint
system properly, to keep you and your
passengers as safe as possible.
Here are some simple steps you can take to
minimize the risk of harm from a deploying
air bag:
1. Children 12 years old and under should always ride buckled up in the rear seat of a
vehicle with a rear seat.
2. A child who is not big enough to wear the vehicle seat belt properly must be secured in
the appropriate child restraint or belt-posi -
tioning booster seat in a rear seating position
Ú
page 170.
3. If a child from 2 to 12 years old (not in a rear-facing child restraint) must ride in the
front passenger seat, move the seat as far
back as possible and use the proper child
restraint
Ú
page 170.
4. Never allow children to slide the shoulder belt behind them or under their arm.
5. You should read the instructions provided with your child restraint to make sure that you
are using it properly.
6. All occupants should always wear their lap and shoulder belts properly. 7. The driver and front passenger seats should
be moved back as far as practical to allow the
front air bags room to inflate.
8. Do not lean against the door or window. If your vehicle has side air bags, and deploy -
ment occurs, the side air bags will inflate
forcefully into the space between occupants
and the door and occupants could be injured.
9. If the air bag system in this vehicle needs to be modified to accommodate a disabled
person, see
Ú
page 255 for customer
service contact information.
WARNING!
Never place a rear-facing child restraint in
front of an air bag. A deploying passenger
front air bag can cause death or serious
injury to a child 12 years or younger,
including a child in a rear-facing child
restraint.
Never install a rear-facing child restraint in
the front seat of a vehicle. Only use a
rear-facing child restraint in the rear seat.
If the vehicle does not have a rear seat, do
not transport a rear-facing child restraint in
that vehicle.
23_GU_OM_EN_USC_t.book Page 157
Page 161 of 268

159
(Continued)
Do not allow people to ride in any area of
your vehicle that is not equipped with seats
and seat belts.
Be sure everyone in your vehicle is in a seat
and using a seat belt properly. Occupants,
including the driver, should always wear their
seat belts whether or not an air bag is also
provided at their seating position to minimize
the risk of severe injury or death in the event
of a crash.
Wearing your seat belt incorrectly could
make your injuries in a collision much worse.
You might suffer internal injuries, or you
could even slide out of the seat belt. Follow
these instructions to wear your seat belt
safely and to keep your passengers safe, too.
Two people should never be belted into a
single seat belt. People belted together can
crash into one another in a collision, hurting
one another badly. Never use a lap/shoulder
belt or a lap belt for more than one person,
no matter what their size.
WARNING! WARNING!
A lap belt worn too high can increase the risk
of injury in a collision. The seat belt forces
won’t be at the strong hip and pelvic bones,
but across your abdomen. Always wear the
lap part of your seat belt as low as possible
and keep it snug.
A twisted seat belt may not protect you
properly. In a collision, it could even cut into
you. Be sure the seat belt is flat against your
body, without twists. If you can’t straighten a
seat belt in your vehicle, take it to an
authorized dealer immediately and have
it fixed.
A seat belt that is buckled into the wrong
buckle will not protect you properly. The lap
portion could ride too high on your body,
possibly causing internal injuries. Always
buckle your seat belt into the buckle nearest
you.
A seat belt that is too loose will not protect
you properly. In a sudden stop, you could
move too far forward, increasing the
possibility of injury. Wear your seat belt
snugly.
A seat belt that is worn under your arm is
dangerous. Your body could strike the inside
surfaces of the vehicle in a collision,
increasing head and neck injury. A seat belt
worn under the arm can cause internal
injuries. Ribs aren’t as strong as shoulder
bones. Wear the seat belt over your shoulder
so that your strongest bones will take the
force in a collision.
A shoulder belt placed behind you will not
protect you from injury during a collision. You
are more likely to hit your head in a collision
if you do not wear your shoulder belt. The lap
and shoulder belt are meant to be used
together.
A frayed or torn seat belt could rip apart in a
collision and leave you with no protection.
Inspect the seat belt system periodically,
checking for cuts, frays, or loose parts.
Damaged parts must be replaced
immediately. Do not disassemble or modify
the seat belt system. If your vehicle is
involved in a collision, or if you have
questions regarding seat belt or retractor
conditions, take your vehicle to an
authorized FCA dealer or authorized
FCA Certified Collision Care Program facility
for inspection.
WARNING!
23_GU_OM_EN_USC_t.book Page 159
Page 162 of 268

SAFETY
160
Lap/Shoulder Belt Operating Instructions
1. Enter the vehicle and close the door. Sit backand adjust the seat.
2. The seat belt latch plate is above the back of the front seat, and next to your arm in the
rear seat (for vehicles equipped with a rear
seat). Grab the latch plate and pull out the
seat belt. Slide the latch plate up the webbing
as far as necessary to allow the seat belt to
go around your lap.
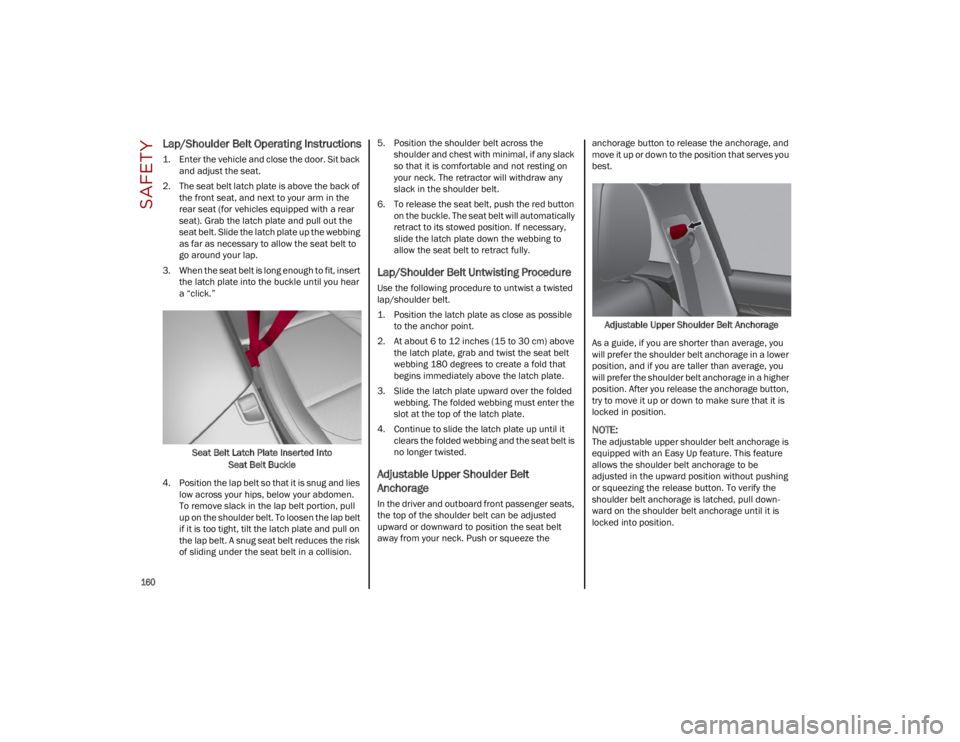
3. When the seat belt is long enough to fit, insert the latch plate into the buckle until you hear
a “click.”
Seat Belt Latch Plate Inserted Into Seat Belt Buckle
4. Position the lap belt so that it is snug and lies low across your hips, below your abdomen.
To remove slack in the lap belt portion, pull
up on the shoulder belt. To loosen the lap belt
if it is too tight, tilt the latch plate and pull on
the lap belt. A snug seat belt reduces the risk
of sliding under the seat belt in a collision. 5. Position the shoulder belt across the
shoulder and chest with minimal, if any slack
so that it is comfortable and not resting on
your neck. The retractor will withdraw any
slack in the shoulder belt.
6. To release the seat belt, push the red button on the buckle. The seat belt will automatically
retract to its stowed position. If necessary,
slide the latch plate down the webbing to
allow the seat belt to retract fully.
Lap/Shoulder Belt Untwisting Procedure
Use the following procedure to untwist a twisted
lap/shoulder belt.
1. Position the latch plate as close as possible to the anchor point.
2. At about 6 to 12 inches (15 to 30 cm) above the latch plate, grab and twist the seat belt
webbing 180 degrees to create a fold that
begins immediately above the latch plate.
3. Slide the latch plate upward over the folded webbing. The folded webbing must enter the
slot at the top of the latch plate.
4. Continue to slide the latch plate up until it clears the folded webbing and the seat belt is
no longer twisted.
Adjustable Upper Shoulder Belt
Anchorage
In the driver and outboard front passenger seats,
the top of the shoulder belt can be adjusted
upward or downward to position the seat belt
away from your neck. Push or squeeze the anchorage button to release the anchorage, and
move it up or down to the position that serves you
best.
Adjustable Upper Shoulder Belt Anchorage
As a guide, if you are shorter than average, you
will prefer the shoulder belt anchorage in a lower
position, and if you are taller than average, you
will prefer the shoulder belt anchorage in a higher
position. After you release the anchorage button,
try to move it up or down to make sure that it is
locked in position.
NOTE:
The adjustable upper shoulder belt anchorage is
equipped with an Easy Up feature. This feature
allows the shoulder belt anchorage to be
adjusted in the upward position without pushing
or squeezing the release button. To verify the
shoulder belt anchorage is latched, pull down -
ward on the shoulder belt anchorage until it is
locked into position.
23_GU_OM_EN_USC_t.book Page 160