2023 ALFA ROMEO GIULIA mirror controls
[x] Cancel search: mirror controlsPage 41 of 248

39
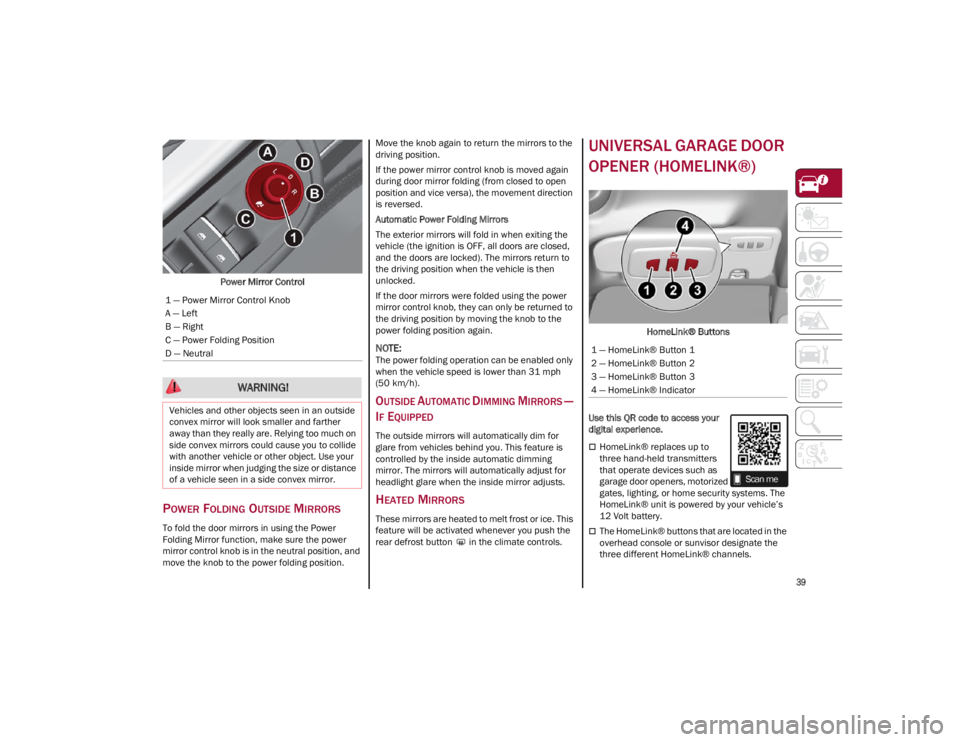
Power Mirror Control
POWER FOLDING OUTSIDE MIRRORS
To fold the door mirrors in using the Power
Folding Mirror function, make sure the power
mirror control knob is in the neutral position, and
move the knob to the power folding position. Move the knob again to return the mirrors to the
driving position.
If the power mirror control knob is moved again
during door mirror folding (from closed to open
position and vice versa), the movement direction
is reversed.
Automatic Power Folding Mirrors
The exterior mirrors will fold in when exiting the
vehicle (the ignition is OFF, all doors are closed,
and the doors are locked). The mirrors return to
the driving position when the vehicle is then
unlocked.
If the door mirrors were folded using the power
mirror control knob, they can only be returned to
the driving position by moving the knob to the
power folding position again.
NOTE:
The power folding operation can be enabled only
when the vehicle speed is lower than 31 mph
(50 km/h).
OUTSIDE AUTOMATIC DIMMING MIRRORS —
I
F EQUIPPED
The outside mirrors will automatically dim for
glare from vehicles behind you. This feature is
controlled by the inside automatic dimming
mirror. The mirrors will automatically adjust for
headlight glare when the inside mirror adjusts.
HEATED MIRRORS
These mirrors are heated to melt frost or ice. This
feature will be activated whenever you push the
rear defrost button in the climate controls.
UNIVERSAL GARAGE DOOR
OPENER (HOMELINK®)
HomeLink® Buttons
Use this QR code to access your
digital experience.
HomeLink® replaces up to
three hand-held transmitters
that operate devices such as
garage door openers, motorized
gates, lighting, or home security systems. The
HomeLink® unit is powered by your vehicle’s
12 Volt battery.
The HomeLink® buttons that are located in the
overhead console or sunvisor designate the
three different HomeLink® channels.
1 — Power Mirror Control Knob
A — Left
B — Right
C — Power Folding Position
D — Neutral
WARNING!
Vehicles and other objects seen in an outside
convex mirror will look smaller and farther
away than they really are. Relying too much on
side convex mirrors could cause you to collide
with another vehicle or other object. Use your
inside mirror when judging the size or distance
of a vehicle seen in a side convex mirror.
1 — HomeLink® Button 1
2 — HomeLink® Button 2
3 — HomeLink® Button 3
4 — HomeLink® Indicator
23_GA_OM_EN_USC_t.book Page 39
Page 50 of 248

GETTING TO KNOW YOUR VEHICLE
48
RAIN SENSING WIPERS
This feature senses rain or snowfall on the
windshield and automatically activates the
wipers. The Rain Sensor is located behind the
interior rearview mirror.Rain Sensor
Rotate the end of the multifunction lever to one of
four settings to activate this feature.
The sensor has an adjustment range that varies
progressively from wiper still (no stroke) when the
windshield is dry, to wiper at continuous speed
(fast operation) with intense rain.
Activation
Rotating the wiper switch to the Low Sensitivity
Rain Sensing position (4) or High Sensitivity Rain
Sensing position (3) activates the rain sensor.
The activation of the rain sensor system is done
by tapping the wiper stalk upwards while the
switch is in the Low Sensitivity Rain Sensing
position (4) or High Sensitivity Rain Sensing
position (3). The variation in sensitivity during rain sensor
operation is also signaled by a stroke of the
wiper.
If the windshield washer is used with the rain
sensor activated, the normal washing cycle is
performed, and then the rain sensor resumes its
normal automatic operation.
NOTE:
Keep the glass in the sensor area clean.
With the windshield wiper lever in the Low
Sensitivity Rain Sensing position (4) or High
Sensitivity Rain Sensing position (3), wiping
operates automatically and is disabled when
the outside temperature is below 32°F (0°C).
Deactivation
To turn off the Rain Sensing Wipers, use the wiper
switch or place the ignition in the OFF position.
In the event of malfunction of the rain sensor
while it is active, the windshield wiper operates
intermittently at a speed consistent with the
sensitivity setting of the rain sensor, whether or
not there is rain on the glass for as long as the
sensor failure is indicated on the display.
The sensor continues to operate and it is possible
to set the windshield wiper to continuous mode
(1 or 2). The failure indication remains on for as
long as the sensor is active. The rain sensor is able to recognize and automat
-
ically adjust itself in the presence of the following
conditions:
Presence of dirt on the controlled surface (salt,
dirt, etc.).
Presence of streaks of water caused by the
worn window wiper blades.
Difference between day and night.
HEADLIGHT WASHERS — IF EQUIPPED
The windshield wiper lever operates the headlight
washers when the ignition is in the ON position
and the headlights are turned on. To use the
headlight washers, pull the lever toward you and
release it. The headlight washers will spray a
timed high-pressure spray of washer fluid onto
each headlight lens. In addition, the windshield
washers will spray the windshield and the
windshield wipers will cycle.
NOTE:
The headlight washers work on every tenth wash
cycle request.
CLIMATE CONTROL
The Climate Control system allows you to regulate
the temperature, air flow, and direction of air
circulating throughout the vehicle. The controls
are located on the touchscreen and on the
instrument panel below the radio.
23_GA_OM_EN_USC_t.book Page 48
Page 83 of 248

81
STARTING THE ENGINE
Before starting the engine, be sure to adjust the
seat, the interior rearview mirror, the door
mirrors, and fasten the seat belt correctly.
Never press the accelerator pedal before starting
the engine.
If necessary, messages indicating the starting
procedure will be shown in the display.
STARTING PROCEDURE
Proceed as follows:
1. Apply the Electric Park Brake and set the gear selector to PARK (P) or NEUTRAL (N).
2. Fully press the brake pedal without touching the accelerator.
3. Briefly push the ignition button.
4. If the engine doesn't start within a few seconds, you need to repeat the procedure. If
the problem persists, contact an authorized
dealer.
REMOTE STARTING SYSTEM
This system uses the key fob to start the engine
conveniently from outside the vehicle while still
maintaining security. The system has a range of
at least 300 feet (91 meters).
The remote starting system also activates the
climate control, the heated seats (if equipped),
and the heated steering wheel (if equipped),
depending on temperatures outside and inside of
the vehicle.
NOTE:
Obstructions between the vehicle and key fob
may reduce this range.
How to use Remote Start
All of the following conditions must be met before
the engine will remote start:
Gear selector in PARK (P).
Doors closed.
Hood closed.
Trunk closed.
Hazard switch off.
Brake switch inactive (brake pedal not
pressed).
WARNING!
When leaving the vehicle, always remove the
key fob from the vehicle and lock your
vehicle.
Never leave children alone in a vehicle, or
with access to an unlocked vehicle.
Allowing children to be in a vehicle
unattended is dangerous for a number of
reasons. A child or others could be seriously
or fatally injured. Children should be warned
not to touch the parking brake, brake pedal
or the transmission gear selector.
Do not leave the key fob in or near the
vehicle, or in a location accessible to
children. A child could operate power
windows, other controls, or move the vehicle.
Do not leave children or animals inside
parked vehicles in hot weather. Interior heat
buildup may cause serious injury or death.
WARNING!
Never pour fuel or other flammable liquid
into the throttle body air inlet opening in an
attempt to start the vehicle. This could result
in flash fire causing serious personal injury.
Do not attempt to push or tow your vehicle to
get it started. Vehicles equipped with an
automatic transmission cannot be started
this way. Unburned fuel could enter the
catalytic converter and once the engine has
started, ignite and damage the converter and
vehicle.
If the vehicle has a discharged battery,
booster cables may be used to obtain a start
from a booster battery or the battery in
another vehicle
Ú
page 177. This type of
start can be dangerous if done improperly.
CAUTION!
To prevent damage to the starter, do not
continuously crank the engine for more than
25 seconds at a time. Wait 60 seconds before
trying again.
23_GA_OM_EN_USC_t.book Page 81