2023 ALFA ROMEO GIULIA lock
[x] Cancel search: lockPage 91 of 248
89
REVERSE (R)
Select this mode only with the vehicle at a
standstill.
NEUTRAL (N)
Use this range when the vehicle is standing for
prolonged periods with the engine running. The
engine may be started in this range. Apply the Electric Park Brake and shift the transmission
into PARK (P) if you must leave the vehicle.
DRIVE (D)
Use this mode in normal driving conditions.
Shifting from DRIVE (D) to PARK (P) or REVERSE
(R) modes must take place only after releasing
the accelerator pedal, with vehicle at a standstill
and brake pedal pressed.
This mode ensures automatic engagement of the
most suitable gears for driving needs and
maximum fuel economy in terms of consumption.
In this position, the transmission shifts the gears
automatically, selecting the most suitable for
forward driving among those available as you go.
This ensures the vehicle's optimal driving charac
-
teristics are provided for all conditions.
AutoStick
In the case of frequent shifting (e.g. for sport
driving, when the vehicle is driven with a heavy
load or on slopes), it is recommended to use the
AutoStick (sequential shifting) mode to select and
keep a lower fixed ratio.
In these conditions, the use of a lower gear
improves vehicle performance, preventing
overheating. It is possible to shift from DRIVE (D) mode to
sequential mode regardless of vehicle speed.
Activation
Starting from DRIVE (D), move the selector to the
left (– and + indication of the trim) to activate the
sequential drive mode. The gear engaged will be
shown on the display.
Shifting is made by moving the gear selector
forwards, towards symbol – or backwards,
towards symbol +.
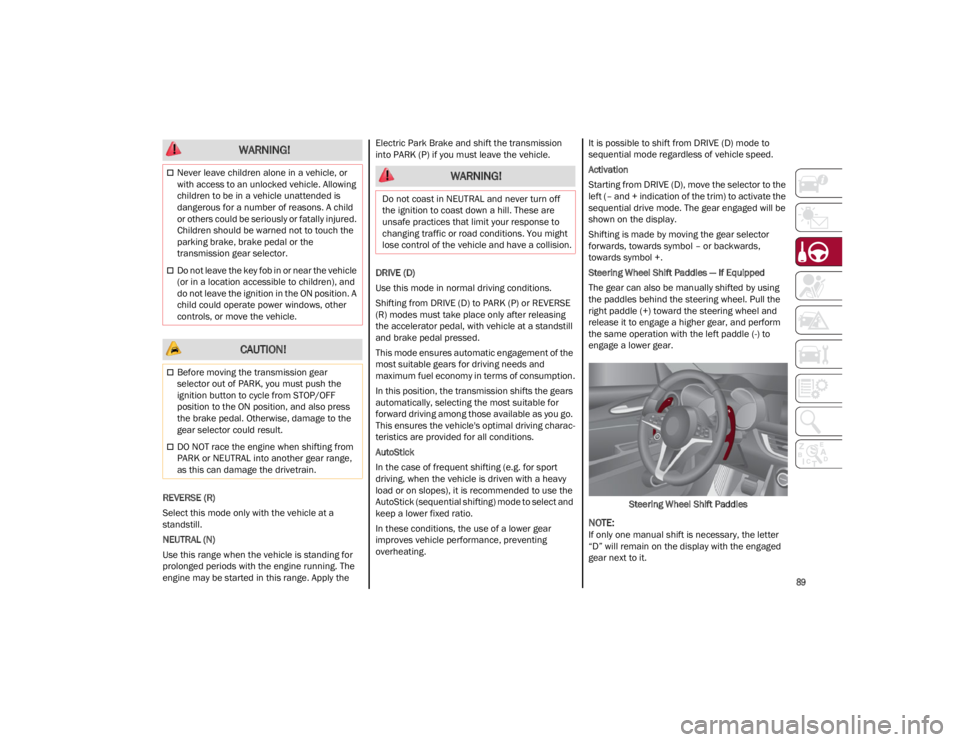
Steering Wheel Shift Paddles — If Equipped
The gear can also be manually shifted by using
the paddles behind the steering wheel. Pull the
right paddle (+) toward the steering wheel and
release it to engage a higher gear, and perform
the same operation with the left paddle (-) to
engage a lower gear.
Steering Wheel Shift Paddles
NOTE:
If only one manual shift is necessary, the letter
“D” will remain on the display with the engaged
gear next to it.
Never leave children alone in a vehicle, or
with access to an unlocked vehicle. Allowing
children to be in a vehicle unattended is
dangerous for a number of reasons. A child
or others could be seriously or fatally injured.
Children should be warned not to touch the
parking brake, brake pedal or the
transmission gear selector.
Do not leave the key fob in or near the vehicle
(or in a location accessible to children), and
do not leave the ignition in the ON position. A
child could operate power windows, other
controls, or move the vehicle.
CAUTION!
Before moving the transmission gear
selector out of PARK, you must push the
ignition button to cycle from STOP/OFF
position to the ON position, and also press
the brake pedal. Otherwise, damage to the
gear selector could result.
DO NOT race the engine when shifting from
PARK or NEUTRAL into another gear range,
as this can damage the drivetrain.
WARNING!
WARNING!
Do not coast in NEUTRAL and never turn off
the ignition to coast down a hill. These are
unsafe practices that limit your response to
changing traffic or road conditions. You might
lose control of the vehicle and have a collision.
23_GA_OM_EN_USC_t.book Page 89
Page 92 of 248
STARTING AND OPERATING
90
Deactivation
To deactivate the sequential driving mode, bring
the gear selector back in position DRIVE (D)
(“automatic” driving mode).
NOTE:
To select the correct gear for maximum
deceleration (engine brake), just keep the gear
paddle pulled (–): the transmission goes to an
operating mode in which the vehicle can slow
down easily.
The vehicle will keep the gear selected by the
driver until the safety conditions allow it.
This means, for example, that the system will
try to prevent the engine from switching off,
automatically downshifting if the engine speed
is too low.
AUTOMATIC TRANSMISSION LIMP HOME
M
ODE
Transmission function is monitored electronically
for abnormal conditions. If a condition is detected
that could result in transmission damage,
Transmission Limp Home Mode is activated.
In this condition, the transmission stays in
FOURTH gear, regardless of the selected gear.
Positions PARK (P), REVERSE (R) and NEUTRAL
(N) still work. The symbol might light up in the instrument
cluster.
Temporary failure
In the event of a momentary problem, the
transmission can be reset to regain all forward
gears by performing the following steps:
1. Stop the vehicle.
2. Shift the transmission into PARK (P), if
possible. If not, shift the transmission to
NEUTRAL (N).
3. Push and hold the ignition until the engine turns off.
4. Wait for about 10 seconds, then restart the engine.
5. Shift into the desired gear range. If the problem is no longer detected, the transmis -
sion will return to normal operation.
NOTE:
Even if the transmission can be reset, we recom -
mend that you visit an authorized dealer at your
earliest possible convenience. An authorized
dealer has diagnostic equipment to determine if
the problem could reoccur. If the transmission
cannot be reset, service is required at an autho -
rized dealer.
BRAKE/TRANSMISSION SHIFT INTERLOCK
(BTSI) S
YSTEM
This vehicle is equipped with a BTSI system that
holds the gear selector in PARK (P) unless the
brakes are applied.
This system prevents you from moving the gear
selector from position PARK (P) unless the brakes
are applied. To shift the transmission out of PARK (P), the
ignition must be placed in the ON/RUN position
(engine running or not) and the brake pedal must
be pressed.
Brake/Transmission Shift Interlock Disabling
Only if strictly necessary (e.g. pushing the vehicle,
conveyor vehicle washing systems), place the
vehicle in the NEUTRAL (N) position when
stopping the engine. See the following steps:
1. Vehicle at a standstill.
2. NEUTRAL (N) mode activated.
3. Push the ignition button for at least three
seconds.
The automatic parking brake engagement
function when the engine is stopped can also be
deactivated on the Information and
Entertainment system by selecting the following
functions on the main menu: “Settings”, “Driver
Assistance” and “Automatic Parking Brake”.
IMPORTANT NOTES
Failure to comply with the following may damage
the transmission:
Shift into PARK (P) mode only with the vehicle
at a standstill.
Select REVERSE (R) mode, or pass from
REVERSE to another mode only with the
vehicle at a standstill and engine idling.
Do not change between PARK (P), REVERSE
(R), NEUTRAL (N) or DRIVE (D) modes with
engine running at a speed above idling.
Before activating any transmission operating
mode, fully press the brake pedal.
WARNING!
Do not downshift for additional engine braking
on a slippery surface. The drive wheels could
lose their grip and the vehicle could skid,
causing a collision or personal injury.
23_GA_OM_EN_USC_t.book Page 90
Page 93 of 248
91
(Continued)
ALFA DNA / PRO SELECTOR
ALFA DNA SYSTEM
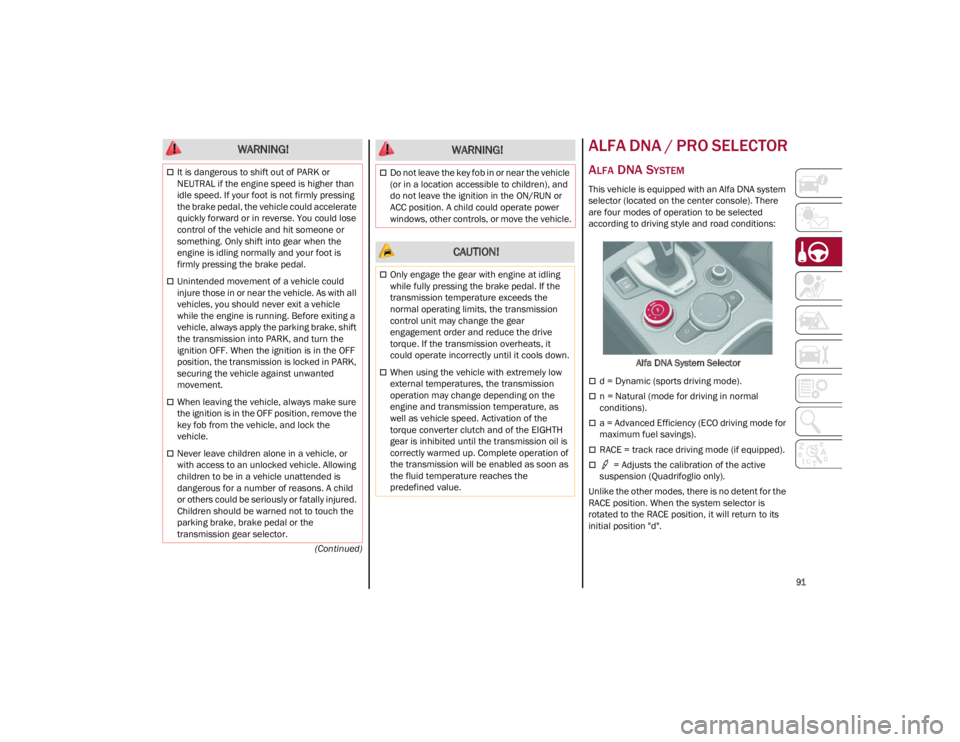
This vehicle is equipped with an Alfa DNA system
selector (located on the center console). There
are four modes of operation to be selected
according to driving style and road conditions:Alfa DNA System Selector
d = Dynamic (sports driving mode).
n = Natural (mode for driving in normal
conditions).
a = Advanced Efficiency (ECO driving mode for
maximum fuel savings).
RACE = track race driving mode (if equipped).
= Adjusts the calibration of the active
suspension (Quadrifoglio only).
Unlike the other modes, there is no detent for the
RACE position. When the system selector is
rotated to the RACE position, it will return to its
initial position "d".
WARNING!
It is dangerous to shift out of PARK or
NEUTRAL if the engine speed is higher than
idle speed. If your foot is not firmly pressing
the brake pedal, the vehicle could accelerate
quickly forward or in reverse. You could lose
control of the vehicle and hit someone or
something. Only shift into gear when the
engine is idling normally and your foot is
firmly pressing the brake pedal.
Unintended movement of a vehicle could
injure those in or near the vehicle. As with all
vehicles, you should never exit a vehicle
while the engine is running. Before exiting a
vehicle, always apply the parking brake, shift
the transmission into PARK, and turn the
ignition OFF. When the ignition is in the OFF
position, the transmission is locked in PARK,
securing the vehicle against unwanted
movement.
When leaving the vehicle, always make sure
the ignition is in the OFF position, remove the
key fob from the vehicle, and lock the
vehicle.
Never leave children alone in a vehicle, or
with access to an unlocked vehicle. Allowing
children to be in a vehicle unattended is
dangerous for a number of reasons. A child
or others could be seriously or fatally injured.
Children should be warned not to touch the
parking brake, brake pedal or the
transmission gear selector.
Do not leave the key fob in or near the vehicle
(or in a location accessible to children), and
do not leave the ignition in the ON/RUN or
ACC position. A child could operate power
windows, other controls, or move the vehicle.
CAUTION!
Only engage the gear with engine at idling
while fully pressing the brake pedal. If the
transmission temperature exceeds the
normal operating limits, the transmission
control unit may change the gear
engagement order and reduce the drive
torque. If the transmission overheats, it
could operate incorrectly until it cools down.
When using the vehicle with extremely low
external temperatures, the transmission
operation may change depending on the
engine and transmission temperature, as
well as vehicle speed. Activation of the
torque converter clutch and of the EIGHTH
gear is inhibited until the transmission oil is
correctly warmed up. Complete operation of
the transmission will be enabled as soon as
the fluid temperature reaches the
predefined value.
WARNING!
23_GA_OM_EN_USC_t.book Page 91
Page 103 of 248

101
Activating Adaptive Cruise Control (ACC)
The minimum set speed for the ACC system is
19 mph (30 km/h) and the maximum is 110 mph
(180 km/h).
The system cannot be activated:
When pressing the brake pedal.
When the brakes are overheated.
When the Electric Park Brake has been
operated.
When either PARK, REVERSE or NEUTRAL is
engaged.
When the engine RPM is above a maximum
threshold.
When the vehicle speed is not within the
operational speed range.
When the Electronic Stability Control (ESC) (or
Anti-Lock Brake System (ABS) or other stability
control systems) are operating or have just
operated.
When the ESC system is off.
When the Forward Collision Warning system (if
equipped) is braking automatically.
In the event of a system failure.
When the engine is off.
In case of obstruction of the radar sensor (in
this case the bumper area where it is located
must be cleaned).
If the system is set, the conditions described
above also cause a cancellation or deactivation
of the system. These situations may vary
according to the conditions.
NOTE:
The system will not be deactivated when speeds
higher than those set are reached by pressing the
accelerator pedal above 110 mph (180 km/h). In
these situations, the system may not work
correctly and it is recommended to deactivate it.
The driver should always obey traffic laws and
speed limits. Never drive above applicable speed
limit restrictions.
To Activate/Deactivate
The system has four operating states:
Enabled (speed not set)
Activated (speed set)
Paused
Deactivated
To Activate
To enable the system, push and release the on/
off button located on the left side on the steering
wheel.
On/Off Button
•
Cannot take street, traffic, and weather
conditions into account, and may be limited upon adverse sight distance conditions.
• Does not always fully recognize complex
driving conditions, which can result in wrong or missing distance warnings.
• Will bring the vehicle to a complete stop
while following a vehicle ah ead and hold
the ve
hicle for approximately two
minutes in the stop position. If the vehicle ahead does not start movingwithin two minutes, the parking brakewill be activated and the ACC system will be canceled.
You should switch off the ACC system:
• When driving in fog, heavy rain, heavy
snow, sleet, heavy traffic, and complex driving situations (i.e., in highwayconstruction zones).
• When entering a turn lane or highway
off-ramp; w hen driving on roads that are
win d
ing, icy, snow-covered, slippery, or
have steep uphill or downhill slopes.
• When circumstances do not allow safe
driving at a constant speed.
WARNING!
23_GA_OM_EN_USC_t.book Page 101
Page 112 of 248

STARTING AND OPERATING
110
TRAFFIC JAM ASSIST (TJA)
SYSTEM — IF EQUIPPED
The Traffic Jam Assist (TJA) system can be
activated on all road types. The system uses a
camera and radar sensors located on the front
fascia/bumper to detect lane markings and keep
the vehicle in the center of the lane.
When the system is unable to detect lane
markings, it will still operate using surrounding
traffic. This can occur in congested traffic
scenarios, when the vehicles ahead or
surrounding obstruct the visibility of the lane
markings. When the speed is below 12 mph
(20 km/h), the system can use a lock-on strategy
that allows the vehicle to automatically follow the
vehicle ahead.
The TJA system combines Adaptive Cruise Control
(ACC) functions with Lane Departure Warning
functions to maintain vehicle speed and steering
wheel behavior.
NOTE:
Do not use the TJA system while driving in urban
areas.
TO ACTIVATE/DEACTIVATE
To activate the system, push the button on the
left side of the steering wheel.
To deactivate the system, push the button again.Traffic Jam Assist Button Suspension Conditions
The following operations will suspend the TJA
system:
Pressing the brake pedal
Opening the driver’s door
Disabling ACC
If the vehicle speed exceeds 37 mph (60 km/h)
Releasing the driver’s seat belt
Placing the gear selector in PARK, REVERSE, or
NEUTRAL
If the Forward Collision Warning system or
“Active Braking” intervenes
Automatic Deactivation
System operation will be temporarily disabled
under the following conditions:
When traveling around narrow bends
If the lane boundaries are not detected
One of the two lines is interrupted
The sun is low and reflects on the radar
camera
If the turn signals are activated
If the driver intentionally changes lanes
without using the turn signal
If manual steering begins
If the driver’s hands are removed from the
steering wheel
When there is no surrounding traffic and there
are no horizontal lane boundaries
If the system is not functioning properly
If lateral acceleration is high
ALWAYS obey traffic laws and pay attention
to the road. ALWAYS drive safely with your
hands on the steering wheel. You have full
responsibility and assume all risks related to
the use of the features and applications in
this vehicle. Only use the features and
applications when it is safe to do so. Failure
to do so may result in an accident involving
serious injury or death.
WARNING!
WARNING!
You should switch off the TJA system:
When driving in fog, heavy rain, heavy snow,
sleet, heavy traffic, and complex driving
situations (i.e., in highway construction
zones).
When entering a turn lane or highway
off-ramp; when driving on roads that are
winding, icy, snow-covered, slippery, or have
steep uphill or downhill slopes.
When circumstances do not allow safe
driving at a constant speed.
23_GA_OM_EN_USC_t.book Page 110
Page 126 of 248
STARTING AND OPERATING
124
(Continued)
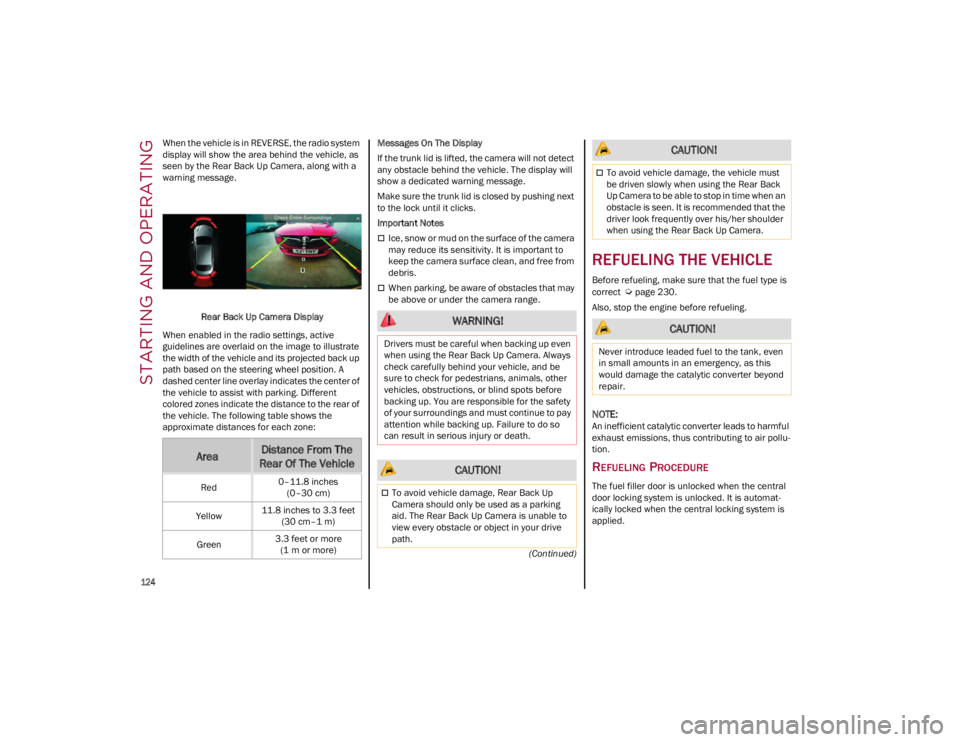
When the vehicle is in REVERSE, the radio system
display will show the area behind the vehicle, as
seen by the Rear Back Up Camera, along with a
warning message.
Rear Back Up Camera Display
When enabled in the radio settings, active
guidelines are overlaid on the image to illustrate
the width of the vehicle and its projected back up
path based on the steering wheel position. A
dashed center line overlay indicates the center of
the vehicle to assist with parking. Different
colored zones indicate the distance to the rear of
the vehicle. The following table shows the
approximate distances for each zone: Messages On The Display
If the trunk lid is lifted, the camera will not detect
any obstacle behind the vehicle. The display will
show a dedicated warning message.
Make sure the trunk lid is closed by pushing next
to the lock until it clicks.
Important Notes
Ice, snow or mud on the surface of the camera
may reduce its sensitivity. It is important to
keep the camera surface clean, and free from
debris.
When parking, be aware of obstacles that may
be above or under the camera range.
REFUELING THE VEHICLE
Before refueling, make sure that the fuel type is
correct
Ú
page 230.
Also, stop the engine before refueling.
NOTE:
An inefficient catalytic converter leads to harmful
exhaust emissions, thus contributing to air pollu -
tion.
REFUELING PROCEDURE
The fuel filler door is unlocked when the central
door locking system is unlocked. It is automat -
ically locked when the central locking system is
applied.
AreaDistance From The
Rear Of The Vehicle
Red 0–11.8 inches
(0–30 cm)
Yellow 11.8 inches to 3.3 feet
(30 cm–1 m)
Green 3.3 feet or more
(1 m or more)
WARNING!
Drivers must be careful when backing up even
when using the Rear Back Up Camera. Always
check carefully behind your vehicle, and be
sure to check for pedestrians, animals, other
vehicles, obstructions, or blind spots before
backing up. You are responsible for the safety
of your surroundings and must continue to pay
attention while backing up. Failure to do so
can result in serious injury or death.
CAUTION!
To avoid vehicle damage, Rear Back Up
Camera should only be used as a parking
aid. The Rear Back Up Camera is unable to
view every obstacle or object in your drive
path.
To avoid vehicle damage, the vehicle must
be driven slowly when using the Rear Back
Up Camera to be able to stop in time when an
obstacle is seen. It is recommended that the
driver look frequently over his/her shoulder
when using the Rear Back Up Camera.
CAUTION!
Never introduce leaded fuel to the tank, even
in small amounts in an emergency, as this
would damage the catalytic converter beyond
repair.
CAUTION!
23_GA_OM_EN_USC_t.book Page 124
Page 127 of 248
125
Opening The Fuel Filler Door
To refuel proceed as follows:
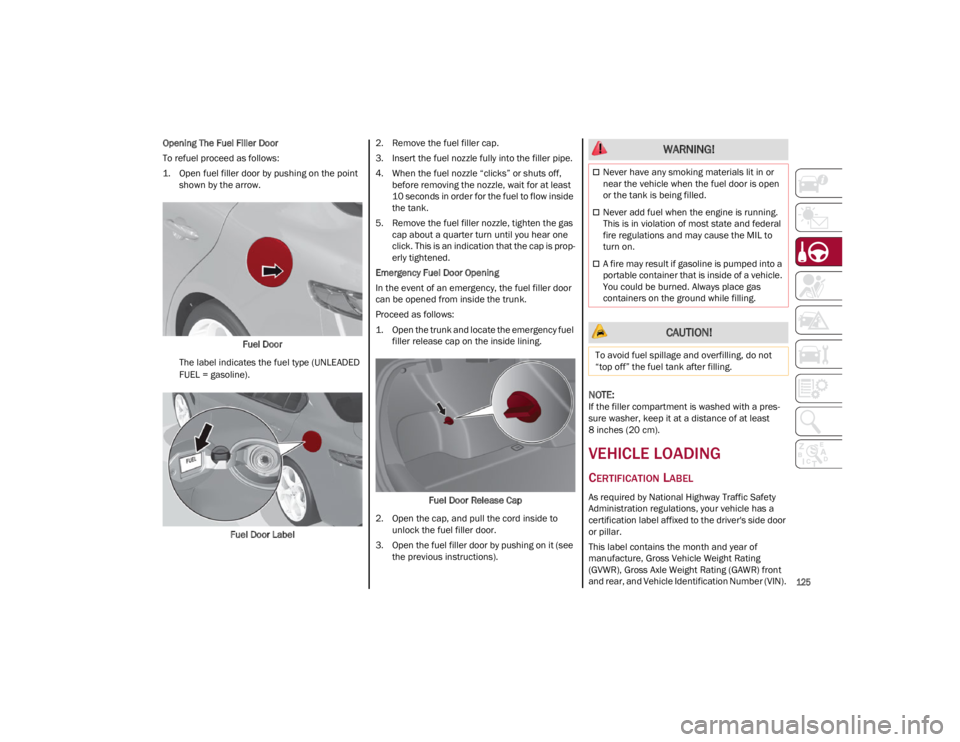
1. Open fuel filler door by pushing on the point shown by the arrow.
Fuel Door
The label indicates the fuel type (UNLEADED
FUEL = gasoline).
Fuel Door Label 2. Remove the fuel filler cap.
3. Insert the fuel nozzle fully into the filler pipe.
4. When the fuel nozzle “clicks” or shuts off,
before removing the nozzle, wait for at least
10 seconds in order for the fuel to flow inside
the tank.
5. Remove the fuel filler nozzle, tighten the gas cap about a quarter turn until you hear one
click. This is an indication that the cap is prop -
erly tightened.
Emergency Fuel Door Opening
In the event of an emergency, the fuel filler door
can be opened from inside the trunk.
Proceed as follows:
1. Open the trunk and locate the emergency fuel filler release cap on the inside lining.
Fuel Door Release Cap
2. Open the cap, and pull the cord inside to unlock the fuel filler door.
3. Open the fuel filler door by pushing on it (see the previous instructions).
NOTE:
If the filler compartment is washed with a pres -
sure washer, keep it at a distance of at least
8 inches (20 cm).
VEHICLE LOADING
CERTIFICATION LABEL
As required by National Highway Traffic Safety
Administration regulations, your vehicle has a
certification label affixed to the driver's side door
or pillar.
This label contains the month and year of
manufacture, Gross Vehicle Weight Rating
(GVWR), Gross Axle Weight Rating (GAWR) front
and rear, and Vehicle Identification Number (VIN).
WARNING!
Never have any smoking materials lit in or
near the vehicle when the fuel door is open
or the tank is being filled.
Never add fuel when the engine is running.
This is in violation of most state and federal
fire regulations and may cause the MIL to
turn on.
A fire may result if gasoline is pumped into a
portable container that is inside of a vehicle.
You could be burned. Always place gas
containers on the ground while filling.
CAUTION!
To avoid fuel spillage and overfilling, do not
“top off” the fuel tank after filling.
23_GA_OM_EN_USC_t.book Page 125
Page 131 of 248
129
(Continued)
This very important section describes the safety
syst
e
ms that your vehicle may be equipped with,
and provides instructions on how to use them
correctly.
ACTIVE SAFETY SYSTEMS
The vehicle may be equipped with the following
active safety devices:
Anti-Lock Brake System (ABS)
Active Torque Vectoring (ATV)
Dynamic Steering Torque (DST)
Drive Train Control (DTC)
Electronic Stability Control (ESC)
Hill Start Assist (HSA)
Panic Brake Assist (PBA)
Traction Control System (TCS)
For the operation of the systems, see the
following pages.
ANTI-LOCK BRAKE SYSTEM (ABS)
An integral part of the braking system, the ABS
prevents one or more wheels from locking and
slipping in all road surface conditions, regardless
of the intensity of the braking action. The system
ensures that the vehicle can be controlled even
during emergency braking, allowing the driver to
optimize stopping distances.
The system intervenes during braking when the
wheels are about to lock, typically in emergency
braking or low-grip conditions where locking may
be more frequent. The system also improves control and stability of
the vehicle when braking on a surface where the
grip of the left and right wheels varies, such as in
a corner.
The Electronic Braking Force Distribution (EBD)
system works with the ABS, allowing the brake
force to be distributed between the front and rear
wheels.
System Intervention
The ABS equipped on this vehicle is provided with
the "Brake-by-wire" (Integrated Brake System —
IBS) function. With this system, the command
given by pressing the brake pedal is not
transmitted hydraulically, but electrically.
Therefore, the light pulsation that is felt on the
pedal with the traditional system is no longer
noticeable.
ACTIVE TORQUE VECTORING (ATV) —
I
F EQUIPPED
The dynamic drive control is used to optimize and
balance the drive torque between the wheels of
the same axles. The ATV system improves the grip
in turns, sending more drive torque to the
external wheel.
Given that, in a turn, the external wheels of the
car travel more than the internal ones and
therefore turn faster, sending a higher thrust to
the external rear wheel allows for the car to be
more stable and to not suffer an "understeer"
condition. Understeer occurs when the vehicle is
turning less than appropriate for the steering
wheel position.
WARNING!
The ABS contains sophisticated electronic
equipment that may be susceptible to
interference caused by improperly installed
or high output radio transmitting equipment.
This interference can cause possible loss of
anti-lock braking capability. Installation of
such equipment should be performed by
qualified professionals.
Pumping of the Anti-Lock Brakes will
diminish their effectiveness and may lead to
a collision. Pumping makes the stopping
distance longer. Just press firmly on your
brake pedal when you need to slow down or
stop.
The ABS cannot prevent the natural laws of
physics from acting on the vehicle, nor can it
increase braking or steering efficiency
beyond that afforded by the condition of the
vehicle brakes and tires or the traction
afforded.
The ABS cannot prevent collisions, including
those resulting from excessive speed in
turns, following another vehicle too closely,
or hydroplaning.
The capabilities of an ABS equipped vehicle
must never be exploited in a reckless or
dangerous manner that could jeopardize the
user’s safety or the safety of others.
WARNING!
23_GA_OM_EN_USC_t.book Page 129