2023 ALFA ROMEO GIULIA lights
[x] Cancel search: lightsPage 158 of 248
SAFETY
156
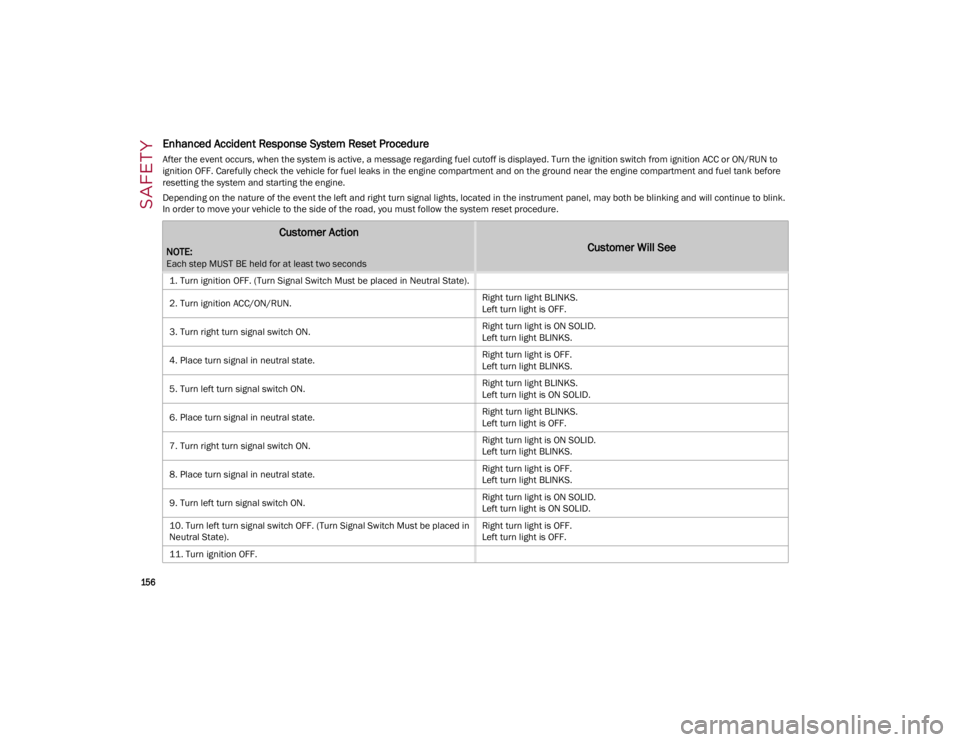
Enhanced Accident Response System Reset Procedure
After the event occurs, when the system is active, a message regarding fuel cutoff is displayed. Turn the ignition switch from ignition ACC or ON/RUN to
ignition OFF. Carefully check the vehicle for fuel leaks in the engine compartment and on the ground near the engine compartment and fuel tank before
resetting the system and starting the engine.
Depending on the nature of the event the left and right turn signal lights, located in the instrument panel, may both be blinking and will continue to blink.
In order to move your vehicle to the side of the road, you must follow the system reset procedure.
Customer Action
NOTE:
Each step MUST BE held for at least two seconds
Customer Will See
1. Turn ignition OFF. (Turn Signal Switch Must be placed in Neutral State).
2. Turn ignition ACC/ON/RUN.Right turn light BLINKS.
Left turn light is OFF.
3. Turn right turn signal switch ON. Right turn light is ON SOLID.
Left turn light BLINKS.
4. Place turn signal in neutral state. Right turn light is OFF.
Left turn light BLINKS.
5. Turn left turn signal switch ON. Right turn light BLINKS.
Left turn light is ON SOLID.
6. Place turn signal in neutral state. Right turn light BLINKS.
Left turn light is OFF.
7. Turn right turn signal switch ON. Right turn light is ON SOLID.
Left turn light BLINKS.
8. Place turn signal in neutral state. Right turn light is OFF.
Left turn light BLINKS.
9. Turn left turn signal switch ON. Right turn light is ON SOLID.
Left turn light is ON SOLID.
10. Turn left turn signal switch OFF. (Turn Signal Switch Must be placed in
Neutral State). Right turn light is OFF.
Left turn light is OFF.
11. Turn ignition OFF.
23_GA_OM_EN_USC_t.book Page 156
Page 159 of 248
157
(Continued)
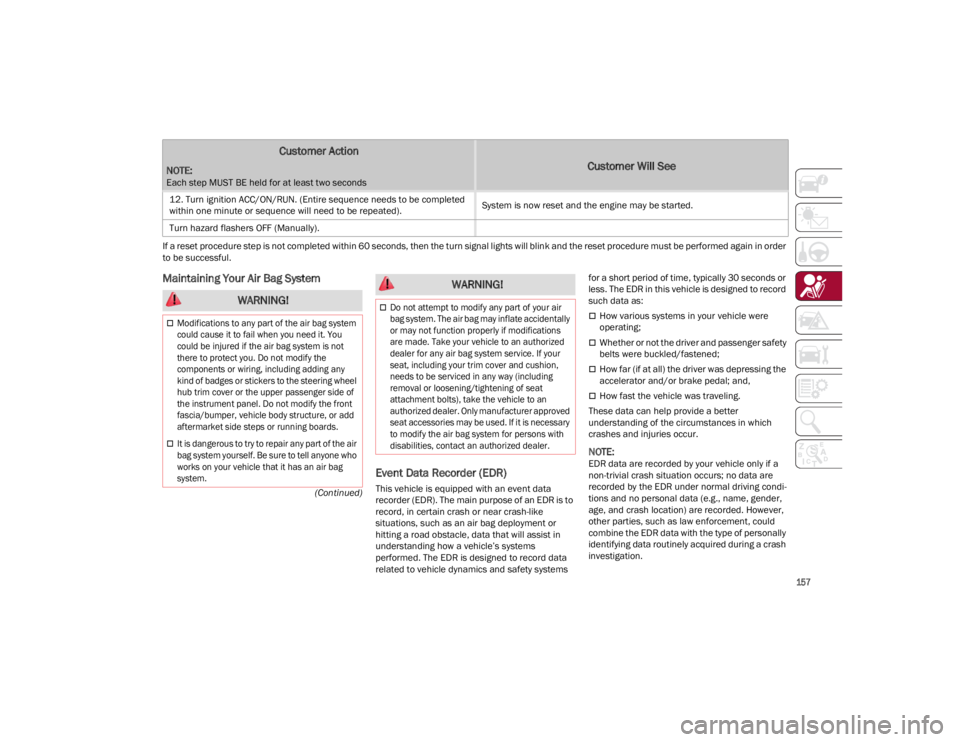
If a reset procedure step is not completed within 60 seconds, then the turn signal lights will blink and the reset procedure must be performed again in order
to be successful.
Maintaining Your Air Bag System
Event Data Recorder (EDR)
This vehicle is equipped with an event data
recorder (EDR). The main purpose of an EDR is to
record, in certain crash or near crash-like
situations, such as an air bag deployment or
hitting a road obstacle, data that will assist in
understanding how a vehicle’s systems
performed. The EDR is designed to record data
related to vehicle dynamics and safety systems for a short period of time, typically 30 seconds or
less. The EDR in this vehicle is designed to record
such data as:
How various systems in your vehicle were
operating;
Whether or not the driver and passenger safety
belts were buckled/fastened;
How far (if at all) the driver was depressing the
accelerator and/or brake pedal; and,
How fast the vehicle was traveling.
These data can help provide a better
understanding of the circumstances in which
crashes and injuries occur.
NOTE:
EDR data are recorded by your vehicle only if a
non-trivial crash situation occurs; no data are
recorded by the EDR under normal driving condi -
tions and no personal data (e.g., name, gender,
age, and crash location) are recorded. However,
other parties, such as law enforcement, could
combine the EDR data with the type of personally
identifying data routinely acquired during a crash
investigation.
12. Turn ignition ACC/ON/RUN. (Entire sequence needs to be completed
within one minute or sequence will need to be repeated). System is now reset and the engine may be started.
Turn hazard flashers OFF (Manually).
Customer Action
NOTE:
Each step MUST BE held for at least two seconds
Customer Will See
WARNING!
Modifications to any part of the air bag system
could cause it to fail when you need it. You
could be injured if the air bag system is not
there to protect you. Do not modify the
components or wiring, including adding any
kind of badges or stickers to the steering wheel
hub trim cover or the upper passenger side of
the instrument panel. Do not modify the front
fascia/bumper, vehicle body structure, or add
aftermarket side steps or running boards.
It is dangerous to try to repair any part of the air
bag system yourself. Be sure to tell anyone who
works on your vehicle that it has an air bag
system.
Do not attempt to modify any part of your air
bag system. The air bag may inflate accidentally
or may not function properly if modifications
are made. Take your vehicle to an authorized
dealer for any air bag system service. If your
seat, including your trim cover and cushion,
needs to be serviced in any way (including
removal or loosening/tightening of seat
attachment bolts), take the vehicle to an
authorized dealer. Only manufacturer approved
seat accessories may be used. If it is necessary
to modify the air bag system for persons with
disabilities, contact an authorized dealer.
WARNING!
23_GA_OM_EN_USC_t.book Page 157
Page 170 of 248
SAFETY
168
PERIODIC SAFETY CHECKS YOU SHOULD
M
AKE OUTSIDE THE VEHICLE
Tires
Examine tires for excessive tread wear and
uneven wear patterns. Check for stones, nails,
glass, or other objects lodged in the tread or
sidewall. Inspect the tread for cuts and cracks.
Inspect sidewalls for cuts, cracks, and bulges.
Check the wheel nuts for tightness. Check the
tires (including spare) for proper cold inflation
pressure.
Lights
Have someone observe the operation of brake
lights and exterior lights while you work the
controls. Check turn signal and high beam
indicator lights on the instrument panel.
Door Latches
Check for proper closing, latching, and locking.
Fluid Leaks
Check area under the vehicle after overnight
parking for fuel, coolant, oil, or other fluid leaks.
Also, if gasoline fumes are detected or if fuel or
brake fluid leaks are suspected the cause should
be located and corrected immediately.
EXHAUST GAS
The best protection against carbon monoxide
entry into the vehicle body is a properly
maintained engine exhaust system.
Whenever a change is noticed in the sound of the
exhaust system, when exhaust fumes can be
detected inside the vehicle, or when the
underside or rear of the vehicle is damaged, have
an authorized dealer inspect the complete
exhaust system and adjacent body areas for
broken, damaged, deteriorated, or mispositioned
parts. Open seams or loose connections could permit exhaust fumes to seep into the passenger
compartment. In addition, inspect the exhaust
system each time the vehicle is raised for
lubrication or oil change. Replace as required.
CARBON MONOXIDE WARNINGS
It is recommended to only use mild soap and
water to clean your floor mats. After cleaning,
always check your floor mat has been
properly installed and is secured to your
vehicle using the floor mat fasteners by
lightly pulling mat.
WARNING!
WARNING!
Exhaust gases can injure or kill. They contain
carbon monoxide (CO), which is colorless and
odorless. Breathing it can make you
unconscious and can eventually poison you. To
avoid breathing (CO), follow these safety tips:
Do not run the engine in a closed garage or in
confined areas any longer than needed to
move your vehicle in or out of the area.
If you are required to drive with the trunk/
liftgate/rear doors open, make sure that all
windows are closed and the climate control
BLOWER switch is set at high speed. DO NOT
use the recirculation mode.
If it is necessary to sit in a parked vehicle with
the engine running, adjust your heating or
cooling controls to force outside air into the
vehicle. Set the blower at high speed.
WARNING!
Carbon monoxide (CO) in exhaust gases is
deadly. Follow the precautions below to
prevent carbon monoxide poisoning:
Do not inhale exhaust gases. They contain
carbon monoxide, a colorless and odorless
gas, which can kill. Never run the engine in a
closed area, such as a garage, and never sit
in a parked vehicle with the engine running
for an extended period. If the vehicle is
stopped in an open area with the engine
running for more than a short period, adjust
the ventilation system to force fresh, outside
air into the vehicle.
Guard against carbon monoxide with proper
maintenance. Have the exhaust system
inspected every time the vehicle is raised.
Have any abnormal conditions repaired
promptly. Until repaired, drive with all side
windows fully open.
When exiting the vehicle, always make sure
the ignition is in the OFF position, remove the
key fob from the vehicle, and lock your
vehicle.
23_GA_OM_EN_USC_t.book Page 168
Page 176 of 248
IN CASE OF EMERGENCY
174
12. Apply the adhesive label from the sealant bottle where it can be easily seen by the
driver as a reminder that the tire has been
treated with a Tire Service Kit, as well as not
to exceed the speed restriction for the
treated tire.
CHECKING AND RESTORING TIRE
P
RESSURE
The compressor can also be used to check and, if
necessary, restore the tire pressure.
Proceed as follows:
1. Release the quick connector and connect it
directly to the valve of the tire to be inflated.
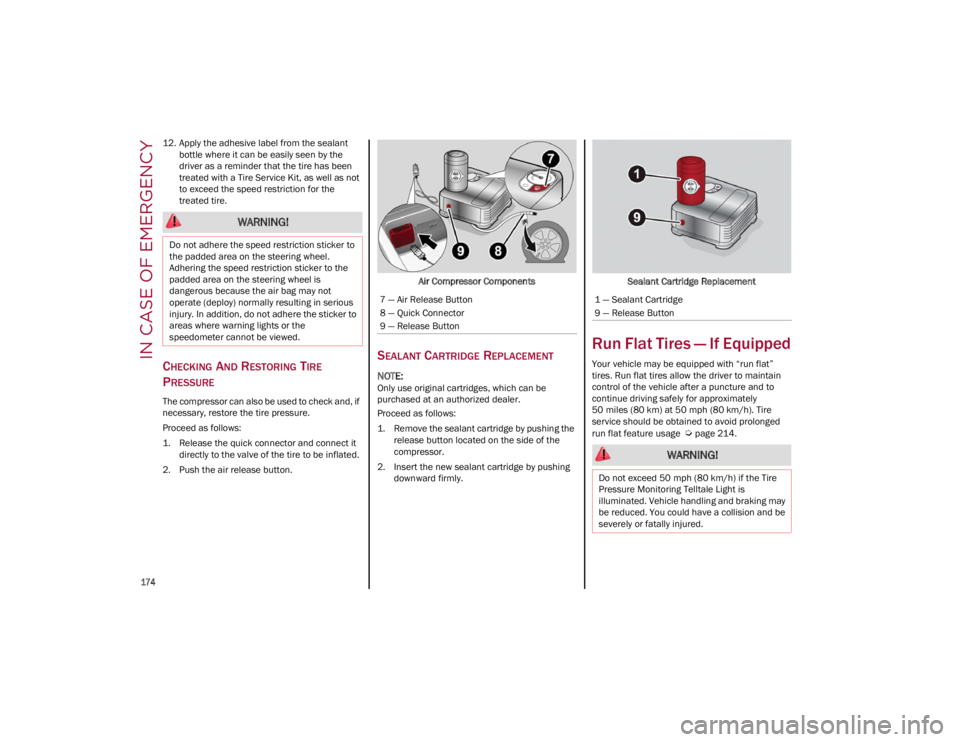
2. Push the air release button. Air Compressor Components
SEALANT CARTRIDGE REPLACEMENT
NOTE:
Only use original cartridges, which can be
purchased at an authorized dealer.
Proceed as follows:
1. Remove the sealant cartridge by pushing the
release button located on the side of the
compressor.
2. Insert the new sealant cartridge by pushing downward firmly. Sealant Cartridge Replacement
Run Flat Tires — If Equipped
Your vehicle may be equipped with “run flat”
tires. Run flat tires allow the driver to maintain
control of the vehicle after a puncture and to
continue driving safely for approximately
50 miles (80 km) at 50 mph (80 km/h). Tire
service should be obtained to avoid prolonged
run flat feature usage
Ú
page 214.
WARNING!
Do not adhere the speed restriction sticker to
the padded area on the steering wheel.
Adhering the speed restriction sticker to the
padded area on the steering wheel is
dangerous because the air bag may not
operate (deploy) normally resulting in serious
injury. In addition, do not adhere the sticker to
areas where warning lights or the
speedometer cannot be viewed.
7 — Air Release Button
8 — Quick Connector
9 — Release Button1 — Sealant Cartridge
9 — Release Button
WARNING!
Do not exceed 50 mph (80 km/h) if the Tire
Pressure Monitoring Telltale Light is
illuminated. Vehicle handling and braking may
be reduced. You could have a collision and be
severely or fatally injured.
23_GA_OM_EN_USC_t.book Page 174
Page 184 of 248

182
SERVICING AND MAINTENANCE
Correct servicing permits the performance of the
vehicle to be maintained over time, as well as
limited running costs and safeguarding the
efficiency of the safety systems.
This chapter explains how.
SCHEDULED SERVICING
Correct servicing is crucial for guaranteeing a
long life for the vehicle under the best conditions.
For this reason, Alfa Romeo has planned a series
of checks and services for your vehicle at fixed
intervals based on distance and time, as
described in the Scheduled Servicing Plan.
Before each service, it is always necessary to
carefully follow the instructions in the Scheduled
Servicing Plan (e.g. periodically check level of
fluids, tire pressure, etc.).
Scheduled Servicing is offered by an authorized
dealer according to a set time schedule. If, during
each operation, in addition to the ones
scheduled, the need arises for further
replacements or repairs, these may be carried
out with the owner’s explicit consent only.
NOTE:
Scheduled Servicing intervals are required by the
manufacturer. Failure to have them carried out
may invalidate the New Vehicle Limited Warranty.
You are advised to inform an authorized dealer of
any small operating irregularities without waiting
for the next service.
PERIODIC CHECKS
Every month or every 600 miles (1,000 km) or
before long trips check and, if necessary, top off:
Engine coolant level.
Brake fluid level (if insufficient, see an
authorized dealer as soon as possible).
Windshield washer fluid level.
Tire inflation pressure and condition.
Operation of lighting system (headlights,
direction indicators, hazard warning lights,
etc.).
Operation of windshield washing/wiping
system and positioning/wear of wiper blades.
Inspect the CV/Universal joints.
Oil consumption of the engine depends on
conditions and driving style. For this reason, the
engine oil level must be checked every
1,860 miles (3,000 km), and top off if necessary
Ú
page 188.
HEAVY USAGE OF THE VEHICLE
If the vehicle is used under one of the following
conditions:
Dusty roads.
Short, repeated journeys less than 4 miles
(7 km) at sub-zero outside temperatures.
Engine often idling or driving long distances at
low speeds or long periods of inactivity.
In the event of a long period of inactivity. The following checks must be carried out more
often than indicated in the Scheduled Servicing
Plan:
Check cleanliness of hood and trunk locks,
cleanliness and lubrication of linkage.
Visually inspect conditions of: engine,
transmission, pipes and hoses (exhaust/fuel
system/brakes) and rubber elements
(sleeves/bushes, etc.).
Check battery charge and battery fluid level
(electrolyte).
Visually inspect conditions of the accessory
drive belts.
Check and, if necessary, change engine oil and
replace oil filter.
Check and, if necessary, replace cabin air
filter.
Check and, if necessary, replace engine air
cleaner.
Severe Duty All Models
Vehicles that are operated in a dusty and off-road
environment, or predominately at idle or very low
engine RPM are known as Severe Duty vehicles.
It is recommended that you change engine oil at
4,000 miles (6,500 km) or 350 hours of engine
run time.
23_GA_OM_EN_USC_t.book Page 182
Page 185 of 248
183
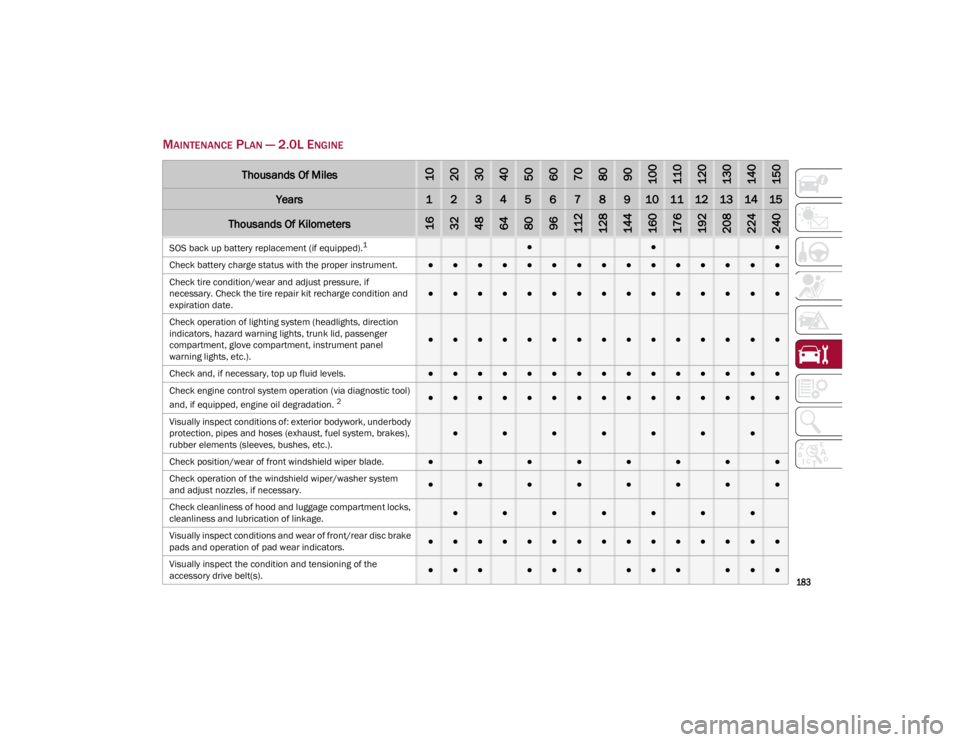
MAINTENANCE PLAN — 2.0L ENGINE
Thousands Of Miles102030405060708090100110120130140150
Years123456789101112131415
Thousands Of Kilometers163248648096112128144160176192208224240
SOS back up battery replacement (if equipped).1●●●
Check battery charge status with the proper instrument.
●●●●●●●●●●●●●●●
Check tire condition/wear and adjust pressure, if
necessary. Check the tire repair kit recharge condition and
expiration date.
●●●●●●●●●●●●●●●
Check operation of lighting system (headlights, direction
indicators, hazard warning lights, trunk lid, passenger
compartment, glove compartment, instrument panel
warning lights, etc.).
●●●●●●●●●●●●●●●
Check and, if necessary, top up fluid levels.
●●●●●●●●●●●●●●●
Check engine control system operation (via diagnostic tool)
and, if equipped, engine oil degradation.
2●●●●●●●●●●●●●●●
Visually inspect conditions of: exterior bodywork, underbody
protection, pipes and hoses (exhaust, fuel system, brakes),
rubber elements (sleeves, bushes, etc.).
●●●●●●●
Check position/wear of front windshield wiper blade.●●●●●●●●
Check operation of the windshield wiper/washer system
and adjust nozzles, if necessary.
●●●●●●●●
Check cleanliness of hood and luggage compartment locks,
cleanliness and lubrication of linkage.
●●●●●●●
Visually inspect conditions and wear of front/rear disc brake
pads and operation of pad wear indicators.●●●●●●●●●●●●●●●
Visually inspect the condition and tensioning of the
accessory drive belt(s).
●●●●●●●●●●●●
23_GA_OM_EN_USC_t.book Page 183
Page 187 of 248
185
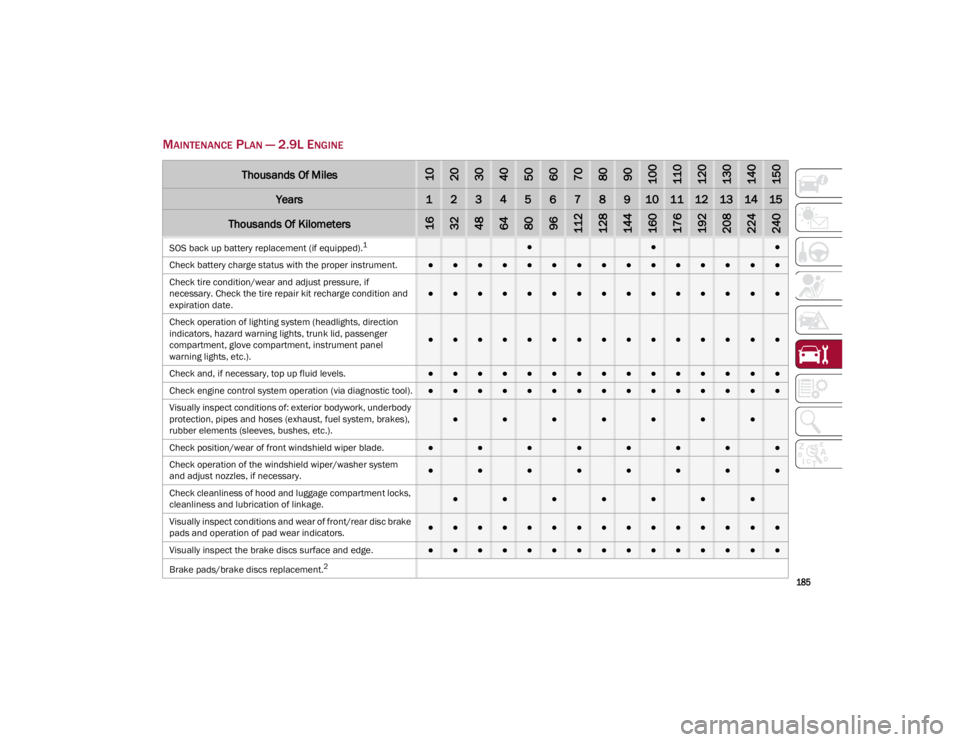
MAINTENANCE PLAN — 2.9L ENGINE
Thousands Of Miles102030405060708090100110120130140150
Years123456789101112131415
Thousands Of Kilometers163248648096112128144160176192208224240
SOS back up battery replacement (if equipped).1●●●
Check battery charge status with the proper instrument.
●●●●●●●●●●●●●●●
Check tire condition/wear and adjust pressure, if
necessary. Check the tire repair kit recharge condition and
expiration date.
●●●●●●●●●●●●●●●
Check operation of lighting system (headlights, direction
indicators, hazard warning lights, trunk lid, passenger
compartment, glove compartment, instrument panel
warning lights, etc.).
●●●●●●●●●●●●●●●
Check and, if necessary, top up fluid levels.
●●●●●●●●●●●●●●●
Check engine control system operation (via diagnostic tool).
●●●●●●●●●●●●●●●
Visually inspect conditions of: exterior bodywork, underbody
protection, pipes and hoses (exhaust, fuel system, brakes),
rubber elements (sleeves, bushes, etc.).
●●●●●●●
Check position/wear of front windshield wiper blade.●●●●●●●●
Check operation of the windshield wiper/washer system
and adjust nozzles, if necessary.
●●●●●●●●
Check cleanliness of hood and luggage compartment locks,
cleanliness and lubrication of linkage.
●●●●●●●
Visually inspect conditions and wear of front/rear disc brake
pads and operation of pad wear indicators.●●●●●●●●●●●●●●●
Visually inspect the brake discs surface and edge.
●●●●●●●●●●●●●●●
Brake pads/brake discs replacement.
2
23_GA_OM_EN_USC_t.book Page 185
Page 189 of 248
187
ENGINE COMPARTMENT
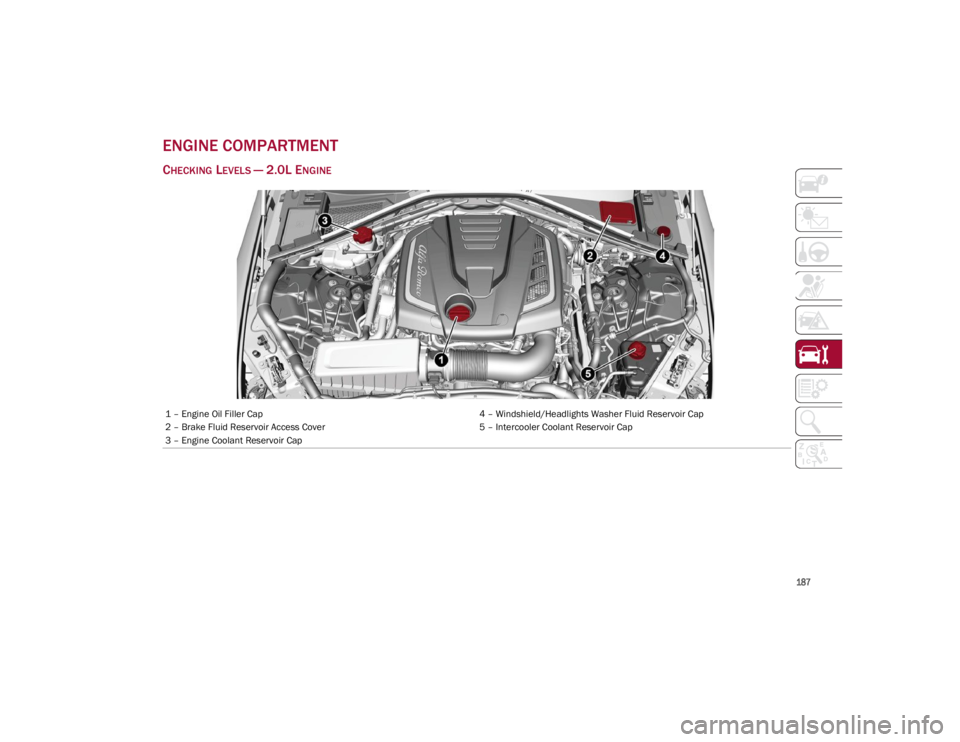
CHECKING LEVELS — 2.0L ENGINE
1 – Engine Oil Filler Cap4 – Windshield/Headlights Washer Fluid Reservoir Cap
2 – Brake Fluid Reservoir Access Cover 5 – Intercooler Coolant Reservoir Cap
3 – Engine Coolant Reservoir Cap
23_GA_OM_EN_USC_t.book Page 187