2023 ALFA ROMEO GIULIA door lock
[x] Cancel search: door lockPage 127 of 248
125
Opening The Fuel Filler Door
To refuel proceed as follows:
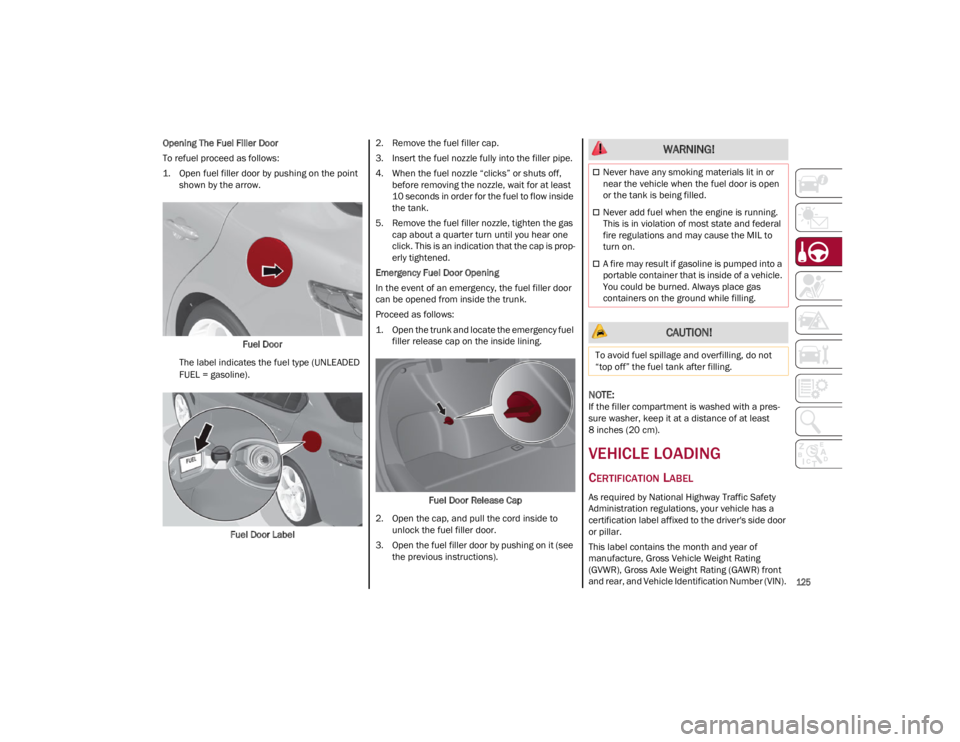
1. Open fuel filler door by pushing on the point shown by the arrow.
Fuel Door
The label indicates the fuel type (UNLEADED
FUEL = gasoline).
Fuel Door Label 2. Remove the fuel filler cap.
3. Insert the fuel nozzle fully into the filler pipe.
4. When the fuel nozzle “clicks” or shuts off,
before removing the nozzle, wait for at least
10 seconds in order for the fuel to flow inside
the tank.
5. Remove the fuel filler nozzle, tighten the gas cap about a quarter turn until you hear one
click. This is an indication that the cap is prop -
erly tightened.
Emergency Fuel Door Opening
In the event of an emergency, the fuel filler door
can be opened from inside the trunk.
Proceed as follows:
1. Open the trunk and locate the emergency fuel filler release cap on the inside lining.
Fuel Door Release Cap
2. Open the cap, and pull the cord inside to unlock the fuel filler door.
3. Open the fuel filler door by pushing on it (see the previous instructions).
NOTE:
If the filler compartment is washed with a pres -
sure washer, keep it at a distance of at least
8 inches (20 cm).
VEHICLE LOADING
CERTIFICATION LABEL
As required by National Highway Traffic Safety
Administration regulations, your vehicle has a
certification label affixed to the driver's side door
or pillar.
This label contains the month and year of
manufacture, Gross Vehicle Weight Rating
(GVWR), Gross Axle Weight Rating (GAWR) front
and rear, and Vehicle Identification Number (VIN).
WARNING!
Never have any smoking materials lit in or
near the vehicle when the fuel door is open
or the tank is being filled.
Never add fuel when the engine is running.
This is in violation of most state and federal
fire regulations and may cause the MIL to
turn on.
A fire may result if gasoline is pumped into a
portable container that is inside of a vehicle.
You could be burned. Always place gas
containers on the ground while filling.
CAUTION!
To avoid fuel spillage and overfilling, do not
“top off” the fuel tank after filling.
23_GA_OM_EN_USC_t.book Page 125
Page 155 of 248
153
Supplemental Side Air Bags
Supplemental Seat-Mounted Side Air Bags
(SABs)
This vehicle is equipped with Supplemental
Seat-Mounted Side Air Bags (SABs).
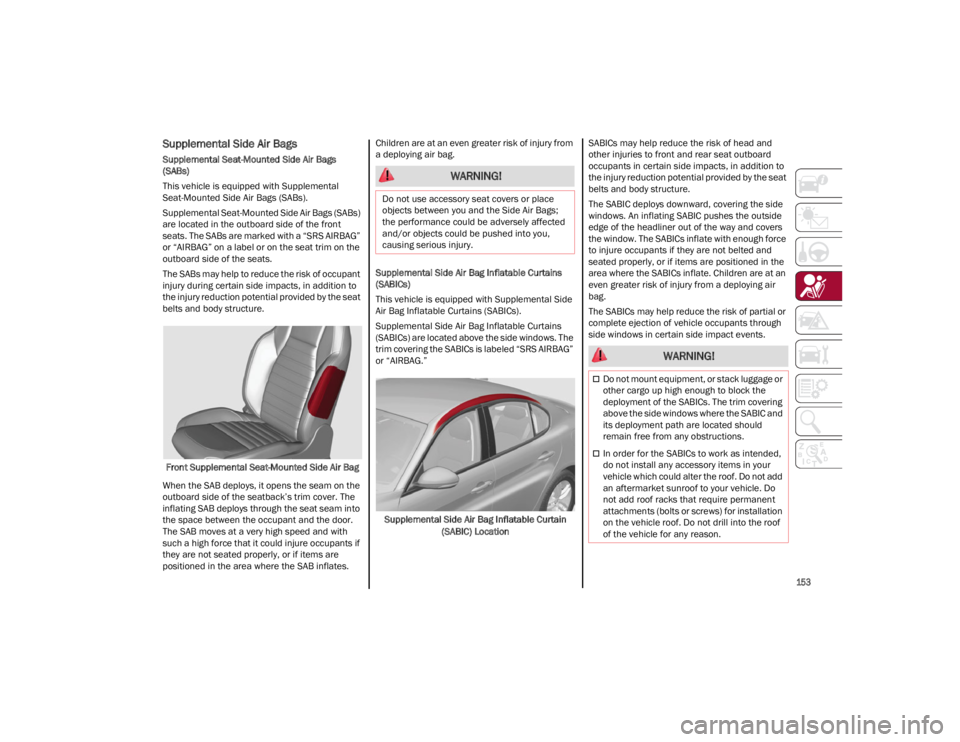
Supplemental Seat-Mounted Side Air Bags (SABs)
are located in the outboard side of the front
seats. The SABs are marked with a “SRS AIRBAG”
or “AIRBAG” on a label or on the seat trim on the
outboard side of the seats.
The SABs may help to reduce the risk of occupant
injury during certain side impacts, in addition to
the injury reduction potential provided by the seat
belts and body structure.Front Supplemental Seat-Mounted Side Air Bag
When the SAB deploys, it opens the seam on the
outboard side of the seatback’s trim cover. The
inflating SAB deploys through the seat seam into
the space between the occupant and the door.
The SAB moves at a very high speed and with
such a high force that it could injure occupants if
they are not seated properly, or if items are
positioned in the area where the SAB inflates. Children are at an even greater risk of injury from
a deploying air bag.
Supplemental Side Air Bag Inflatable Curtains
(SABICs)
This vehicle is equipped with Supplemental Side
Air Bag Inflatable Curtains (SABICs).
Supplemental Side Air Bag Inflatable Curtains
(SABICs) are located above the side windows. The
trim covering the SABICs is labeled “SRS AIRBAG”
or “AIRBAG.”
Supplemental Side Air Bag Inflatable Curtain (SABIC) Location SABICs may help reduce the risk of head and
other injuries to front and rear seat outboard
occupants in certain side impacts, in addition to
the injury reduction potential provided by the seat
belts and body structure.
The SABIC deploys downward, covering the side
windows. An inflating SABIC pushes the outside
edge of the headliner out of the way and covers
the window. The SABICs inflate with enough force
to injure occupants if they are not belted and
seated properly, or if items are positioned in the
area where the SABICs inflate. Children are at an
even greater risk of injury from a deploying air
bag.
The SABICs may help reduce the risk of partial or
complete ejection of vehicle occupants through
side windows in certain side impact events.
WARNING!
Do not use accessory seat covers or place
objects between you and the Side Air Bags;
the performance could be adversely affected
and/or objects could be pushed into you,
causing serious injury.
WARNING!
Do not mount equipment, or stack luggage or
other cargo up high enough to block the
deployment of the SABICs. The trim covering
above the side windows where the SABIC and
its deployment path are located should
remain free from any obstructions.
In order for the SABICs to work as intended,
do not install any accessory items in your
vehicle which could alter the roof. Do not add
an aftermarket sunroof to your vehicle. Do
not add roof racks that require permanent
attachments (bolts or screws) for installation
on the vehicle roof. Do not drill into the roof
of the vehicle for any reason.
23_GA_OM_EN_USC_t.book Page 153
Page 157 of 248

155
Driver and Front Passenger Air Bags
Seat Belt Buckle Switch
Supplemental Side Air Bags
Supplemental Knee Air Bags
Front and Side Impact Sensors
Seat Belt Pretensioners
Seat Track Position Sensors
If A Deployment Occurs
The front air bags are designed to deflate
immediately after deployment.
NOTE:
Front and/or side air bags will not deploy in all
collisions. This does not mean something is
wrong with the air bag system.
If you do have a collision which deploys the air
bags, any or all of the following may occur:
The air bag material may sometimes cause
abrasions and/or skin reddening to the
occupants as the air bags deploy and unfold.
The abrasions are similar to friction rope burns
or those you might get sliding along a carpet or
gymnasium floor. They are not caused by
contact with chemicals. They are not
permanent and normally heal quickly.
However, if you haven’t healed significantly
within a few days, or if you have any blistering,
see your doctor immediately.
As the air bags deflate, you may see some
smoke-like particles. The particles are a normal
by-product of the process that generates the
non-toxic gas used for air bag inflation. These
airborne particles may irritate the skin, eyes,
nose, or throat. If you have skin or eye irritation,
rinse the area with cool water. For nose or throat
irritation, move to fresh air. If the irritation continues, see your doctor. If these particles
settle on your clothing, follow the garment
manufacturer’s instructions for cleaning.
Do not drive your vehicle after the air bags have
deployed. If you are involved in another collision,
the air bags will not be in place to protect you.
NOTE:
Air bag covers may not be obvious in the
interior trim, but they will open during air bag
deployment.
After any collision, the vehicle should be taken
to an authorized dealer immediately.
Enhanced Accident Response System
In the event of an impact, if the communication
network remains intact, and the power remains
intact, depending on the nature of the event, the
Occupant Restraint Controller (ORC) will
determine whether to have the Enhanced
Accident Response System perform the following
functions:
Cut off fuel to the engine (if equipped)
Cut off battery power to the electric motor (if
equipped)
Flash hazard lights as long as the battery has
power
Turn on the interior lights, which remain on as
long as the battery has power or for
15 minutes from the intervention of the
Enhanced Accident Response System
Unlock the power door locks
Your vehicle may also be designed to perform any
of these other functions in response to the
Enhanced Accident Response System:
Turn off the Fuel Filter Heater, Turn off the
HVAC Blower Motor, Close the HVAC
Circulation Door
Cut off battery power to the: • Engine
• Electric Motor (if equipped)
• Electric power steering
• Brake booster
• Electric park brake
• Automatic transmission gear selector
• Horn
• Front wiper
• Headlamp washer pump (if equipped)
NOTE:
After an accident, remember to cycle the ignition
to the OFF position and remove the key from the
ignition switch to avoid draining the battery. Care -
fully check the vehicle for fuel leaks in the engine
compartment and on the ground near the engine
compartment and fuel tank before resetting the
system and starting the engine. If there are no
fuel leaks or damage to the vehicle electrical
devices (e.g. headlights) after an accident, reset
the system by following the procedure described
below. If you have any doubt, contact an autho -
rized dealer.
WARNING!
Deployed air bags and seat belt pretensioners
cannot protect you in another collision. Have
the air bags, seat belt pretensioners, and the
seat belt retractor assemblies replaced by an
authorized dealer immediately. Also, have the
Occupant Restraint Controller System serviced
as well.
23_GA_OM_EN_USC_t.book Page 155
Page 170 of 248
SAFETY
168
PERIODIC SAFETY CHECKS YOU SHOULD
M
AKE OUTSIDE THE VEHICLE
Tires
Examine tires for excessive tread wear and
uneven wear patterns. Check for stones, nails,
glass, or other objects lodged in the tread or
sidewall. Inspect the tread for cuts and cracks.
Inspect sidewalls for cuts, cracks, and bulges.
Check the wheel nuts for tightness. Check the
tires (including spare) for proper cold inflation
pressure.
Lights
Have someone observe the operation of brake
lights and exterior lights while you work the
controls. Check turn signal and high beam
indicator lights on the instrument panel.
Door Latches
Check for proper closing, latching, and locking.
Fluid Leaks
Check area under the vehicle after overnight
parking for fuel, coolant, oil, or other fluid leaks.
Also, if gasoline fumes are detected or if fuel or
brake fluid leaks are suspected the cause should
be located and corrected immediately.
EXHAUST GAS
The best protection against carbon monoxide
entry into the vehicle body is a properly
maintained engine exhaust system.
Whenever a change is noticed in the sound of the
exhaust system, when exhaust fumes can be
detected inside the vehicle, or when the
underside or rear of the vehicle is damaged, have
an authorized dealer inspect the complete
exhaust system and adjacent body areas for
broken, damaged, deteriorated, or mispositioned
parts. Open seams or loose connections could permit exhaust fumes to seep into the passenger
compartment. In addition, inspect the exhaust
system each time the vehicle is raised for
lubrication or oil change. Replace as required.
CARBON MONOXIDE WARNINGS
It is recommended to only use mild soap and
water to clean your floor mats. After cleaning,
always check your floor mat has been
properly installed and is secured to your
vehicle using the floor mat fasteners by
lightly pulling mat.
WARNING!
WARNING!
Exhaust gases can injure or kill. They contain
carbon monoxide (CO), which is colorless and
odorless. Breathing it can make you
unconscious and can eventually poison you. To
avoid breathing (CO), follow these safety tips:
Do not run the engine in a closed garage or in
confined areas any longer than needed to
move your vehicle in or out of the area.
If you are required to drive with the trunk/
liftgate/rear doors open, make sure that all
windows are closed and the climate control
BLOWER switch is set at high speed. DO NOT
use the recirculation mode.
If it is necessary to sit in a parked vehicle with
the engine running, adjust your heating or
cooling controls to force outside air into the
vehicle. Set the blower at high speed.
WARNING!
Carbon monoxide (CO) in exhaust gases is
deadly. Follow the precautions below to
prevent carbon monoxide poisoning:
Do not inhale exhaust gases. They contain
carbon monoxide, a colorless and odorless
gas, which can kill. Never run the engine in a
closed area, such as a garage, and never sit
in a parked vehicle with the engine running
for an extended period. If the vehicle is
stopped in an open area with the engine
running for more than a short period, adjust
the ventilation system to force fresh, outside
air into the vehicle.
Guard against carbon monoxide with proper
maintenance. Have the exhaust system
inspected every time the vehicle is raised.
Have any abnormal conditions repaired
promptly. Until repaired, drive with all side
windows fully open.
When exiting the vehicle, always make sure
the ignition is in the OFF position, remove the
key fob from the vehicle, and lock your
vehicle.
23_GA_OM_EN_USC_t.book Page 168
Page 192 of 248
SERVICING AND MAINTENANCE
190
NOTE:
The headlight washing system will not work if the
liquid level is low (as indicated by the symbol on
the instrument cluster display). On vehicles
equipped with headlight washers, there is a refer-
ence notch on the dipstick: ONLY the windshield/
rear window washer operates with the level below
this reference.
BRAKE FLUID
Check that the fluid is at the maximum level. If
the fluid level in the tank is low, contact an
authorized dealer to have the system checked.
AUTOMATIC TRANSMISSION ACTIVATION
S
YSTEM OIL
The transmission control oil level should only be
checked at an authorized dealer.
USEFUL ADVICE FOR EXTENDING THE
L
IFE OF YOUR BATTERY
To avoid draining your battery and make it last
longer, observe the following instructions:
When you park the car, ensure that the doors
and trunk are closed properly to prevent any
lights from remaining on inside the
passenger's compartment.
Do not keep accessories (e.g. radio, hazard
warning lights, etc.) switched on for a long time
when the engine is not running.
Before performing any operation on the
electrical system, disconnect the negative
battery cable. If you wish to install electrical accessories after
purchasing the car that require permanent
electrical supply (e.g. alarm, etc.), or accessories
which influence the electrical supply
requirements, contact an authorized dealer,
whose qualified staff will evaluate the overall
electrical consumption.
NOTE:
After the battery is disconnected, the steering
must be initialized. The warning light on the
instrument panel switches on to indicate this. To
carry out this procedure, simply turn the steering
wheel all the way from one end to the other, and
then turn it back to the central position.
BATTERY
The battery does not require the electrolyte to be
topped up with distilled water. A periodic check
carried out at an authorized dealer, however, is
necessary to check efficiency.
Follow the battery manufacturer's instructions for
maintenance.
Replacing The Battery
If necessary, replace the battery with another
original battery with the same specifications.
Follow the battery manufacturer’s instructions for
maintenance.
NOTE:
It will not be possible to open the trunk with a key
or by pushing the button in the passenger
compartment when the battery is disconnected.
So, always position the manual trunk opening
strap on the trunk lock before disconnecting the
battery
Ú
page 220.
CAUTION!
If the charge level remains under 50% for a
long time, the battery may be damaged by
sulphation, reducing its capacity and
efficiency during a vehicle start. The battery is
also more prone to the risk of freezing (at
temperatures as high as 14°F (-10°C).
WARNING!
Battery acid is a corrosive solution and can
burn or even blind you. Do not allow battery
acid to contact your eyes, skin, or clothing.
Do not lean over a battery when attaching
clamps
Ú
page 177. If acid splashes in eyes
or on skin, flush the area immediately with
large amounts of water.
Battery gas is flammable and explosive.
Keep flame or sparks away from the battery.
Do not use a booster battery or any other
booster source with an output greater than
12 Volts. Do not allow cable clamps to touch
each other.
Battery posts, terminals, and related
accessories contain lead and lead
compounds. Wash hands after handling.
23_GA_OM_EN_USC_t.book Page 190
Page 195 of 248
193
LUBRICATING MOVING PARTS OF THE
B
ODYWORK
Ensure that the locks and bodywork junction
points, including components such as the seat
guides, door hinges (and rollers), trunk and hood
are periodically lubricated with lithium-based
grease to ensure correct, silent operation and to
protect them from rust and wear.
Thoroughly clean the components, eliminating
every trace of dirt and dust. After lubricating,
eliminate excess oil and grease. Also pay
particular attention to the hood closing devices,
to ensure correct operation. During operations on
the hood, to be carried out with the engine cold,
also remember to check, clean and lubricate the
locking, release and safety devices.
Lubricate the external lock barrels twice a year.
Apply a small amount of high-quality lubricant
directly into the lock barrel.
If necessary, contact an authorized dealer as
soon as possible.
WINDSHIELD WIPER
Periodically clean the windshield and rear window
and rubber profile of the windshield wiper blades,
using a sponge or a soft cloth and a non-abrasive
detergent. This eliminates the salt or impurities
accumulated when driving.
Prolonged operation of the windshield window
wipers with dry glass may cause the deterioration
of the blades, in addition to abrasion of the
surface of the glass. To eliminate the impurities
on the dry glass, always operate the windshield
washers. In the event of very low outdoor temperatures,
below 0°F (-17.8°C), ensure that the movement
of the rubber part in contact with the glass is not
obstructed. Use a suitable deicing product to
release it if required.
Avoid using the windshield wipers to remove frost
or ice.
Also avoid contact of the rubber profile of the
blades with petroleum derivatives such as engine
oil, gas, etc.
NOTE:
The life of the windshield wiper blades varies
according to the usage frequency. In any case, it
is advised to replace the blades approximately
once a year. When the blades are worn, noise,
marks on the glass or streaks of water may be
noticed. In the presence of these conditions,
clean the windshield wiper blades or, if neces
-
sary, replace them.
Raising The Windshield Wiper Blades (“Service
Position” Function)
The “service position” function allows the driver
to replace the windshield wiper blades more
easily. It is also recommended to activate this
function when it is snowing and to make it easier
to remove any dirt deposits in the area where the
blades are normally positioned, when washing. Activation Of The Function
To activate this function, disable the windshield
wiper before setting the ignition device to OFF.
This function can only be activated within two
minutes of placing the ignition in OFF.
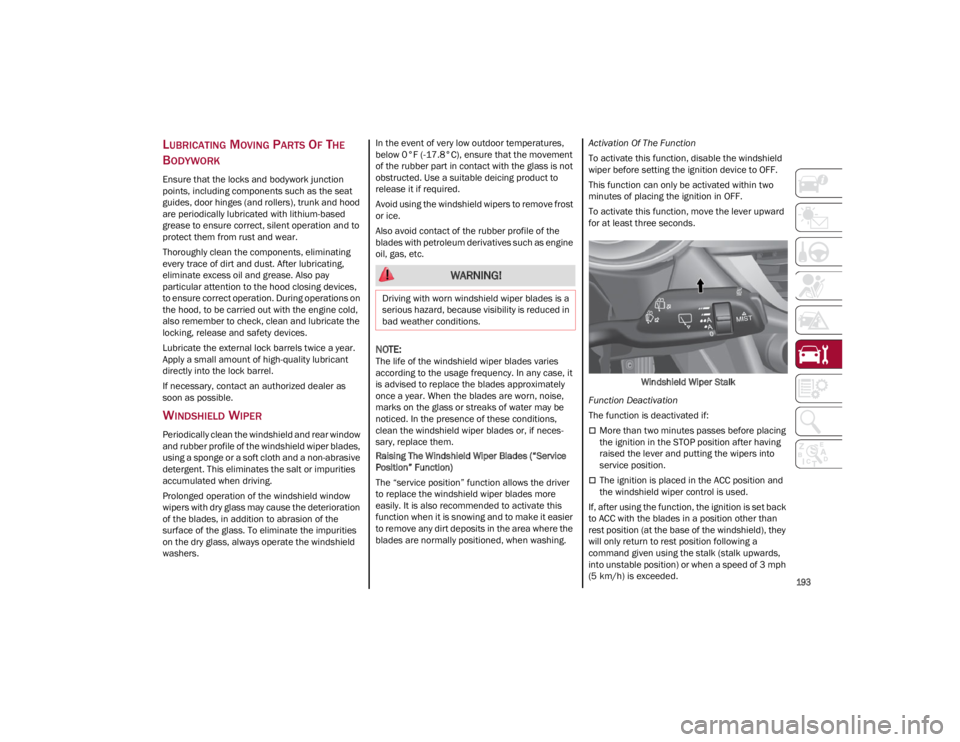
To activate this function, move the lever upward
for at least three seconds.
Windshield Wiper Stalk
Function Deactivation
The function is deactivated if:
More than two minutes passes before placing
the ignition in the STOP position after having
raised the lever and putting the wipers into
service position.
The ignition is placed in the ACC position and
the windshield wiper control is used.
If, after using the function, the ignition is set back
to ACC with the blades in a position other than
rest position (at the base of the windshield), they
will only return to rest position following a
command given using the stalk (stalk upwards,
into unstable position) or when a speed of 3 mph
(5 km/h) is exceeded.
WARNING!
Driving with worn windshield wiper blades is a
serious hazard, because visibility is reduced in
bad weather conditions.
23_GA_OM_EN_USC_t.book Page 193
Page 201 of 248
199
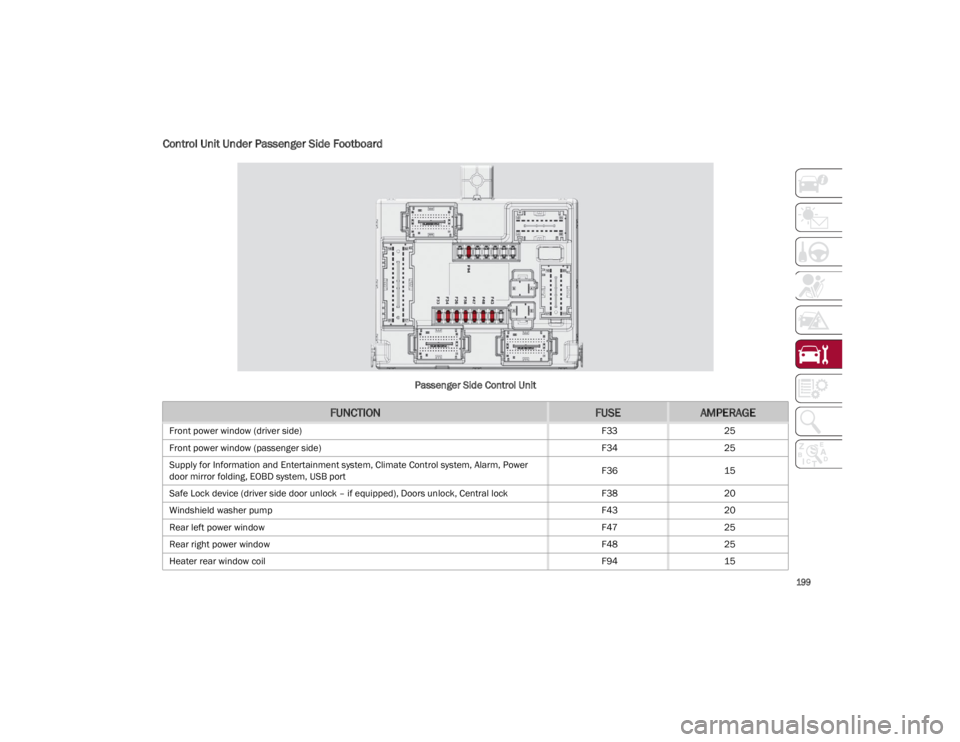
Control Unit Under Passenger Side Footboard
Passenger Side Control Unit
FUNCTIONFUSEAMPERAGE
Front power window (driver side)F3325
Front power window (passenger side) F3425
Supply for Information and Entertainment system, Climate Control system, Alarm, Power
door mirror folding, EOBD system, USB port F36
15
Safe Lock device (driver side door unlock – if equipped), Doors unlock, Central lock F3820
Windshield washer pump F4320
Rear left power window F4725
Rear right power window F4825
Heater rear window coil F9415
23_GA_OM_EN_USC_t.book Page 199
Page 223 of 248
221
Manual Trunk Opening Device
Proceed as follows if the battery needs to be
disconnected:
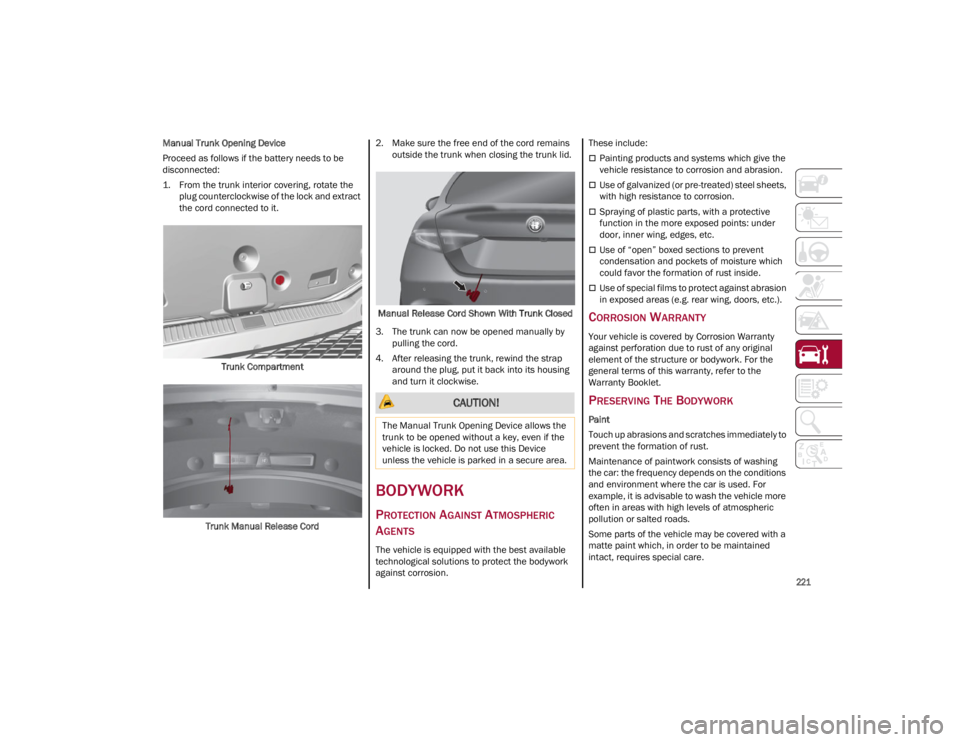
1. From the trunk interior covering, rotate the plug counterclockwise of the lock and extract
the cord connected to it.
Trunk Compartment
Trunk Manual Release Cord 2. Make sure the free end of the cord remains
outside the trunk when closing the trunk lid.
Manual Release Cord Shown With Trunk Closed
3. The trunk can now be opened manually by pulling the cord.
4. After releasing the trunk, rewind the strap around the plug, put it back into its housing
and turn it clockwise.
BODYWORK
PROTECTION AGAINST ATMOSPHERIC
A
GENTS
The vehicle is equipped with the best available
technological solutions to protect the bodywork
against corrosion. These include:
Painting products and systems which give the
vehicle resistance to corrosion and abrasion.
Use of galvanized (or pre-treated) steel sheets,
with high resistance to corrosion.
Spraying of plastic parts, with a protective
function in the more exposed points: under
door, inner wing, edges, etc.
Use of “open” boxed sections to prevent
condensation and pockets of moisture which
could favor the formation of rust inside.
Use of special films to protect against abrasion
in exposed areas (e.g. rear wing, doors, etc.).
CORROSION WARRANTY
Your vehicle is covered by Corrosion Warranty
against perforation due to rust of any original
element of the structure or bodywork. For the
general terms of this warranty, refer to the
Warranty Booklet.
PRESERVING THE BODYWORK
Paint
Touch up abrasions and scratches immediately to
prevent the formation of rust.
Maintenance of paintwork consists of washing
the car: the frequency depends on the conditions
and environment where the car is used. For
example, it is advisable to wash the vehicle more
often in areas with high levels of atmospheric
pollution or salted roads.
Some parts of the vehicle may be covered with a
matte paint which, in order to be maintained
intact, requires special care.
CAUTION!
The Manual Trunk Opening Device allows the
trunk to be opened without a key, even if the
vehicle is locked. Do not use this Device
unless the vehicle is parked in a secure area.
23_GA_OM_EN_USC_t.book Page 221