2023 ALFA ROMEO GIULIA door lock
[x] Cancel search: door lockPage 59 of 248
57
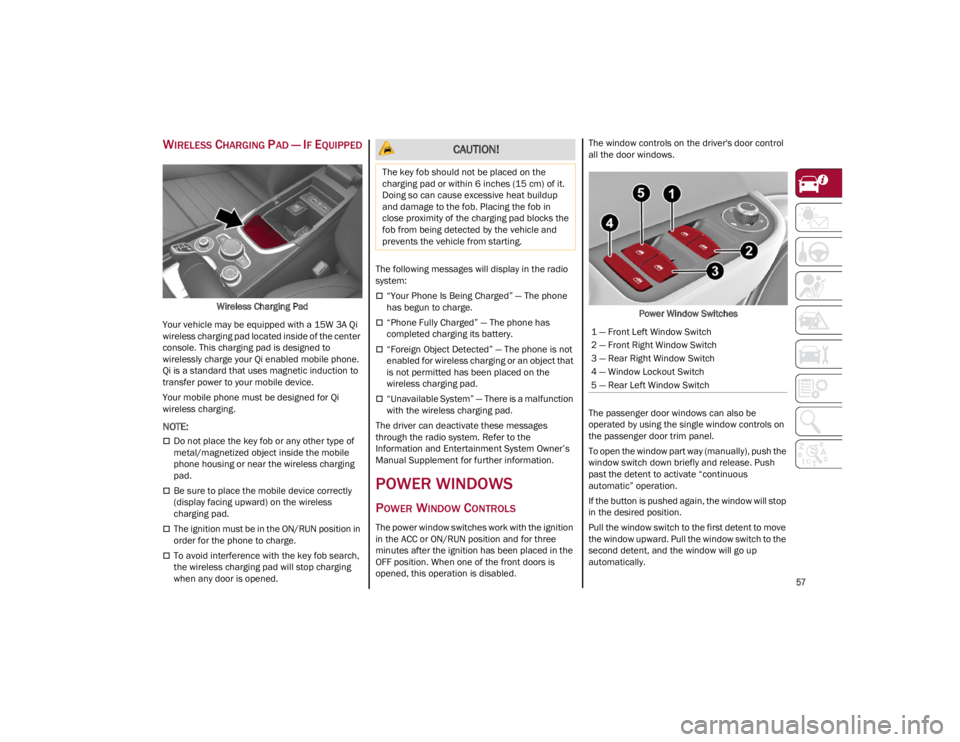
WIRELESS CHARGING PAD — IF EQUIPPED
Wireless Charging Pad
Your vehicle may be equipped with a 15W 3A Qi
wireless charging pad located inside of the center
console. This charging pad is designed to
wirelessly charge your Qi enabled mobile phone.
Qi is a standard that uses magnetic induction to
transfer power to your mobile device.
Your mobile phone must be designed for Qi
wireless charging.
NOTE:
Do not place the key fob or any other type of
metal/magnetized object inside the mobile
phone housing or near the wireless charging
pad.
Be sure to place the mobile device correctly
(display facing upward) on the wireless
charging pad.
The ignition must be in the ON/RUN position in
order for the phone to charge.
To avoid interference with the key fob search,
the wireless charging pad will stop charging
when any door is opened. The following messages will display in the radio
system:
“Your Phone Is Being Charged” — The phone
has begun to charge.
“Phone Fully Charged” — The phone has
completed charging its battery.
“Foreign Object Detected” — The phone is not
enabled for wireless charging or an object that
is not permitted has been placed on the
wireless charging pad.
“Unavailable System” — There is a malfunction
with the wireless charging pad.
The driver can deactivate these messages
through the radio system. Refer to the
Information and Entertainment System Owner’s
Manual Supplement for further information.
POWER WINDOWS
POWER WINDOW CONTROLS
The power window switches work with the ignition
in the ACC or ON/RUN position and for three
minutes after the ignition has been placed in the
OFF position. When one of the front doors is
opened, this operation is disabled. The window controls on the driver's door control
all the door windows.
Power Window Switches
The passenger door windows can also be
operated by using the single window controls on
the passenger door trim panel.
To open the window part way (manually), push the
window switch down briefly and release. Push
past the detent to activate “continuous
automatic” operation.
If the button is pushed again, the window will stop
in the desired position.
Pull the window switch to the first detent to move
the window upward. Pull the window switch to the
second detent, and the window will go up
automatically.
CAUTION!
The key fob should not be placed on the
charging pad or within 6 inches (15 cm) of it.
Doing so can cause excessive heat buildup
and damage to the fob. Placing the fob in
close proximity of the charging pad blocks the
fob from being detected by the vehicle and
prevents the vehicle from starting.
1 — Front Left Window Switch
2 — Front Right Window Switch
3 — Rear Right Window Switch
4 — Window Lockout Switch
5 — Rear Left Window Switch
23_GA_OM_EN_USC_t.book Page 57
Page 64 of 248

GETTING TO KNOW YOUR VEHICLE
62
CLOSING
Grip one of the trunk lid interior handles and pull
the trunk lid down until it is low enough to place
your hands on the exterior surface of the trunk.
Use your hands to then push the trunk lid down
until you hear the lock latch into place.Trunk Lid Interior Handles
NOTE:
It will not be possible to open the trunk lid with
the key fob or by pushing the interior trunk lid
release button when the battery is disconnected.
Always position the manual trunk lid opening
strap on the trunk lid lock before disconnecting
the battery
Ú
page 220.
Before closing the trunk lid, make sure your key
fob is not inside the trunk. If the key fob is
detected, the trunk lid will latch then automati -
cally unlock so that the key fob cannot be locked
in the trunk.
TRUNK RE-INITIALIZATION
NOTE:
If the battery is disconnected or the protection
fuse blows, the trunk lid opening/closing mecha -
nism must be re-initialized as follows:
1. Close all the doors and the trunk lid.
2. Push the lock button on the remote control.
3. Push the unlock button on the remote control.
TRUNK SPECIFICATIONS
Access To The Tire Service Kit (Quadrifoglio
Models)
To access the Tire Service Kit, lift the carpet in the
trunk
Ú
page 171.
Cargo Area (Quadrifoglio Models) Rear Cargo Tie–Downs — If Equipped
There are four hooks inside the trunk for
attaching the cargo net or cables which can
safely secure the cargo.
Rear Cargo Tie-Downs
NOTE:
Do not apply a load greater than 22 lb (10 kg) on
a single hook.
Cargo Net — If Equipped
This is useful for correctly arranging the cargo
and/or for transporting light materials.
23_GA_OM_EN_USC_t.book Page 62
Page 71 of 248

69
Dynamic
Race (If Equipped)
The display graphically shows the values of: ○ engine torque;
○ turbocharger pressure;
○ engine oil pressure (L = low pressure/ H= high pressure).
NOTE:
The engine torque and turbocharger pressure
values vary according to the engine type.
Race Dynamic
Acceleration Gauge
The displayed parameters are related to vehi -
cle stability, the graphs illustrate the trend of
the longitudinal/lateral accelerations (G-me -
ter information), considering gravity accelera -
tion as a reference unit.
Lateral acceleration peaks are also indicated.
11. Driving Mode Display (Alfa DNA System)
12. Distance Traveled (miles/km) display
13. Fuel Consumption
14. Warning Indications Display (e.g. danger of ice, open doors, ABS operation, etc.)
15. Range
CUSTOMER PROGRAMMABLE SETTINGS
Multiple settings can be programmed by the user
using the radio. This section describes only the
basic settings:
Units & Language
Clock & Date
Cluster
To access the settings list in the radio, proceed as
follows:
Press the Home button to access the main
menu.
Select Settings from the main menu using the
Rotary Knob or by pressing Settings on the
touchscreen.
Rotary Knob
1 — ON/OFF Control And Volume Knob
2 — OPTION Button
3 — Rotary Pad
4 — Home Button
23_GA_OM_EN_USC_t.book Page 69
Page 83 of 248
81
STARTING THE ENGINE
Before starting the engine, be sure to adjust the
seat, the interior rearview mirror, the door
mirrors, and fasten the seat belt correctly.
Never press the accelerator pedal before starting
the engine.
If necessary, messages indicating the starting
procedure will be shown in the display.
STARTING PROCEDURE
Proceed as follows:
1. Apply the Electric Park Brake and set the gear selector to PARK (P) or NEUTRAL (N).
2. Fully press the brake pedal without touching the accelerator.
3. Briefly push the ignition button.
4. If the engine doesn't start within a few seconds, you need to repeat the procedure. If
the problem persists, contact an authorized
dealer.
REMOTE STARTING SYSTEM
This system uses the key fob to start the engine
conveniently from outside the vehicle while still
maintaining security. The system has a range of
at least 300 feet (91 meters).
The remote starting system also activates the
climate control, the heated seats (if equipped),
and the heated steering wheel (if equipped),
depending on temperatures outside and inside of
the vehicle.
NOTE:
Obstructions between the vehicle and key fob
may reduce this range.
How to use Remote Start
All of the following conditions must be met before
the engine will remote start:
Gear selector in PARK (P).
Doors closed.
Hood closed.
Trunk closed.
Hazard switch off.
Brake switch inactive (brake pedal not
pressed).
WARNING!
When leaving the vehicle, always remove the
key fob from the vehicle and lock your
vehicle.
Never leave children alone in a vehicle, or
with access to an unlocked vehicle.
Allowing children to be in a vehicle
unattended is dangerous for a number of
reasons. A child or others could be seriously
or fatally injured. Children should be warned
not to touch the parking brake, brake pedal
or the transmission gear selector.
Do not leave the key fob in or near the
vehicle, or in a location accessible to
children. A child could operate power
windows, other controls, or move the vehicle.
Do not leave children or animals inside
parked vehicles in hot weather. Interior heat
buildup may cause serious injury or death.
WARNING!
Never pour fuel or other flammable liquid
into the throttle body air inlet opening in an
attempt to start the vehicle. This could result
in flash fire causing serious personal injury.
Do not attempt to push or tow your vehicle to
get it started. Vehicles equipped with an
automatic transmission cannot be started
this way. Unburned fuel could enter the
catalytic converter and once the engine has
started, ignite and damage the converter and
vehicle.
If the vehicle has a discharged battery,
booster cables may be used to obtain a start
from a booster battery or the battery in
another vehicle
Ú
page 177. This type of
start can be dangerous if done improperly.
CAUTION!
To prevent damage to the starter, do not
continuously crank the engine for more than
25 seconds at a time. Wait 60 seconds before
trying again.
23_GA_OM_EN_USC_t.book Page 81
Page 85 of 248
83
AFTER STARTING — WARMING UP THE
E
NGINE
Proceed as follows:
Travel slowly, letting the engine run at a
reduced RPM, without accelerating suddenly.
It is recommended to wait until the digital
engine coolant temperature indicator starts to
rise for maximum performance.
STOPPING THE ENGINE
To stop the engine, proceed as follows:
1. Park the vehicle in a position that is not
dangerous for oncoming traffic.
2. Engage the PARK (P) mode.
3. With engine idling, push the ENGINE START/ STOP button on the steering wheel to stop the
engine.
NOTE:
Do not leave the ignition in ACC position when the
engine is off.
To shut off the engine with vehicle speed greater
than 5 mph (8 km/h), you must push and hold
the ignition or push the ENGINE START/STOP
button three times consecutively within a few
seconds. The engine will shut down, and the
ignition will be placed in the ACC position.
With the keyless ignition system, it is possible to
leave the vehicle taking the key fob with you
without the engine switching off. The vehicle will
inform the absence of the key on board, only if the
doors are closed. After stopping the engine (cycling from the ACC to
the OFF position), the accessories are still
powered for about three minutes, or until a door
is opened.
When the ignition is in the OFF position, the
window switches remain active for three minutes.
Opening a front door will cancel this function.
After severe driving, idle the engine to allow the
temperature inside the engine compartment to
cool before shutting off the engine.
TURBOCHARGER COOL DOWN
It is recommended before switching the vehicle
off, to keep the engine idling for a few minutes so
that the turbocharger can be suitably lubricated.
This procedure is particularly recommended after
severe driving.
After a full load operation, keep the engine idling
for three to five minutes before switching it off.
This time allows the lubricating oil and the engine
coolant to eliminate the excessive heat from
combustion chamber, bearings, inner
components and turbocharger.
ENGINE BLOCK HEATER —
IF EQUIPPED
The engine block heater warms the engine and
permits quicker starts in cold weather.
Connect the cord to a 110-115 Volt AC electrical
outlet with a grounded, three-wire extension cord.
For ambient temperatures below 0°F (-18°C),
the engine block heater is recommended. For
ambient temperatures below -20°F (-29°C), the
engine block heater is required.See the following steps to properly use the engine
block heater:
1. Locate the engine block heater cord (access
door on the passenger side wiper cowl).
2. Pull the cord to the front of the vehicle and plug it into a grounded, three-wire extension
cord.
3. After the vehicle is running, properly stow away behind access door on the passenger
side wiper cowl.
NOTE:
The engine block heater cord is a factory
installed option. If your vehicle is not equipped,
heater cords are available from an authorized
dealer.
The engine block heater will require 110 Volts
AC and 6.5 Amps to activate the heater
element.
The engine block heater must be plugged in at
least one hour to have a warming effect on the
engine and at least four hours to have a
warming effect when ambient temperatures
are below -20°F (-29°C).
WARNING!
Remember to disconnect the engine block
heater cord before driving. Damage to the
110-115 Volt electrical cord could cause
electrocution.
23_GA_OM_EN_USC_t.book Page 83
Page 88 of 248
STARTING AND OPERATING
86
(Continued)
ELECTRIC PARK BRAKE (EPB)
O
PERATING MODES
The EPB may operate as follows:
“Dynamic Operating Mode”: this mode is
activated by pulling the switch repeatedly
while driving.
“Static Engagement and Release Mode”: with
the vehicle stationary, the EPB can be
activated by pulling the switch on the center
console once. Push the switch and the brake
pedal at the same time to disengage the
brake.
“Drive Away Release”: the EPB will automat -
ically disengage with the driver side seat belt
fastened and the detection of an action
performed by the driver to move the vehicle
(forward gear or reverse gear). This feature can
be turned on or off in the Information and
Entertainment System.
“Safe Hold”: engages if the gear selector is not
in PARK (P) position and the driver's intention
of leaving the vehicle is detected. The EPB will
automatically engage the EPB.
SAFE HOLD
Safe Hold is a safety function that automatically
engages the EPB if the driver attempts to leave
the vehicle while the ignition is in ON/RUN.
The EPB engages automatically to prevent
vehicle movement if:
The vehicle speed is below 2 mph (3 km/h).
A transmission operating mode different from
PARK (P) is activated.
The driver's seat belt is not fastened.
The driver side door is open.
No attempts to apply pressure on the brake
pedal have been detected.
The vehicle is parked on roads with a slope of
more than 4%.
The “Safe Hold” function can be temporarily
disabled by pushing the switch located on the
center console and the brake pedal at the same
time, with the vehicle stationary and the driver
side door open.
Once disabled, the function will activate again
when the vehicle speed reaches 12 mph (20 km/h)
or the ignition is cycled to OFF and then to ACC.
AUTOMATIC
TRANSMISSION
The vehicle is equipped with an electronically
controlled 8-speed automatic transmission
where gear shifting automatically takes place,
depending on the vehicle usage instantaneous
parameters (vehicle speed, grade, and
accelerator pedal position).
Manual gear shifting can still occur thanks to the
“sequential mode” position for the gear selector.
WARNING!
It is dangerous to shift out of PARK or
NEUTRAL if the engine speed is higher than
idle speed. If your foot is not firmly pressing
the brake pedal, the vehicle could accelerate
quickly forward or in reverse. You could lose
control of the vehicle and hit someone or
something. Only shift into gear when the
engine is idling normally and your foot is
firmly pressing the brake pedal.
Unintended movement of a vehicle could
injure those in or near the vehicle. As with all
vehicles, you should never exit a vehicle
while the engine is running. Before exiting a
vehicle, always apply the parking brake, shift
the transmission into PARK, and turn the
ignition OFF. When the ignition is in the OFF
position, the transmission is locked in PARK,
securing the vehicle against unwanted
movement.
When leaving the vehicle, always make sure
the ignition is in the OFF position, remove the
key fob from the vehicle, and lock the
vehicle.
Never leave children alone in a vehicle, or
with access to an unlocked vehicle. Allowing
children to be in a vehicle unattended is
dangerous for a number of reasons. A child
or others could be seriously or fatally injured.
Children should be warned not to touch the
parking brake, brake pedal or the
transmission gear selector.
23_GA_OM_EN_USC_t.book Page 86
Page 112 of 248

STARTING AND OPERATING
110
TRAFFIC JAM ASSIST (TJA)
SYSTEM — IF EQUIPPED
The Traffic Jam Assist (TJA) system can be
activated on all road types. The system uses a
camera and radar sensors located on the front
fascia/bumper to detect lane markings and keep
the vehicle in the center of the lane.
When the system is unable to detect lane
markings, it will still operate using surrounding
traffic. This can occur in congested traffic
scenarios, when the vehicles ahead or
surrounding obstruct the visibility of the lane
markings. When the speed is below 12 mph
(20 km/h), the system can use a lock-on strategy
that allows the vehicle to automatically follow the
vehicle ahead.
The TJA system combines Adaptive Cruise Control
(ACC) functions with Lane Departure Warning
functions to maintain vehicle speed and steering
wheel behavior.
NOTE:
Do not use the TJA system while driving in urban
areas.
TO ACTIVATE/DEACTIVATE
To activate the system, push the button on the
left side of the steering wheel.
To deactivate the system, push the button again.Traffic Jam Assist Button Suspension Conditions
The following operations will suspend the TJA
system:
Pressing the brake pedal
Opening the driver’s door
Disabling ACC
If the vehicle speed exceeds 37 mph (60 km/h)
Releasing the driver’s seat belt
Placing the gear selector in PARK, REVERSE, or
NEUTRAL
If the Forward Collision Warning system or
“Active Braking” intervenes
Automatic Deactivation
System operation will be temporarily disabled
under the following conditions:
When traveling around narrow bends
If the lane boundaries are not detected
One of the two lines is interrupted
The sun is low and reflects on the radar
camera
If the turn signals are activated
If the driver intentionally changes lanes
without using the turn signal
If manual steering begins
If the driver’s hands are removed from the
steering wheel
When there is no surrounding traffic and there
are no horizontal lane boundaries
If the system is not functioning properly
If lateral acceleration is high
ALWAYS obey traffic laws and pay attention
to the road. ALWAYS drive safely with your
hands on the steering wheel. You have full
responsibility and assume all risks related to
the use of the features and applications in
this vehicle. Only use the features and
applications when it is safe to do so. Failure
to do so may result in an accident involving
serious injury or death.
WARNING!
WARNING!
You should switch off the TJA system:
When driving in fog, heavy rain, heavy snow,
sleet, heavy traffic, and complex driving
situations (i.e., in highway construction
zones).
When entering a turn lane or highway
off-ramp; when driving on roads that are
winding, icy, snow-covered, slippery, or have
steep uphill or downhill slopes.
When circumstances do not allow safe
driving at a constant speed.
23_GA_OM_EN_USC_t.book Page 110
Page 126 of 248
STARTING AND OPERATING
124
(Continued)
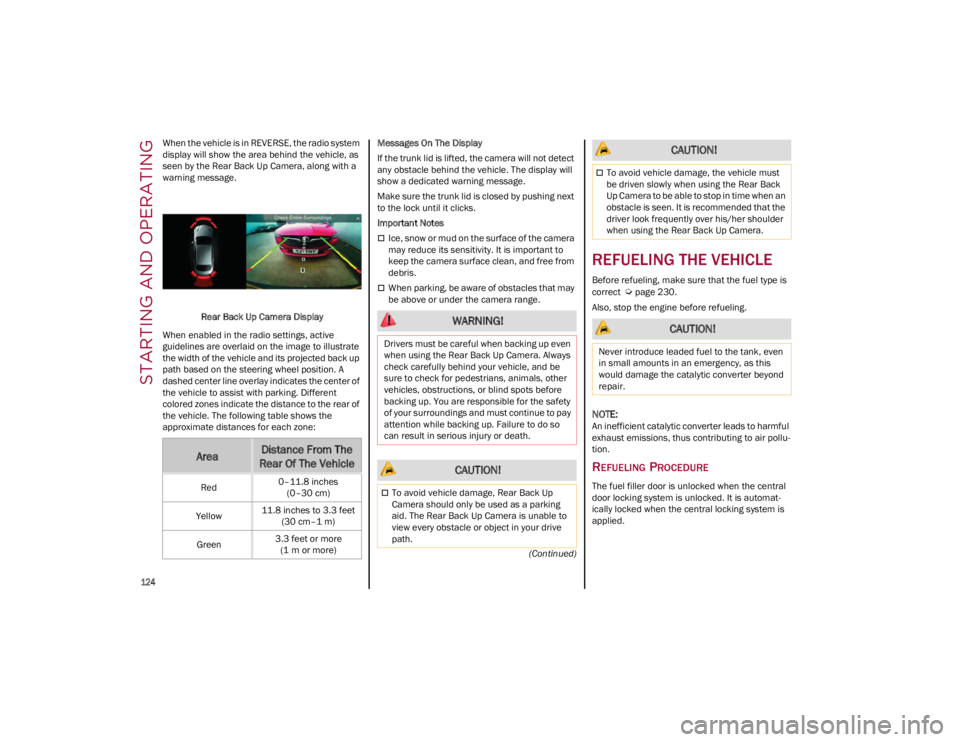
When the vehicle is in REVERSE, the radio system
display will show the area behind the vehicle, as
seen by the Rear Back Up Camera, along with a
warning message.
Rear Back Up Camera Display
When enabled in the radio settings, active
guidelines are overlaid on the image to illustrate
the width of the vehicle and its projected back up
path based on the steering wheel position. A
dashed center line overlay indicates the center of
the vehicle to assist with parking. Different
colored zones indicate the distance to the rear of
the vehicle. The following table shows the
approximate distances for each zone: Messages On The Display
If the trunk lid is lifted, the camera will not detect
any obstacle behind the vehicle. The display will
show a dedicated warning message.
Make sure the trunk lid is closed by pushing next
to the lock until it clicks.
Important Notes
Ice, snow or mud on the surface of the camera
may reduce its sensitivity. It is important to
keep the camera surface clean, and free from
debris.
When parking, be aware of obstacles that may
be above or under the camera range.
REFUELING THE VEHICLE
Before refueling, make sure that the fuel type is
correct
Ú
page 230.
Also, stop the engine before refueling.
NOTE:
An inefficient catalytic converter leads to harmful
exhaust emissions, thus contributing to air pollu -
tion.
REFUELING PROCEDURE
The fuel filler door is unlocked when the central
door locking system is unlocked. It is automat -
ically locked when the central locking system is
applied.
AreaDistance From The
Rear Of The Vehicle
Red 0–11.8 inches
(0–30 cm)
Yellow 11.8 inches to 3.3 feet
(30 cm–1 m)
Green 3.3 feet or more
(1 m or more)
WARNING!
Drivers must be careful when backing up even
when using the Rear Back Up Camera. Always
check carefully behind your vehicle, and be
sure to check for pedestrians, animals, other
vehicles, obstructions, or blind spots before
backing up. You are responsible for the safety
of your surroundings and must continue to pay
attention while backing up. Failure to do so
can result in serious injury or death.
CAUTION!
To avoid vehicle damage, Rear Back Up
Camera should only be used as a parking
aid. The Rear Back Up Camera is unable to
view every obstacle or object in your drive
path.
To avoid vehicle damage, the vehicle must
be driven slowly when using the Rear Back
Up Camera to be able to stop in time when an
obstacle is seen. It is recommended that the
driver look frequently over his/her shoulder
when using the Rear Back Up Camera.
CAUTION!
Never introduce leaded fuel to the tank, even
in small amounts in an emergency, as this
would damage the catalytic converter beyond
repair.
CAUTION!
23_GA_OM_EN_USC_t.book Page 124