Page 57 of 122

Instrument operation
48
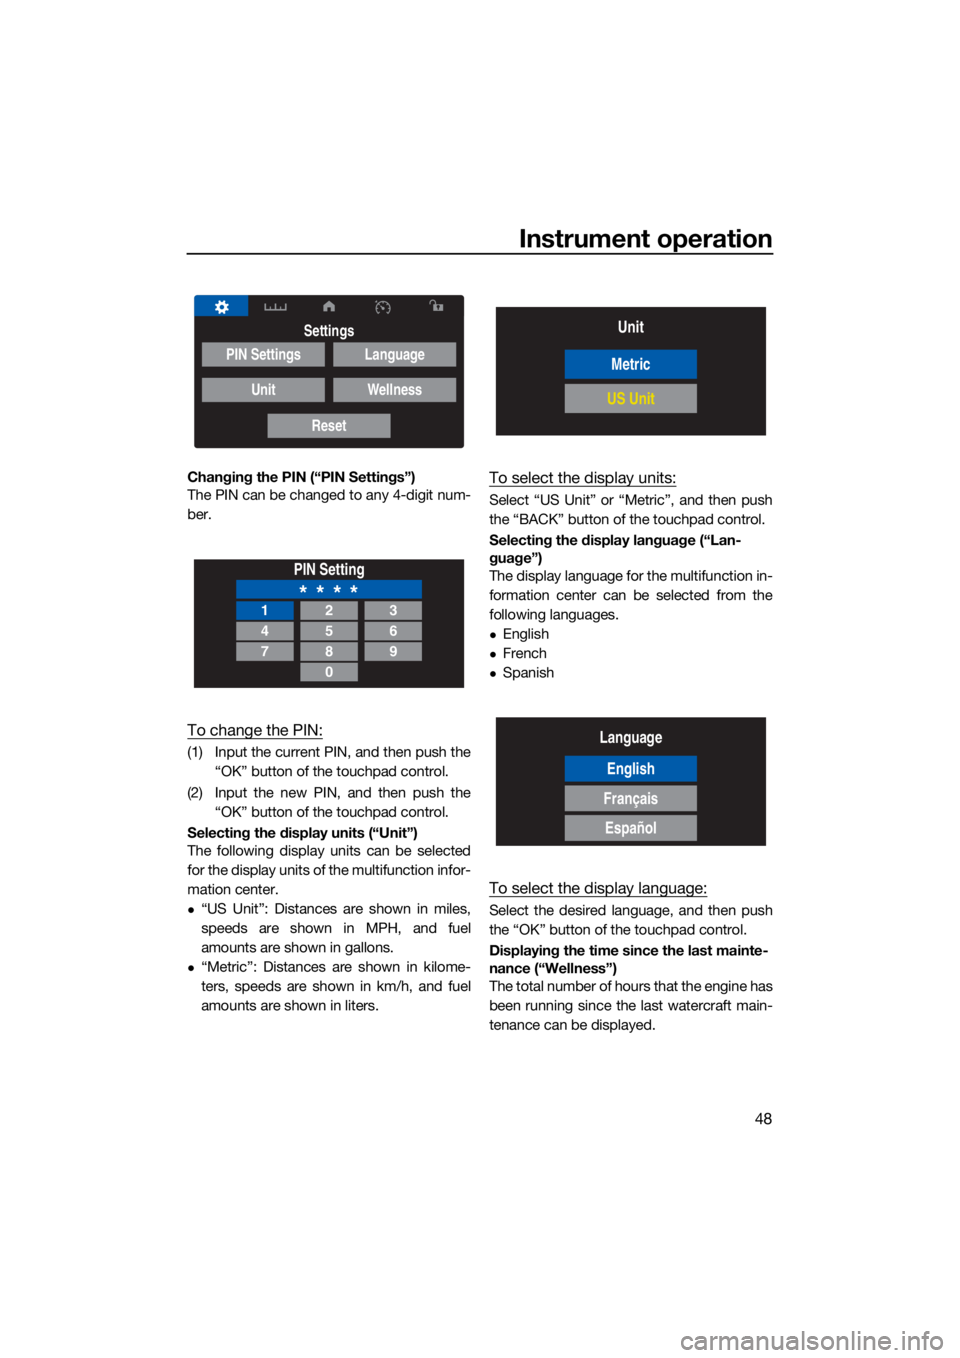
Changing the PIN (“PIN Settings”)
The PIN can be changed to any 4-digit num-
ber.
To change the PIN:
(1) Input the current PIN, and then push the“OK” button of the touchpad control.
(2) Input the new PIN, and then push the “OK” button of the touchpad control.
Selecting the display units (“Unit”)
The following display units can be selected
for the display units of the multifunction infor-
mation center.
“US Unit”: Distances are shown in miles,
speeds are shown in MPH, and fuel
amounts are shown in gallons.
“Metric”: Distances are shown in kilome-
ters, speeds are shown in km/h, and fuel
amounts are shown in liters.
To select the display units:
Select “US Unit” or “Metric”, and then push
the “BACK” button of the touchpad control.
Selecting the display language (“Lan-
guage”)
The display language for the multifunction in-
formation center can be selected from the
following languages.
English
French
Spanish
To select the display language:
Select the desired language, and then push
the “OK” button of the touchpad control.
Displaying the time since the last mainte-
nance (“Wellness”)
The total number of hours that the engine has
been running since the last watercraft main-
tenance can be displayed.
Settings
PIN Settings
Unit
Language
Wellness
Reset
PIN Setting
* * * *123
456
789
0
Unit
Metric
US Unit
Language
English
Français
Español
UF4N71E0.book Page 48 Thursday, August 5, 2021 11:58 AM
Page 58 of 122

Instrument operation
49
To reset the number of hours of opera-
tion:
Select “Reset”.
Resetting the settings (“Reset”)
The settings can be reset to their factory de-
fault settings. The items that are reset and the
default settings are as follows.
Display units: US Unit
Language: English
Trip time: 0.0
Distance traveled: 0.0
Average fuel consumption per gallon or li-
ter: 0.0
Total fuel used: 0.0
To reset the settings:
Select “Reset”.EJU45190Engine lock screen “ ”
The engine lock screen shows the setting
screen for the Yamaha Security System in the
center display. (See page 25 for Yamaha Se-curity System setting procedures.)
EJU46400Warning function
The multifunction information center can indi-
cate the following warnings.
Fuel level warning
Battery voltage warning
Check engine warning
Engine overheat warning
Oil pressure warning
Other warnings (communication errors, ex-
ceeding the maintenance intervals, and so
on)
To stop the buzzer when a malfunction is ac-
tivated, correct the cause of the problem and
start the engine again, or push the “OK” but-
ton of the touchpad control.
Fuel level warning
If the amount of remaining fuel is low, the low-
est fuel level segment blinks orange, “Low
Fuel” is displayed on the display, and the
buzzer sounds intermittently.
Wellness
Time Since Last Maintenance 0Hrs
Reset
Reset
Reset To Factory?
Reset
1 “OK” button
1
UF4N71E0.book Page 49 Thursday, August 5, 2021 11:58 AM
Page 59 of 122

Instrument operation
50
If the fuel level warning is activated, refill the
fuel tank as soon as possible. (See page 61
for information on filling the fuel tank.)
Battery voltage warning
If the battery voltage is less than 12 volts or
more than 18 volts when the engine is not
running, the voltage display of the voltmeter
blinks.
If the battery voltage warning is activated,
have the watercraft serviced by a Yamaha
dealer as soon as possible.
Check engine warning “ ”
If a sensor malfunction or a short circuit is
detected, “ ” is shown in the warning bar,
and the buzzer sounds intermittently.
If the check engine warning is activated, im-
mediately reduce the engine speed, return toshore, and have a Yamaha dealer check the
engine.
TIP
Push the “OK” button of the touchpad control
to display a description of the warning in the
center display.
Engine overheat warning “ ”
If the engine temperature rises
significantly, “ ” and “ ” are shown in the
warning bar, and the buzzer sounds continu-
ously.
If the engine overheat warning is activated,
immediately reduce the engine speed, return
to shore, and then make sure that water is
being discharged from the port (left) cooling
water pilot outlet while the engine is running.
If there is no discharge of water, stop the en-
gine, and then check the jet intake for clog-
ging. (See page 106 for information on the jet
intake.)
NOTICE: If you cannot locate and
correct the cause of the overheating, con-
sult a Yamaha dealer. Continuing to oper-
ate at higher speeds could result in severe
engine damage.
[ECJ00042]
14.3V
km/h
RPM
Low
Fuel
10.8V
km/h
RPM
UF4N71E0.book Page 50 Thursday, August 5, 2021 11:58 AM
Page 60 of 122

Instrument operation
51
TIP
While the engine overheat warning is acti-
vated, the maximum engine speed is limit-
ed.
Push the “OK” button of the touchpad con-
trol to display a description of the warning
in the center display.
Oil pressure warning “ ”
If the oil pressure drops significantly, “ ”
and “ ” are shown in the warning bar, and
the buzzer sounds intermittently.
If the oil pressure warning is activated, imme-
diately reduce the engine speed, return to
shore, and then check the engine oil level.
(See page 63 for information on checking the
engine oil level.) If the oil level is sufficient,
have a Yamaha dealer check the watercraft.
TIP
While the oil pressure warning is activated,
the maximum engine speed is limited.
Push the “OK” button of the touchpad con-
trol to display a description of the warning
in the center display.
Other warnings (communication errors,
exceeding the maintenance intervals, and
so on) “ ”
If any other malfunction is detected or if the
engine has been operated for more than 50
hours since the last maintenance, the warn-
ing bar is shown instead of the tachometer
value display, “ ” is shown, and the buzz-
er sounds intermittently.If a warning is activated, have the watercraft
serviced by a Yamaha dealer as soon as pos-
sible.
TIP
Push the “OK” button of the touchpad control
to display a description of the warning in the
center display.
UF4N71E0.book Page 51 Thursday, August 5, 2021 11:58 AM
Page 61 of 122

Instrument operation
52
EJU46301
Audio system (equipped models)
This model is equipped with an audio system
that can be connected via Bluetooth.
EJU46312Audio control
This model is equipped with an audio control
to operate the audio system.
Power button
Press this button to turn the audio system on.
Play/Pause button
Press this button to play or pause. Cursor button “ / ”
Press these buttons to skip to the previous or
next track.
Cursor button “ / ”
Press these buttons to adjust the volume.
To connect an external device:
(1) Turn on the Bluetooth function of the ex-
ternal device, and then search for this
audio system.
(2) Turn the audio system on by pushing the power button on the audio control.
(3) Select this audio system to connect to it.
To disconnect an external device:
Turn the Bluetooth function of the external
device off.
1 Speaker
1 12V DC outlet
2 USB charger
3 Audio control
4 Cursor button
5 Play/Pause button
6 Power button
11
1
3
65
4
2
UF4N71E0.book Page 52 Thursday, August 5, 2021 11:58 AM
Page 62 of 122
Instrument operation
53
EJU46321
Accessory outlet
There is a 12 V DC outlet located inside the
glove compartment.
ECJ02920
Do not use an automotive cigarette
lighter or other accessories that get hot
because the outlet can be damaged.
The load must never exceed 120 W (10
A), otherwise the fuse may blow or the
battery may discharge.
EJU46331
USB charger
There is a USB charger located inside the
glove compartment. The USB charger can be
used to charge external devices.
ECJ02930
The load must never exceed 10.5 W (2.1 A),
otherwise the fuse may blow or the battery
may discharge.
112V DC outlet
1
1USB charger
1
UF4N71E0.book Page 53 Thursday, August 5, 2021 11:58 AM
Page 63 of 122
Equipment operation
54
EJU40336
EquipmentEJU31045Seats
The front and rear seats are removable.
Remove the seats to access the engine com-
partment and seat storage compartment.
To remove the rear seat:
(1) Pull the rear seat latch up, and then lift upthe rear of the seat.
(2) Pull the seat rearward and remove it.
To install the rear seat:
(1) Insert the projections on the front of the seat into the stays on the deck. (2) Push the rear of the seat down to secure-
ly lock it in place.
To remove the front seat:
(1) Remove the rear seat.
(2) Pull the front seat latch up, and then liftup the rear of the seat.
(3) Pull the seat rearward and remove it.
1 Seat latch
1
1Seat latch
1
UF4N71E0.book Page 54 Thursday, August 5, 2021 11:58 AM
Page 64 of 122

Equipment operation
55
To install the front seat:
(1) Insert the projection on the front of theseat into the stay on the deck.
(2) Push the rear of the seat down to secure- ly lock it in place.
(3) Securely install the rear seat in its original position.
EJU31364Handgrip
The handgrip is used when boarding the wa-
tercraft from the water and when the spotter is facing rearward.
WARNING! Do not use
the handgrip to lift the watercraft. The
handgrip is not designed to support the
watercraft’s weight. If the handgrip
breaks, the watercraft could fall, which
could result in severe injury.
[EWJ00022]
EJU37383
Reboarding grip
The reboarding grip is used when boarding
the watercraft from the water.
EJU34866Reboarding step (VX / VX DELUXE /
VX CRUISER / VX LIMITED)
The reboarding step is used to assist in re-
boarding the watercraft from the water.
When boarding the watercraft, push the re-
boarding step down until it stops. The step
returns automatically to its original position
when released. WARNING! Do not use the
reboarding step to lift the watercraft. The
1 Handgrip
1 Reboarding grip
1
1
UF4N71E0.book Page 55 Thursday, August 5, 2021 11:58 AM
 1
1 2
2 3
3 4
4 5
5 6
6 7
7 8
8 9
9 10
10 11
11 12
12 13
13 14
14 15
15 16
16 17
17 18
18 19
19 20
20 21
21 22
22 23
23 24
24 25
25 26
26 27
27 28
28 29
29 30
30 31
31 32
32 33
33 34
34 35
35 36
36 37
37 38
38 39
39 40
40 41
41 42
42 43
43 44
44 45
45 46
46 47
47 48
48 49
49 50
50 51
51 52
52 53
53 54
54 55
55 56
56 57
57 58
58 59
59 60
60 61
61 62
62 63
63 64
64 65
65 66
66 67
67 68
68 69
69 70
70 71
71 72
72 73
73 74
74 75
75 76
76 77
77 78
78 79
79 80
80 81
81 82
82 83
83 84
84 85
85 86
86 87
87 88
88 89
89 90
90 91
91 92
92 93
93 94
94 95
95 96
96 97
97 98
98 99
99 100
100 101
101 102
102 103
103 104
104 105
105 106
106 107
107 108
108 109
109 110
110 111
111 112
112 113
113 114
114 115
115 116
116 117
117 118
118 119
119 120
120 121
121


